
Catégories populaires
Vous cherchez un fil?


Commentaires / Questions (16)
![]() Sharon a écrit:
Sharon a écrit:
Any suggestion on how I could make this a bit wider? This was a funn project. Instruction was easy to follow. S
06.12.2021 - 16:33DROPS Design a répondu:
Hi Sharon, If you cast on more stitches then the head band will be wider. Just make sure the number of stitches is divisible by 3 + 2. Happy knitting!
07.12.2021 - 07:03
![]() Stephanie Bedard a écrit:
Stephanie Bedard a écrit:
Hi there, I am stuck at the middle part! Here’s the part of the pattern I’m having issues with: ROW 5: K 1 edge st, * 1 YO, K 2 in next st *, repeat from *-* 4 times in total and finish with K 1 edge st = 14 sts on needle I had 6 sts on my needle as mentioned after decreasing on row 1 as expected, but when increasing at row 5, I am left with only 11 sts and not 14. Is there any troubleshooting possible here ? Thank you!!
03.12.2021 - 18:29DROPS Design a répondu:
Dear Stephanie, you have 2 edge stitches on each side + 4 YO + 2x4=8 sts. So in total you have 14 stitches. You k2 in each of the 4 sts between the edge stitches, so you increase one stitch in each stitch. Happy knitting!
05.12.2021 - 17:27
![]() Sharon a écrit:
Sharon a écrit:
What is the correct size needles to make the headband. A size 10,75 give a head band hard like a board. This cannot be the correct needles. Is the size give in the pattern correct.
26.11.2021 - 18:29DROPS Design a répondu:
Dear Sharon, everyone knits with a different gauge, Pleade make a swatch and use the needles with which you can achieve the knitting tension goven in the pattern. Happy Stitching!
28.11.2021 - 00:26
![]() Sharon a écrit:
Sharon a écrit:
Hi, looking to start the headband an am confused on how to join the back invisible using kitichner stitch. The first time I made this 3 needle bind off was the solution but it was not invisible and an unhappy with the results. The one am working on now is a Christmas gift so it has to be prefect. So my question again is how do I kitichner the back to make it invisible? Thanks for your response.
26.11.2021 - 09:33DROPS Design a répondu:
Dear Sharon, this video shows how to sew together patterns such as rib in this pattern and should help you to finish your piece. Happy finishing!
26.11.2021 - 15:46
![]() Pru a écrit:
Pru a écrit:
Hello- on knitting the headband as per the instructions...i get a 'seed stitch' pattern...ive ripped out and started 5 times now...am i reading this wrong? please help me...thank you!!
07.12.2019 - 22:19DROPS Design a répondu:
Dear Pru, check your number of stitches (you should have 14) and remember to work with 1 edge stitch in garter stitch in each side.On row 1, work: K1 (edge st), then (K1, P1, K1) until 1 stitch remain, K the last st. On row 2, work: K1 (edge st), then repeat: (P1, K1, P1) until last st remain, K last st. Repeat rows 1 and 2. Happy knitting!
09.12.2019 - 08:54
![]() Tanja Kroczek a écrit:
Tanja Kroczek a écrit:
Hallo Zusammen! Ich stricke gerade das Stirnband. Nach dem 1. Absatz "Wie folgt weiterstricken" steht unter dem 1. Punkt: 6 Maschen übrig, was passiert damit?
02.02.2019 - 12:16DROPS Design a répondu:
Liebe Frau Kroczek, bei der 1. Hin-Reihe hier nehmen Sie Maschen ab (= 2 M so abheben als würden sie re zusgestr, 1 M re, die 2 abgehobenen M überziehen), am Ende dieser Reihe sind es nur noch 6 Maschen auf der Nadel. Viel Spaß beim stricken!
04.02.2019 - 11:06
![]() Nagymama a écrit:
Nagymama a écrit:
Pedig automatával könnyebb és mindenekelőtt pontosabb lenne a fordítás! Egyszer kell jól beprogramozni, és onnantól kezdve nem hibázik. Nem úgy, mint... na mindegy, szóval a leírás még mindig nem jó, mert van ám 6. meg 7. sora is. Hogy a helyesírásról meg az elírásokról ne is beszéljünk. :(
01.10.2018 - 09:39
![]() Nagymama a écrit:
Nagymama a écrit:
Már megint rossz a magyar leírás. Nem ez az első eset. Tessenek már végiggondolni, hogy ha a fejpántnál ezt a két sort váltogatjuk, akkor abból milyen minta lesz!
30.09.2018 - 09:34DROPS Design a répondu:
Kedves Nagymama! Köszönjük, hogy felhívta a figyelmünket a hibára, ami így javításra is került. A fordításokat nem automata készíti, így sajnos, a legnagyobb odafigyelés mellett is előfordulhatnak hibák. Célunk, hogy minél pontosabb minták legyenek a weboldalon, ezért mindig köszönettel vesszük, ha jelzést kapunk egy-egy javítani valóról. Sikeres kézimunkázást!
30.09.2018 - 14:52
![]() Gail Thorpe a écrit:
Gail Thorpe a écrit:
Thank you for your help on pattern #164-27. The tutorial is very helpful. I have another question. I knit the piece in Polaris yarn. Should I block it before I sew it together? The yarn is so plush and heavy that it seems daunting to plunge it under water. Will it be okay to do so? Please give me some detailed instructions. Thank you.
16.06.2017 - 01:11DROPS Design a répondu:
Dear Mrs Thorpe, some knitters block every piece, some others don't. Feel free to contact your DROPS store even per mail or telephone they will have some more individual tipps for you. Happy knitting!
16.06.2017 - 09:12
![]() Anne a écrit:
Anne a écrit:
Que veux dire, pour le rang 2 du tour de cou: i m lis à l'end. Que veux dire lis???je n'ai jamais pu trouver l'explication! Merci
01.03.2017 - 19:52DROPS Design a répondu:
Chere Anne, 1 maille lis est la premiere maille du rang. Parfois elle est tricotee autrement que les autres mailles pour que le bord du tricot soit esthetique et facile a assemler a la fin. Bon tricot!
01.03.2017 - 20:27
|
|
What A Sight!#whatasightset |
|
|
|
|
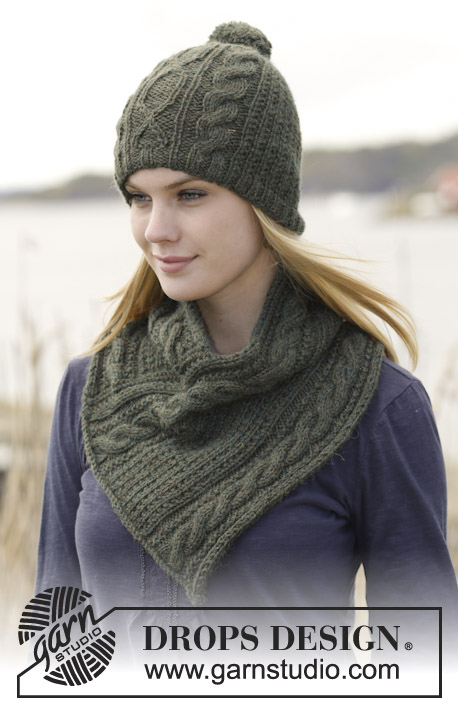
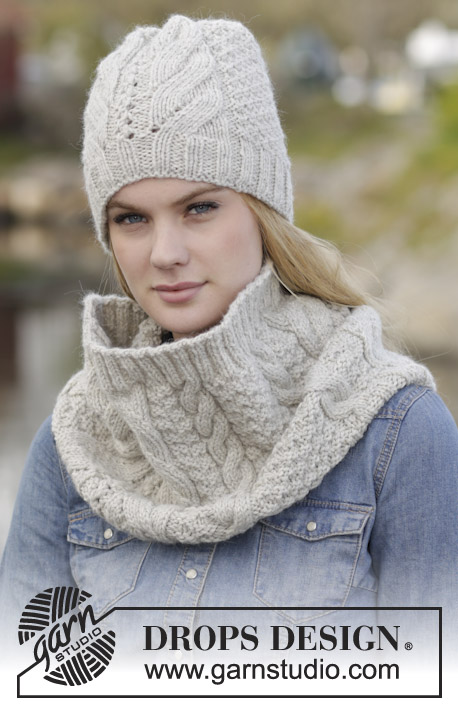
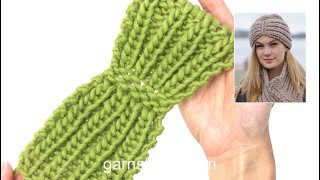
Ensemble DROPS: Bandeau et tour de cou en côtes, en ”Polaris”.
DROPS 164-27 |
|
|
BANDEAU: Monter 14 m avec les aiguilles 7 en Polaris et tricoter ainsi: RANG 1 (= sur l'envers): 1 m lis à l'end, *1 m end, 1 m env, 1 m end*, répéter de *-* 4 fois au total et terminer par 1 m lis à l'end. RANG 2 (= sur l'endroit): 1 m lis à l'end, *1 m env, 1 m end, 1 m env*, répéter de *-* 4 fois au total et terminer par 1 m lis à l'end. Répéter les rangs 1 et 2 jusqu'à ce que l'ouvrage mesure environ 23 cm, ajuster pour que le rang suivant soit sur l'endroit. PENSER À BIEN CONSERVER LA MÊME TENSION QUE POUR L'ÉCHANTILLON! Tricoter ensuite ainsi: RANG 1 (= sur l'endroit): 1 m lis à l'end, *glisser 2 m comme pour les tricoter ens à l'end, 1 m end, passer les m glissées par-dessus la m tricotée*, répéter de *-* 4 fois au total et terminer par 1 m lis à l'end = il reste 6 m. RANG 2 (= sur l'envers): Tricoter toutes les mailles à l'end. RANG 3: Tricoter toutes les mailles à l'end. RANG 4: Tricoter toutes les mailles à l'end. RANG 5: 1 m lis à l'end, *1 jeté, tricoter 2 fois la m suivante à l'end (= alternativement dans le brin arrière ou le brin avant*, répéter de *-* 4 fois au total et terminer par 1 m lis à l'end = 14 m. RANG 6: 1 m lis à l'end, *1 m end, 1 m env, 1 m end*, répéter de *-* 4 fois au total et terminer par 1 m lis à l'end - NOTE: Tricoter les jetés torse (= dans le brin arrière au lieu du brin avant) au rang suivant, pour éviter les trous. RANG 7: 1 m lis à l'end, *1 m env, 1 m end, 1 m env*, répéter de *-* 4 fois au total et terminer par 1 m lis à l'end. Répéter les rangs 6 et 7 jusqu'à ce que l'ouvrage mesure environ 48 cm (ou longueur souhaitée) et rabattre les mailles comme elles se présentent. Assembler le bandeau au milieu dos en grafting pour que la couture soit invisible. ---------------------------------------------------------- TOUR DE COU: POINT MOUSSE (en allers et retours): Tricoter tous les rangs à l'endroit. 1 côte mousse = 2 rangs end. ASTUCE CHANGEMENT DE PELOTE: Pour changer de pelote en Polaris, diviser le fil de fin de pelote en 2 sur les 15 derniers cm – couper une des 2 parties et faire de même pour le début de la pelote suivante. Placer les 15 premiers et les 15 derniers cm ensemble, l'un au-dessus de l'autre, pour que le fil ait une épaisseur normale et continuer à tricoter – ceci permet d'obtenir un changement de pelote invisible. ---------------------------------------------------------- TOUR DE COU: Se tricote en allers et retours avec une couture à la fin. Monter 18-21 m avec les aiguilles 10 en Polaris. Tricoter 2 côtes au POINT MOUSSE - voir ci-dessus. Continuer ensuite en côtes ainsi: RANG 1 (= sur l'endroit): 2 m end, *2 m env, 1 m end*, répéter de *-* jusqu'à ce qu'il reste 1 m et terminer par 1 m end. RANG 2 (= sur l'envers): 1 m lis à l'end, *1 m env, 2 m end *, répéter de *-* jusqu'à ce qu'il reste 2 m, terminer par 1 m env et 1 m lis à l'end. Répéter les rangs 1 et 2. NE PAS OUBLIER DE BIEN CONSERVER LA MÊME TENSION QUE POUR L'ÉCHANTILLON et VOIR ASTUCE CHANGEMENT DE PELOTE. À 23-26 cm de hauteur totale, placer 1 marqueur dans la 1ère m sur l'aiguille (vu sur l'endroit). Tricoter jusqu'à ce que l'ouvrage mesure 86-88 cm, tricoter 2 côtes mousse et rabattre toutes les mailles à l'end sur l'endroit. ASSEMBLAGE: Plier le tour de cou pour que les mailles rabattues soient contre le côté, entre le rang de montage et le marqueur et coudre bord à bord . |
|
Vous avez terminé ce modèle?Alors taguez vos photos avec #dropspattern #whatasightset ou bien présentez-les dans la galerie #dropsfan Vous avez besoin d'aide pour ce modèle ?Vous trouverez 19 tutoriels vidéo, une rubrique commentaires/questions et plus encore en vous rendant sur la page du modèle sur garnstudio.com © 1982-2026 DROPS Design A/S. Tous droits réservés. Ce document, y compris ces sous-sections, est protégé par les droits d'auteur (copyright). Apprenez-en davantage sur ce que vous pouvez faire avec nos modèles en bas de chacune des pages de notre site. |


Avec plus de 40 ans dans la conception de modèles tricot et crochet, DROPS Design offre l'une des plus vastes collections de modèles gratuits sur internet - traduits dans 17 langues. À ce jour, on compte 325 catalogues et 12298 modèles en français.
Nous nous efforçons de vous apporter le meilleur de ce que le tricot et le crochet peuvent vous offrir, inspiration et conseils mais également des fils de haute qualité à des prix incroyables! Vous souhaiteriez utiliser nos modèles autrement que pour un usage personnel? Vous pouvez lire ce que vous êtes autorisés à faire dans le Copyright en bas de page de chacun de nos modèles. Bon tricot!
Poster un commentaire sur le modèle DROPS 164-27
Nous aimerions connaître votre avis sur ce modèle !
Si vous souhaitez poser une question, merci de bien vouloir vérifier que vous avez choisi la bonne catégorie dans le formulaire ci-dessous afin d'accélérer la réponse. Les champs obligatoires sont indiqués par une *.