
Catégories populaires
Vous cherchez un fil?


Commentaires / Questions (34)
Menawatie Hardath a écrit:
Is it possible to separate the rows by actually stating "Row 1, 2,"etc? Also typing each new row on a new line?
08.10.2018 - 23:12DROPS Design a répondu:
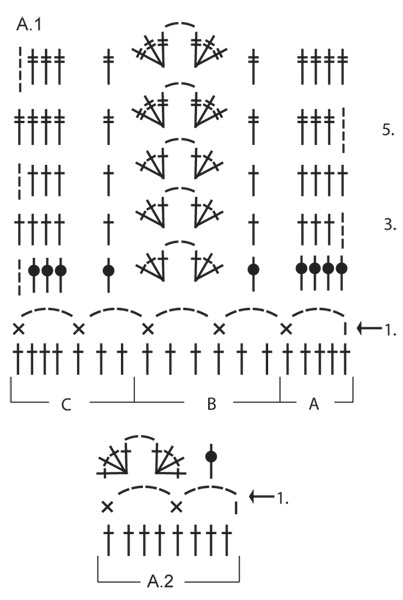
Dear Mrs Hardath, there is only diagrams to this pattern, when working diagrams, work each row in each diagram as follows: row 1 in A.1A, A.1B and A.1C (= read from the right towards the left), then row 2 in A.1C, A.1B, A.1A (= read from the left towards the right) and continue reading/working diagrams like this. Happy crocheting!
09.10.2018 - 09:43
![]() Paula a écrit:
Paula a écrit:
I am.having trouble figuring out the first part of the instructions for the fan pattern: A. 1A A.1B does that mean 5dc (A) and then 4ch 1sc(1A) 4dc (A) 4ch 1sc 4ch 1sc (1B)? I also tried just doing the chain SC row but it doesn\'t look right if I have to do that for rows 1-4. I\'m obviously fairly new to crocheting and I don\'t know anyone else who crochets.
16.06.2018 - 03:38DROPS Design a répondu:
Dear Paula, when working diagrams start at the bottom corner on the right side from RS and read towards the left: work A.1A over the first 5 sts (= row 1 = 1 turning ch, 4 ch, skip 3 sts, 1 sc in next st), then repeat A.1B over the next sts until 7 sts remain and work A.1C over these last sts. From WS read from the left towards the right: work A.1C, repeat A.1B and finish with A.1A. Happy crocheting!
18.06.2018 - 09:44
![]() Frida a écrit:
Frida a écrit:
Jag gillar verkligen cotton/viscose-blandningen men hittar inget lilvärdigt alternativ bland de garner man får upp som ersättning. Tycker att det är helt fel att ull-blandningar alls visas som alternativ! Kommer ni komma ut med ett nytt bomull/viskos-garn inom överskådlig tid eller måste jag leta efter andra än Drops garner?
30.04.2018 - 12:42DROPS Design a répondu:
Hej Frida, mange vil gerne strikke/hækle i modsvarende strikkefasthed i uld eller bomuld, så derfor har vi de alternativer med som kan erstatte strikkefastheden. Vi har ikke noget nyt Cotton Viscose på vej hjem desværre. God fornøjelse!
07.05.2018 - 16:47Lisa a écrit:
I recently made this. It turned out much larger. It worked out beautifully but just a large instead of medium. Has anyone else had this problem? Is this consistent across drops , as I would like to make more but am reluctant to .
25.06.2017 - 01:24DROPS Design a répondu:
Dear Lisa, sorry to hear that your piece ended up in a different size than expected. Every piece is different, the sizing depends a lot on the style of the garnment, the xarn and the pattern it is knittet with. You should ALWAYS make a gauge swatch and wash it and check the stitch count, and also check teh shematincs and compare your peiece to the given sizes there, often. Happy knitting.
25.06.2017 - 19:51
![]() Yvonne a écrit:
Yvonne a écrit:
Hi, are the rows under the sleeve included in the 22 rows for the yoke? Thanks
07.04.2016 - 12:12DROPS Design a répondu:
Dear Yvonne, all rows are written out separately, just follow the pattern! Happy crocheting!
07.04.2016 - 12:34
![]() Gerdien a écrit:
Gerdien a écrit:
Goedenavond, Ik ben bezig met het waaierpatroon en haak maat L, de eerste toer met de stokjes snap ik maar dan de toer met de 4 lossen en een vaste er tussen,hoe moet ik dan het getal 35 keer zien?? is dat het aantal dat je 1B herhaald, dat is bij mij 71 en A en C aan het begin en eind van de toer, ik hoop dat u mij kunt helpen! Vriendelijke groet Gerdien
04.04.2016 - 18:34DROPS Design a répondu:
Hoi Gerdien. Je haakt eerst A.1A (= 5 st), dan herhaal je A.1B (= 6 st) 35 keer = je herhaalt dus het patroon over 6 x 35 stokjes = 210 en eindigt met A.1C (= 7 st)
05.04.2016 - 12:42
![]() Yvonne a écrit:
Yvonne a écrit:
Hi, I am having trouble with the measurements of the piece. I'm making the cardigan using the 'Small' pattern. I have 26 rows of treble crochet in the section before the pattern fan. This makes the piece about 27cm rather than the 18cm mentioned in the pattern. Have I made a mistake with my counting? How many rows should there be in total before starting the pattern fan when using the 'Small' pattern? Many thanks
26.03.2016 - 12:49DROPS Design a répondu:
Dear Yvonne, you have to work a total of 22 rows for yoke in size S: 1 row (=112 tr) + 1 row (=140 tr) + 1 row (inserting markers+ inc evenly) + 1 row (+24 tr) + 18 rows (inc a total of 9 time every row from RS= 276 tr) = 22 rows and approx. 18 cm. Happy crocheting!
29.03.2016 - 09:20
![]() Eva a écrit:
Eva a écrit:
Thank you for your help. I have now finished the increases on each side of the markers. It now says "then inc before every marker (=12tr inc)". Could you please confirm whether this first row of 12tr increases is worked from the RS or the WS? Thank you.
08.03.2016 - 23:01DROPS Design a répondu:
Dear Eva, you inc before each marker (= 12 tr inc) every row from RS, ie every other row (as before), the first of these inc row will be worked from RS. Happy crocheting!
09.03.2016 - 08:57
![]() Eva a écrit:
Eva a écrit:
When it says "repeat increase on every row from RS" does this mean alternate rows? i.e. repeat increase on every second row?
07.03.2016 - 22:17DROPS Design a répondu:
Dear Eva, that's right, you work RS row with inc, and work next row from WS withouth inc. Happy crocheting!
08.03.2016 - 08:16
![]() Ikbenpietje Niet a écrit:
Ikbenpietje Niet a écrit:
Bedankt voor het antwoord! Ik had het patroon niet goed gelezen. Er staat a.1a, a.1b. Had de komma over geslagen, vandaar dat ik het niet snapte. Dank je wel hoor!
27.09.2015 - 10:10
|
||||||||||||||||||||||||||||
Lady Ascot Cardigan#ladyascotcardigan |
||||||||||||||||||||||||||||
 |
 |
|||||||||||||||||||||||||||
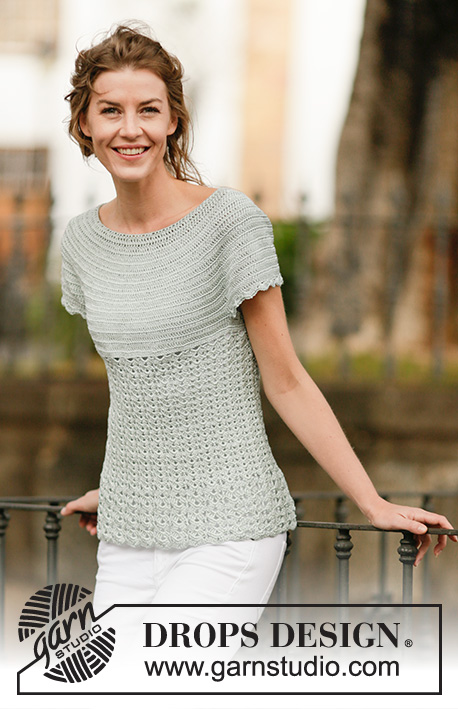
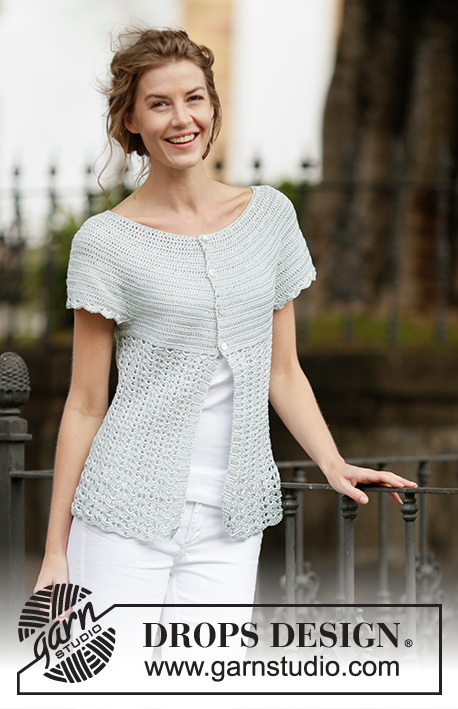
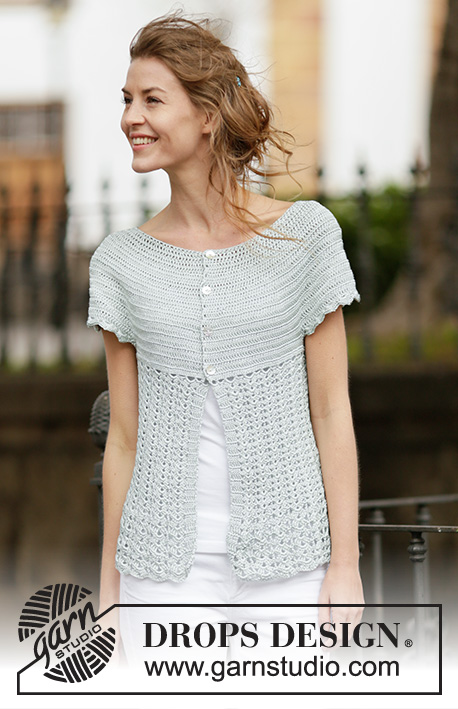
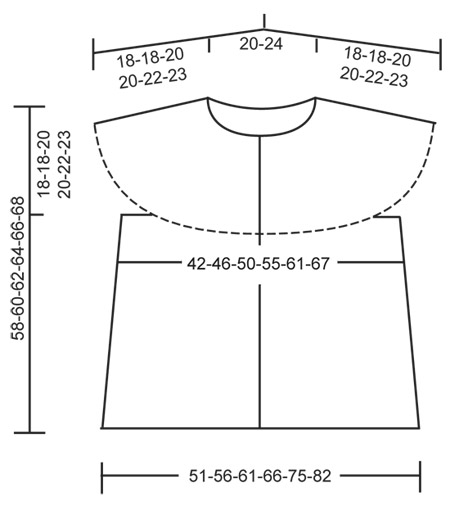
Gilet DROPS au crochet avec point d'éventails et empiècement arrondi, crocheté de haut en bas (top down), en ”Cotton Viscose”. Du S au XXXL.
DROPS 162-25 |
||||||||||||||||||||||||||||
|
POINT FANTAISIE: Voir diagrammes A.1-A.2. INFO CROCHET: Remplacer la 1ère B de chaque rang de B par 3 ml et terminer chaque rang de B par 1 B dans la 3e ml du début du rang. AUGMENTATIONS: Pour augmenter 1 B, crocheter 2 B dans 1 B. ---------------------------------------------------------- GILET: Se crochète de haut en bas, en allers et retours à partir du milieu devant. Monter une chaînette de 136-140-145-150-155-160 ml (y compris 3 ml pour tourner) avec le crochet 3.5 en Cotton Viscose. Crocheter 1 B dans la 4e ml à partir du crochet (= 2 B), *sauter 1 ml, 1 B dans chacune des 5 ml suivantes*, répéter de *-* jusqu'à ce qu'il reste 0-4-3-2-1-0 ml, 1 B dans chacune des 0-4-3-2-1-0 dernières ml = 112-116-120-124-128-132 B - VOIR INFO CROCHET. Crocheter 1 rang de B (= 1 B dans chaque B), EN MÊME TEMPS, augmenter 28 B à intervalles réguliers (c'est-à-dire augmenter 1 B après environ tous les 4e B) – VOIR AUGMENTATIONS = 140-144-148-152-156-160 B. Placer 12 marqueurs ainsi: Crocheter 17-18-19-20-21-22 B EN MÊME TEMPS, augmenter 1-0-0-2-2-1 B à intervalles réguliers, placer le 1er marqueur, *crocheter 4 B, placer le marqueur suivant*, répéter de *-* encore 1 fois, crocheter 20 B, placer le marqueur suivant, *crocheter 4 B, placer le marqueur suivant*, répéter de *-* encore 1 fois, crocheter 34-36-38-40-42-44 B EN MÊME TEMPS, augmenter 2-0-0-4-4-2 B à intervalles réguliers, placer le marqueur suivant, *crocheter 4 B, placer le marqueur suivant*, répéter de *-* encore 1 fois, crocheter 20 B, placer le marqueur suivant, *crocheter 4 B, placer le marqueur suivant*, répéter de *-* encore 1 fois, crocheter 17-18-19-20-21-22 B EN MÊME TEMPS, augmenter 1-0-0-2-2-1 B à intervalles réguliers = 144-144-148-160-164-164 B. PENSER À BIEN CONSERVER LA MÊME TENSION QUE POUR L'ÉCHANTILLON! Au rang suivant sur l'endroit, augmenter 1 B de chaque côté de chaque marqueur (= 24 B augmentées), répéter ces augmentations 1-4-5-7-8-10 fois au total tous les rangs sur l'endroit, puis augmenter avant chaque marqueur (= 12 B augmentées), répéter ces augmentations 9-6-6-4-4-3 fois au total tous les rangs sur l'endroit = 276-312-340-376-404-440 B. L'ouvrage mesure environ 18-18-20-20-22-23 cm. Crocheter le rang suivant ainsi: 36-43-48-54-59-66 B (= devant), crocheter 12 ml (placer 1 marqueur au milieu de ces nouvelles ml = sous la manche), sauter 66-70-74-80-84-88 B du rang précédent (= manche), crocheter 72-86-96-108-118-132 B (= dos), 12 ml (placer 1 marqueur au milieu de ces nouvelles ml = sous la manche), sauter 66-70-74-80-84-88 B du rang précédent et crocheter 36-43-48-54-59-66 B (= devant) = 168-196-216-240-260-288 B/ml (= 84-98-108-120-130-144 B/ml pour le dos et 42-49-54-60-65-72 B/ml pour chaque devant). Placer 1 marqueur - MESURER MAINTENANT L'OUVRAGE À PARTIR D'ICI! Crocheter 1 rang de B (= 1B dans chaque B et 1 B dans chaque ml sous la manche), EN MÊME TEMPS, augmenter 18-8-6-0-10-6 B à intervalles réguliers = 186-204-222-240-270-294 B. Crocheter 1 rang de B. Continuer ensuite au point d'éventails. POINT D'ÉVENTAILS: Crocheter les rangs 1 -4 du diagramme A.1 ainsi: A.1A, 29-32-35-38-43-47 fois A.1B, terminer par A.1C. Répéter ensuite les rangs 3 et 4 jusqu'à ce que l'ouvrage mesure 29-31-31-33-31-31 cm, ajuster pour que le dernier rang soit un rang 4. Crocheter ensuite les rangs 5 -6 du diagramme A.1. Répéter les rangs 5 et 6 jusqu'à ce que l'ouvrage mesure environ 40-42-43-45-45-45 cm. Arrêter. BORDURE DES MANCHES: Commencer au milieu sous la manche ainsi: 1 ms dans la 6e des 12 ml de l’emmanchure, 3 ml (= 1 B), 1 B dans chacune des 6 ml suivantes, 1 B dans le rang de B où la chaînette de la manche a été crochetée, 1 B dans chacune des 66-70-74-80-84-88 B (= au-dessus de la manche) EN MÊME TEMPS, augmenter 0-4-0-2-6-2 B à intervalles réguliers, 1 B dans le rang de B où la chaînette de la manche a été crochetée, 1 B dans chacune des 5 ml restant sous la manche = 80-88-88-96-104-104 B. Crocheter ensuite 10-11-11-12-13-13 fois A.2. Arrêter quand A.2 a été crocheté 1 fois en hauteur. Crocheter l'autre bordure de manche de la même façon. ASSEMBLAGE: Coudre les boutons sur le devant gauche, celui du haut à environ 1 cm du col, espacer les autres d'environ 6 cm. Boutonner entre 2 B du devant droit. |
||||||||||||||||||||||||||||
Légende diagramme(s) |
||||||||||||||||||||||||||||
|
||||||||||||||||||||||||||||
 |
||||||||||||||||||||||||||||
 |
||||||||||||||||||||||||||||
Vous avez terminé ce modèle?Alors taguez vos photos avec #dropspattern #ladyascotcardigan ou bien présentez-les dans la galerie #dropsfan Vous avez besoin d'aide pour ce modèle ?Vous trouverez 10 tutoriels vidéo, une rubrique commentaires/questions et plus encore en vous rendant sur la page du modèle sur garnstudio.com © 1982-2026 DROPS Design A/S. Tous droits réservés. Ce document, y compris ces sous-sections, est protégé par les droits d'auteur (copyright). Apprenez-en davantage sur ce que vous pouvez faire avec nos modèles en bas de chacune des pages de notre site. |
||||||||||||||||||||||||||||


Avec plus de 40 ans dans la conception de modèles tricot et crochet, DROPS Design offre l'une des plus vastes collections de modèles gratuits sur internet - traduits dans 17 langues. À ce jour, on compte 325 catalogues et 12298 modèles en français.
Nous nous efforçons de vous apporter le meilleur de ce que le tricot et le crochet peuvent vous offrir, inspiration et conseils mais également des fils de haute qualité à des prix incroyables! Vous souhaiteriez utiliser nos modèles autrement que pour un usage personnel? Vous pouvez lire ce que vous êtes autorisés à faire dans le Copyright en bas de page de chacun de nos modèles. Bon tricot!
Poster un commentaire sur le modèle DROPS 162-25
Nous aimerions connaître votre avis sur ce modèle !
Si vous souhaitez poser une question, merci de bien vouloir vérifier que vous avez choisi la bonne catégorie dans le formulaire ci-dessous afin d'accélérer la réponse. Les champs obligatoires sont indiqués par une *.