
Catégories populaires
Vous cherchez un fil?


Commentaires / Questions (100)
![]() Mariam Khan a écrit:
Mariam Khan a écrit:
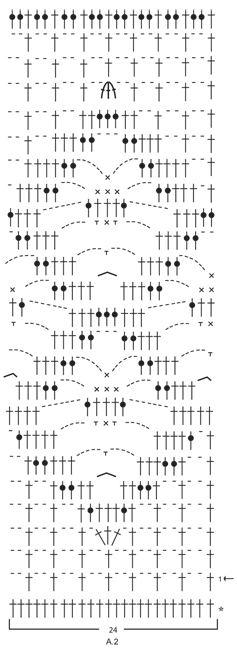
Hei. I A3 så er det grupper med 4 staver oppover i midten. Jeg syns diagrammet viser veldig dårlig hvordan det skal bli gjort. Skal stavene bli heklet i maskene fra forrige rundes staver eller skal de hekles i en gruppe i luftmaske buen?
29.09.2016 - 17:30DROPS Design a répondu:
Hej Mariam. De förste 4 staver + 2 lm + 4 staver (rk 3) haekles om lm fra forrige omg. Naeste gruppe staver (rk 4) haekles om de 2 lm fra forrige omg. I rk 5 ligesaa. I rk 6 haekles först de 4 staver överst i de 3 lm, saa 4 lm og 1 fm nederst i de 3 lm, 3 lm, 1 fm nederst om de naeste 3 lm, 4 lm og 4 staver överst i de 3 lm. Osv.
04.10.2016 - 16:41
![]() Mariam Khan a écrit:
Mariam Khan a écrit:
I diagrammet er det et symbol som forklares slik: Hekle 1 st i neste st - men vent med siste gjennomtrekning (= 2 m på nåla), hekle 1 st i hver av de neste 2 st på samme måte, dra tråden gjennom alle 4 m på nåla. Jeg vet ikke om dere har skrevet feil eller om jeg misforstår. Hvis man skal vente med siste gjennomtrekning på totalt 3 staver, vil det på slutten av stav nr 3 være seks masker på nåla som skal dras gjennom. Er det slik det skal gjøres?
13.09.2016 - 19:01DROPS Design a répondu:
Hej Mariam. Det er korrekt hvad der staar. Du skal slaa om og trekke igennem 1 gang hver gang, saa har du 4 m paa naalen naar du har heklet de 3 st. Dvs: du hekler 1 st, men vent med å trekke igjennom den siste løkken av st (det er nå 2 løkker på nålen), hekl st nr 2, men vent med å trekke igjennom den siste løkken av st = 3 m paa naalen, hekl st nr 3, efter förste gennemtraek har du ialt 4 m paa pinden
14.09.2016 - 11:43Maria a écrit:
Very nice and easy to make 🙂
30.08.2016 - 16:29
![]() Mette Munch-Boutrup a écrit:
Mette Munch-Boutrup a écrit:
Jeg har hæklet denne flotte nederdel i Safran og er meget glad for den. Nu vil jeg gerne hækle den med garn der giver en lettere nederdel, evt. med en silkeagtigt overflade. Kan I hjælpe mig med hvilket drops garn jeg kan bruge (evt. kombinationer) uden at jeg skal ændrer på opskriften? Mvh Mette
22.06.2016 - 09:03DROPS Design a répondu:
Hej Mette. Her er garnalternativerne til Safran, du kan eventuelt lave den i BabyAlpaca Silk. Eller tag en snak med din garnbutik, maaske har de ogsaa et alternativ.
23.06.2016 - 12:35
![]() Sacha Roest a écrit:
Sacha Roest a écrit:
Can you please explain the last row on the bottom of the skirt? I cant seem to make it look good. When it says skip 3dc; the ch4 stretches out to much and doesnt look right. And the ch4 insert in next ch sp looks a bit awkward aswell. As if they are too close together in certain places.
24.04.2016 - 18:43Sacha Roest a répondu:
I just asked you a question but I have figured it out. Thanks anyway!
24.04.2016 - 19:09
![]() Kelly a écrit:
Kelly a écrit:
I was wondering if you could explain in the A1 pattern and the others, if we are supposed to work stitch/chain for stitch/chain how is it that in the first part of the A1/AX rows the number of stitches go up or down from round to round, how do we maintain the stitch count to be the same (in my case 252 stitches for each round, before we reach the next increase)? I'm confused on this part to be able to match the pattern? Please explain. Thanks Kelly
08.04.2016 - 04:45DROPS Design a répondu:
Dear Kelly, A.1 is worked over 12 sts and will be repeated 12 times in total in width, there is no inc in A.1, insert a marker between each repeat so that you can check each row in diagram. After you have worked A.1 (and A.X a total of 2 times), work 12 rounds with dc while inc 36 dc evenly, then work A.2 on next round. Read more about diagrams here and how to inc evenly here. Happy crocheting!
08.04.2016 - 09:05
![]() Kelly a écrit:
Kelly a écrit:
I was wondering for the graph, if each stitch was individual to each chain. Most diagrams have chain's underneath the symbol to indicate where the stitch is going. Also when it says to work from 1st round in A1 (=12 dc) 21 times in width, and when AX has been worked verticall what does that mean? At this point are you supposed to actually crochet 12dc and turn 21 times? Thanks, Kelly
05.04.2016 - 00:27DROPS Design a répondu:
Dear Kelly, the diagram A.1 will be worked a total of 21 times in width on the round (work first round 1 over all sts, then round 2 over all sts etc..) - inserting a marker between each repeat may help - Make 1 ch for each "-" in diagram, so that on row 3 in A.1, you will work 5 ch, 1 sc, 5 ch between the dc - A.X = row 3 to 6 in A.1. When working A.1, work to row 6 = including A.X then work again the row 3 to 6 (= A.X) then continue A.1 with next row (= row 7 in A.1, coming after A.X). Happy crocheting!
05.04.2016 - 09:31
![]() Rendi a écrit:
Rendi a écrit:
Hello, are the instructions available in English, please? I have not yet learned to use charts. Thank you :-)
31.01.2016 - 17:34DROPS Design a répondu:
Dear Rendi, there are only diagrams to this pattern - each symbol represent 1 st/group of st as stated under diagram text, start reading from the right and read every round from the right towards the left. You are welcome to contact your DROPS store for any further individual assistance. Happy crocheting!
01.02.2016 - 11:19
![]() Sacha Roest a écrit:
Sacha Roest a écrit:
Please look at the terms in the diagram, maybe its a mistake... The little X says "sc in/around st", the little T: "sc in ch-space". My question is how to sc in ch-space. The term: "dc around ch-space" I get... So is this just wrong? Should the little T be called "sc around ch-space"? Or is it the same as the little X?
05.09.2015 - 20:16DROPS Design a répondu:
Dear Mrs Roest, you crochet around the ch-space inserting crochet hook in the ch-space, but when you have to crochet in the st (eg in the sc below), you will insert crochet hook under both threads of st (sc in this example) from previous round. Happy crocheting!
07.09.2015 - 10:42
![]() Sacha Roest a écrit:
Sacha Roest a écrit:
In the diagram explanation one symbol is the "dc around ch-space" another "sc in ch-space". Is there is a difference inbetween "in" and "around"? As far as I know they are the same and the only difference is the dc and sc.. Please let me know if this is true. (I made the mistake by posting this question for uk aswell..)
03.09.2015 - 12:13DROPS Design a répondu:
See answer below.
03.09.2015 - 15:35
|
|||||||||||||||||||||||||||||||||||||
Summer Escape#summerescapeskirt |
|||||||||||||||||||||||||||||||||||||
 |
 |
||||||||||||||||||||||||||||||||||||
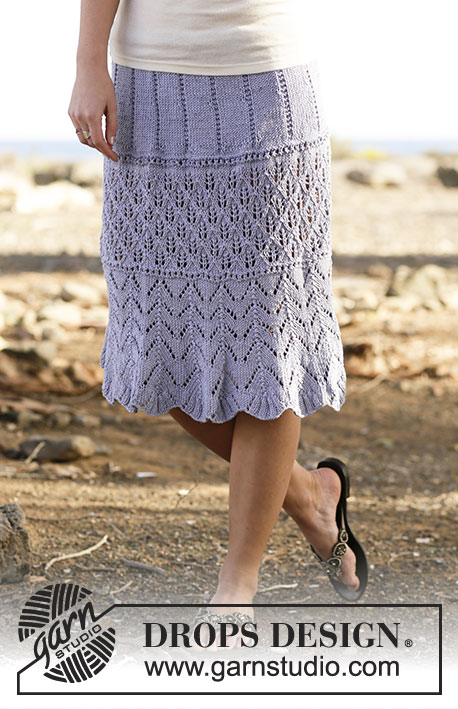
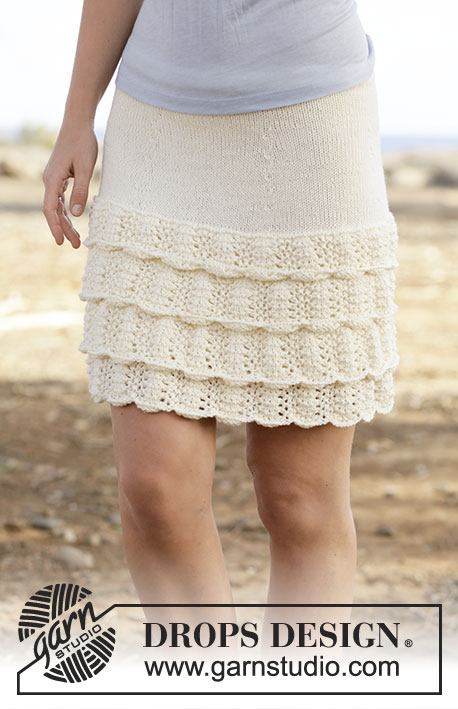
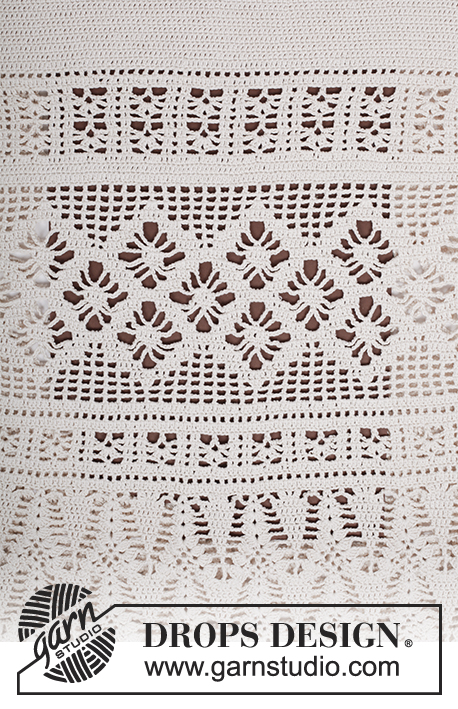
Jupe DROPS au crochet, en brides et point ajouré, crochetée de haut en bas (top down), en ”Safran”. Du S au XXXL.
DROPS 162-18 |
|||||||||||||||||||||||||||||||||||||
|
INFO CROCHET: Remplacer la 1ère B du début du rang /tour par 3 ml. Terminer le rang par 1 B dans la 3e ml du rang précédent (quand on travaille en allers et retours) et terminer le tour par 1 mc dans la 3e ml du début du tour (quand on travaille en rond). NE PAS remplacer la 1ère ms au début du tour mais crocheter 1 ml avant la ms du début du tour. Terminer par 1 mc dans la 1ère ml du tour. AUGMENTATIONS: Pour augmenter 1 B, crocheter 2 B dans la même B. DIMINUTIONS: Crocheter 1 B mais ne pas faire le dernier jeté (= 2 boucles sur le crochet), crocheter ensuite la B suiv mais au dernier jeté, écouler les 3 boucles sur le crochet = 1 m diminuée. POINT FANTAISIE: Voir diagrammes A.1 à A.3. ---------------------------------------------------------- JUPE: Se crochète de haut en bas, en allers et retours jusqu'à la fente côté, puis continuer en rond. Monter une chaînette de 186-209-232-258-279-305 ml (y compris 3 ml pour tourner) avec le crochet 3.5 en Safran. Crocheter le 1er rang ainsi: 1 B dans la 4ème ml à partir du crochet, 1 B dans chacune des 4 ml suiv, *sauter 1 ml, 1 B dans chacune des 6 ml suivantes*, répéter de *-* jusqu'à ce qu'il reste 3-5-7-5-5-3 ml, sauter 1 ml et terminer par 1 B dans chacune des 2-4-6-4-4-2 dernières B = 158-178-198-220-238-260 B. Crocheter ensuite en allers et retours, en B (= 1 B dans chaque B) - VOIR INFO CROCHET. PENSER À BIEN CONSERVER LA MÊME TENSION QUE POUR L'ÉCHANTILLON! Quand 5 rangs ont été crochetés, placer 6 marqueurs ainsi: le 1er après 14-14-16-20-21-22 B, puis espacer les autres marqueurs de 26-30-33-36-39-43 B, il y a 14-14-17-20-22-23 B après le dernier marqueur à la fin du rang. Au rang suivant, augmenter 1 B avant chaque marqueur – VOIR AUGMENTATIONS! Répéter ces augmentations encore 6-6-7-8-9-10 fois tous les 2 rangs - NOTE: augmenter alternativement avant et après les marqueurs = 200-220-246-274-298-326 B. EN MÊME TEMPS, après un total de 12 rangs en hauteur, arrêter la fente sur le côté et continuer en rond, en commençant le tour sur le côté – VOIR INFO CROCHET! À 24-24-25-25-25-26 cm de hauteur totale, augmenter 28-32-30-26-38-22 m à intervalles réguliers au tour suivant = 228-252-276-300-336-348 m. Crocheter maintenant ainsi: Crocheter 19-21-23-25-28-29 fois à partir du 1er tour de A.1 (= 12 B) en largeur. Quand A.X a été crocheté 1 fois en hauteur, répéter A.X encore 1 fois avant de continuer par le tour suivant du diagramme. Crocheter ensuite 1-2-2-1-2-3 tours de B, EN MÊME TEMPS, au dernier tour, augmenter 36-36-36-36-24-36 m à intervalles réguliers = 264-288-312-336-360-384 B. Crocheter maintenant à partir du 1er tour de A.2 (= 11-12-13-14-15-16 fois en largeur), EN MÊME TEMPS, au dernier tour, augmenter 12 B à intervalles réguliers pour toutes les tailles = 276-300-324-348-372-396 B. Continuer avec A.1 (= 23-25-27-29-31-33 fois en largeur), 1 fois en hauteur, EN MÊME TEMPS, au dernier tour, augmenter 12-20-12-20-12-20 B à intervalles réguliers = 288-320-336-368-384-416 B. Crocheter maintenant A.3 (= 18-20-21-23-24-26 fois en largeur). Quand A.3 a été crocheté 1 fois en hauteur, répéter encore 1-1-1-2-2-2 fois A.Z en hauteur. Crocheter maintenant ainsi: 1 ml (= 1 ms), ** crocheter * 4 ml, 1 ms dans l'arceau suivant*, répéter de *-*encore 2 fois, 4 ml, sauter 3 B, 1 ms dans la B suivante**, répéter de **-** tout le tour, et terminer par 1 mc dans la 1ère ml du tour. ARCEAUX DE BOUTONNIÈRES: Le long de l'ouverture du devant, crocheter des arceaux de boutonnières ainsi (commencer en bas): 2 ms dans la 1ère B, 3 ml, sauter 1 B, *2 ms dans chacune des 2 B suivantes, 3 ml, sauter 1 B*, répéter de *-* 3 fois au total et terminer par 2 ms dans la dernière B en haut, tourner et crocheter le rang retour ainsi: 1 ms dans chaque ms et 3 ms dans chaque arceau. BORDURE DE BOUTONNAGE: Le long de l'autre côté de l'ouverture, crocheter 5 rangs de ms en allers et retours (au 1er rang, crocheter 2 ms dans chaque B = 24 ms), couper le fil. Coudre les boutons sur la bordure. BORDURE: Réaliser la bordure suivante en haut de la jupe, le long de la taille, ainsi sur l'endroit: joindre le fil avec 1 mc au bord de la bordure de boutonnage, 1 ml, *1 ml, sauter 1 ml, 1 ms dans la ml suiv*, répéter de *-* tout le long de la taille. Arrêter. |
|||||||||||||||||||||||||||||||||||||
Légende diagramme(s) |
|||||||||||||||||||||||||||||||||||||
|
|||||||||||||||||||||||||||||||||||||
 |
|||||||||||||||||||||||||||||||||||||
 |
|||||||||||||||||||||||||||||||||||||
 |
|||||||||||||||||||||||||||||||||||||
Vous avez terminé ce modèle?Alors taguez vos photos avec #dropspattern #summerescapeskirt ou bien présentez-les dans la galerie #dropsfan Vous avez besoin d'aide pour ce modèle ?Vous trouverez 12 tutoriels vidéo, une rubrique commentaires/questions et plus encore en vous rendant sur la page du modèle sur garnstudio.com © 1982-2026 DROPS Design A/S. Tous droits réservés. Ce document, y compris ces sous-sections, est protégé par les droits d'auteur (copyright). Apprenez-en davantage sur ce que vous pouvez faire avec nos modèles en bas de chacune des pages de notre site. |
|||||||||||||||||||||||||||||||||||||


Avec plus de 40 ans dans la conception de modèles tricot et crochet, DROPS Design offre l'une des plus vastes collections de modèles gratuits sur internet - traduits dans 17 langues. À ce jour, on compte 324 catalogues et 12290 modèles en français.
Nous nous efforçons de vous apporter le meilleur de ce que le tricot et le crochet peuvent vous offrir, inspiration et conseils mais également des fils de haute qualité à des prix incroyables! Vous souhaiteriez utiliser nos modèles autrement que pour un usage personnel? Vous pouvez lire ce que vous êtes autorisés à faire dans le Copyright en bas de page de chacun de nos modèles. Bon tricot!
Poster un commentaire sur le modèle DROPS 162-18
Nous aimerions connaître votre avis sur ce modèle !
Si vous souhaitez poser une question, merci de bien vouloir vérifier que vous avez choisi la bonne catégorie dans le formulaire ci-dessous afin d'accélérer la réponse. Les champs obligatoires sont indiqués par une *.