
Catégories populaires
Vous cherchez un fil?


Commentaires / Questions (50)
![]() Niva a écrit:
Niva a écrit:
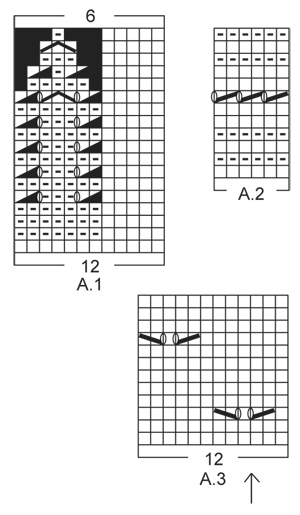
Must admit this is the most confusing pattern I’ve ever tried and I’m an accomplished knitter. I’ve read it so many times to work it out and I’m almost there. Does the A4 pattern stop after the 12 rows in the graph?
08.04.2021 - 04:33DROPS Design a répondu:
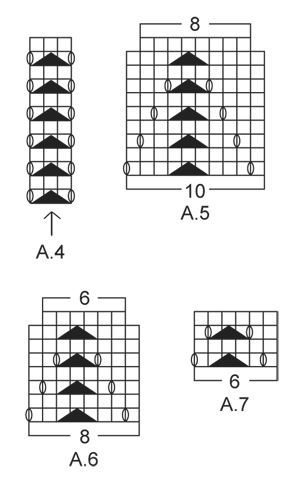
Dear Niva, A.4 will be repeated in height until all decreases for raglan are done. Happy knitting!
08.04.2021 - 07:51
![]() Nova a écrit:
Nova a écrit:
At the beginning of the A4 graph is the YO between the last stitch on the body and the first stitch on the sleeve?
07.04.2021 - 13:43DROPS Design a répondu:
Dear Nova, the stitch with the arrow in A.4 should be the one with the marker at the transitions, so that you will have 1 yarn over, the double decrease with marker in the middle stitch, 1 yarn over; this means there will be one hole (yarn over) on body and on sleeve. Happy knitting!
07.04.2021 - 14:26
![]() Nova a écrit:
Nova a écrit:
After attaching the sleeves for size L and beginning middle back for the first round, it says to start on the same row for the sleeve as for the body. Does this mean if I’m on row 4 on the body (A1) that I start on row 4 for the sleeves (A3)? Also A1 the arrow designates the middle of the sleeve but the graph starts with A4 which is 3 stitches and A3 is another 3 sts total 6 sts wouldn't the middle be half of 68 sts which is 34 sts?
06.04.2021 - 14:03DROPS Design a répondu:
Dear Nova, you should finish the sleeves 8adjust its length) so you will end up in the same row if the pattern as on the body, so you can continue the pattern without disrupting it. The arrow should match the middle of the sleeves, the upper middle line, put the stitch marked there, and count outwards to find out where you should start. Happy Knitting!
06.04.2021 - 14:26
![]() Nova a écrit:
Nova a écrit:
This is becoming a real challenge but I’m not going to give up! I am attaching the sleeves to the body but notice you don’t mention double pointed needles in your materials needed for this project. How are you supposed to knit these sleeves together with the body without them? It won’t work.
25.03.2021 - 01:52DROPS Design a répondu:
Dear Nova, when you have knitted the sleeves, you put all the stitches on one curcular needle, (back, sleeve, fron, sleeve), and knot the circular needle on the round. You don't knit "together" as a three needle bind off, but along with the body, in one big circle, that is getting decreased as you get to the neckline. Happy Knitting!
25.03.2021 - 02:26
![]() Nova a écrit:
Nova a écrit:
Hi again. I’m up to the yoke and I’m really confused about this section of the pattern. The fact that there are 3 graphs to be worked is a challenge in itself. The confusion is in the A4 graph between the body and the sleeves, does this have to do with the shaping of the raglan?
09.03.2021 - 13:31DROPS Design a répondu:
Dear Nova, pattern A.4 is between each body and sleeve, right at the raglan line. Shaping happens before and after this pattern. Happy Knitting!
09.03.2021 - 13:57
![]() Nova a écrit:
Nova a écrit:
When you get to the side where the first increases have been worked you have two extra stitches so to keep the eyelet pattern uniform, the space between the next eyelet is 9 stitches and that throws the whole eyelet pattern out. I don’t know how you can keep the eyelet pattern 7 stitches between with these increases on the side. The new repeat would make more sense at the beginning of the round.
26.02.2021 - 23:15DROPS Design a répondu:
See answer below - if you can't work a part of decrease (K2 tog, YO), over the new stitches, just work these stitches in stocking stitch without the lace pattern. You shoulud have the correct number of sts between each eyelet in width. Hope this will help. Happy knitting!
01.03.2021 - 08:00
![]() Nova a écrit:
Nova a écrit:
The beginning of the round the increases can be worked out but it’s the increases halfway on the side marker those stitches throw the whole eyelet pattern out. You can’t do 7 stitches between the pattern it doesn’t work out I’ve tried it
26.02.2021 - 22:52DROPS Design a répondu:
Dear Nova, if you don't have enough stitches to work the whole lace pattern on the side, this means there are not enough stitches yet, just work these stitches in stocking stitch. Work the lace pattern over the new stitches only if you have enough stitches to work them. This means each lace pattern should be worked with 7 knit stitches in between. Happy knitting!
01.03.2021 - 07:58
![]() Nova a écrit:
Nova a écrit:
Are you saying to read the graph from left to right and then right to left alternately and the added stitches will work out with the eyelet pattern?
26.02.2021 - 16:33DROPS Design a répondu:
Hi Nova, when working in the round all rounds are worked from the right side, and the diagram is read solely from right to left. When starting a new round, simply start working the first symbol on the next row in diagram. Happy knitting!
28.02.2021 - 21:14
![]() Nova a écrit:
Nova a écrit:
For example on the 3rd round after the first increases there are 4 stitches left at the end of the round and I’m not sure whether to knit those stitches as normal or do the pattern.
26.02.2021 - 15:19DROPS Design a répondu:
Dear Nova, see previous answer, make always sure that the eyelet pattern fit in height, it shouldn't be displaced. Happy knitting!
26.02.2021 - 16:17
![]() Nova a écrit:
Nova a écrit:
When doing the body and the A3 and making the increases on either side of the markers I notice that those extra stitches will throw the alternate pattern out where the holes should be. Is that how it’s supposed to be?
26.02.2021 - 15:08DROPS Design a répondu:
Dear Nova, the increased stitches should be worked in A.3, this means at the beg of A.3 work the new stitches as a new repeat reading diagram from the left towards the right (= there should be always 7 sts before the next K2 tog, YO in the lace pattern. And at the end of A.3, work the new stitches as a new repeat of A.3 (reading from the right towards the left). Hope this will help. Happy knitting!
26.02.2021 - 16:16
|
||||||||||||||||||||||||||||
White Romance#whiteromancetop |
||||||||||||||||||||||||||||
 |
 |
|||||||||||||||||||||||||||
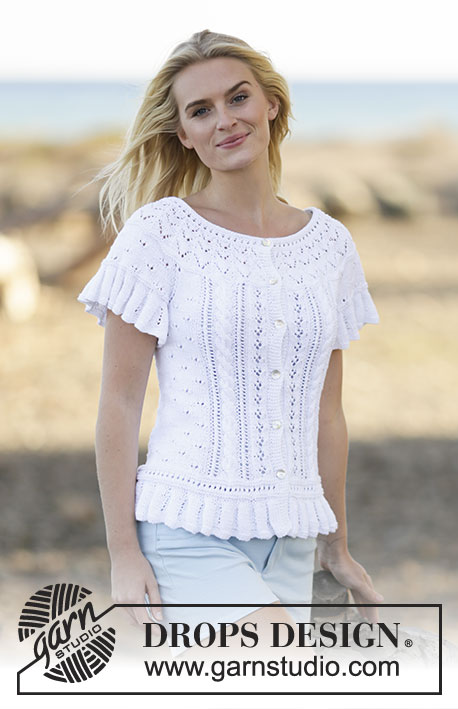
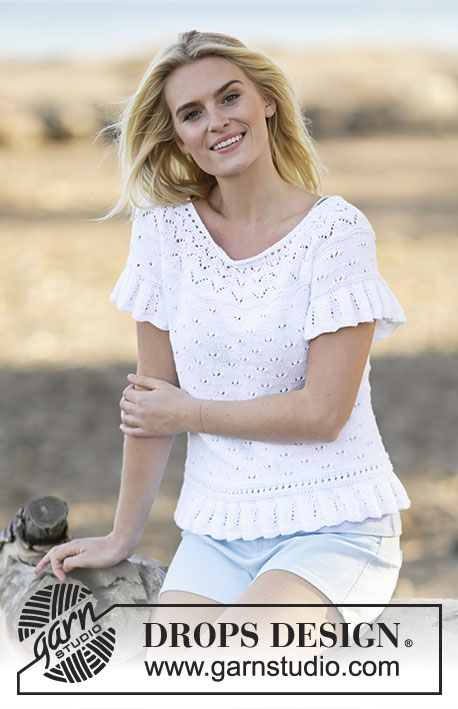
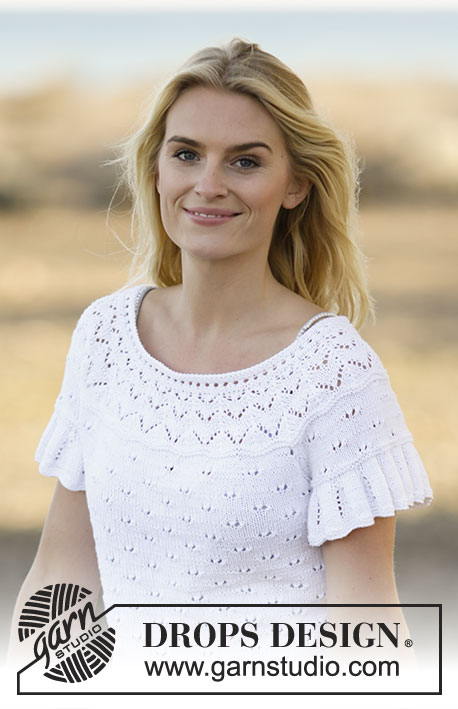
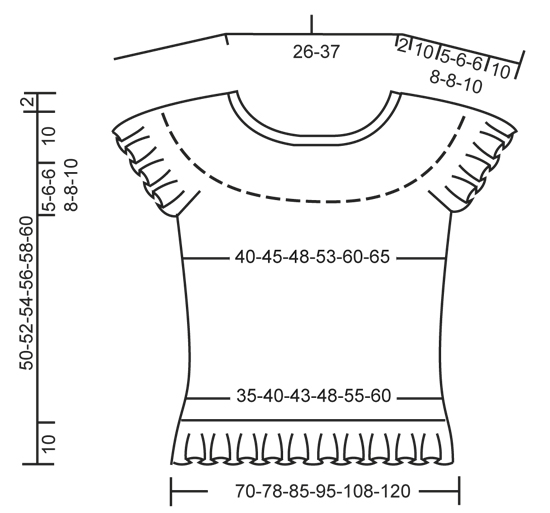
Top ajouré DROPS avec manches courtes et empiècement arrondi, en ”Safran”. Du S au XXXL.
DROPS 159-12 |
||||||||||||||||||||||||||||
|
POINT MOUSSE (en rond sur aiguille circulaire): Tricoter: *1 tour end, 1 tour env*, répéter de *-*. 1 côte mousse = 2 tours. POINT FANTAISIE: Voir les diagrammes A.1 à A.7. Les diagrammes montrent tous les rangs du point fantaisie, vus sur l'endroit. AUGMENTATIONS: Augmenter 1 m en faisant 1 jeté. Au tour suivant, tricoter le jeté torse pour éviter les trous - tricoter les augmentations en jersey. RAGLAN: Diminuer pour le raglan de chaque côté de A.4, à chaque transition entre les manches, le dos et le devant. Diminuer ainsi après A.4: Glisser 1 m à l'end, 1 m end, passer la m glissée par-dessus la m tricotée. Diminuer ainsi 2 m avant A.4: 2 m ens à l'end. ---------------------------------------------------------- DOS & DEVANT: Se tricotent en rond sur aiguille circulaire. Monter 336-372-408-456-516-576 m avec l'aiguille circulaire 2.5 en Safran. Tricoter 2 côtes au POINT MOUSSE - voir ci-dessus. Continuer avec l'aiguille circulaire 3 et tricoter en point fantaisie du diagramme A.1. Quand A.1 a été tricoté 1 fois en hauteur, il reste 168-186-204-228-258-288 m. Continuer ensuite en suivant le diagramme A.2. Après A.2, tricoter 2 tours end, EN MÊME TEMPS, répartir 0-6-0-0-6-0 augmentations au dernier tour = 168-192-204-228-264-288 m. Placer 1 marqueur au début du tour et 1 autre marqueur après 84-96-102-114-132-144 m (= repères côtés). Continuer ensuite en suivant le diagramme A.3. PENSER À BIEN CONSERVER LA MÊME TENSION QUE POUR L'ÉCHANTILLON! EN MÊME TEMPS, quand l'ouvrage mesure 12 cm, augmenter 1 m de chaque côté des 2 marqueurs - VOIR AUGMENTATIONS (= 4 augmentations). Répéter ces augmentations de chaque côté 6 fois au total tous les 4-4-4-5-5-5 cm = 192-216-228-252-288-312 m - NOTE: Tricoter les augmentations en jersey. Continuer jusqu'à ce que l'ouvrage mesure 35-36-38-38-40-40 cm. Tricoter ensuite le tour suivant ainsi: Rabattre 5-5-5-6-6-6 m pour l'emmanchure, tricoter 86-98-104-114-132-144 m (= devant), rabattre 10-10-10-12-12-12 m pour l'emmanchure (c'est-à-dire 5-5-5-6-6-6 m de chaque côté du marqueur), tricoter 86-98-104-114-132-144 m (= dos) et rabattre les 5-5-5-6-6-6 m restantes. Mettre en attente et tricoter les manches. MANCHES: Se tricotent en rond sur aiguille circulaire. Monter 144-156-156-168-168-180 m avec l'aiguille circulaire 2.5 en Safran. Tricoter 2 côtes au POINT MOUSSE - voir ci-dessus. Continuer avec l'aiguille circulaire 3 et tricoter en suivant le diagramme A.1. Après A.1, il reste 72-78-78-84-84-90 m. Tricoter 2 côtes mousse, EN MÊME TEMPS, au dernier tour, rabattre les 10-10-10-12-12-12 m au milieu sous la manche = il reste 62-68-68-72-72-78 m. Mettre en attente et tricoter l'autre manche. EMPIÈCEMENT: Glisser les mailles des manches sur la même aiguille circulaire que le dos et le devant, au-dessus des mailles rabattues pour les emmanchures (sans les tricoter) = 296-332-344-372-408-444 m, EN MÊME TEMPS, placer 1 marqueur dans la 1ère et 1 marqueur dans la dernière m de chacune des manches (= 4 marqueurs). Commencer au milieu dos et continuer le dos et le devant en point fantaisie comme avant, EN MÊME TEMPS, tricoter A.3 sur les manches (la flèche dans le diagramme doit correspondre au milieu de la manche, commencer au même rang du diagramme que le devant et le dos). Tricoter en plus A.4 à chaque transition entre le dos/le devant et les manches (la flèche dans le diagramme doit correspondre à la m avec le marqueur). Quand 2 tours ont été tricotés en rond sur toutes les mailles, commencer à diminuer pour le RAGLAN - voir ci-dessus (= 8 diminutions). Répéter ces diminutions 4-5-5-7-7-8 fois au total tous les 4 tours = 264-292-304-316-352-380 m. Tricoter 2 côtes mousse sur toutes les mailles, EN MÊME TEMPS, répartir 4-12-4-6-12-10 diminutions au 1er tour = 260-280-300-310-340-370 m. Tricoter 2 tours end. Commencer maintenant à diminuer pour l'empiècement arrondi et tricoter en rond, en suivant le diagramme A.5 (= 26-28-30-31-34-37 fois tout le tour – NOTE: Changer pour une aiguille circulaire plus petite quand nécessaire). Quand A.5 a été tricoté 1 fois en hauteur, tricoter A.6 au lieu de A.5. Quand A.6 a été tricoté 1 fois en hauteur, on a 156-168-180-186-204-222 m. Tricoter maintenant A.7 au lieu de A.6. Quand A.7 a été tricoté 1 fois en hauteur, tricoter une ré-hausse pour l'encolure dos. Placer 1 marqueur au milieu devant. Commencer au milieu dos et tricoter à l'end jusqu'à ce qu'il reste 14-14-16-16-18-20 m avant le marqueur. Tourner, tricoter le rang retour à l'end jusqu'à ce qu'il reste 14-14-16-16-18-20 m avant le marqueur de l'autre côté. Tourner, tricoter à l'end jusqu'à ce qu'il reste 30-30-34-34-38-42 m avant le marqueur. Tourner, tricoter le rang retour à l'end jusqu'à ce qu'il reste 30-30-34-34-38-42 m avant le marqueur de l'autre côté. Tourner, tricoter à l'end jusqu'à ce qu'il reste 46-46-52-52-58-64 m avant le marqueur. Tourner, tricoter le rang retour à l'end jusqu'à ce qu'il reste 46-46-52-52-58-64 m avant le marqueur de l'autre côté. Tourner, tricoter à l'end jusqu'à ce qu'il reste 62-62-70-70-76-86 m avant le marqueur. Tourner, tricoter le rang retour à l'end jusqu'à ce qu'il reste 62-62-70-70-76-86 m avant le marqueur de l'autre côté. Tourner et tricoter le rang retour à l'end jusqu'au début du tour. COL: Continuer avec l'aiguille circulaire 2.5 et tricoter en rond sur toutes les mailles en suivant le diagramme A.2. EN MÊME TEMPS, au 1er tour, répartir 22-24-24-26-30-32 diminutions = 134-144-156-160-174-190 m. Après A.2, rabattre souplement les mailles à l'end sur l'endroit. Le top mesure environ 52-54-56-58-60-62 cm depuis l'épaule jusqu'en bas. ASSEMBLAGE: Fermer l'ouverture sous les manches par une couture. |
||||||||||||||||||||||||||||
Légende diagramme(s) |
||||||||||||||||||||||||||||
|
||||||||||||||||||||||||||||
 |
||||||||||||||||||||||||||||
 |
||||||||||||||||||||||||||||
 |
||||||||||||||||||||||||||||
Vous avez terminé ce modèle?Alors taguez vos photos avec #dropspattern #whiteromancetop ou bien présentez-les dans la galerie #dropsfan Vous avez besoin d'aide pour ce modèle ?Vous trouverez 30 tutoriels vidéo, une rubrique commentaires/questions et plus encore en vous rendant sur la page du modèle sur garnstudio.com © 1982-2026 DROPS Design A/S. Tous droits réservés. Ce document, y compris ces sous-sections, est protégé par les droits d'auteur (copyright). Apprenez-en davantage sur ce que vous pouvez faire avec nos modèles en bas de chacune des pages de notre site. |
||||||||||||||||||||||||||||


Avec plus de 40 ans dans la conception de modèles tricot et crochet, DROPS Design offre l'une des plus vastes collections de modèles gratuits sur internet - traduits dans 17 langues. À ce jour, on compte 324 catalogues et 12290 modèles en français.
Nous nous efforçons de vous apporter le meilleur de ce que le tricot et le crochet peuvent vous offrir, inspiration et conseils mais également des fils de haute qualité à des prix incroyables! Vous souhaiteriez utiliser nos modèles autrement que pour un usage personnel? Vous pouvez lire ce que vous êtes autorisés à faire dans le Copyright en bas de page de chacun de nos modèles. Bon tricot!
Poster un commentaire sur le modèle DROPS 159-12
Nous aimerions connaître votre avis sur ce modèle !
Si vous souhaitez poser une question, merci de bien vouloir vérifier que vous avez choisi la bonne catégorie dans le formulaire ci-dessous afin d'accélérer la réponse. Les champs obligatoires sont indiqués par une *.