
Catégories populaires
Vous cherchez un fil?


Commentaires / Questions (127)
![]() Debbie a écrit:
Debbie a écrit:
Can you make a you tube video showing how this is made?
20.05.2015 - 01:53DROPS Design a répondu:
Dear Debbie, you will find videos related to the sts used under tab "videos", you can work either following diagram or written pattern. Should you need any further assistance, you are welcome to ask your question here or to contact your DROPS store. Happy crocheting!
20.05.2015 - 10:02
![]() Judi Ames a écrit:
Judi Ames a écrit:
For Ruth, to put it more clearly, at end of first row, you turn, chain 3 (= first stitch) for turning chain...after the ch stitch do 2 more stitches, then stitch in ch-sp, ch 3 and continue...I was wondering why I had no turning chain and the rows were getting wider, too...does this help?
07.05.2015 - 22:35
![]() Lia a écrit:
Lia a écrit:
Ik ben met het voorpand bezig .Moet ik 3 stokjes in de 3 lossen tussen de tussen de stokjes in de hoek maken of in het eerst losse boogje? Keer de tweede toer 1st. in de eerst 3losse maar er zijn toch gen losse alleen 3 stokjes ? Moet je om een om aan het begin van de toer 3 stokjes haken of alleen maar boogjes?
30.04.2015 - 20:32
![]() Vivian a écrit:
Vivian a écrit:
Thx for the response about the sleeves! I woke up this morning and reread the instructions and understand them completely now!
27.04.2015 - 17:03
![]() Vivian a écrit:
Vivian a écrit:
I have the question about the increase every sixth round on the back panel. I think I understand what the instructions say…every 6th round you would have a DC ch3 DC all in the same ch sp on either side of the corners as you go round equaling 8 extra DC & ch3 per sixth round? BUT, I do not see that in the picture, which makes me question whether I understand clearly.
27.04.2015 - 17:01DROPS Design a répondu:
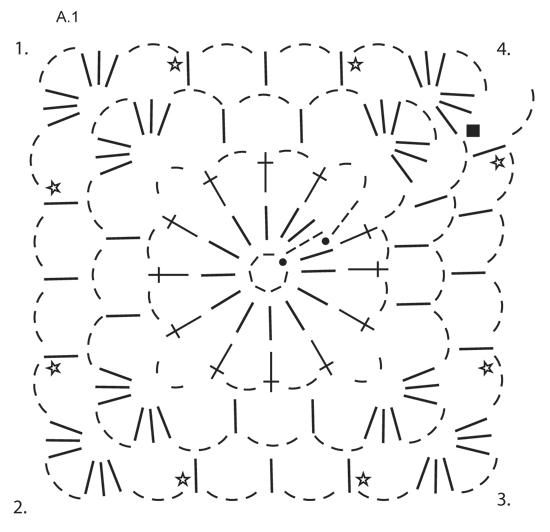
Dear Vivian, diagram shows only first 4 rounds, increase starts on round 5, then every 6th round where you will work 1 dc + 3ch +1dc +3 ch in same ch-space each side of each corner (= 2 dc more per side = 8 dc inc per inc round). Happy crocheting!
27.04.2015 - 17:14
![]() Vivian a écrit:
Vivian a écrit:
I am totally lost on the directions for the sleeves. Is there any possibility I could get a simplified explanation on dec the sleeves? I just don't understand the way it is written. Also, when I enlarge the picture of the back piece, I don't see where the inc are in the example? I don't think I did that part right :( , all I did was put in one extra DC, but I am plowing ahead anyhow. thx!
27.04.2015 - 07:06DROPS Design a répondu:
Dear Vivian, mid under sleeve replace 1 dc+3 ch that way: work next dc in next ch-space but wait with last pull through (2 sts on hook, work next dc in next ch space and on last pull through, pull yarn through all sts on hook. For any individual assistance, remember you can get help from your DROPS store. Happy crocheting!
27.04.2015 - 11:42
![]() Ruth a écrit:
Ruth a écrit:
Nope, sorry, still don't understand what you do at the turn after the first row...any chance of a picture? To clarify - I finish the first row with 3ch, 3 tr in ch-loop in the corner, I turn and then....what??!!
26.04.2015 - 23:22DROPS Design a répondu:
Dear Ruth, on 2nd row start with 3 ch (= 1st tr), 1 tr in each of the first 2 tr, then repeat *1 tr in ch-space, 3 ch* to the end of row and finish with 1 tr in the last ch-space, 1 tr in each of the last 3 tr. On 3rd row, turn and work 3 ch, 1 tr in each of the next 2 tr, *3 ch, 1 tr in next ch-space*, repeat to the end of row and finish with 1 tr in each of the last 3 tr. Repeat then row 2 and 3. Happy crocheting!
27.04.2015 - 14:19
![]() Ruth a écrit:
Ruth a écrit:
Nope, sorry, still don't understand what you do at the turn after the first row...any chance of a picture?
26.04.2015 - 23:10
![]() Ruth a écrit:
Ruth a écrit:
I am struggling to understand what happens at the corners when you turn on the frontpiece. A close up picture might help - the pattern makes no sense to me and I am so close! After severalf restarts I have done the main body and arms and it's looking good, but I can't figure out the turns. Help!.
24.04.2015 - 22:44DROPS Design a répondu:
Dear Ruth, when you work only on front piece, crochet 3 tr in 1st ch-loop in the corner, then repeat *3 ch, 1 tr around ch-loop*, finish with 3ch, 3 tr in ch-loop in the corner. And continue then repeating row 2 and 3 - remember to replace 1st tr with 3 ch at the beg of row. Happy crocheting!
25.04.2015 - 10:19
![]() Lelel Mas a écrit:
Lelel Mas a écrit:
En el delantero, como se continua el patrón sin que salgan aumentos, si se trabaja un punto alto en cada arco aumenta igual que antes.
01.04.2015 - 09:34DROPS Design a répondu:
Hola Lelel, gracias por escribir. Repasando el patrón he encontrado una corrección del delantero sin actualizar en español. Ahora está actualizado. Sentimos las molestias y esperamos que la corrección te ayude a realizar el delantero.
05.04.2015 - 12:12
|
||||||||||||||||||||||
Around the World#aroundtheworldcardigan |
||||||||||||||||||||||
 |
 |
|||||||||||||||||||||
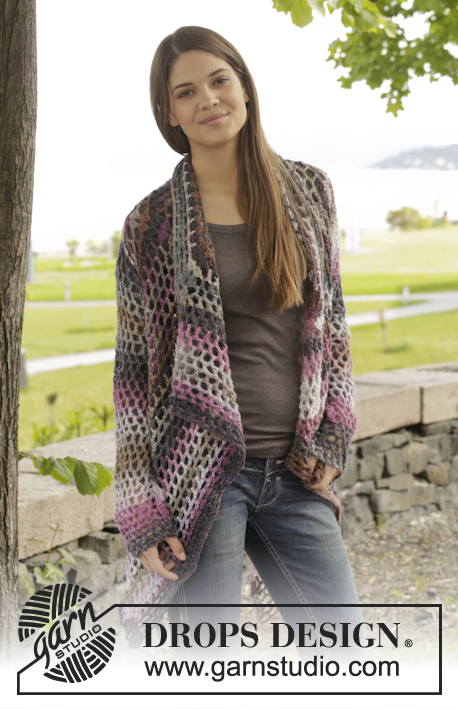
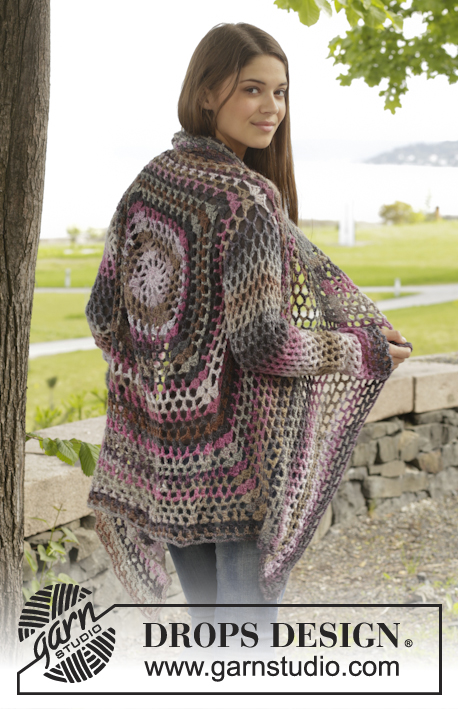
Veste ajourée DROPS au crochet, en ”Big Delight”. Du S au XXXL
DROPS 156-42 |
||||||||||||||||||||||
|
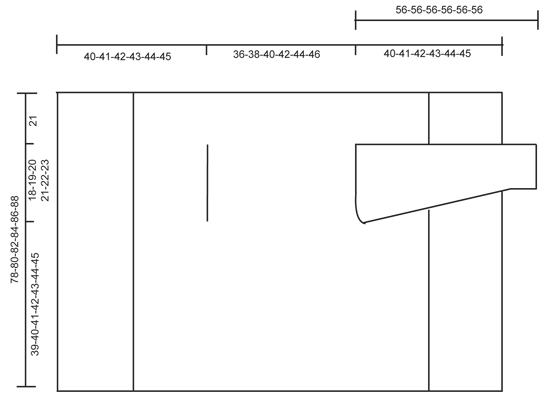
POINT FANTAISIE: Voir diagramme A.1. DIMINUTIONS (manches): Diminuer 1 motif (= 1 B + 3 ml) en ne faisant pas les ml, mais écouler 2 B ainsi: Crocheter 1 B mais ne pas faire le dernier jeté (= 2 boucles sur le crochet), crocheter ensuite la B suiv mais au dernier jeté, écouler toutes les boucles sur le crochet. ---------------------------------------------------------- DOS & DEVANTS: Se crochètent en rond, à partir du milieu dos. Monter une chaînette de 6 ml avec le crochet 5 en Big Delight et joindre en rond avec 1 mc dans la 1ère ml. Crocheter en suivant le diagramme A.1, c’est-à-dire ainsi: TOUR 1: 3 ml, 13 B dans le rond de ml, terminer par 1 mc dans la 3ème ml du début du tour. TOUR 2: 5 ml, sauter 1 B, 1 B dans la B suivante, *2 ml, 1 B dans la B suivante *, répéter de *-* tout le tour, terminer par 2 ml = 12 B + 2 ml. TOUR 3: Crocheter maintenant le cercle en un carré, c’est-à-dire crocheter ainsi: 3 B + 3 ml + 3 B (= coin) dans le 1er arceau, 3 ml, 1 B dans l’arceau suivant, 3 ml, 1 B dans l’arceau suivant, 3 ml, *3 B + 3 ml + 3 B (= coin) dans l’arceau suivant, 3 ml, 1 B dans l’arceau suivant, 3 ml, 1 B dans l’arceau suivant, 3 ml*, répéter de *-* 3 fois au total, 1 B dans l’arceau suivant (= 2 dernières ml du tour précédent), 3 ml. TOUR 4: 3 B + 3 ml + 3 B (= coin) dans le 1er arceau, *3 ml, 1 B dans l’arceau suivant, 3 ml, 1 B dans l’arceau suivant, 3 ml, 1 B dans l’arceau suivant, 3 ml, 3 B + 3 ml + 3 B (= coin) dans l’arceau suivant*, répéter de *-* 3 fois au total, 3 ml, 1 B dans l’arceau suivant, 3 ml, 1 B dans l’arceau suivant, 3 ml, 1 B dans l’arceau suivant, 3 ml, 1 B dans l’arceau suivant, 3 ml. PENSER À BIEN CONSERVER LA MÊME TENSION QUE POUR L’ÉCHANTILLON! Répéter le tour 4 avec les augmentations, c’est-à-dire crocheter 1 B + 3 ml en plus entre chaque coin tous les tour (= 4 augmentations par tour) EN MÊME TEMPS, tous les 6 tours, augmenter 1 B + 3 ml en plus de chaque côté des coins - voir étoile dans le diagramme (= 8 augmentations en plus par tour). Continuer ainsi jusqu’à ce que le carré mesure 36-38-40-42-44-46 cm x 36-38-40-42-44-46 cm. Crocheter maintenant les emmanchures ainsi: continuer comme avant jusqu'au 1er coin, crocheter 3 B + 3 ml + 3 B dans l'arceau du coin. Crocheter maintenant des ml jusqu'au milieu du côté suivant (c'est-à-dire au milieu entre le 1er et le 2ème coin) ainsi: 1 ml pour chaque ml/B sautée. Continuer ensuite comme avant jusqu'au milieu entre le 3ème et le 4ème coin. Crocheter maintenant des ml jusqu'au début du tour ainsi: 1 ml pour chaque ml/B sautée. Au tour suivant, crocheter et augmenter comme avant sur toutes les mailles, et dans les chaînettes des emmanchures. Continuer ainsi jusqu’à ce que le carré mesure 78-80-82-84-86-88 cm x 78-80-82-84-86-88 cm (c’est-à-dire 21 cm depuis les emmanchures dans toutes les tailles). Arrêter. DEVANTS: Crocheter maintenant en allers et retours entre le 1er et le 2ème coin. NOTE! Crocheter le devant sans augmenter. 1er RANG: Crocheter à partir du 1er coin ainsi: 3 B dans l'arceau du coin, * 3 ml, 1 B dans l'arceau*, répéter de *-* et terminer par 3 ml et 3 B dans le coin. 2ème RANG: Tourner et crocheter ainsi: 1 B dans chacune des 3 premières B, *1 B dans l'arceau, 3 ml*, répéter de *-* et terminer par 1 B dans le dernier arceau et 1 B dans chacune des 3 B. 3ème RANG: Tourner et crocheter ainsi: 1 B dans chacune des 3 premières B, * 3 ml, 1 B dans le dernier arceau*, répéter de *-* et terminer par 3 ml et 1 B dans chacune des 3 dernières B. Continuer en répétant les rangs 2 et 3 ainsi jusqu'à ce que 19-20-21-22-23-24 cm aient été crochetés en allers et retours, arrêter. Répéter de l’autre côté: crocheter maintenant en allers et retours à partir du 3ème coin jusqu’au 4ème coin. Terminer par un tour tout autour du carré, comme avant, mais dans l’arceau dans chaque coin crocheter 6 B. Arrêter. MANCHES: Se crochètent en rond, de haut en bas, à partir des emmanchures, en commençant au milieu sous la manche, sur l’endroit. TOUR 1: 6 ml (= 1 B + 3 ml), *1 B dans l’arceau suivant, 3 ml*, répéter de *-* 16-17-18-19-20-21 fois au total, terminer par 1 mc dans la 3ème ml. TOUR 2: 5 ml, *1 B dans l’arceau suivant, 3 ml*, répéter de *-* 16-17-18-19-20-21 fois au total, 1 ml, terminer par 1 mc dans la 3ème ml au début du tour. Répéter les tours 1 et 2 - EN MÊME TEMPS, diminuer 1 B + 3 ml au début du 4ème-6ème-6ème-8ème-8ème-6ème tour en écoulant 2 B ens – VOIR DIMINUTIONS – au milieu sous la manche. Répéter ces diminutions tous les 6-6-6-4-4-4 tours = 12-12-13-13-14-14 B. Continuer en rond sans diminuer jusqu’à ce que la manche mesure environ 56 cm dans toutes les tailles. Arrêter. Crocheter l'autre manche de la même façon. |
||||||||||||||||||||||
Légende diagramme(s) |
||||||||||||||||||||||
|
||||||||||||||||||||||
 |
||||||||||||||||||||||
 |
||||||||||||||||||||||
Vous avez terminé ce modèle?Alors taguez vos photos avec #dropspattern #aroundtheworldcardigan ou bien présentez-les dans la galerie #dropsfan Vous avez besoin d'aide pour ce modèle ?Vous trouverez 7 tutoriels vidéo, une rubrique commentaires/questions et plus encore en vous rendant sur la page du modèle sur garnstudio.com © 1982-2026 DROPS Design A/S. Tous droits réservés. Ce document, y compris ces sous-sections, est protégé par les droits d'auteur (copyright). Apprenez-en davantage sur ce que vous pouvez faire avec nos modèles en bas de chacune des pages de notre site. |
||||||||||||||||||||||


Avec plus de 40 ans dans la conception de modèles tricot et crochet, DROPS Design offre l'une des plus vastes collections de modèles gratuits sur internet - traduits dans 17 langues. À ce jour, on compte 324 catalogues et 12290 modèles en français.
Nous nous efforçons de vous apporter le meilleur de ce que le tricot et le crochet peuvent vous offrir, inspiration et conseils mais également des fils de haute qualité à des prix incroyables! Vous souhaiteriez utiliser nos modèles autrement que pour un usage personnel? Vous pouvez lire ce que vous êtes autorisés à faire dans le Copyright en bas de page de chacun de nos modèles. Bon tricot!
Poster un commentaire sur le modèle DROPS 156-42
Nous aimerions connaître votre avis sur ce modèle !
Si vous souhaitez poser une question, merci de bien vouloir vérifier que vous avez choisi la bonne catégorie dans le formulaire ci-dessous afin d'accélérer la réponse. Les champs obligatoires sont indiqués par une *.