
Catégories populaires
Vous cherchez un fil?


Commentaires / Questions (127)
![]() Barbara a écrit:
Barbara a écrit:
Moet je na de armsgaten als je verder haakt in het patroon ook elke zesde toer extra blijven meerderen?
26.10.2015 - 17:18DROPS Design a répondu:
Hoi Barbara. Ja, jeg gaat door met de vierkant tot het vierkantje 21 cm meet vanaf het armsgat. Pas bij het haken van de voorpanden maak je geen meerderingen meer.
27.10.2015 - 14:40
![]() Barbara a écrit:
Barbara a écrit:
Ik heb een vraag over de toer ná de armsgaten. Je moet volgens het patroon haken, ook over de losse van de armsgaten. Dus drie lossen en een stokje neem ik aan. Als ik op de losse haak, om de hoeveel steken komt dan mijn stokje?
23.10.2015 - 13:08DROPS Design a répondu:
Hoi Barbara. Je haakt om de lossen, je hoeft ze niet te tellen en in te haken.
23.10.2015 - 13:47Theresa Lambert a écrit:
I'm not understanding what to do on row 4 would you please help me says something and adding another dc? Please help me out.
20.10.2015 - 00:23DROPS Design a répondu:
Dear Theresa, it is just to clear, that there is 1 dc + 3 ch more between each corner on every round. Just follow previous instructions.
18.12.2015 - 11:53
![]() Lorraine De Maria a écrit:
Lorraine De Maria a écrit:
I think this is my last question on the armholes- thank you for all your help - I understand I am counting the side of the pattern and then chaining that many for the hole in the sleeve- do I attach it in the middle between both corners on the side of this or do I attached it to the other corner before doing my pattern again??
19.10.2015 - 13:43DROPS Design a répondu:
Dear Mrs De Maria, when you have crocheted the chain for armhole and skipped the number of sts matching between first (1st armhole) corner and mid between 1st and 2nd corner, crochet as before from middle between 1st and 2nd corner to the 2nd corner. For 2nd armhole, crochet as before from 3rd corner to middle side before 4th corner, crochet a chain skipping the matching number of sts to the 4th corner. Happy crocheting!
19.10.2015 - 14:10Lorraine De Maria a écrit:
Thank you so much - I think I understand now- I will get back to you if I have any questions in the future - Love your site!!
16.10.2015 - 19:38
![]() Lorraine De Maria a écrit:
Lorraine De Maria a écrit:
Maybe this is a better way to ask- I will follow for the armhole on the answer that says to chain as many chains as it would take to reach the middle of the square - then do I attach it with a chain where I counted 1/2 before the corner?? or do I attach it in the corner I am working on? and how many sets of double crochets and chains do I put in the corner before doing this long chain??
15.10.2015 - 22:38DROPS Design a répondu:
Dear Mrs De Maria, after you have skipped half the side (from the corner to middle between both corners), continue in pattern as before to next corner. Number of chains will depend of number of sts you will skip - count the number of sts skipped to the middle between both corners and chain this number. Happy crocheting!
16.10.2015 - 09:28
![]() Lorraine De Maria a écrit:
Lorraine De Maria a écrit:
I sent a question early about the sleeves (armholes) and I see others have wrote for help on the same subject and I have been crocheting for years and I am still confused- one answer is saying to decrease - the other is saying count the stitches half way to the next corner and chain that amount - then attach it where? and which one is it?
15.10.2015 - 22:10DROPS Design a répondu:
Dear Mrs De Maria, when working armhole, work as before until first corner, then work 3 dc+3 ch+ 3 dc in corner (as before), then crochet a ch to create armhole (number of ch = number of sts skipped from 1st corner to the middle of the side between 1st and 2nd corner), and continue as before and repeat armhole between 3rd and 4th corner: work from 3rd corner as before to middle of side between both corners, ch same number of ch as for 1st armhole and 3dc,3ch,3dc in 4th corner, then work as before to the beg of round. Happy crocheting!
16.10.2015 - 09:24
![]() Lorraine De Maria a écrit:
Lorraine De Maria a écrit:
I bought the yarn for the drops Pattern (around the world) I had no trouble with it until I got to the Sleeves - I don't understand - do I just do a DC and then ch 3 in each of the corners on the square of the Pattern instead of the 3dc, ch3 and 3dc??
15.10.2015 - 21:20DROPS Design a répondu:
Dear Mrs De Maria, on 1st round of sleeve, work around armhole, ie in last row on square (skipped sts when working armhole) + in the ch/1st row after armhole and work around 1 dc in each ch-space with 3 ch between each dc. Happy crocheting!
16.10.2015 - 09:14
![]() Helen a écrit:
Helen a écrit:
Please can to tell me where I can find instructions on how to do a crochet tension square. In relation to this pattern. As I can only find how too do Knitted ones.
14.10.2015 - 14:20DROPS Design a répondu:
Dear Helen, you can work the first 7 rounds to check your tension as stated on the tab "materials" at the right side of the picture. Happy crocheting!
14.10.2015 - 16:42Kathie a écrit:
This is the most confusing pattern I have ever tried to follow. No matter how many times I start over I end up with an extra DC and Ch 3 space on the final side of the A-1 Diagram. It does not matter if I follow the written pattern or the chart. If this is so easily written I would think that you would just make a video of how to do the actual pattern instead of videos just showing the stitches that are used.
01.10.2015 - 02:35
|
||||||||||||||||||||||
Around the World#aroundtheworldcardigan |
||||||||||||||||||||||
 |
 |
|||||||||||||||||||||
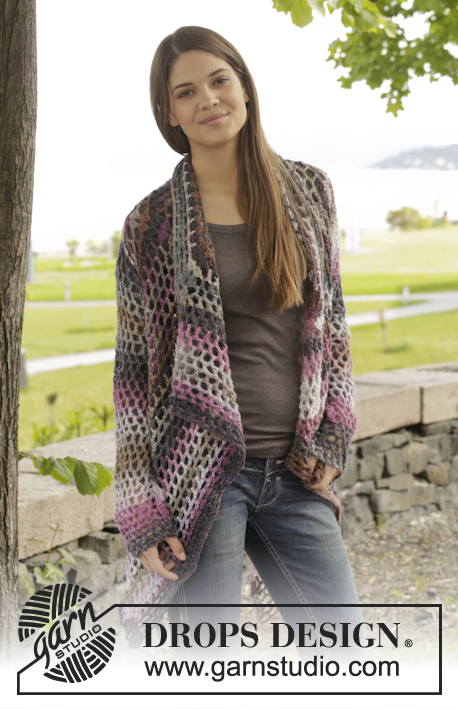
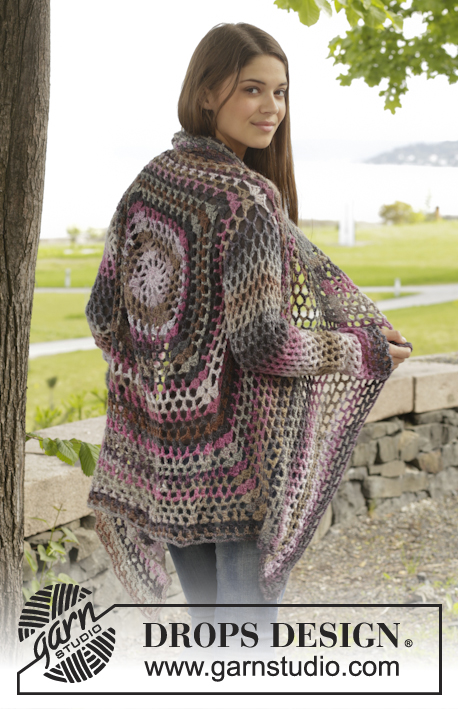
Veste ajourée DROPS au crochet, en ”Big Delight”. Du S au XXXL
DROPS 156-42 |
||||||||||||||||||||||
|
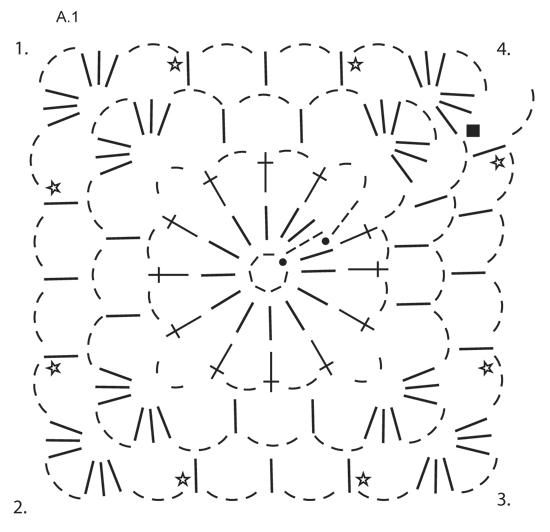
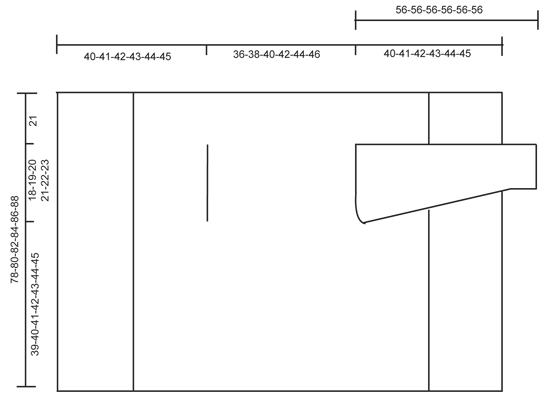
POINT FANTAISIE: Voir diagramme A.1. DIMINUTIONS (manches): Diminuer 1 motif (= 1 B + 3 ml) en ne faisant pas les ml, mais écouler 2 B ainsi: Crocheter 1 B mais ne pas faire le dernier jeté (= 2 boucles sur le crochet), crocheter ensuite la B suiv mais au dernier jeté, écouler toutes les boucles sur le crochet. ---------------------------------------------------------- DOS & DEVANTS: Se crochètent en rond, à partir du milieu dos. Monter une chaînette de 6 ml avec le crochet 5 en Big Delight et joindre en rond avec 1 mc dans la 1ère ml. Crocheter en suivant le diagramme A.1, c’est-à-dire ainsi: TOUR 1: 3 ml, 13 B dans le rond de ml, terminer par 1 mc dans la 3ème ml du début du tour. TOUR 2: 5 ml, sauter 1 B, 1 B dans la B suivante, *2 ml, 1 B dans la B suivante *, répéter de *-* tout le tour, terminer par 2 ml = 12 B + 2 ml. TOUR 3: Crocheter maintenant le cercle en un carré, c’est-à-dire crocheter ainsi: 3 B + 3 ml + 3 B (= coin) dans le 1er arceau, 3 ml, 1 B dans l’arceau suivant, 3 ml, 1 B dans l’arceau suivant, 3 ml, *3 B + 3 ml + 3 B (= coin) dans l’arceau suivant, 3 ml, 1 B dans l’arceau suivant, 3 ml, 1 B dans l’arceau suivant, 3 ml*, répéter de *-* 3 fois au total, 1 B dans l’arceau suivant (= 2 dernières ml du tour précédent), 3 ml. TOUR 4: 3 B + 3 ml + 3 B (= coin) dans le 1er arceau, *3 ml, 1 B dans l’arceau suivant, 3 ml, 1 B dans l’arceau suivant, 3 ml, 1 B dans l’arceau suivant, 3 ml, 3 B + 3 ml + 3 B (= coin) dans l’arceau suivant*, répéter de *-* 3 fois au total, 3 ml, 1 B dans l’arceau suivant, 3 ml, 1 B dans l’arceau suivant, 3 ml, 1 B dans l’arceau suivant, 3 ml, 1 B dans l’arceau suivant, 3 ml. PENSER À BIEN CONSERVER LA MÊME TENSION QUE POUR L’ÉCHANTILLON! Répéter le tour 4 avec les augmentations, c’est-à-dire crocheter 1 B + 3 ml en plus entre chaque coin tous les tour (= 4 augmentations par tour) EN MÊME TEMPS, tous les 6 tours, augmenter 1 B + 3 ml en plus de chaque côté des coins - voir étoile dans le diagramme (= 8 augmentations en plus par tour). Continuer ainsi jusqu’à ce que le carré mesure 36-38-40-42-44-46 cm x 36-38-40-42-44-46 cm. Crocheter maintenant les emmanchures ainsi: continuer comme avant jusqu'au 1er coin, crocheter 3 B + 3 ml + 3 B dans l'arceau du coin. Crocheter maintenant des ml jusqu'au milieu du côté suivant (c'est-à-dire au milieu entre le 1er et le 2ème coin) ainsi: 1 ml pour chaque ml/B sautée. Continuer ensuite comme avant jusqu'au milieu entre le 3ème et le 4ème coin. Crocheter maintenant des ml jusqu'au début du tour ainsi: 1 ml pour chaque ml/B sautée. Au tour suivant, crocheter et augmenter comme avant sur toutes les mailles, et dans les chaînettes des emmanchures. Continuer ainsi jusqu’à ce que le carré mesure 78-80-82-84-86-88 cm x 78-80-82-84-86-88 cm (c’est-à-dire 21 cm depuis les emmanchures dans toutes les tailles). Arrêter. DEVANTS: Crocheter maintenant en allers et retours entre le 1er et le 2ème coin. NOTE! Crocheter le devant sans augmenter. 1er RANG: Crocheter à partir du 1er coin ainsi: 3 B dans l'arceau du coin, * 3 ml, 1 B dans l'arceau*, répéter de *-* et terminer par 3 ml et 3 B dans le coin. 2ème RANG: Tourner et crocheter ainsi: 1 B dans chacune des 3 premières B, *1 B dans l'arceau, 3 ml*, répéter de *-* et terminer par 1 B dans le dernier arceau et 1 B dans chacune des 3 B. 3ème RANG: Tourner et crocheter ainsi: 1 B dans chacune des 3 premières B, * 3 ml, 1 B dans le dernier arceau*, répéter de *-* et terminer par 3 ml et 1 B dans chacune des 3 dernières B. Continuer en répétant les rangs 2 et 3 ainsi jusqu'à ce que 19-20-21-22-23-24 cm aient été crochetés en allers et retours, arrêter. Répéter de l’autre côté: crocheter maintenant en allers et retours à partir du 3ème coin jusqu’au 4ème coin. Terminer par un tour tout autour du carré, comme avant, mais dans l’arceau dans chaque coin crocheter 6 B. Arrêter. MANCHES: Se crochètent en rond, de haut en bas, à partir des emmanchures, en commençant au milieu sous la manche, sur l’endroit. TOUR 1: 6 ml (= 1 B + 3 ml), *1 B dans l’arceau suivant, 3 ml*, répéter de *-* 16-17-18-19-20-21 fois au total, terminer par 1 mc dans la 3ème ml. TOUR 2: 5 ml, *1 B dans l’arceau suivant, 3 ml*, répéter de *-* 16-17-18-19-20-21 fois au total, 1 ml, terminer par 1 mc dans la 3ème ml au début du tour. Répéter les tours 1 et 2 - EN MÊME TEMPS, diminuer 1 B + 3 ml au début du 4ème-6ème-6ème-8ème-8ème-6ème tour en écoulant 2 B ens – VOIR DIMINUTIONS – au milieu sous la manche. Répéter ces diminutions tous les 6-6-6-4-4-4 tours = 12-12-13-13-14-14 B. Continuer en rond sans diminuer jusqu’à ce que la manche mesure environ 56 cm dans toutes les tailles. Arrêter. Crocheter l'autre manche de la même façon. |
||||||||||||||||||||||
Légende diagramme(s) |
||||||||||||||||||||||
|
||||||||||||||||||||||
 |
||||||||||||||||||||||
 |
||||||||||||||||||||||
Vous avez terminé ce modèle?Alors taguez vos photos avec #dropspattern #aroundtheworldcardigan ou bien présentez-les dans la galerie #dropsfan Vous avez besoin d'aide pour ce modèle ?Vous trouverez 7 tutoriels vidéo, une rubrique commentaires/questions et plus encore en vous rendant sur la page du modèle sur garnstudio.com © 1982-2026 DROPS Design A/S. Tous droits réservés. Ce document, y compris ces sous-sections, est protégé par les droits d'auteur (copyright). Apprenez-en davantage sur ce que vous pouvez faire avec nos modèles en bas de chacune des pages de notre site. |
||||||||||||||||||||||


Avec plus de 40 ans dans la conception de modèles tricot et crochet, DROPS Design offre l'une des plus vastes collections de modèles gratuits sur internet - traduits dans 17 langues. À ce jour, on compte 324 catalogues et 12290 modèles en français.
Nous nous efforçons de vous apporter le meilleur de ce que le tricot et le crochet peuvent vous offrir, inspiration et conseils mais également des fils de haute qualité à des prix incroyables! Vous souhaiteriez utiliser nos modèles autrement que pour un usage personnel? Vous pouvez lire ce que vous êtes autorisés à faire dans le Copyright en bas de page de chacun de nos modèles. Bon tricot!
Poster un commentaire sur le modèle DROPS 156-42
Nous aimerions connaître votre avis sur ce modèle !
Si vous souhaitez poser une question, merci de bien vouloir vérifier que vous avez choisi la bonne catégorie dans le formulaire ci-dessous afin d'accélérer la réponse. Les champs obligatoires sont indiqués par une *.