
Catégories populaires
Vous cherchez un fil?


Commentaires / Questions (127)
![]() Loele Van Den Bergh a écrit:
Loele Van Den Bergh a écrit:
Kan iemand mij uitleggen hoe de mouwen gehaakt worden. Ik begrijp het principe wel, maar als ik op de goede kant haak en met de 5 losse de nieuwe toeren begin loopt de hele mindering gedraaid over de voorkant van de mouw. Ik heb overigens ook meer losse bogen dan aangegeven in het patroon. Dit kan ik oplossen door midden onder te minderen maar hoe voorkom ik dat het begin van de rondes over de mouw lopen?
03.01.2016 - 18:02DROPS Design a répondu:
Hoi Loele. Je moet ervoor zorgen, dat de minderingen steeds op dezelfde plek worden gemaakt. Het lijkt dat je de minderingen op de toer opschuift waardoor ze zich verplaatsen en het mouw "draait". Ik zou ook kijken of je het patroon volgt zodat er niet steeds meer bogen komen.
05.01.2016 - 15:39
![]() Yvonne Pottgießer-Bündgen a écrit:
Yvonne Pottgießer-Bündgen a écrit:
Meine Frage vom 20.12.15 wurde leider noch nicht beantwortet. Darf ich mich nochmal in Erinnerung rufen? Vielen Dank.
30.12.2015 - 17:33DROPS Design a répondu:
Sie müssen bis zur Mitte einer Seite des Quadrats häkeln, Sie häkeln also die Hälfte dieser Seite, dann überspringen Sie den Rest der Seite (also die andere Hälfte), indem Sie statt der Maschen die entsprechende Anzahl an Luftmaschen häkeln. Die Ecke häkeln Sie dann wieder normal und wiederholen das Ganze dann an der gegenüberliegenden Seite. Die Armausschnitte umfassen also jeweils die Hälfte einer Seite.
05.01.2016 - 19:18
![]() Christine Hohenstein a écrit:
Christine Hohenstein a écrit:
Are any further questions being answered????? I have a customer waiting on this item to be made. Can someone else help me if the creator isnt available to help me?
29.12.2015 - 16:55DROPS Design a répondu:
Dear Mrs Hohenstein, please find answer below and thank you very much for your patience. Happy crocheting!
02.01.2016 - 15:17
![]() Christine Hohenstein a écrit:
Christine Hohenstein a écrit:
I am so confused as to how to do the sleeve. I got the first corner done. But from there I do not understand the written instructions I have also read many comments and answers and am still confused is there anyway that you can try and in a very simple way explain how to do the first side including the first sleeve? Please and thank you
27.12.2015 - 21:39DROPS Design a répondu:
Dear Mrs Hohenstein, to shape armholes, work to 1st corner, work 3 dc+3ch+3 dc in corner, then you will work a chain to shape the hole for the sleeve as follows: count number of sts from the 1st corner to the middle of side between 1st and 2nd corner and chain this number of sts, continue working as before from middle of this side to 2nd corner, continue as before to the 3rd corner, then work as before from the corner to the mid of side between 3rd and 4th corner, you will now skip the next sts to the 4th corner and replace these skipped sts by a chain of the number of skipped sts. Finish round as before. Happy crocheting!
02.01.2016 - 14:19
![]() Yvonne Pottgießer-Bündgen a écrit:
Yvonne Pottgießer-Bündgen a écrit:
Ich habe Probleme mit den Ärmelausschnitten. Verstehe ich das richtig, dass ich ein Stäbchen gehäkelt habe, dann 3 Lfm + nochmal 3 Lfm um das nächste Stb.zu überspringen,dann wieder 3 Lfm und das nächste Stb häkele? Wenn ja, wie wiederhole ich dass in der nächsten Runde? Verdoppele ich die Lfm zum überspringen, da ja auch der Luftmaschenbogen breiter ist? Ich hoffe, ich habe mich einigermaßen verständlich ausgedrückt. Vielen Dank.
20.12.2015 - 18:15DROPS Design a répondu:
Antwort siehe oben!
25.01.2016 - 11:09
![]() Tara a écrit:
Tara a écrit:
Sorry, I wasn't talking about the armholes, but the sides. It's under the "Front Piece" section of the pattern.
18.11.2015 - 02:35DROPS Design a répondu:
Dear Tara and sorry, my mistake - the 2nd front piece is worked as you did for the first side but this time crochet between the 3rd and 4th corner (seen from RS): crochet row 1 starting in the 3rd corner and finishing in the 4th corner. Happy crocheting!
18.11.2015 - 09:44
![]() Tara a écrit:
Tara a écrit:
This is under the Front section: Repeat on the other side, now work back and forth from third to fourth corner. So am I working this on 3 out of 4 sides? If so, on the bottom side, do I go all the way to the front corners or just the middle to connect the sides (which would not make the sides any longer in front)? I hope this makes sense. I appreciate the help!
17.11.2015 - 14:32DROPS Design a répondu:
Dear Tara, first armhole is worked between 1st corner and middle of side before 2nd corner, 2nd armhole is worked from middle of side after 3rd corner (work to the middle of the side as before) to the 4th corner (ch same number of ch you crocheted for 1st armhole and skip same number of sts as for 1st armhole). Happy crocheting!
17.11.2015 - 16:39
![]() Tara a écrit:
Tara a écrit:
I have read through all the comments and I am confused on Lauren's question. She said that on the 4th side there is an extra DC + 3ch but you said there should not be. However, in the diagram if you count the DC lines it shows 4 on the 4th side and 3 on the other side. When does this get straightened out to be an equal number of DC's on each side? Thanks in advance.
11.11.2015 - 03:10DROPS Design a répondu:
Dear Tara, your question has been forwarded. Thank you in advance for your patience and comprehension.
12.11.2015 - 09:49Helen Watt a écrit:
Hi there! I would like some clarification regarding the increase on the body after the chain for the armhole. The pattern reads"On next round work pattern and inc as before OVER ALL STS, also in ch for armholes." To increase over all sts would make the garment very large? I assume this is incorrect and the increase is the same as previous to the making the armhole. Therefore increasing every 6th row? I just want to make sure that this is correct.
05.11.2015 - 10:06DROPS Design a répondu:
Dear Mrs Watt, yes that's correct, you continue as before and increase as you did before (= continue increasing every 6h row). Happy crocheting!
05.11.2015 - 10:27
![]() Sarah a écrit:
Sarah a écrit:
I am not sure what to do on round 5, it says to increase on each corner, which is a total of 4 increases? Correct? Where do i increase and do i still do the extra treble and chain 3 in the last chain space?
01.11.2015 - 17:42DROPS Design a répondu:
Dear Sarah, on round 5 continue as before (there will be 3 ch, 1 tr more between corners), and on round 6 start inc with 1 tr + 3 ch more in every place with a star in the diagram. Happy crocheting!
02.11.2015 - 09:22
|
||||||||||||||||||||||
Around the World#aroundtheworldcardigan |
||||||||||||||||||||||
 |
 |
|||||||||||||||||||||
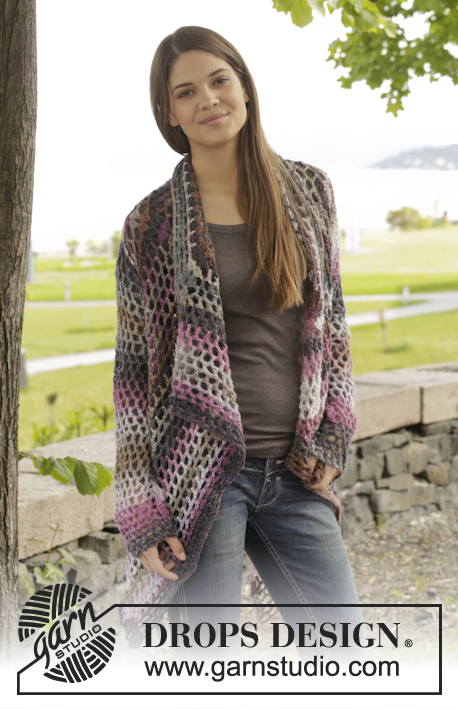
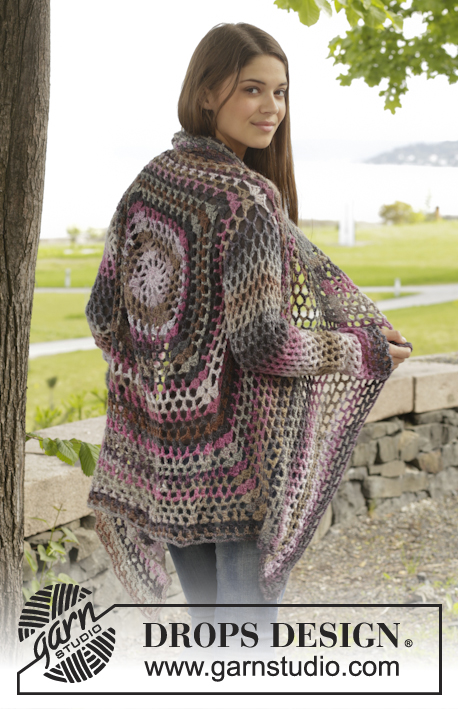
Veste ajourée DROPS au crochet, en ”Big Delight”. Du S au XXXL
DROPS 156-42 |
||||||||||||||||||||||
|
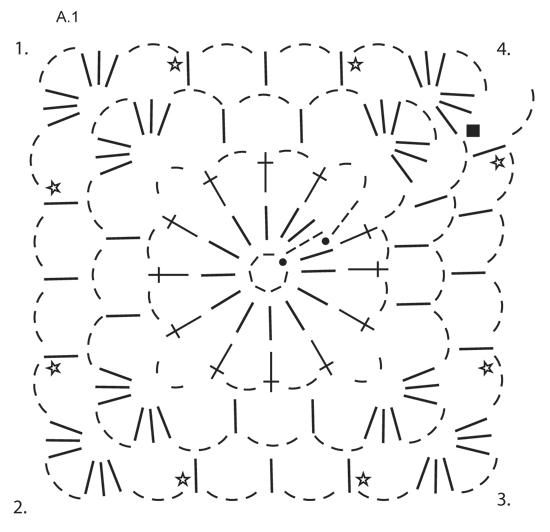
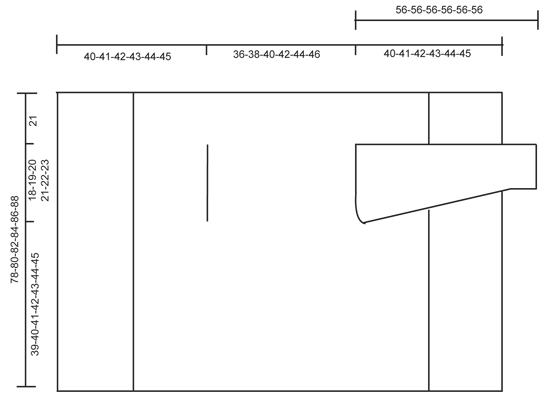
POINT FANTAISIE: Voir diagramme A.1. DIMINUTIONS (manches): Diminuer 1 motif (= 1 B + 3 ml) en ne faisant pas les ml, mais écouler 2 B ainsi: Crocheter 1 B mais ne pas faire le dernier jeté (= 2 boucles sur le crochet), crocheter ensuite la B suiv mais au dernier jeté, écouler toutes les boucles sur le crochet. ---------------------------------------------------------- DOS & DEVANTS: Se crochètent en rond, à partir du milieu dos. Monter une chaînette de 6 ml avec le crochet 5 en Big Delight et joindre en rond avec 1 mc dans la 1ère ml. Crocheter en suivant le diagramme A.1, c’est-à-dire ainsi: TOUR 1: 3 ml, 13 B dans le rond de ml, terminer par 1 mc dans la 3ème ml du début du tour. TOUR 2: 5 ml, sauter 1 B, 1 B dans la B suivante, *2 ml, 1 B dans la B suivante *, répéter de *-* tout le tour, terminer par 2 ml = 12 B + 2 ml. TOUR 3: Crocheter maintenant le cercle en un carré, c’est-à-dire crocheter ainsi: 3 B + 3 ml + 3 B (= coin) dans le 1er arceau, 3 ml, 1 B dans l’arceau suivant, 3 ml, 1 B dans l’arceau suivant, 3 ml, *3 B + 3 ml + 3 B (= coin) dans l’arceau suivant, 3 ml, 1 B dans l’arceau suivant, 3 ml, 1 B dans l’arceau suivant, 3 ml*, répéter de *-* 3 fois au total, 1 B dans l’arceau suivant (= 2 dernières ml du tour précédent), 3 ml. TOUR 4: 3 B + 3 ml + 3 B (= coin) dans le 1er arceau, *3 ml, 1 B dans l’arceau suivant, 3 ml, 1 B dans l’arceau suivant, 3 ml, 1 B dans l’arceau suivant, 3 ml, 3 B + 3 ml + 3 B (= coin) dans l’arceau suivant*, répéter de *-* 3 fois au total, 3 ml, 1 B dans l’arceau suivant, 3 ml, 1 B dans l’arceau suivant, 3 ml, 1 B dans l’arceau suivant, 3 ml, 1 B dans l’arceau suivant, 3 ml. PENSER À BIEN CONSERVER LA MÊME TENSION QUE POUR L’ÉCHANTILLON! Répéter le tour 4 avec les augmentations, c’est-à-dire crocheter 1 B + 3 ml en plus entre chaque coin tous les tour (= 4 augmentations par tour) EN MÊME TEMPS, tous les 6 tours, augmenter 1 B + 3 ml en plus de chaque côté des coins - voir étoile dans le diagramme (= 8 augmentations en plus par tour). Continuer ainsi jusqu’à ce que le carré mesure 36-38-40-42-44-46 cm x 36-38-40-42-44-46 cm. Crocheter maintenant les emmanchures ainsi: continuer comme avant jusqu'au 1er coin, crocheter 3 B + 3 ml + 3 B dans l'arceau du coin. Crocheter maintenant des ml jusqu'au milieu du côté suivant (c'est-à-dire au milieu entre le 1er et le 2ème coin) ainsi: 1 ml pour chaque ml/B sautée. Continuer ensuite comme avant jusqu'au milieu entre le 3ème et le 4ème coin. Crocheter maintenant des ml jusqu'au début du tour ainsi: 1 ml pour chaque ml/B sautée. Au tour suivant, crocheter et augmenter comme avant sur toutes les mailles, et dans les chaînettes des emmanchures. Continuer ainsi jusqu’à ce que le carré mesure 78-80-82-84-86-88 cm x 78-80-82-84-86-88 cm (c’est-à-dire 21 cm depuis les emmanchures dans toutes les tailles). Arrêter. DEVANTS: Crocheter maintenant en allers et retours entre le 1er et le 2ème coin. NOTE! Crocheter le devant sans augmenter. 1er RANG: Crocheter à partir du 1er coin ainsi: 3 B dans l'arceau du coin, * 3 ml, 1 B dans l'arceau*, répéter de *-* et terminer par 3 ml et 3 B dans le coin. 2ème RANG: Tourner et crocheter ainsi: 1 B dans chacune des 3 premières B, *1 B dans l'arceau, 3 ml*, répéter de *-* et terminer par 1 B dans le dernier arceau et 1 B dans chacune des 3 B. 3ème RANG: Tourner et crocheter ainsi: 1 B dans chacune des 3 premières B, * 3 ml, 1 B dans le dernier arceau*, répéter de *-* et terminer par 3 ml et 1 B dans chacune des 3 dernières B. Continuer en répétant les rangs 2 et 3 ainsi jusqu'à ce que 19-20-21-22-23-24 cm aient été crochetés en allers et retours, arrêter. Répéter de l’autre côté: crocheter maintenant en allers et retours à partir du 3ème coin jusqu’au 4ème coin. Terminer par un tour tout autour du carré, comme avant, mais dans l’arceau dans chaque coin crocheter 6 B. Arrêter. MANCHES: Se crochètent en rond, de haut en bas, à partir des emmanchures, en commençant au milieu sous la manche, sur l’endroit. TOUR 1: 6 ml (= 1 B + 3 ml), *1 B dans l’arceau suivant, 3 ml*, répéter de *-* 16-17-18-19-20-21 fois au total, terminer par 1 mc dans la 3ème ml. TOUR 2: 5 ml, *1 B dans l’arceau suivant, 3 ml*, répéter de *-* 16-17-18-19-20-21 fois au total, 1 ml, terminer par 1 mc dans la 3ème ml au début du tour. Répéter les tours 1 et 2 - EN MÊME TEMPS, diminuer 1 B + 3 ml au début du 4ème-6ème-6ème-8ème-8ème-6ème tour en écoulant 2 B ens – VOIR DIMINUTIONS – au milieu sous la manche. Répéter ces diminutions tous les 6-6-6-4-4-4 tours = 12-12-13-13-14-14 B. Continuer en rond sans diminuer jusqu’à ce que la manche mesure environ 56 cm dans toutes les tailles. Arrêter. Crocheter l'autre manche de la même façon. |
||||||||||||||||||||||
Légende diagramme(s) |
||||||||||||||||||||||
|
||||||||||||||||||||||
 |
||||||||||||||||||||||
 |
||||||||||||||||||||||
Vous avez terminé ce modèle?Alors taguez vos photos avec #dropspattern #aroundtheworldcardigan ou bien présentez-les dans la galerie #dropsfan Vous avez besoin d'aide pour ce modèle ?Vous trouverez 7 tutoriels vidéo, une rubrique commentaires/questions et plus encore en vous rendant sur la page du modèle sur garnstudio.com © 1982-2026 DROPS Design A/S. Tous droits réservés. Ce document, y compris ces sous-sections, est protégé par les droits d'auteur (copyright). Apprenez-en davantage sur ce que vous pouvez faire avec nos modèles en bas de chacune des pages de notre site. |
||||||||||||||||||||||


Avec plus de 40 ans dans la conception de modèles tricot et crochet, DROPS Design offre l'une des plus vastes collections de modèles gratuits sur internet - traduits dans 17 langues. À ce jour, on compte 324 catalogues et 12290 modèles en français.
Nous nous efforçons de vous apporter le meilleur de ce que le tricot et le crochet peuvent vous offrir, inspiration et conseils mais également des fils de haute qualité à des prix incroyables! Vous souhaiteriez utiliser nos modèles autrement que pour un usage personnel? Vous pouvez lire ce que vous êtes autorisés à faire dans le Copyright en bas de page de chacun de nos modèles. Bon tricot!
Poster un commentaire sur le modèle DROPS 156-42
Nous aimerions connaître votre avis sur ce modèle !
Si vous souhaitez poser une question, merci de bien vouloir vérifier que vous avez choisi la bonne catégorie dans le formulaire ci-dessous afin d'accélérer la réponse. Les champs obligatoires sont indiqués par une *.