
Catégories populaires
Vous cherchez un fil?


Commentaires / Questions (147)
![]() Anna a écrit:
Anna a écrit:
Hoi , de rechterkant is klaar. Erg mooi! Maar nu de linkerkant, tot en met de eerste naald snap ik. Is het zo dat je nu het patroon breit op de achterkant en de voorkant gewoon volgt? En bij A1 krijg ik aan de voorkant de ene omslag goed maar de andere omslag gaat de verkeerde kant op ! Wat doe ik fout? Alvast bedankt Anna
10.09.2015 - 18:35DROPS Design a répondu:
Hoi Anna. Je begint met het breien van de 2e nld (verkeerde kant) en breit eerst de 2e nld van A.1 en A.3, maar het zou helemaal geen verschil maken hoe je het patroon op de goede kant breit, dus het omslag zou ook niet de verkeerde kant op gaan.
11.09.2015 - 14:05
![]() Nicky a écrit:
Nicky a écrit:
Hallo, ich bin da auch gestolpert. Bin immer wieder an der Anleitung an einer Stelle gescheitert. Wie unten vom Team schon aufgezählt wurde: * stricken Sie 5 kraus re, 2 re, 3 li, 2 re, A.1, 1 re, A.2A-A.2C, 2 re wenden und stricken zurück usw. Allerdings steht hier in der Schriftlichen Anleitung: * 2 M re, A.1 (= 23 M) ***(hier wenden)***, 1 M re, A.2A, A.2 B über die nächsten 8-14-20 M, A.2 C, 2 M re (hier wenden) Da ist doch ein *Wenden* (das mit den 3 Sternen) zu viel oder? Grüße Nicky
10.08.2015 - 02:34DROPS Design a répondu:
Es gibt ein Video zu den verkürzten R dieser Jacke, vielleicht schauen Sie sich das mal an, das erklärt vieles besser, Sie finden es im Kopf neben dem Foto unter Videos, es heißt "Stricken: Verkürzte Reihen und Muster für die Kreisjacke 154-8". Wenn noch Fragen offen sind, fragen Sie gerne wieder.
16.08.2015 - 18:30
![]() Hannah a écrit:
Hannah a écrit:
So on the left side, the first row is knit every stitch? Ok, got it. thank you.
13.05.2015 - 15:47
![]() Hannah a écrit:
Hannah a écrit:
Thank you. I finally figured it out. It's a bit long winded but I got there. When knit the left back, it says work 1 row, then pattern. When Starting the LEFT side it says knit 1 row. Am I right in thinking this 1st row will be...... K5gs P2, K3, P2, A1(23sts), K1, A3A, A3B (8sts), A3C, K2, A1, K2 P3 K2 K5gs? Then start on row 2 of the pattern knitting 10sts, turn etc. Am I right?
13.05.2015 - 15:29DROPS Design a répondu:
Dear Hannah, the pattern is correct as written, but short rows are worked from WS too, ie work 1st row from WS: K5 garter st, P2, K3, turn and work return row from RS, and continue short rows as for right piece, but turning on row from WS. Happy knitting!
13.05.2015 - 16:19
![]() Hannah a écrit:
Hannah a écrit:
Thank you. I finally figured it out. It's a bit long winded but I got there. When knit the left back, it says work 1 row, then pattern. Do I work the 7th row of the the pattern - all 86 stitches? And I knit A.1 and A.3 Left to right? Then I start the next row on row 2 of the pattern on the 10 stitches, then turn etc? Am I right?
12.05.2015 - 20:59
![]() Hannah a écrit:
Hannah a écrit:
Thank you. I finally figured it out. It's a bit long winded but I got there. When knit the left back, it says work 1 row, then pattern. Do I work the 7th row of the the pattern - all 86 stitches? And I knit A.1 and A.3 Left to right? Then I start the next row on row 2 of the pattern on the 10 stitches, then turn etc? Am I right?
12.05.2015 - 19:09
![]() Hannah a écrit:
Hannah a écrit:
Thank you. I finally figured it out. It's a bit long winded but I got there. When knit the left back, it says work 1 row, then pattern. Do I work 1 full row? And I knit A.1 Left to right - am I right?
12.05.2015 - 16:38DROPS Design a répondu:
Dear Hannah, on left piece, K 1 row from RS over all sts, then start short rows and pattern from WS, ie starting on 2nd row in A.1 and A.3. Happy knitting!
13.05.2015 - 09:32
![]() Hannah a écrit:
Hannah a écrit:
Hi, I have never knitted a drops pattern before, I am used to knitting the patterns that tell you how to work each row; so I'm a bit confused as to what I need to do. So far I have cast on 86 stitches and knitted 2 rows in garter stitch. What do I have to do next?
12.05.2015 - 13:05DROPS Design a répondu:
Dear Hannah, you then continue working in pattern and short rows at the same time: 2 rows over 10 sts (=5 sts in garter st, K 2, P 3), then 2 rows over 35 sts = the first 10 sts + K 2, A.1 (= 23 sts), then 2 rows over 51 sts = the first 35 sts + K 1, A.2A, A.2 B over the next 8 sts, A.2 C, K 2 and 2 rows over all sts = the first 51 sts + A.1(= 23 sts), K 2, P 3, K 2, 5 sts in garter st. Happy knitting!
12.05.2015 - 13:26
![]() Angelique a écrit:
Angelique a écrit:
Hallo, ik heb het parroon succesvol doorlopen en het is prachtig. Ik weet helaas niet goed hoe ik het in elkaar moet zetten. Wanneer ik de opzet- en afkantrand aan elkaar zet kan ik er toch geen vest meer van maken? Ik hoop dat julioe een andere manier hebben om het uit te leggen. Bvd Angelique
28.04.2015 - 20:16DROPS Design a répondu:
Hoi Angelique. Je naait eerst de opzetrand samen met de afkantrand - dat doe je op beide delen. Dan krijg je twee delen (mouw + voorpand en helft achterpand) zoals te zien op de maattekening onderaan. Je naait deze twee aan elkaar zoals beschreven
29.04.2015 - 13:55
![]() Marlies Batz a écrit:
Marlies Batz a écrit:
Hallo, ich habe leichte Schwierigkeiten mit der Anleitung für SUMMER SNUG. Sind die Rückreihen nicht mit angegeben? ( Die Maschen werden dann sicherlich so gestrickt wie sie erscheinen, ausser die Krausrippen.) Ansonsten macht die Anleitung für mich leider keinen Sinn. Über eine Antwort freue ich mich sehr. Viele Grüße Marlies Batz
23.02.2015 - 19:01DROPS Design a répondu:
Es sind alle R in den Diagrammen eingezeichnet, auch die Rück-R. Da wir schon einige Verständnisfragen bei diesem Modell hatten, möchte ich Sie bitten, sich die vorherigen deutschen Fragen und Antworten in dieser Kommentarliste durchzulesen, vielleicht wird dann einiges klarer. Ansonsten können Sie aber natürlich gerne weiter fragen, die Jacke soll Ihnen ja gut gelingen!
24.02.2015 - 22:42
|
||||||||||||||||
Summer Snug#summersnugjacket |
||||||||||||||||
 |
 |
|||||||||||||||
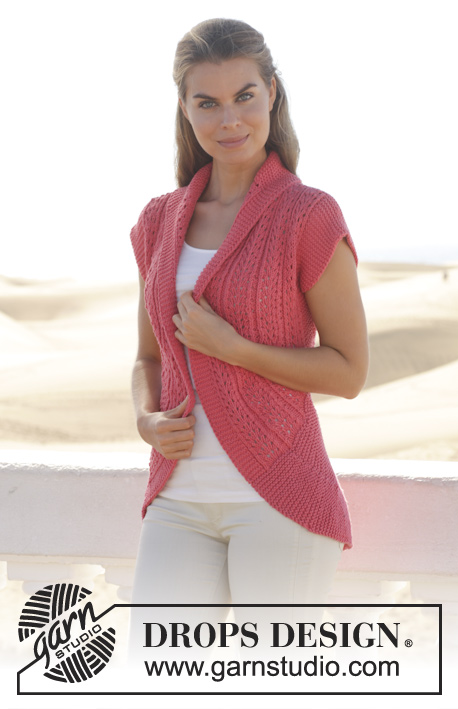
Veste ajourée DROPS tricotée en cercles, en ”Paris”. Du S au XXXL.
DROPS 154-8 |
||||||||||||||||
|
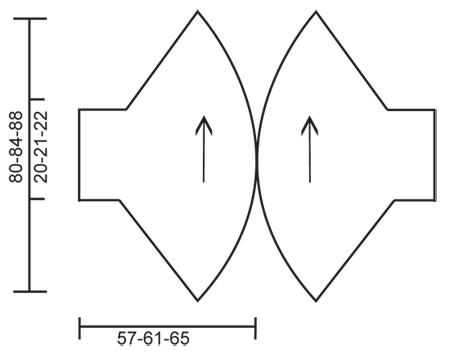
POINT MOUSSE (en allers et retours) : Tricoter tous les rangs à l'endroit. 1 côte mousse = 2 rangs end. POINT FANTAISIE : Voir diagrammes A.1 à A.3. Les diagrammes montrent tous les rangs du point fantaisie, vus sur l'endroit. RANGS RACCOURCIS : * Tricoter 1 rang sur les 10 premières m, tourner et tricoter le rang retour. Tricoter 1 rang sur les 35 premières m, tourner et tricoter le rang retour. Tricoter 1 rang sur les 51-57-63 premières m, tourner et tricoter le rang retour. Tricoter 1 rang sur toutes les mailles, tourner et tricoter le rang retour*. Répéter de *-*, c'est-à-dire 8 rangs au plus large et 2 rangs au plus étroit pour 1 série des rangs raccourcis. ---------------------------------------------------------- DEVANT DROIT /DOS : Se tricote en allers et retours sur aiguille circulaire. Monter 86-92-98 m sur l'aiguille circulaire 6 en Paris. Tricoter 1 côte au POINT MOUSSE - voir ci-dessus. Continuer ensuite en point fantaisie, EN MÊME TEMPS, tricoter en RANGS RACCOURCIS – voir ci-dessus (1er rang = sur l'endroit): 5 m au point mousse, 2 m end, 3 m env, (tourner ici), 2 m end, A.1 (= 23 m) (tourner ici), 1 m end, A.2A, A.2 B au-dessus des 8-14-20 m suiv, A.2 C, 2 m end, (tourner ici), A.1(= 23 m), 2 m end, 3 m env, 2 m end, 5 m au point mousse. Continuer en point fantaisie ainsi jusqu'à ce que l'ouvrage mesure 40-42-44 cm au plus étroit et 160-168-176 cm au plus large. Tricoter 1 côte mousse sur toutes les mailles et rabattre. DEVANT GAUCHE /DOS : Se tricote en allers et retours sur aiguille circulaire. Monter 86-92-98 m sur l'aiguille circulaire 6 en Paris. Tricoter 1 côte au POINT MOUSSE - voir ci-dessus. Tricoter 1 rang end sur l'endroit et continuer ensuite en point fantaisie, EN MÊME TEMPS tricoter en RANGS RACCOURCIS – voir ci-dessus (1er rang = sur l'envers - NOTE: Commencer au 2ème rang de A.1 et A.3): 5 m au point mousse, 2 m env, 3 m end, (tourner ici), 2 m env, A.1 (= 23 m), (tourner ici), 1 m env, A.3A, A.3 B au-dessus des 8-14-20 m suiv, A.3 C, 2 m env, (tourner ici), A.1 (= 23 m), 2 m env, 3 m end, 2 m env, 5 m au point mousse. Continuer en point fantaisie jusqu'à ce que l'ouvrage mesure 40-42-44 cm au plus étroit et 160-168-176 cm au plus large. Tricoter 1 côte mousse sur toutes les mailles et rabattre. ASSEMBLAGE : Coudre le rang de montage aux mailles rabattues. Placer les 2 pièces ensemble l'une contre l'autre pour que les 5 m au point mousse du côté le plus large se rejoignent, et coudre sur environ 58-62 cm au milieu dos, bord à bord – veiller à ce que la couture de chaque pièce soit au milieu sous la manche. |
||||||||||||||||
Légende diagramme(s) |
||||||||||||||||
|
||||||||||||||||
 |
||||||||||||||||
 |
||||||||||||||||
Vous avez terminé ce modèle?Alors taguez vos photos avec #dropspattern #summersnugjacket ou bien présentez-les dans la galerie #dropsfan Vous avez besoin d'aide pour ce modèle ?Vous trouverez 20 tutoriels vidéo, une rubrique commentaires/questions et plus encore en vous rendant sur la page du modèle sur garnstudio.com © 1982-2026 DROPS Design A/S. Tous droits réservés. Ce document, y compris ces sous-sections, est protégé par les droits d'auteur (copyright). Apprenez-en davantage sur ce que vous pouvez faire avec nos modèles en bas de chacune des pages de notre site. |
||||||||||||||||


Avec plus de 40 ans dans la conception de modèles tricot et crochet, DROPS Design offre l'une des plus vastes collections de modèles gratuits sur internet - traduits dans 17 langues. À ce jour, on compte 324 catalogues et 12290 modèles en français.
Nous nous efforçons de vous apporter le meilleur de ce que le tricot et le crochet peuvent vous offrir, inspiration et conseils mais également des fils de haute qualité à des prix incroyables! Vous souhaiteriez utiliser nos modèles autrement que pour un usage personnel? Vous pouvez lire ce que vous êtes autorisés à faire dans le Copyright en bas de page de chacun de nos modèles. Bon tricot!
Poster un commentaire sur le modèle DROPS 154-8
Nous aimerions connaître votre avis sur ce modèle !
Si vous souhaitez poser une question, merci de bien vouloir vérifier que vous avez choisi la bonne catégorie dans le formulaire ci-dessous afin d'accélérer la réponse. Les champs obligatoires sont indiqués par une *.