
Catégories populaires
Vous cherchez un fil?


Commentaires / Questions (147)
![]() Tina Nielsen a écrit:
Tina Nielsen a écrit:
Glemte lige noget... Hvordan kan det være der er ulige antal pinde i A1 og A2A mm man skal jo strikke vrang pinden tilbage eller læser jeg mønstret forkert?
19.06.2016 - 20:06DROPS Design a répondu:
Hej Tina. Jeg tror der er glemt noget der, men jeg ville strikke en vrang pind tilbage og saa starte paany.
24.06.2016 - 12:55
![]() Tina Nielsen a écrit:
Tina Nielsen a écrit:
Nu har jeg lavet de første 8 rk af A1 så der er 8 rk i den brede ende og to i den smalle ende. Starter jeg så forfra med 10 m og vend. Der er så 4 pinde tilbage af A1 fortsætter jeg bare der og det samme med de andre mønstre. Spørgsmålet er altså... Efter hver gang man har nået 8 pinde starter man så med 10m og vende 35 m og vend 51 m og vend alle masker og vend...? Håber i forstår mit spørgsmål...
19.06.2016 - 19:49DROPS Design a répondu:
Hej Tina. Du skal hele tiden fortsaette med vendinger og mönster som det kommer. Det betyder at du vil have flere gentagelser af A.1 i den ene side end i den anden. Saa det er at holde tungen lige i munden og eventuelt notere hvor du er i hvert mönster.
24.06.2016 - 12:54
![]() Barbara Kerr a écrit:
Barbara Kerr a écrit:
I found the pattern works if I did A2B for 10sts instead of 8 sts The video unfortunately fast forwards at that point
19.05.2016 - 20:12DROPS Design a répondu:
Dear Mrs Kerr, in A.2 (1st size), you work A.3A (= 3 sts), then A.2B (= 4 sts) a total of 2 times over the next 8 sts then finish with A.2C (= 2 sts) - on 1st row A.2C is similar as the last 2 sts in A.2B, but on row 2, you will have to work with A.2C over the last 3 sts in A.2. Happy knitting!
20.05.2016 - 10:53
![]() Barbara a écrit:
Barbara a écrit:
The cast on is 86, the stitch count is 83 10+25+9+4+25+10=83 Please help me to set it up correctly Thank you
16.05.2016 - 01:19DROPS Design a répondu:
Dear Barbara, you cast on 86 sts but then you have to work short rows, so you don't work on all the sts on needle: which is the point you've got stuck? Happy knitting!
16.05.2016 - 09:32Jirapannee Supratya a écrit:
The video shows upto 8 rows. How about the last 4rows of the work pattern 1set of A1. Do we start the work shot row right away with the work pattern OR we work 4 rows over all sts. and starting the work short row with the next repetition of 1st set of A1. Note: I understand that short row will be worked through out not only the 1set of work.
23.11.2015 - 13:38DROPS Design a répondu:
Dear Mrs Supratya, you will work following A.1 when working on these sts, so that both A.1 will be worked differently - follow each A.1 with the following row you are working on. Happy knitting!
23.11.2015 - 13:58Jirapannee Supratya a écrit:
Since the web not allow me to finish my question in one input, here is the 2nd question 2) The work SHORT ROW is an 8 rows set. ( 8rows at the widest and 2rows at the most narrow in 1 repetition) . The work pattern calls for 12 rows. When I finish the 8 rows , I will continue work 4 more rows over all sts before repeating the work pattern and work short row. Do I understand it correctly ? if not, pls help clarifying the next step.
22.11.2015 - 08:02DROPS Design a répondu:
Dear Mrs Supratya, the short rows are worked over 8 rows and are repeated all the way to shape the piece. Look at the video in the previous answer to figure out how to work. Happy knitting!
23.11.2015 - 09:54
![]() Ruth Jose a écrit:
Ruth Jose a écrit:
Thank you. wrap on wrong side! the purl row! going to buy the yarn tomorrow!
17.09.2015 - 03:11
![]() Ruth Jose a écrit:
Ruth Jose a écrit:
One more question! on left side, do I read the pattern from rt to left and start on a all purl row? which is row 2, and is it purl 2 tog and spp? I love Paris
16.09.2015 - 00:13DROPS Design a répondu:
Dear Ruth Jose, all rows with yo have to be done from RS. On right front piece, work row 1 from RS and start short rows from RS. On left front piece, K first 1 row from RS and work short rows beg with row 2 in A.1 and A.3. (nb: from RS: read diagram from the right towards the left, from WS: read from the left towards the right). Happy knitting!
16.09.2015 - 09:17
![]() Ruth Jose a écrit:
Ruth Jose a écrit:
Hi , Is this correct? Third turn K1(K1, K2T0G ,0 ,K2TOG, O, K2TOG ,O)X2, K2TOG,O,K2, ==19 STITCHES +35= 54 I should have 57???? Please help before I buy the yarn!
15.09.2015 - 00:16DROPS Design a répondu:
Dear Ruth Jose, when working 1st row in A.2 on 3rd turn, continue as follows after A.1 and first sts: K1, A.2A (= K1, K2 tog, YO), then work A.2B over the next 14 sts (repeat A.2B a total of 3 times: K2 tog, YO, K2, YO, then work K2, YO), and work A.2C (= K2 tog, YO). Happy knitting!
15.09.2015 - 09:58
![]() Ruth Jose a écrit:
Ruth Jose a écrit:
Lost three stitches on third turn! I have 19 stitches and 35=54. I should have 57
14.09.2015 - 23:52DROPS Design a répondu:
Dear Ruth Jose, remember to check your number of sts worked in each diagram, a good idea can be to add extra marker between each kind of pattern/diagram so that you can check if your number of sts match. Happy knitting!
15.09.2015 - 09:49
|
||||||||||||||||
Summer Snug#summersnugjacket |
||||||||||||||||
 |
 |
|||||||||||||||
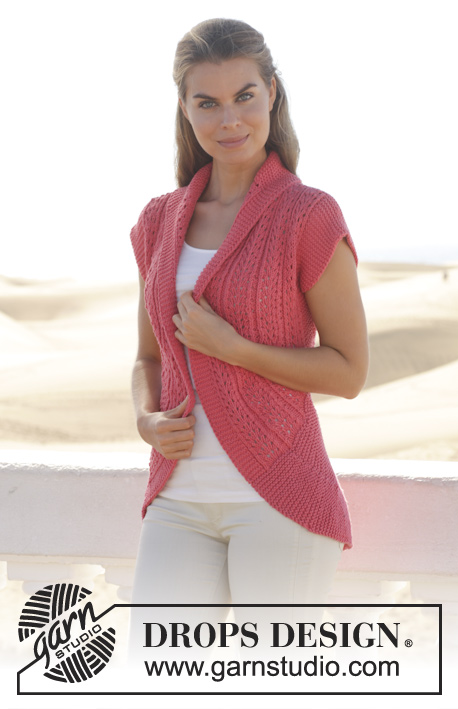
Veste ajourée DROPS tricotée en cercles, en ”Paris”. Du S au XXXL.
DROPS 154-8 |
||||||||||||||||
|
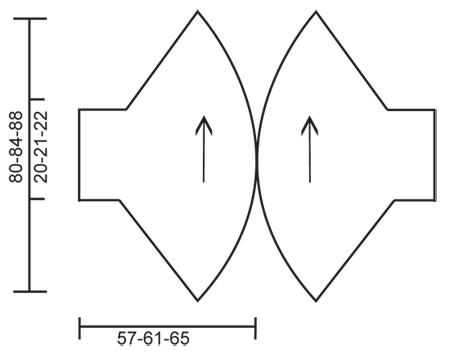
POINT MOUSSE (en allers et retours) : Tricoter tous les rangs à l'endroit. 1 côte mousse = 2 rangs end. POINT FANTAISIE : Voir diagrammes A.1 à A.3. Les diagrammes montrent tous les rangs du point fantaisie, vus sur l'endroit. RANGS RACCOURCIS : * Tricoter 1 rang sur les 10 premières m, tourner et tricoter le rang retour. Tricoter 1 rang sur les 35 premières m, tourner et tricoter le rang retour. Tricoter 1 rang sur les 51-57-63 premières m, tourner et tricoter le rang retour. Tricoter 1 rang sur toutes les mailles, tourner et tricoter le rang retour*. Répéter de *-*, c'est-à-dire 8 rangs au plus large et 2 rangs au plus étroit pour 1 série des rangs raccourcis. ---------------------------------------------------------- DEVANT DROIT /DOS : Se tricote en allers et retours sur aiguille circulaire. Monter 86-92-98 m sur l'aiguille circulaire 6 en Paris. Tricoter 1 côte au POINT MOUSSE - voir ci-dessus. Continuer ensuite en point fantaisie, EN MÊME TEMPS, tricoter en RANGS RACCOURCIS – voir ci-dessus (1er rang = sur l'endroit): 5 m au point mousse, 2 m end, 3 m env, (tourner ici), 2 m end, A.1 (= 23 m) (tourner ici), 1 m end, A.2A, A.2 B au-dessus des 8-14-20 m suiv, A.2 C, 2 m end, (tourner ici), A.1(= 23 m), 2 m end, 3 m env, 2 m end, 5 m au point mousse. Continuer en point fantaisie ainsi jusqu'à ce que l'ouvrage mesure 40-42-44 cm au plus étroit et 160-168-176 cm au plus large. Tricoter 1 côte mousse sur toutes les mailles et rabattre. DEVANT GAUCHE /DOS : Se tricote en allers et retours sur aiguille circulaire. Monter 86-92-98 m sur l'aiguille circulaire 6 en Paris. Tricoter 1 côte au POINT MOUSSE - voir ci-dessus. Tricoter 1 rang end sur l'endroit et continuer ensuite en point fantaisie, EN MÊME TEMPS tricoter en RANGS RACCOURCIS – voir ci-dessus (1er rang = sur l'envers - NOTE: Commencer au 2ème rang de A.1 et A.3): 5 m au point mousse, 2 m env, 3 m end, (tourner ici), 2 m env, A.1 (= 23 m), (tourner ici), 1 m env, A.3A, A.3 B au-dessus des 8-14-20 m suiv, A.3 C, 2 m env, (tourner ici), A.1 (= 23 m), 2 m env, 3 m end, 2 m env, 5 m au point mousse. Continuer en point fantaisie jusqu'à ce que l'ouvrage mesure 40-42-44 cm au plus étroit et 160-168-176 cm au plus large. Tricoter 1 côte mousse sur toutes les mailles et rabattre. ASSEMBLAGE : Coudre le rang de montage aux mailles rabattues. Placer les 2 pièces ensemble l'une contre l'autre pour que les 5 m au point mousse du côté le plus large se rejoignent, et coudre sur environ 58-62 cm au milieu dos, bord à bord – veiller à ce que la couture de chaque pièce soit au milieu sous la manche. |
||||||||||||||||
Légende diagramme(s) |
||||||||||||||||
|
||||||||||||||||
 |
||||||||||||||||
 |
||||||||||||||||
Vous avez terminé ce modèle?Alors taguez vos photos avec #dropspattern #summersnugjacket ou bien présentez-les dans la galerie #dropsfan Vous avez besoin d'aide pour ce modèle ?Vous trouverez 20 tutoriels vidéo, une rubrique commentaires/questions et plus encore en vous rendant sur la page du modèle sur garnstudio.com © 1982-2026 DROPS Design A/S. Tous droits réservés. Ce document, y compris ces sous-sections, est protégé par les droits d'auteur (copyright). Apprenez-en davantage sur ce que vous pouvez faire avec nos modèles en bas de chacune des pages de notre site. |
||||||||||||||||


Avec plus de 40 ans dans la conception de modèles tricot et crochet, DROPS Design offre l'une des plus vastes collections de modèles gratuits sur internet - traduits dans 17 langues. À ce jour, on compte 324 catalogues et 12290 modèles en français.
Nous nous efforçons de vous apporter le meilleur de ce que le tricot et le crochet peuvent vous offrir, inspiration et conseils mais également des fils de haute qualité à des prix incroyables! Vous souhaiteriez utiliser nos modèles autrement que pour un usage personnel? Vous pouvez lire ce que vous êtes autorisés à faire dans le Copyright en bas de page de chacun de nos modèles. Bon tricot!
Poster un commentaire sur le modèle DROPS 154-8
Nous aimerions connaître votre avis sur ce modèle !
Si vous souhaitez poser une question, merci de bien vouloir vérifier que vous avez choisi la bonne catégorie dans le formulaire ci-dessous afin d'accélérer la réponse. Les champs obligatoires sont indiqués par une *.