
Catégories populaires
Vous cherchez un fil?


Commentaires / Questions (59)
Sandra a écrit:
I'm a beginner and the finished product was too tight at the end. What did I do wrong?
12.12.2018 - 15:21DROPS Design a répondu:
Dear Sandra, did you get the correct tension? You should have 17 dc (UK)/ sc (US) = 10 cm/4" in width - and keep the same tension while working the hat. Happy crocheting!
12.12.2018 - 16:10Libby a écrit:
Hi, first of all great pattern it comes out really good! My question is, do I keep decrease as I go along from the black or do I decrease only once in the black row in this pattern? I hope you understand my question
14.11.2018 - 14:24DROPS Design a répondu:
Dear Libby, you decrease only 1 time 12-14 sts on one round (the first round after the 3 rounds with medium brown) = there are now 76-82 sts continue working the last 6 rounds without decreasing anymore. Happy crocheting!
14.11.2018 - 15:04
![]() Angelina a écrit:
Angelina a écrit:
How do I stop the spiral? There's not obvious transition from the beginning of the spiral to the end, so I can't tell where to put my sl st before I change colors.
16.08.2018 - 02:12DROPS Design a répondu:
Dear Angelina, for a nicer transition for the stripes, add a marker in the first st of every round and let the marker follow the piece so that you can sl st the last st with first colour in this stitch. You can also continue working in the round in a spiral with the new colour, the transition will be quite smooth. Happy crocheting!
16.08.2018 - 09:37Lyn a écrit:
Thanks for your prompt reply and video. I understand working in the round but it doesn't work the same in a spiral for me. Is the jog unavoidable in this situation
23.05.2018 - 15:02DROPS Design a répondu:
Dear Lynn, when working stripes, stop the spiral and join in the round with the technique shown in the video will avoid you a jog at the beg of round. Happy crocheting!
23.05.2018 - 16:07Lyn a écrit:
I am failing to be able to join my spiral stripes without the "jog" despite reading an earlier comment you made. "before changing colour you can join with a sl st with the new colour and continue as before without joining until next stripe, you will then avoid a jog at the back of hat" It sounds simple enough but not working for me. Can you suggest what I'm missing in the interpretation n explain again
23.05.2018 - 14:24Lyn a écrit:
I'm failing to be able to join my spiral stripes without the "jog" despite reading your earlier answer to Lori. I'm obviously not interpreting something correctly "before changing colour you can join with a sl st with the new colour and continue as before without joining until next stripe, you will then avoid a jog at the back of hat" It sounds simple enough but it's not working for me..any suggestions what I'm missing.
23.05.2018 - 14:18DROPS Design a répondu:
Dear Lynn, this video shows how to change colour at the end of round, ie work the beg of st with first colour (same of the round you are finishing) and make the last pull through with the colour used on next round. Happy crocheting!
23.05.2018 - 14:39
![]() Lori a écrit:
Lori a écrit:
Because the rows are worked in a spiral, my stripes are not straight at the join. Any advice?
06.04.2018 - 06:21DROPS Design a répondu:
Dear Lori, before changing colour you can join with a sl st with the new colour and continue as before without joining until next stripe, you will then avoid a jog at the back of hat. Happy crocheting!
06.04.2018 - 08:47
![]() Sciakath a écrit:
Sciakath a écrit:
I have made two of these now and am on my third -- and I NEVER usually repeat a pattern! These beanies have such a nice weight to them -- not too bulky. I used yarn I had in my stash (Loops & Threads Impeccable) and it worked great. Thanks for the EXCELLENT pattern!
04.03.2018 - 22:12Margarita Lucero Apolonio a écrit:
Podría mandarme el patrón de este gorro
19.03.2017 - 06:55DROPS Design a répondu:
Hola Margarita. Con este línk puedes descargar el patrón gratis: https://www.garnstudio.com/pattern.php?id=6379&cid=23
27.03.2017 - 20:49Danielle a écrit:
It seems to me that this is worked in single crochet, am I wrong?
27.01.2017 - 21:58DROPS Design a répondu:
Dear Danielle, you are right, this hat is worked in sc, crocheting in back loop of sts. See US-English pattern here. Happy crocheting!
30.01.2017 - 10:33
|
|
Carmel |
|
 |
 |
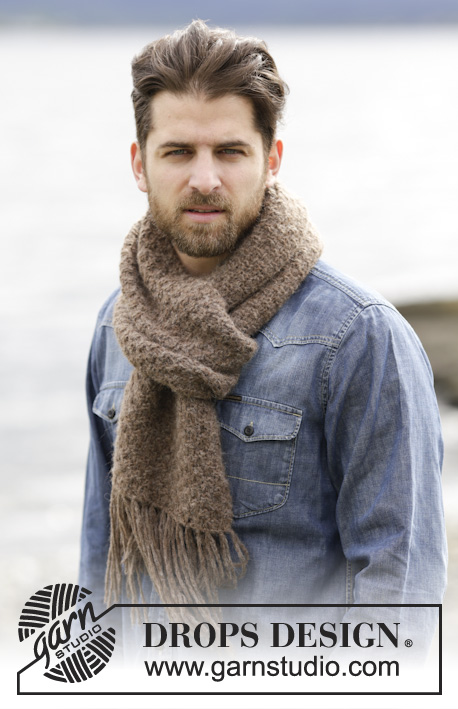
Bonnet homme DROPS au crochet, en “Nepal”. Du S au XL
DROPS Extra 0-980 |
|
|
INFO CROCHET: Après la dernière ms du tour, continuer le tour suivant avec 1 ms dans la ms suiv (= 1ère ms du tour précédent). NOTE: Placer un marqueur au début du tour entre la dernière ms et la 1ère ms du tour, faire suivre le marqueur au fur et à mesure. Crocheter les ms dans le brin arrière des mailles pour créer une texture rayée. ROND MAGIQUE : Quand on travaille en rond, commencer par cette technique permet d'éviter un trou au milieu (au lieu du rond de ml) : Tenir l'extrémité du fil et l'enrouler une fois autour de l'index pour former une boucle. Tenir la boucle avec le pouce et le majeur gauche, placer le fil au-dessus de l'index gauche, piquer le crochet dans la boucle, faire 1 jeté et passer le fil dans la boucle, crocheter 1 ml, puis continuer en ms autour de la boucle. Quand le nombre de ms souhaité est atteint, tirer l'extrémité du fil pour resserrer la boucle et continuer à crocheter en rond, en spirale (voir info crochet). DIMINUTIONS: Écouler ensemble approximativement tous les 7ème /8ème ms – 6ème /7ème ms du tour. Écouler 2 ms ens ainsi: Piquer le crochet dans la 1ère ms et ramener 1 boucle, piquer le crochet dans la ms suiv et ramener 1 boucle, faire 1 jeté et écouler toutes les boucles sur le crochet. -------------------------------------------------------- BONNET: Avec le crochet 5 et le fil brun moyen, faire un ROND MAGIQUE – voir ci-dessus, ou monter une chaînette de ml et joindre en rond avec 1 mc dans la 1ère ml. VOIR INFO CROCHET! TOUR 1: 8 ms dans le rond magique/rond de ml. Crocheter maintenant en ms en piquant uniquement le brin arrière de chacune des m. TOUR 2: 2 ms dans chaque ms = 16 ms. TOUR 3: *1 ms dans la 1ère ms, 2 ms dans la ms suiv*, répéter de *-* = 24 ms. TOUR 4: *1 ms dans chacune des 2 ms suiv, 2 ms dans la ms suiv*, répéter de *-* = 32 ms. TOUR 5: 1 ms dans chaque ms = 32 ms. PENSER À BIEN CONSERVER LA MÊME TENSION QUE POUR L'ÉCHANTILLON! TOUR 6: *1 ms dans chacune des 3 ms suiv, 2 ms dans la ms suiv *, répéter de *-* = 40 ms. TOUR 7: *1 ms dans chacune des 4 ms suiv, 2 ms dans la ms suiv *, répéter de *-* = 48 ms. TOUR 8: *1 ms dans chacune des 5 ms suiv, 2 ms dans la ms suiv *, répéter de *-* = 56 ms. TOUR 9: *1 ms dans chacune des 6 ms suiv, 2 ms dans la ms suiv *, répéter de *-* = 64 ms. TOUR 10: *1 ms dans chacune des 7 ms suiv, 2 ms dans la ms suiv *, répéter de *-* = 72 ms. TOUR 11: *1 ms dans chacune des 8 ms suiv, 2 ms dans la ms suiv *, répéter de *-* = 80 ms. TOUR 12: *1 ms dans chacune des 9 ms suiv, 2 ms dans la ms suiv *, répéter de *-* = 88 ms. Les augmentations en taille S/M se terminent ici, continuer en ms, en rond,. TOUR 13: *1 ms dans chacune des 10 ms suiv, 2 ms dans la ms suiv *, répéter de *-* = 96 ms. Les augmentations en taille L/XL se terminent ici, continuer en ms, en rond,. À 12-15 cm de hauteur totale, crocheter en ms comme avant et changer de couleur ainsi: 2 tours noir, 3 tours brun moyen, 1 tour noir et sur ce tour, diminuer 12-14 ms à intervalles réguliers – VOIR DIMINUTIONS (= il reste 76-82 ms), 4 tours noir, 2 tours brun moyen. Le bonnet mesure environ 20-23 cm à partir du haut. Arrêter. |
|
Vous avez terminé ce modèle?Alors taguez vos photos avec #dropspattern ou bien présentez-les dans la galerie #dropsfan Vous avez besoin d'aide pour ce modèle ?Vous trouverez 7 tutoriels vidéo, une rubrique commentaires/questions et plus encore en vous rendant sur la page du modèle sur garnstudio.com © 1982-2026 DROPS Design A/S. Tous droits réservés. Ce document, y compris ces sous-sections, est protégé par les droits d'auteur (copyright). Apprenez-en davantage sur ce que vous pouvez faire avec nos modèles en bas de chacune des pages de notre site. |
|


Avec plus de 40 ans dans la conception de modèles tricot et crochet, DROPS Design offre l'une des plus vastes collections de modèles gratuits sur internet - traduits dans 17 langues. À ce jour, on compte 324 catalogues et 12291 modèles en français.
Nous nous efforçons de vous apporter le meilleur de ce que le tricot et le crochet peuvent vous offrir, inspiration et conseils mais également des fils de haute qualité à des prix incroyables! Vous souhaiteriez utiliser nos modèles autrement que pour un usage personnel? Vous pouvez lire ce que vous êtes autorisés à faire dans le Copyright en bas de page de chacun de nos modèles. Bon tricot!
Poster un commentaire sur le modèle DROPS Extra 0-980
Nous aimerions connaître votre avis sur ce modèle !
Si vous souhaitez poser une question, merci de bien vouloir vérifier que vous avez choisi la bonne catégorie dans le formulaire ci-dessous afin d'accélérer la réponse. Les champs obligatoires sont indiqués par une *.