
Catégories populaires
Vous cherchez un fil?


Commentaires / Questions (40)
![]() Beverley a écrit:
Beverley a écrit:
Next question. If 1 repetition is 8 rows (2 rows at narrowest), on row 9 do you start the repetition again until row 16, if so, what happens to next 4 rows from row 17 to row 20 to complete A4?
15.08.2021 - 21:53DROPS Design a répondu:
Dear Beverley, when working the short rows, you will work the stitches in A.4 just as shown in the diagram (= every row is worked with A.4 at the beg of row from RS/end of row from WS), then work the ridge pattern after A.4 as frollwos: row 1-4 ridge pattern on row 3 to 6, then work row 1-2 ridge pattern on row 7-8 short rows; then row 3-4 ridge pattern on row 3-4 next repeat short rows, etc... Hope this will help. Happy knitting!
16.08.2021 - 08:29
![]() Beverley a écrit:
Beverley a écrit:
Just to clarify my question, there are 8 rows to a pattern but the 1st two rows don’t contain and ridge stitches. On row 3 to 8 these have ridge stitches ( total of 6 rows) but the pattern for ridge stitches has 4 rows ). What pattern of ridge stitch do I knit on row 7 and 8 of the main pattern?
15.08.2021 - 21:24DROPS Design a répondu:
Dear Beverly, you just have to always repeat the 4 rows in the ridge pattern, this means you will always repeat these 4 rows over the first 12 sts ridge pattern (after A.4) and repeat the 4 rows ridge pattern after A.5 (see previous answer). Happy knitting!
16.08.2021 - 08:25
![]() Beverley a écrit:
Beverley a écrit:
Hi, I understand the principles of how to knit this by knitting as instructions then turn to go back then kip it the next row plus a few more of the pattern and so on. What I don’t understand is on row 5 out of 8 when you start A5 for the first time and which row of the 4 ridge stiches rows that constructed the 6 ridge stitches? Is it the same row as the 12?
15.08.2021 - 19:24DROPS Design a répondu:
Dear Beverley, you will work the stitches in A.5 just when you will work row 5 to 8, ie the first time you work row 5, work row 1 in A.5, then work on row 6 to 8, you will work row 2 to 4. Next time you will work row 5 -8 in short rows, you will then work row 5 to 8 in A.5 etc. The 6 sts ridge pattern are worked then repeating the 4 rows the same way, ie when working row 5-8 short rows, work row 1 to 4 ridge pattern. Happy knitting!
16.08.2021 - 08:19
![]() Sally a écrit:
Sally a écrit:
When working the short rows, when it says "Work 1row over all stitches" does "all stitches" mean all the stitches worked so far or all the stitches cast on?
23.03.2019 - 17:16DROPS Design a répondu:
Dear Sally, when working the short rows, "work 1 row over all stitches" means to work all stitches on left needle = the onen previously worked with the short rows as well as the other ones. Happy knitting!
25.03.2019 - 10:36
![]() Deb a écrit:
Deb a écrit:
Are the charts to be read from left to right or right to left? Thank you.
21.11.2018 - 21:58DROPS Design a répondu:
Hi Deb, The charts are read from bottom right to left on first row. If you are working back and forth the next row is read from left to right, if you are working in the round continue the next row from right to left. Happy knitting!
22.11.2018 - 07:46
![]() Kate Gomes a écrit:
Kate Gomes a écrit:
Is this garment knitted from the top down?
15.10.2018 - 21:15DROPS Design a répondu:
Dear Mrs Gomes, the cape is worked sideways with short rows. Happy knitting!
16.10.2018 - 09:10
![]() Torunn Riise-Larsen a écrit:
Torunn Riise-Larsen a écrit:
Og hva skal stikkes når det står: "strikk 1 p over a4, snu og strikk tilbake. Men hva slags masker skal man bruke? Synes ikke det er så lett å forstå oppskriften deres...
02.10.2018 - 17:13DROPS Design a répondu:
Hei Torunn. Vendinger er det samme som forkortede pinner: altså på hver pinne fra retten strikker du over fler masker enn forrige pinne. Du skal strikke dette samtidig som du strikker mønster etter diagram - så når det står snu og strikk tilbake følger du anvisningene i diagrammet som vanlig. Altså første gang strikker du en omgang A.4, snur og strikker neste omgang A.4 tilbake. Så snur du arbeidet igjen og strikker neste omgang A.4 og strikker videre 2 masker rett og 12 masker åpne rille. Så snur du og strikker tilbake osv. Dette gjentar du til halsen måler 35 cm i den korteste siden. God fornøyelse.
03.10.2018 - 14:19
![]() Torunn Riise-Larsen a écrit:
Torunn Riise-Larsen a écrit:
Ang. vendinger. Skal det gjøres etter at hele A4, dvs 20 pinner, er strikket. Eller etter hver pinne av a4?
02.10.2018 - 15:52
![]() Patricia a écrit:
Patricia a écrit:
Pourriez vous mettre une vidéo pour le commencement du diagramme A4 svp merci ?
18.11.2016 - 16:21DROPS Design a répondu:
Bonjour Patricia, votre demande a été enregistrée, mais en attendant la vidéo, lisez le diagramme en commençant en bas à droite sur l'endroit de droite à gauche et de gauche à droite sur l'envers. Retrouvez sous la légende la signification de chaque symbole. Bon tricot!
18.11.2016 - 17:43
![]() Maple a écrit:
Maple a écrit:
Thanks for your answer. but i don't understand..i understand how to read the diagram but i don't understand the shoulder piece paragraph. so confused. can you write it step by step. for example, step 1, knit 1 row . step 2, p 1 rows. sorry i am too dumb..
28.06.2016 - 02:22DROPS Design a répondu:
Dear Maple, The Shoulder piece paragraph explains how to work the sts, ie which pattern will be used to work the sts, at the same time work the short rows to get the correct shape. For any further individual assistance, you are welcome to contact the store where you bought your yarn. Happy knitting!
28.06.2016 - 08:29
|
|||||||||||||||||||||||||||||||||||||||||||
Miss Marple#missmarpleset |
|||||||||||||||||||||||||||||||||||||||||||
 |
 |
||||||||||||||||||||||||||||||||||||||||||
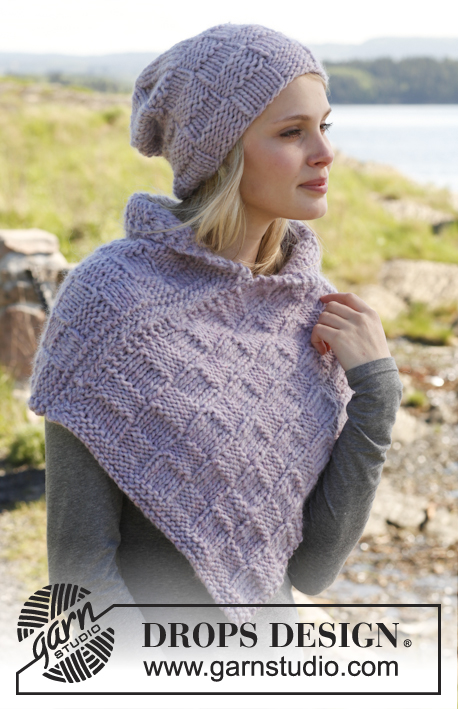
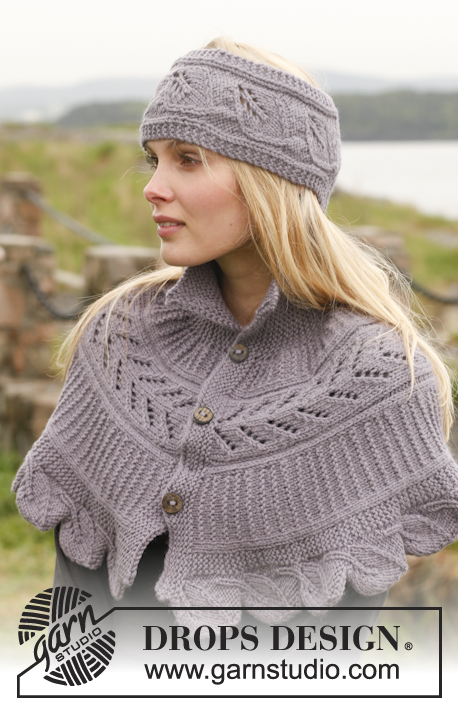
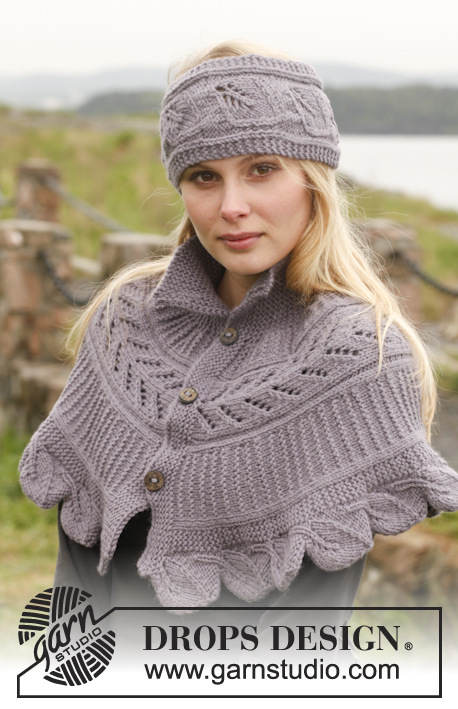
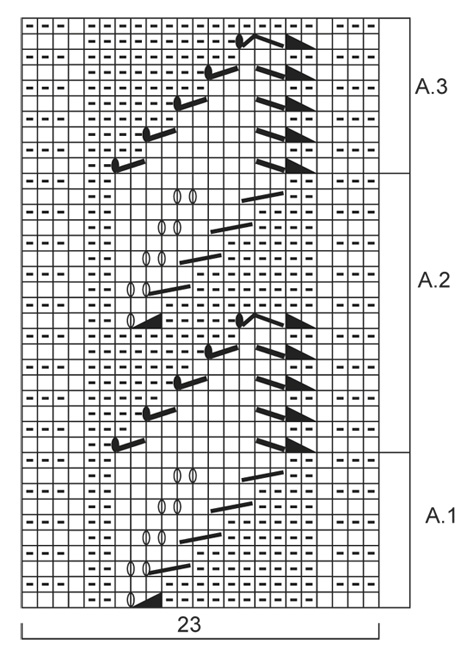
Bandeau et chauffe-épaules DROPS avec bordure feuille, en ”Nepal”
DROPS 149-41 |
|||||||||||||||||||||||||||||||||||||||||||
|
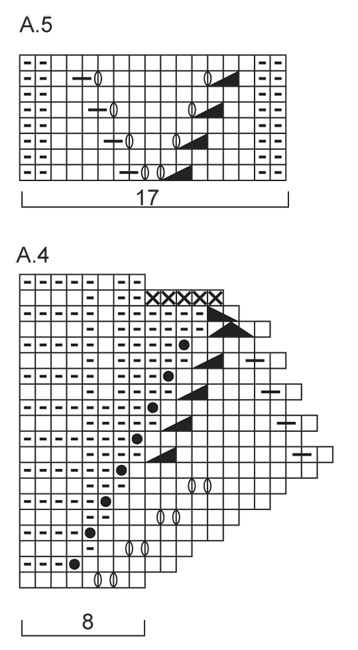
POINT MOUSSE (en allers et retours) : Tricoter tous les rangs à l'endroit. 1 "côte" mousse = 2 rangs end. POINT FANTAISIE BANDEAU: Voir les diagrammes A.1 à A.3. Les diagrammes montrent tous les rangs du point fantaisie, vus sur l'endroit. POINT FANTAISIE CHAUFFE-ÉPAULES : Voir les diagrammes A.4 à A.5. Les diagrammes montrent tous les rangs du point fantaisie, vus sur l'endroit. POINT MOUSSE FANTAISIE (allers et retours sur les aiguilles): Rang 1: Tricoter toutes les mailles à l'endroit sur l'endroit. Rang 2: Tricoter toutes les mailles à l'envers sur l'envers. Rang 3: Tricoter toutes les mailles à l'endroit sur l'endroit. Rang 4: Tricoter toutes les mailles à l'endroit sur l'envers. RANGS RACCOURCIS : Tricoter les rangs raccourcis ainsi: * Tricoter 1 rang sur les mailles de A.4, tourner et tricoter le rang retour. Tricoter 1 rang sur les mailles de A.4 + 2 m endroit + 12 m point mousse fantaisie, tourner et tricoter le rang retour. Tricoter 1 rang sur les mailles de A.4 + 2 m endroit + 12 m point mousse fantaisie + 2 m endroit + A.5 + 2 m endroit + 6 m point mousse fantaisie, tourner et tricoter le rang retour. Tricoter 1 rang sur toutes les mailles, tourner et tricoter le rang retour*. Répéter de *-*, c'est-à-dire 1 série = 8 rangs du côté le plus large et 2 rangs au plus étroit. ---------------------------------------------------------- BANDEAU : Monter 23 m avec les aiguilles 5 en Nepal. Tricoter au POINT MOUSSE - voir ci-dessus – pendant 3 cm. Tricoter ensuite en point fantaisie A.1. Après avoir tricoté 1 fois A.1 en hauteur, continuer en point fantaisie A.2. À environ 46 cm de hauteur totale, ajuster après 1 rapport complet de A.2, tricoter en point fantaisie A.3. Tricoter 1 fois A.3 en hauteur, puis tricoter au point mousse pendant 3 cm, ou la taille souhaitée. Rabattre. Coudre les mailles rabattues à celles du montage à points soignés. ---------------------------------------------------------- CHAUFFE-ÉPAULES : Se tricote en allers et retours sur aiguille circulaire. Monter 67 m sur l'aiguille circulaire 5 en Nepal. Tricoter 5 CÔTES MOUSSE - voir ci-dessus. Tricoter ensuite ainsi: A.4, 2 m en jersey, point mousse fantaisie au-dessus des 12 m suiv, 2 m en jersey, A.5, 2 m en jersey, 6 m point mousse fantaisie, 18 m au point mousse. EN MÊME TEMPS tricoter les RANGS RACCOURCIS - voir ci-dessus. Tricoter les rangs raccourcis jusqu'à ce que l'ouvrage mesure 35 cm du côté le plus court (ou la taille souhaitée), ajuster après 1 motif complet de A.4. Tricoter 3 côtes mousse, au rang suivant sur l'endroit ouvrir des boutonnières ainsi: Tricoter 16 m, 2 m ens à l'end, 1 jeté, * tricoter 13 m, 2 m ens à l'end, 1 jeté *, répéter de *-* 3 fois, terminer par 4 m end. Continuer au point mousse jusqu'à ce qu'un total de 5 côtes mousse ait été tricoté, rabattre. Coudre les boutons sur la bordure devant gauche. |
|||||||||||||||||||||||||||||||||||||||||||
Légende diagramme(s) |
|||||||||||||||||||||||||||||||||||||||||||
|
|||||||||||||||||||||||||||||||||||||||||||
 |
|||||||||||||||||||||||||||||||||||||||||||
 |
|||||||||||||||||||||||||||||||||||||||||||
Vous avez terminé ce modèle?Alors taguez vos photos avec #dropspattern #missmarpleset ou bien présentez-les dans la galerie #dropsfan Vous avez besoin d'aide pour ce modèle ?Vous trouverez 18 tutoriels vidéo, une rubrique commentaires/questions et plus encore en vous rendant sur la page du modèle sur garnstudio.com © 1982-2026 DROPS Design A/S. Tous droits réservés. Ce document, y compris ces sous-sections, est protégé par les droits d'auteur (copyright). Apprenez-en davantage sur ce que vous pouvez faire avec nos modèles en bas de chacune des pages de notre site. |
|||||||||||||||||||||||||||||||||||||||||||


Avec plus de 40 ans dans la conception de modèles tricot et crochet, DROPS Design offre l'une des plus vastes collections de modèles gratuits sur internet - traduits dans 17 langues. À ce jour, on compte 324 catalogues et 12290 modèles en français.
Nous nous efforçons de vous apporter le meilleur de ce que le tricot et le crochet peuvent vous offrir, inspiration et conseils mais également des fils de haute qualité à des prix incroyables! Vous souhaiteriez utiliser nos modèles autrement que pour un usage personnel? Vous pouvez lire ce que vous êtes autorisés à faire dans le Copyright en bas de page de chacun de nos modèles. Bon tricot!
Poster un commentaire sur le modèle DROPS 149-41
Nous aimerions connaître votre avis sur ce modèle !
Si vous souhaitez poser une question, merci de bien vouloir vérifier que vous avez choisi la bonne catégorie dans le formulaire ci-dessous afin d'accélérer la réponse. Les champs obligatoires sont indiqués par une *.