
Catégories populaires
Vous cherchez un fil?


Commentaires / Questions (118)
![]() Maria a écrit:
Maria a écrit:
Is it possible, that your stitch count is incorrect? With size XL I get 212 stitches around the chest, which come to 124 cm of circumference with a gauge of 17 stitches, instead of the indicated 116 cm... As Klaudia, I do not get your proportions: 84 cm (144 stitches at a 17 st gauge) of neckline circumference!?
04.02.2026 - 14:55
![]() Silvia a écrit:
Silvia a écrit:
Buongiorno, i 4 ferri in cui metto in attesa le maglie per lo scollo devono coincidere con gli ultimi 4 ferri del raglan? Io ho iniziato a mettere in attesa a 41 cm ma poi il raglan è continuato per un po' e mi sono trovata uno scalino...
30.12.2025 - 09:21DROPS Design a répondu:
Buongiorno Silvia, deve seguire le indicazioni riportate: se le diminuzioni non sono terminate deve diminuire 1 maglia su ogni ferro fino alla fine delle diminuzioni. Buon lavoro!
30.12.2025 - 22:09
![]() Klaudia a écrit:
Klaudia a écrit:
Vielen Dank für die rasche Antwort. Mir war nicht klar, dass die Jacke einen so weiten Halsausschnitt hat - aber kein Problem, ich stricke einfach ein paar Abnahmen und Reihen mehr. Passt dann sicherlich auch noch oder?
02.12.2025 - 08:56DROPS Design a répondu:
Liebe Klaudia, wenn Sie Änderungen machen möchten, denken Sie daran, die Jacke regelmäßig anzuprobieren, so wissen Sie, ob alles passt. Viel Spaß beim Stricken!
02.12.2025 - 17:07
![]() Klaudia a écrit:
Klaudia a écrit:
Servus, rein mathematisch bleiben mir erheblich mehr Maschen nach Abschluss der Raglanabnahmen übrig: ich stricke in XXL und habe bei Beginn der Rundpasse 352 M auf der Nadel, nehme dann 20 plus 6 x 8 M ab - sind 208 M. Es bleiben also 144 M übrig. Laut Anleitung sollten es jedoch "ca. 80 - 120 M entlang des gesamten Halsrandes" sein. Ich hab mal für alle Größen gerechnet und komm auf 92 - 156 M ??
01.12.2025 - 14:22DROPS Design a répondu:
Liebe Klaudia, in XXL sind es 352 M am Anfang der Passe, für Raglan wird man insgesamt 208 Maschen abnehmen, dazu werden noch auch wenigstens 44 Maschen für den Hals stillgelegt und zwar: 12 M + (3 Maschen x 2) + (2 M x 2)= 22 M + 1 M in jeder 2. Reihe bis die Raglanabnahmen fertig sind. So sind es ca: 352-208-(22x2 Seiten) = 100 Maschen - dann stricken Sie alle Maschen inkl. die stillgelgten Maschen = wenigstens 44 Maschen (22 beidseitig) = ca 144 M. Viel Spaß beim Stricken!
01.12.2025 - 16:17
![]() Karishma Shah a écrit:
Karishma Shah a écrit:
Hi! When you say "remember the gauge" for the button band garter stitch, does that mean I should switch back to my Size 7 needles for the button band while using Size 8 needles for the stockinette?
24.10.2025 - 21:33DROPS Design a répondu:
Dear Karishma Shah, after garter stitch at the bottom, you start working all the stitches on circular needle size 8 mm (including band mid front stitches). Happy knitting!
03.11.2025 - 08:53
![]() Tanja a écrit:
Tanja a écrit:
Kann das erste Knopfloch auch bereits nach 16cm statt nach 24 cm gearbeitet werden oder fällt der Kragen dann nicht richtig? Ich möchte den Hals lieber geschlossener haben.
03.09.2025 - 08:45DROPS Design a répondu:
Liebe Tanja, das letzte Knopfloch wird ca 1 cm bevor man die Maschen für den Hals stilllegt, so können Sie kalkulieren, ob Sie am besten ein anderes Knopfloch vor dem 1. stricken möchten oder ob Sie dann liber das letzte früher stricken. Viel Spaß beim Stricken!
03.09.2025 - 16:18
![]() Susanne Hermann Danielsen a écrit:
Susanne Hermann Danielsen a écrit:
Hvor er opskriften til kraven ???
05.05.2025 - 13:07DROPS Design a répondu:
Hei Susanne. Står under HALS: Når raglan indtagningerne er færdige skiftes til rundp 4,5 og der strikkes m op fra trådene = ca 80 til 120 m langs hele halskanten. Strik 1 p r - Samtidig med at m-ant justeres til 84-88-92-96-100-108 m. Fortsæt med retstrik til kraven måler 8-8-8-9-9-9 cm. Luk alle m løst af. mvh DROPS Design
05.05.2025 - 14:10
![]() Marie Duranceau a écrit:
Marie Duranceau a écrit:
Can you help me please, I have decreased 13 times and have reached the length recommended before I start to decrease on both the knit side and again on the purl side. How can I progress?
26.04.2025 - 23:53DROPS Design a répondu:
Dear Mrs Duranceau, what about your tension? Do you have the 22 rows stocking stitch = 10 cm in height? If not, then you might have to edit how often you should work the decreases to match your own tension and the finished measurements. Happy knitting!
28.04.2025 - 09:29
![]() Marie Duranceau a écrit:
Marie Duranceau a écrit:
I find the instructions for the yoke very confusing, what do I do? Do I do the decreases on the knit and purl rows then do a plain knit and purl rows with no decreases? That makes 4rows altogether, and then do the 2 decrease rows again?
23.04.2025 - 15:49DROPS Design a répondu:
See answer below, if it's still not clear, make sure to tell us which size you are working on. Happy knitting!
23.04.2025 - 16:20
![]() Marie Duranceau a écrit:
Marie Duranceau a écrit:
I find the instructions for the yoke very confusing, what do I do? Do I do the decreases on the knit and purl rows then do a plain knit and purl rows with no decreases? That makes 4rows altogether, and then do the 2 decrease rows again?
23.04.2025 - 15:49DROPS Design a répondu:
Dear Mrs Duranceau, you start to decrease for raglan on the very first row over all stitches for yoke; and decrease for raglan a total of 18 -20 times (see size) on every other row = on every row from the right side then 2 to 8 times on every row = from both right side and wrong side, at the same time, remember to shape neck when piece measures 41-45 cm, first slipping stitches on each side on a thread/stitch holder, then casting off stitches. Can this help? Happy knitting!
23.04.2025 - 16:19
|
|
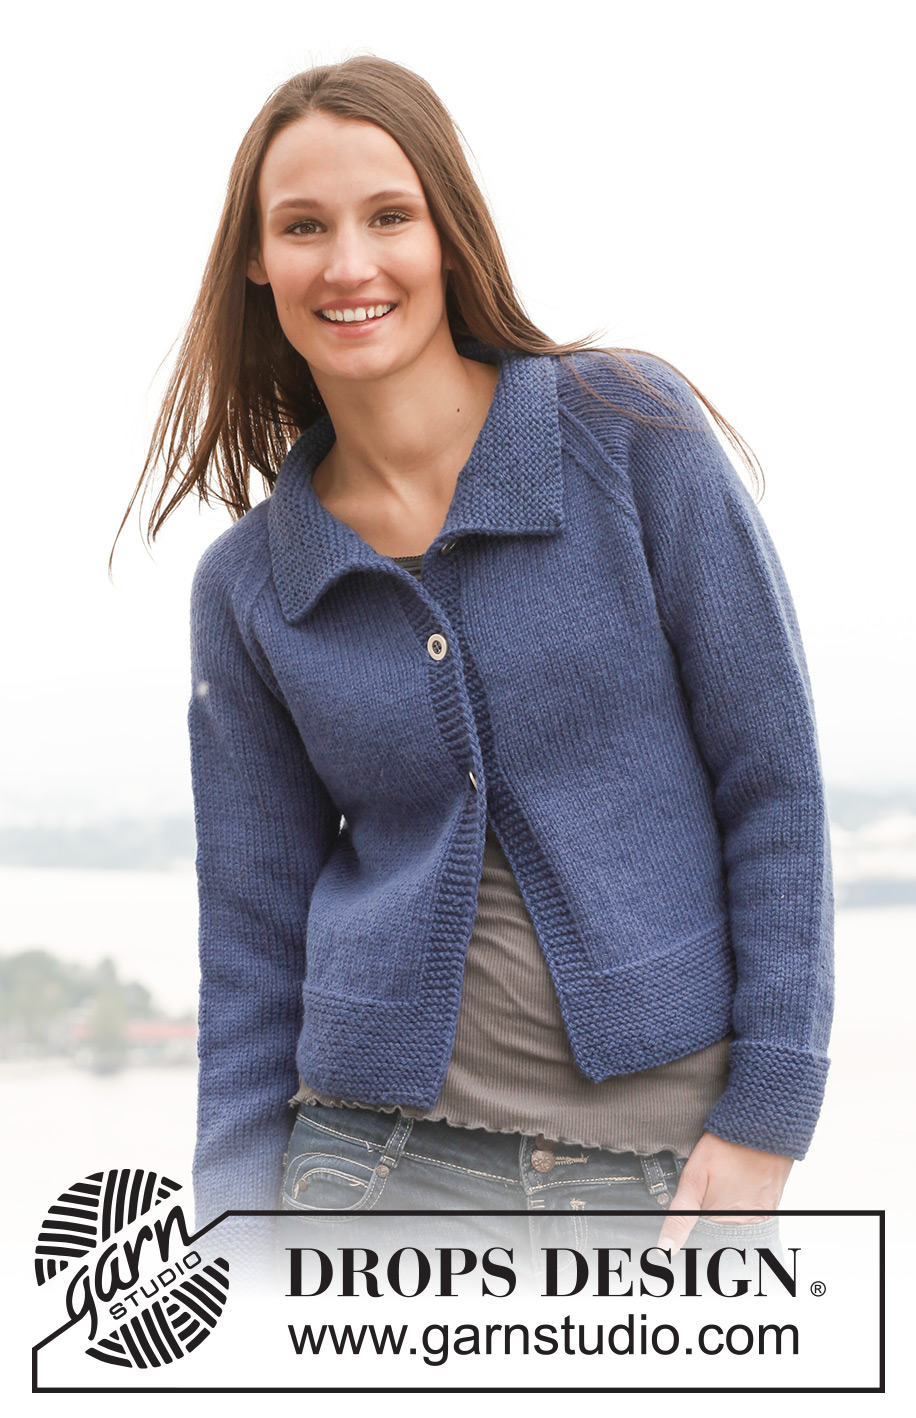
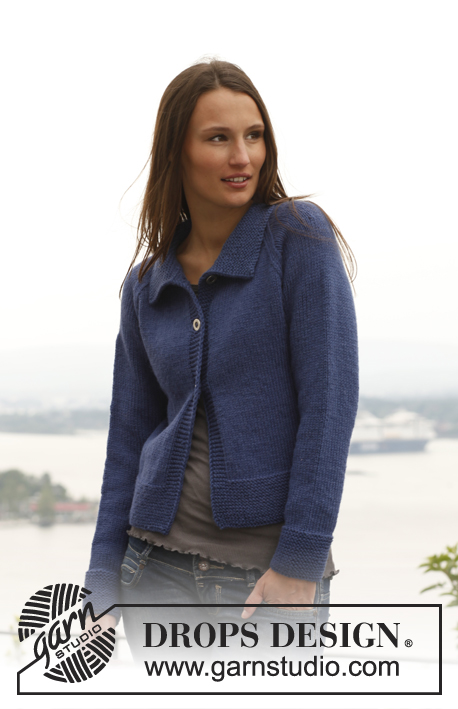
Winter Morning#wintermorningcardigan |
|
 |
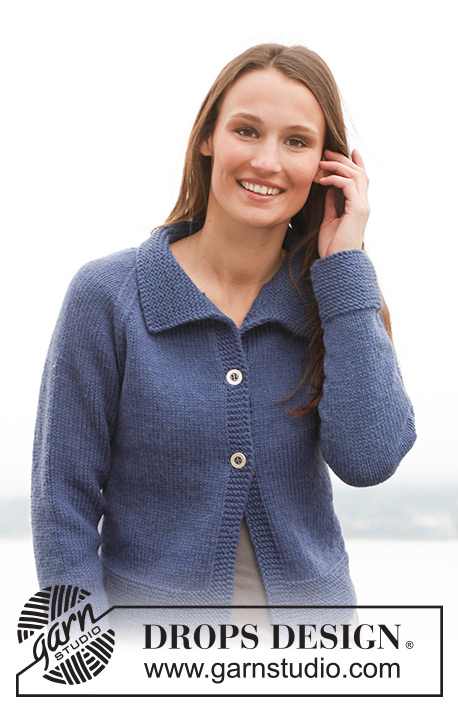 |
Veste raglan DROPS en ”Alaska”. Du S au XXXL.
DROPS 141-9 |
|
|
POINT MOUSSE (en allers et retours) : Tricoter tous les rangs à l'endroit. 1 "côte" mousse = 2 rangs end. POINT MOUSSE (en rond) : Tricoter *1 tour end, 1 tour env *, répéter de *-*. AUGMENTATIONS: Augmenter 1 m de chaque côté du marqueur ainsi: Tricoter jusqu'à ce qu'il reste 1 m avant le marqueur, faire 1 jeté, tricoter 2 m (le marqueur se trouve entre ces 2 m), faire 1 jeté. Au rang suivant, tricoter les jetés torse pour éviter les trous. RAGLAN: Diminuer ainsi sur l'endroit: Tricoter jusqu'à ce qu'il reste 3 m avant le marqueur, 2 m ens à l'end, 2 m end (le marqueur se trouve entre ces 2 m), glisser 1 m à l'end, 1 m end, passer la m glissée par-dessus la m tricotée. Diminuer ainsi sur l'envers: Tricoter jusqu'à ce qu'il reste 3 m avant le marqueur, 2 m ens torse à l'env (c'est-à-dire tricoter le brin arrière au lieu du brin avant), 2 m env (le marqueur se trouve entre ces 2 m), 2 m ens à l'env. BOUTONNIÈRES : Ouvrir 3 boutonnières sur l'endroit, sur la bordure devant droit. 1 boutonnière = rabattre la 5ème et la 6ème m à partir du bord (milieu devant) et au rang suivant, monter 2 m au-dessus de ces mailles. Emplacement des boutonnières (en cm de hauteur totale): TAILLE S: 24, 32, 40 cm. TAILLE M: 25, 33, 41 cm. TAILLE L: 24, 33, 42 cm. TAILLE XL: 25, 34, 43 cm. TAILLE XXL: 24, 34, 44 cm. TAILLE XXXL: 24, 34, 44 cm. -------------------------------------------------------- DOS & DEVANTS : Se tricotent en allers et retours sur aiguille circulaire à partir du milieu devant. Monter 140-156-172-192-212-232 m en Alaska avec l'aiguille circulaire 4,5. Tricoter au POINT MOUSSE - voir ci-dessus - pendant 8-8-8-9-9-9 cm. Au rang suivant sur l'endroit, continuer avec l'aiguille circulaire 5, et tricoter en jersey – mais tricoter les 6-6-6-8-8-8 m de chaque côté au point mousse (= bordures devants). NE PAS OUBLIER DE BIEN CONSERVER LA MÊME TENSION QUE POUR L'ÉCHANTILLON ! LIRE ATTENTIVEMENT LA SUITE AVANT DE CONTINUER ! Continuer en jersey avec 6-6-6-8-8-8 m au point mousse de chaque côté jusqu'à ce que l'ouvrage mesure 9-9-9-10-10-10 cm. Placer un marqueur à 38-42-46-52-57-62 m de chaque côté (= 64-72-80-88-98-108 m entre les marqueurs pour le dos). Faire suivre les marqueurs au fur et à mesure. Augmenter maintenant 1 m de chaque côté de chaque marqueur – voir AUGMENTATIONS ci-dessus = 4 augmentations. Répéter ces augmentations encore 4 fois (5 fois au total) tous les 4-4-4½-4½-4½-4½ cm = 160-176-192-212-232-252 m (= 74-82-90-98-108-118 m entre les marqueurs pour le dos) - EN MÊME TEMPS, à 24-25-24-25-24-24 cm de hauteur totale, ouvrir la 1ère boutonnière sur la bordure devant droit - VOIR BOUTONNIÈRES. Continuer jusqu'à ce que l'ouvrage mesure 29-30-31-32-33-34 cm. Rabattre ensuite 3 m de chaque côté de chaque marqueur pour les emmanchures (c'est-à-dire 6 m rabattre de chaque côté) = il reste 148-164-180-200-220-240 m. Mettre en attente et tricoter les manches. MANCHES : Se tricotent en rond sur aiguilles doubles pointes. Monter 36-38-40-42-44-44 m avec les aiguilles doubles pointes 4.5 en Alaska. Tricoter au point mousse pendant 8 cm. Continuer ensuite avec les aiguilles doubles pointes 5 en jersey. Placer un marqueur au début du tour (= milieu sous la manche). À 9 cm de hauteur totale, augmenter 1 m de chaque côté du marqueur. Répéter ces augmentations encore 10-11-12-12-13-15 fois (= 11-12-13-13-14-16 fois au total) tous les 3½-3-3-3-2½-2 cm = 58-62-66-68-72-76 m. À 48-48-47-47-46-46 cm de hauteur totale (moins haut pour les grandes tailles car l'arrondi de la manche est plus long et les épaules plus larges), rabattre 3 m de chaque côté du marqueur (= 6 m rabattues au milieu sous la manche) = il reste 52-56-60-62-66-70 m. EMPIÈCEMENT : Reprendre les manches sur la même aiguille circulaire que le dos et les devants, au-dessus des mailles rabattues pour les emmanchures = 252-276-300-324-352-380 m. Placer 1 marqueur à chaque transition des manches avec le dos et les devants (= 4 marqueurs), faire suivre les marqueurs au fur et à mesure. Tricoter ensuite en jersey avec 6-6-6-8-8-8 m au point mousse de chaque côté - EN MÊME TEMPS, au 1er rang sur l'endroit, commencer les diminutions du RAGLAN - voir ci-dessus. Diminuer 18-18-18-20-20-20 fois au total tous les 2 rangs, puis 2-4-6-4-6-8 fois tous les rangs. EN MÊME TEMPS, à 41-42-43-44-45-45 cm de hauteur totale, glisser en attente les premières mailles du début de chaque rang à partir de l'encolure sur un arrêt de mailles ainsi : 1 fois 8-8-10-10-12-12 m, 1-1-1-2-2-2 fois 3 m, 2 fois 2 m, puis 1 m jusqu'à ce que le raglan soit fini. COL: Quand toutes les diminutions du raglan sont faites, continuer avec l'aiguille circulaire 4,5, tricoter les mailles en attente sur les arrêts de mailles = environ 80 à 120 m tout autour de l'encolure. Tricoter 1 rang end EN MÊME TEMPS, ajuster le nombre de mailles à 84-88-92-96-100-108. Tricoter au point mousse jusqu'à ce que le col mesure 8-8-8-9-9-9 cm. Rabattre souplement toutes les mailles. ASSEMBLAGE : Fermer l'ouverture sous les manches par une couture. Coudre les boutons sur la bordure devant gauche. |
|
 |
|
Vous avez terminé ce modèle?Alors taguez vos photos avec #dropspattern #wintermorningcardigan ou bien présentez-les dans la galerie #dropsfan Vous avez besoin d'aide pour ce modèle ?Vous trouverez 16 tutoriels vidéo, une rubrique commentaires/questions et plus encore en vous rendant sur la page du modèle sur garnstudio.com © 1982-2026 DROPS Design A/S. Tous droits réservés. Ce document, y compris ces sous-sections, est protégé par les droits d'auteur (copyright). Apprenez-en davantage sur ce que vous pouvez faire avec nos modèles en bas de chacune des pages de notre site. |
|


Avec plus de 40 ans dans la conception de modèles tricot et crochet, DROPS Design offre l'une des plus vastes collections de modèles gratuits sur internet - traduits dans 17 langues. À ce jour, on compte 324 catalogues et 12290 modèles en français.
Nous nous efforçons de vous apporter le meilleur de ce que le tricot et le crochet peuvent vous offrir, inspiration et conseils mais également des fils de haute qualité à des prix incroyables! Vous souhaiteriez utiliser nos modèles autrement que pour un usage personnel? Vous pouvez lire ce que vous êtes autorisés à faire dans le Copyright en bas de page de chacun de nos modèles. Bon tricot!
Poster un commentaire sur le modèle DROPS 141-9
Nous aimerions connaître votre avis sur ce modèle !
Si vous souhaitez poser une question, merci de bien vouloir vérifier que vous avez choisi la bonne catégorie dans le formulaire ci-dessous afin d'accélérer la réponse. Les champs obligatoires sont indiqués par une *.