
Catégories populaires
Vous cherchez un fil?


Commentaires / Questions (68)
![]() Melanie a écrit:
Melanie a écrit:
Can these squares be crocheted together instead of sewn please?
02.03.2020 - 09:04DROPS Design a répondu:
Dear Melanie, sure you can crochet them together instead of sewing them together if you rather. Happy crocheting!
02.03.2020 - 11:21
![]() Leisa Roberts a écrit:
Leisa Roberts a écrit:
Hi how can I download and print this off please
03.07.2019 - 01:17DROPS Design a répondu:
Dear Ms. Roberts, you can print the patttern by clicking on the icon "print: pattern" at any time. Choosing a virtual printer will allow you to save it as a .PDF file. Happy crocheting!
03.07.2019 - 06:52
![]() Lindyloowho a écrit:
Lindyloowho a écrit:
Good morning. Love this blanket. Please can I check for the striped square, should the work be turned at the end of every row or just row 2? Thank you.
21.04.2019 - 10:06DROPS Design a répondu:
Dear Lindyloowho, you turn the work at the end of every row in the striped square. Only the finishing border is worked in round around whole square. Happy crocheting!
21.04.2019 - 13:35
![]() Liliana Gomez Lopez a écrit:
Liliana Gomez Lopez a écrit:
HI. I LOVE THIS PATTERN AND I AM GOING TO DO IT. IN MY COUNTRY WE USUALLY DO DIAGRAMAS TO CROCHET.IT IS EASIER TO FOLLOW AND IT MAY BE USED FOR ALL OVER THE WORLD WITHOUT THE NEED TO KNOW AND UNDERSTAND THE LANGUAGE. THANK YOU.
22.02.2019 - 18:04
![]() Carolyn Lueders a écrit:
Carolyn Lueders a écrit:
On pinterest you show two pictures of the blanket worked up in different colors. Could you tell me the colors of the second one. It has a softer shade of pink
22.11.2018 - 18:41DROPS Design a répondu:
Dear Mrs Lueders, please contact the owner of the picture in Pinterest to get more info s ince the photo is not ours we cannot help there sorry. Your DROPS Store can also help you to find the best colours matching your wishes - even per mail or telephone. Happy crocheting!
23.11.2018 - 11:30
![]() Donna Arundale a écrit:
Donna Arundale a écrit:
I would like too see a video of this that shows the whole process of making the orange blossom Blanket I cannot read patterns and have trouble with reading so having a full version visual tutorail video from beginning too the end is how I learn too do things. I note there are some video links but they dont gel too me watching them so I was wondering if you have a tutorail of this blanket step by step at all.
06.11.2018 - 02:20
![]() Christy Wilson-Murray a écrit:
Christy Wilson-Murray a écrit:
I love the orange blossom throw pattern but was hoping you could tell me the colors that were used in the pink version rather than the orange. Thanks
29.10.2018 - 18:10DROPS Design a répondu:
Dear Christy, not sure what you mean by "the pink version" as the colors for eaxh row of each squareis given in the pattern, the orange/red/pink, and the more pinkish colors as well. Happy Crafting!
30.10.2018 - 03:33Cheryl Taylor a écrit:
I Am trying to find the link to download the free pattern called, \"Easy Crochet 3D Flower\". I keep getting to a site to download Embird. The Flower Picture is on the page with the website listed but there are no directions or any link. Can you please send me a link. TY
10.10.2018 - 15:20DROPS Design a répondu:
Dear Mrs Taylor, do you mean this pattern? This one is only available in our video sections, you'll find the written pattern below the video. Happy crocheting!
10.10.2018 - 16:20Penni a écrit:
This is the first time in going to try something like this ! It's beautiful I hope it turns out as beautiful as it looks!
05.10.2018 - 22:13Neethu Varghese a écrit:
Love all your patterns, great work, I love all the crochet pattern you have on your website and its great that you are giving all these designs for free, great work, i am trying to do the orange blossom and i have question on step 9, you said, repeat from (-) a total of 3 times, but whats (-) i cant quite make from the step although i understood, i have to repeat from *-*, can you please help, i saw the video but its only till 7, can you please do a video for the whole flower
14.07.2017 - 05:14DROPS Design a répondu:
Dear Mrs Varghese, you have to repeat (4 ch, 1 tr(UK-English)/1 dc (US-English) in next ch-loop), repeat from (-) a total of 3 times, ie you will have 4 ch, 1 tr/1 dc, 4 ch, 1 tr/1 dc, 4 ch, 1 tr/1 dc. Then repeat from the first * to the last *. Happy crocheting!
14.07.2017 - 10:09
|
|
Orange Blossom#orangeblossomblanket |
|
 |
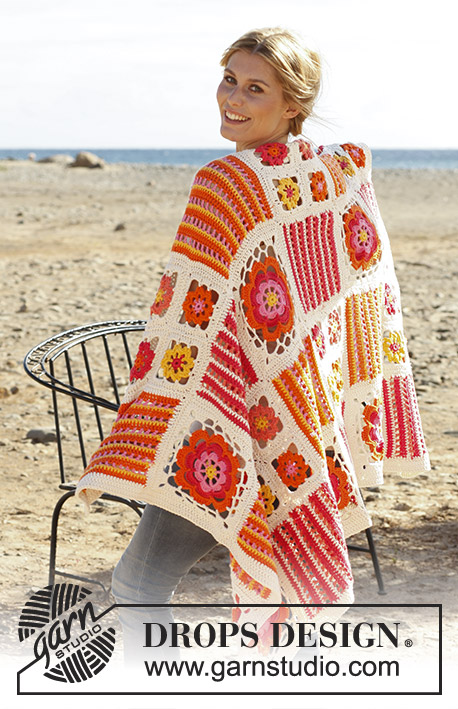 |
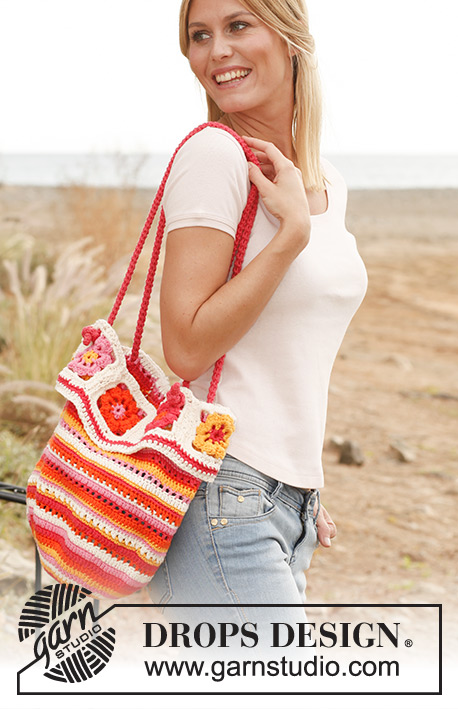
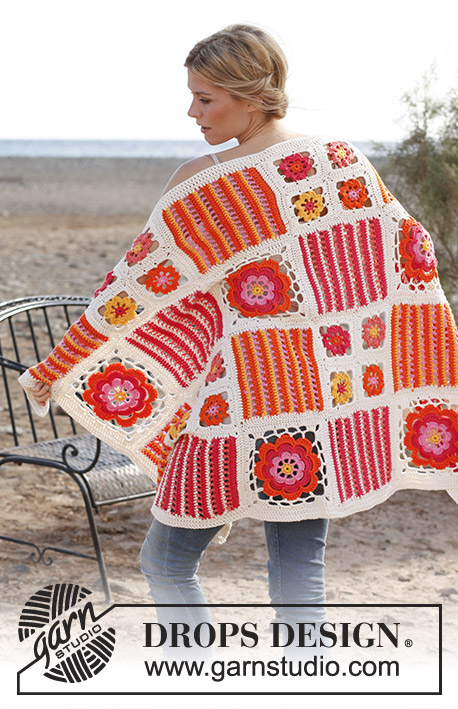
Couverture DROPS composée de différents carrés au crochet, en ”Paris”.
DROPS 139-39 |
|
|
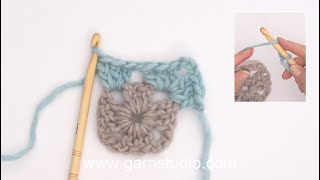
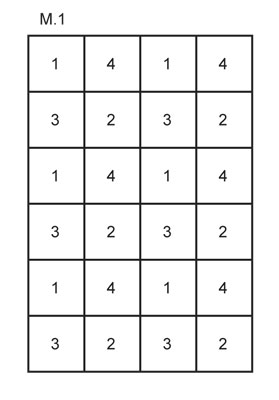
ASTUCE CROCHET : Remplacer la 1ère B de chaque tour/rang par 3 ml. -------------------------------------------------------- COUVERTURE : Elle se compose de 4 sortes de carrés. Réaliser 6 carrés de chaque sorte = un total de 24 carrés. LIRE ASTUCE CROCHET ! CARRÉ 1 (= 1 grande fleur) : Monter une chaînette de 4 ml avec le crochet 5 en jaune vif et joindre en rond avec 1 mc dans la 1ère ml. TOUR 1 : 1 ml, 8 ms dans le rond de ml, terminer par 1 mc dans la 1ère ms, couper le fil. TOUR 2 (en rose moyen) : 6 ml (= 1 B + 3 ml), *1 B dans la ms suiv, 3 ml*, répéter de *-* 7 fois au total et terminer par 1 mc dans la 3ème ml du début du tour = 8 B espacées de 3 ml chacune. TOUR 3 : 1 ml, crocheter ainsi dans chaque arceau : 1 ms, 1 dB, 3 B, 1 dB et 1 ms, terminer le tour par 1 mc dans la ml du début du tour = 8 pétales, couper le fil. TOUR 4 (en framboise) : 7 ml, *1 ms entre les 2 pétales suivants, 6 ml*, répéter de *-* 7 fois au total, terminer le tour par 1 mc dans la 1ère ml du début du tour = 8 arceaux. TOUR 5 : 1 ml, crocheter ainsi dans chaque arceau : 1 ms, 1 dB, 5 B, 1 dB et 1 ms, terminer le tour par 1 mc dans la ml du début du tour = 8 pétales, couper le fil. TOUR 6 (en orange) : 10 ml, *1 ms entre les 2 pétales suivants, 9 ml*, répéter de *-* 7 fois au total, terminer le tour par 1 mc dans la 1ère ml du début du tour = 8 arceaux. TOUR 7 : 1 ml, crocheter ainsi dans chaque arceau : 1 ms, 1 dB, 1 B, 5 DB, 1 B, 1 dB et 1 ms, terminer le tour par 1 mc dans la ml du début du tour = 8 pétales. Couper le fil et le passer dans la m sur le crochet. TOUR 8 (en écru) : Commencer par 1 ms dans la 1ère DB du 1er pétale, 3 ml (= 1 B), *8 ml (= coin), sauter 3 DB, 1 B dans la dernière DB du même pétale, 5 ml, 1 ms dans la première DB du pétale suivant, 5 ml, sauter 3 DB, 1 ms dans la dernière DB du même pétale, 5 ml, 1 B dans la première DB du pétale suivant *, répéter de *-* 4 fois au total mais terminer par 1 mc dans la 3ème ml du début du tour (au lieu d'1 B dans la 1ère DB du pétale suivant). TOUR 9 : 1 mc dans l'arceau de 8 ml, *4 B + 4 ml + 4 B dans l'arceau du coin, (4 ml, 1 B dans l'arceau suivant), répéter de (-) 3 fois au total, 4 ml*, répéter de *-* 4 fois au total, terminer par 1 mc dans la 1ère B du début du tour. TOUR 10 : *1 B dans chacune des 4 premières B, dans l'arceau du coin : 3 B + 2 ml + 3 B, 1 B dans chacune des 4 B suivantes, 4 B dans chacun des 4 arceaux suivants, 1 B dans chacune des 4 B suivantes*, répéter de *-* 4 fois au total, terminer le tour par 1 mc dans la 1ère B du début du tour. On a maintenant 30 B le long de chaque côté et 2 ml dans chaque coin. Couper le fil. Le carré mesure environ 22 x 22 cm. CARRÉ 2 (= 4 petites fleurs) : On a 4 couleurs différentes pour les petits carrés. Carré A : Couleur 1 = framboise, couleur 2 = jaune vif. Carré B: Couleur 1 = orange, couleur 2 = framboise. Carré C: Couleur 1 = rose moyen, couleur 2 = orange. Carré D: Couleur 1 = jaune vif, couleur 2 = abricot. Terminer tous les carrés en écru. Réaliser 6 carrés de chaque couleur. Monter une chaînette de 4 ml avec le crochet 5 et la couleur 1 et joindre en rond avec 1 mc dans la 1ère ml. TOUR 1 : 1 ml, 8 ms dans le rond de ml, terminer par 1 mc dans la 1ère ms, couper le fil. TOUR 2 (en couleur 2) : 5 ml (= 1 ms + 4 ml), *1 ms dans la ms suiv, 4 ml*, répéter de *-* 7 fois au total et terminer par 1 mc dans la 1ère ml du début du tour = 8 ms espacées de 4 ml chacune. TOUR 3 : 1 ml, crocheter ainsi dans chaque arceau : 1 ms, 1 dB, 2 B, 1 dB et 1 ms, terminer le tour par 1 mc dans la ml du début du tour = 8 pétales. Couper le fil. TOUR 4 (en écru) : 1 ms en haut du 1er pétale, *8 ml, 1 ms en haut du pétale suivant, 3 ml, 1 ms en haut du pétale suivant*, répéter de *-* tout le tour mais terminer par 1 mc dans la ms du début du tour. TOUR 5 : Dans l'arceau du coin, crocheter *5 B + 2 ml + 5 B, 4 B dans l'arceau suivant *, répéter de *-* 4 fois au total, terminer par 1 mc dans la 1ère B du début du tour, couper le fil. 1 carré = environ 11 x 11 cm. Réaliser 1 carré dans chaque couleur. Les assembler en un grand carré – coudre bord à bord en écru, maille à maille. Le carré mesure environ 22 x 22 cm. CARRÉ 3 (= rayures) : Monter SOUPLEMENT une chaînette de 31 ml en framboise, tourner. RANG 1 : Crocheter 1 B dans la 4ème ml à partir du crochet, 1 B dans chaque ml = 29 B (la 1ère B = 3 ml). RANG 2 (changer pour le fil abricot) : NOTE: ne pas couper les fils à chaque rayure, mais les faire suivre le long du bord. 4 ml (= 1 B + 1 ml), sauter 1 B, 1 B dans la B suiv, *1 ml, sauter 1 B, 1 B dans la B suiv*, répéter de *-* tout le rang = 14 arceaux, tourner. RANG 3 (changer pour le fil écru) : 1 ml, 1 ms dans chaque B et 1 ms dans chaque ml = 29 ms. RANG 4 (changer pour le fil framboise) : Crocheter 1 B dans chaque ms. Répéter les rangs 2-4 jusqu'à ce que l'ouvrage mesure environ 20 cm – arrêter après un rang 4. Crocheter ensuite 1 tour écru en B tout autour du carré – ajuster pour qu'il y ait 30 B le long de chaque côté et aussi 2 ml dans chaque coin, couper le fil. Le carré mesure environ 22 x 22 cm. CARRÉ 4 : Se réalise comme le carré 3 mais commencer en orange, puis crocheter les rangs 1 et 4 en orange, le rang 2 en rose moyen et le rang 3 en jaune vif. ASSEMBLAGE : Placer les carrés les uns contre les autres comme le montre le diagramme M.1. Les coudre bord à bord en écru, maille à maille. BORDURE DE FINITION : Crocheter 2 tours de B en écru tout autour de la couverture, dans chaque coin faire : 2 B + 2 ml + 2 B à chacun des 2 tours. Couper et rentrer les fils. |
|
 |
|
Vous avez terminé ce modèle?Alors taguez vos photos avec #dropspattern #orangeblossomblanket ou bien présentez-les dans la galerie #dropsfan Vous avez besoin d'aide pour ce modèle ?Vous trouverez 9 tutoriels vidéo, une rubrique commentaires/questions et plus encore en vous rendant sur la page du modèle sur garnstudio.com © 1982-2026 DROPS Design A/S. Tous droits réservés. Ce document, y compris ces sous-sections, est protégé par les droits d'auteur (copyright). Apprenez-en davantage sur ce que vous pouvez faire avec nos modèles en bas de chacune des pages de notre site. |
|


Avec plus de 40 ans dans la conception de modèles tricot et crochet, DROPS Design offre l'une des plus vastes collections de modèles gratuits sur internet - traduits dans 17 langues. À ce jour, on compte 324 catalogues et 12290 modèles en français.
Nous nous efforçons de vous apporter le meilleur de ce que le tricot et le crochet peuvent vous offrir, inspiration et conseils mais également des fils de haute qualité à des prix incroyables! Vous souhaiteriez utiliser nos modèles autrement que pour un usage personnel? Vous pouvez lire ce que vous êtes autorisés à faire dans le Copyright en bas de page de chacun de nos modèles. Bon tricot!
Poster un commentaire sur le modèle DROPS 139-39
Nous aimerions connaître votre avis sur ce modèle !
Si vous souhaitez poser une question, merci de bien vouloir vérifier que vous avez choisi la bonne catégorie dans le formulaire ci-dessous afin d'accélérer la réponse. Les champs obligatoires sont indiqués par une *.