
Catégories populaires
Vous cherchez un fil?


Commentaires / Questions (32)
![]() Ursula a écrit:
Ursula a écrit:
Hej! Jag har kommit till vänster framkant och än så länge stämmer måtten mot skiss. I framkant har jag ca 20 lm-bågar, om jag ska virkar 3 fm om varje båge blir det 60 fm i framkant plus 2 i halskanten, alltså 62 fm. Men i mönstret står det att det ska bli, i min storlek, 117fm. Var blir det fel? (Har provat att virka 3fm även i varje "rombspets" också och fått ihop till 113 fm, men framkanten blir alldeles för lång). Hur ska man göra? Tack på förhand!
28.03.2015 - 14:46DROPS Design a répondu:
Hej Ursula, det kan låta som om du virkar lösare än vi, men om du får det till at se fint ut, så är du ju nästan klar med koftan. Lycka till :)
15.05.2015 - 14:03
![]() Marla Holmquist a écrit:
Marla Holmquist a écrit:
We are making this cardigan and are having trouble understanding how to "decrease for the neck by crocheting 2 rows over only 3 ch-loops on each shoulder (do not crochet over the center5 ch-loops)." Could you please clarify how to get from one side to the other with out crocheting over the middle or binding off and reattaching. Help! Thanks
29.05.2014 - 06:12DROPS Design a répondu:
Dear Mrs Holmquist, you will here crochet the shoulder, simply crochet 2 rows over the 3 ch-loops towards shoulder on one side, leaving remaining ch-loops unworked. Cut the yarn and work 2 rows over the 3 ch-loops towards shoulder on the other side. Happy crocheting!
29.05.2014 - 18:33
![]() AN a écrit:
AN a écrit:
Ich bin heute das erste mal auf Eure tolle Seite gestossen. Frage ist: was bedeuten die Sternchen?(1 fM in die 7. Lm häkeln, * 5 Lm, 5 Lm überspringen, 1 fM in die nächste Lm *, von *-* wiederholen )......es ist gleich zu welcher Anleitung, bei allen gibt es das und ich kann damit nichts anfangen.
09.05.2013 - 15:34DROPS Design a répondu:
Liebe An, die Sternchen markieren eine Stelle. Es steht: „von *-* wiederholen“, bei Ihrem Beispiel wiederholen Sie also fortlaufend: „ 5 Lm, 5 Lm überspringen, 1 fM in die nächste Lm“.
10.05.2013 - 07:45
![]() Pat a écrit:
Pat a écrit:
What does dec for the neck by crocheting 2 rows over only 3-34-4-5 ch-loops on each shoulder (do not crochet over the center 5-6-5-6-6 ch-loops?
26.08.2012 - 20:08DROPS Design a répondu:
Since you only work loops on shoulder not on loops along neck, this will then be a dec for neck. Work each shoulder separately.
28.08.2012 - 02:31
![]() Peyrol a écrit:
Peyrol a écrit:
Le diagramme n'est pas assez expressif pour moi qui suis mal voyante et qui est la passion du crochet dommage
29.06.2012 - 14:45
![]() Jeanette a écrit:
Jeanette a écrit:
Working the sleeves the oattern states to work 12-13-14-14-15 chain loops. For the size i am making, i need to work 14 chain loops i divided in half and have 7 chain loops on front n 7 on back. My question...what about the remaining chain loops at underarm on body if sweater...are they left unworked? There are 5 chain loop left on each side. I cant picture how those remaining loops will be incoporated into the seam
22.03.2012 - 05:02DROPS Design a répondu:
You have the armhole, and spread out the 14 chain loops all around the whole armhole. Start where the first bind off for armhole was made (where the side seam will start) and stop in the other side where first bind off was made. You should not skip any loops at underarm of body.
22.03.2012 - 21:20
![]() Sarah a écrit:
Sarah a écrit:
How do you start on the sleeves? Are they crocheted completely seperate than seamed on, or do you start then on the shoulder?
11.03.2012 - 01:08DROPS Design a répondu:
As the pattern tells; the sleeve is crocheted from the top down. You work 12-13-14-14-15 ch-loops in armhole, with 5 ch in each ch-loop. Then you continue crocheting back and forth in the same way as you were doing on body.
12.03.2012 - 19:50
![]() Margaret-Anne Hilliard a écrit:
Margaret-Anne Hilliard a écrit:
Thank you for asking this question. I've been struggling at this point for days!!!
29.09.2009 - 15:35
![]() DROPS Design a écrit:
DROPS Design a écrit:
Right front: Ch 43-43-49-49-55. Crochet the first row as follows: 1 sc in 7th ch from hook, * ch 5, skip over 5 ch, 1 sc in the next ch *, repeat * - * = 7-7-8-8-9 ch-loops, turn the work. Continue as follows: ch 6, 1 sc in first ch-loop, * ch 5, 1 sc in the next ch-loop *, repeat * - * across row and turn the work.
27.04.2007 - 11:43
![]() Michael a écrit:
Michael a écrit:
Thanks for you help. I have another question for you. It says Right front. Do I ch where I started the cardigan at. Or do I ch at the top where the shoulder is? Right front: Ch 43-43-49-49-55. Crochet as on back = 7-7-8-8-9 ch-loops?
26.04.2007 - 20:07
|
||||||||||
Atlantica |
||||||||||
|
|
||||||||||
Gilet Drops pour Filles au crochet en Muskat
DROPS 90-16 |
||||||||||
|
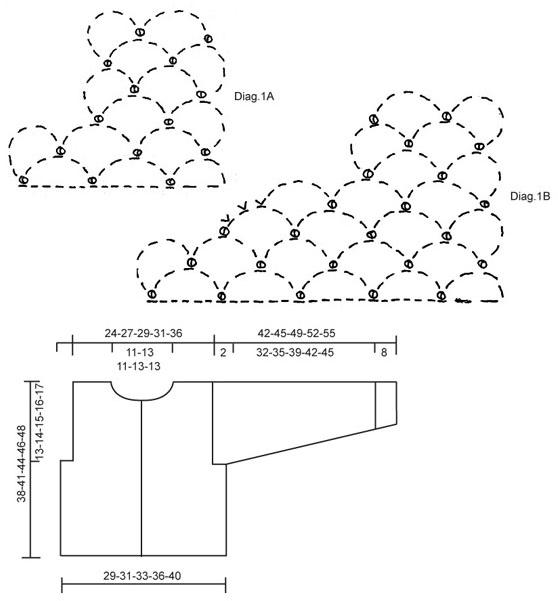
ÉCHANTILLON 4,5 arceaux de large x 10 rangs = 10 x 10 cm POINT FANTAISIE : Voir diagrammes RÉALISATION DOS Monter 75-85-91-97-109 ml, et faire le 1er rang ainsi : 1 ms dans la 7ème ml à partir du crochet, * 5 ml, sauter 5 ml, 1 ms dans la m suiv* répéter de *à* = 13-14-15-16-18 arceaux, tourner et continuer ainsi : 6 ml, 1 ms dans le 1er arceau, * 5 ml, 1 ms dans l’arceau suiv* répéter de *à* tout le rang et tourner A 25-27-29-30-31 cm de hauteur totale, dim pour les emmanchures : continuer comme avant jusqu’à ce qu’il reste 1 arceau, tourner, continuer en arceaux et répéter les diminutions de l’autre côté –voir M1A. il y a 1 arceau de chaque côté en moins = 11-12-13-14-16 arceaux. Continuer comme avant. A 36-39-42-44-46 cm de hauteur totale, dim pour l’encolure en faisant 2 rangs sur les 3-3-4-4-5 arceaux de chaque côté pour les épaules (ne pas travailler sur les 5-6-5-6-6 arceaux du milieu). L’ouvrage mesure env. 38-41-44-46-48 cm, arrêter. DEVANT DROIT Monter 43-43-49-49-55 ml ; travailler comme pour le dos = 7-7-8-8-9 arceaux. A 25-27-29-30-31 cm de hauteur totale, former l’emmanchure sur le côté comme au dos : 6-6-7-7-8 arceaux. A 33-35-38-39-41 cm de hauteur totale, former l’encolure en suiv M1B. Vous avez alors diminué 3 arceaux pour l’encolure et il reste 3-3-4-4-5 arceaux pour l’épaule. Continuer jusqu’à 38-41-44-46-48 cm de hauteur totale et arrêter. DEVANT GAUCHE Comme pour le devant droit mais en sens inverse. ASSEMBLAGE Assembler les épaules ainsi : 1 mc dans le 1er arceau du dos, 3 ml, 1 ms dans le 1er arceau du devant, 3 ml, 1 ms dans le 1er arceau du dos MANCHES Les manches sont réalisées à partir du haut vers le bas ainsi : le long de l’emmanchure faire 12-13-14-14-15 arceaux de 5 ml. Continuer en allers retours comme pour le corps du gilet. A 2 cm de hauteur de manches, mettre un marqueur de chaque côté et mesurer à partir de là. A 2-2-3-3-3 cm de hauteur du marqueur, dim 1 arceau d’un côté - voir M1A A 12-13-15-16-17 cm de hauteur du marqueur, dim 1 arceau de l’autre côté Répéter cette dim de chaque côté 1 fois de plus à 10-11-12-13-14 cm entre chaque diminution = il reste 8-9-10-10-11 arceaux. Continuer jusqu’à 40-43-47-50-53 cm de hauteur du marqueur et arrêter. ASSEMBLAGE Assembler les manches et les côtés de la même façon que pour les épaules. Coudre les manches sous l’emmanchure avec de petits points là où vous avez diminué 1 arceau sur le dos/devant. Encolure : faire 2 rangs de ms autour de l’encolure (le 1er rang sur l’envers) ; à raison de 3 ms par arceau env. faire en sorte que l’encolure ne soit ni trop serrée, ni trop lâche. Bande de boutonnage gauche : faire 4 rangs de ms le long du devant gauche (y compris sur le col – faire le 1er rang sur l’envers – et env 3 ms par arceau) = env. 99-105-114-117-123 ms, tourner avec 1 ml Bande de boutonnage droite : faire de la même façon que pour la bande de devant gauche, mais après 2 rangs, répartir 5 boutonnières. La boutonnière du bas est placée à env. 2 cm du bord inférieur et celle du haut à env. 2 m du bord supérieur. 1 boutonnière = 2 ml, sauter 2 ms, 1 ms dans la m suiv, au rang suiv, faire 2 ms dans l’arceau de 2 ml. Coudre les boutons. |
||||||||||
Légende diagramme(s) |
||||||||||
|
||||||||||
 |
||||||||||
Vous avez terminé ce modèle?Alors taguez vos photos avec #dropspattern ou bien présentez-les dans la galerie #dropsfan Vous avez besoin d'aide pour ce modèle ?Vous trouverez 3 tutoriels vidéo, une rubrique commentaires/questions et plus encore en vous rendant sur la page du modèle sur garnstudio.com © 1982-2026 DROPS Design A/S. Tous droits réservés. Ce document, y compris ces sous-sections, est protégé par les droits d'auteur (copyright). Apprenez-en davantage sur ce que vous pouvez faire avec nos modèles en bas de chacune des pages de notre site. |
||||||||||


Avec plus de 40 ans dans la conception de modèles tricot et crochet, DROPS Design offre l'une des plus vastes collections de modèles gratuits sur internet - traduits dans 17 langues. À ce jour, on compte 324 catalogues et 12290 modèles en français.
Nous nous efforçons de vous apporter le meilleur de ce que le tricot et le crochet peuvent vous offrir, inspiration et conseils mais également des fils de haute qualité à des prix incroyables! Vous souhaiteriez utiliser nos modèles autrement que pour un usage personnel? Vous pouvez lire ce que vous êtes autorisés à faire dans le Copyright en bas de page de chacun de nos modèles. Bon tricot!
Poster un commentaire sur le modèle DROPS 90-16
Nous aimerions connaître votre avis sur ce modèle !
Si vous souhaitez poser une question, merci de bien vouloir vérifier que vous avez choisi la bonne catégorie dans le formulaire ci-dessous afin d'accélérer la réponse. Les champs obligatoires sont indiqués par une *.