
Catégories populaires
Vous cherchez un fil?


Commentaires / Questions (131)
![]() Yvonne a écrit:
Yvonne a écrit:
Ik vind het patroon echt erg moeilijk. Bijvoorbeeld hoeveel keer M1, M2 enz. enz. Ik heb het werk nu al drie keer uitgetrokken terwijl ik in 1 kleur brei. Als ik naar de instructievideo kijk wordt ik niet veel wijzer. Heeft u dit patroon niet in Jip en Janneke taal? Ik hoop dat u kunt helpen.
03.11.2017 - 21:30DROPS Design a répondu:
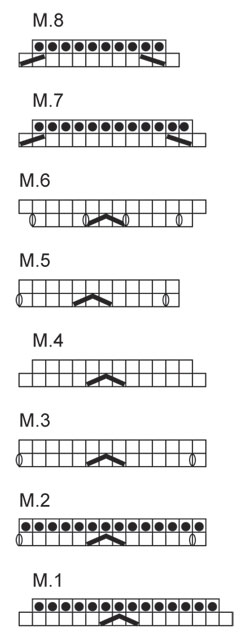
Hallo Yvonne, We hebben het patroon zo geschreven, zodat het voor iedereen begrijpelijk zou moeten zijn. Je kunt altijd hier terrecht voor vragen, maar je kunt ook bij je verkooppunt vragen om hulp, zodat iemand met je mee kan kijken. Na het opzetten brei je een aantal herhalingen (hoeveel is afhankijlijk van je maat) in de breedte van A.1 en A.1 brei je één keer in de hoogte. De getallen waar streepjes tussen staan corresponderen met de maten, dus als er bijv. staat 168-180-192-216-240-264 steken op de naald is dat 168 voor S, 180 voor M en zo verder.
04.11.2017 - 13:41Sandra Martins a écrit:
Hello again! I realised that on my phone the box with description of the diagram often doesn't have the symbols in it, that's why it all looked the same. I got to the bit on size S-L, and now it says to work M6 over the next 8 repetitions, but M6 is an increase and if increased once, you cannot repeat it. can you help? Many thanks, Sandra
09.04.2017 - 19:29DROPS Design a répondu:
Dear Mrs Martins, in size L, you will work M.5 over the first 4 repeats (= as before), but now work M.6 over the next 8 repeats (= you will inc over the next 8 repeats), work M.5 over the 4 next repeats as before. When you have worked M.6 1 time in height, work M.3 over M.6 but work M.5 as before over the repeats of M.5. Happy knitting!
12.04.2017 - 11:41
![]() Sandra Martins a écrit:
Sandra Martins a écrit:
Hi, I'm looking forward to do this project but cannot work out why knit and purl are both represented in the diagram the same way (white box), nor can I understand how the pattern is worked out. Many thanks for your help, Sandra
06.03.2017 - 23:55DROPS Design a répondu:
Dear Mrs Martins, the white box in diagram will be worked K from RS and the dot will be worked P, so that in M1 for example you work 1 round K (with dec on 1st round), 1 round P and in M.3, you will work 2 rounds (with dec/inc on 1st row). Happy knitting!
07.03.2017 - 09:06
![]() Lucie a écrit:
Lucie a écrit:
Dobrý den, vzor M1 má kolik řad ? aby byla sekvence dokončená ? a chápu dobře, že se ve vzoru M1 plete hladce 7ok a poté se dle schéma splétá ? děkuji za radu.
19.06.2016 - 22:28DROPS Design a répondu:
Dobrý den, Lucie, vzor M.1 je tvořen 2 řadami (lícovou a rubovou). V lícové řadě upleteme 7 ok hladce, pak 3 oka spleteme - přetažením, tj. 1 oko sejmeme hladce, 2 oka spleteme hladce a to sejmuté přes ně přetáhneme - pak upleteme 6 ok hladce a začneme zase od začátku. V následující řadě (rubové) upleteme všechna oka obrace. Tím je dokončena celá sekvence vzoru M.1. Hodně zdaru! Hana
20.06.2016 - 07:04
![]() Øygunn a écrit:
Øygunn a écrit:
Ang. høyre stolpe :etter at jeg har strikket 3 rette og snudd: skal jeg strikke helt frem til der jeg strikket tre rette eller blir det 6 masker til sammen der jeg skal øke?
16.09.2015 - 10:04DROPS Design a répondu:
Hej Øygunn, Du vender og strikker helt fram til før de 3 m midt bak, legg deretter opp 6 nye m på slutten av p midt bak til høyre stolpe. Det er altså nye m du legger op (så det overlapper den anden side. God fornøjelse!
16.09.2015 - 15:06
![]() Andrea Jacobsen a écrit:
Andrea Jacobsen a écrit:
Når jeg afprøver strikkefastheden følgetr jeg diagrammet, så jeg kan lave sik-sakmønster. Men jeg øger maskeantallet ved at følge mønstret, og dermed ikke i stand til at måle mon strikkefasthed, hvad gør jeg forkert ? mvh Andrea
05.09.2015 - 18:32DROPS Design a répondu:
Hej Andrea. Pröv at strikke din pröve efter M.2, M.3 eller M.5, der aendres antallet af masker ikke.
08.09.2015 - 15:47
![]() Dianne a écrit:
Dianne a écrit:
What does the guage directions mean? - "US 6 - or size needed to get 24 sts with zigzag pattern=width 4" ; I'm used to the pattern giving me the amount of stitches horizontally and vertically to make a 4" swatch. Please help! Thanks, Diannw
05.07.2015 - 01:05DROPS Design a répondu:
Dear Dianne, in zigzag pattern tension should be 24 sts = 4" in width with larger needle, height can be adjusted with the measurements, but you should get a tension of 22 sts x 46 rows in garter sts = 4"x4" with smaller needdle. Happy knitting!
06.07.2015 - 10:03
![]() Ann a écrit:
Ann a écrit:
Hi You helped a lot with the rows ie M1 M2 etc, it would be so good if the pattern had said that, but now I want to ask about the colour changes. Can you simplify that for me. The stripes in ridges and stripes in stocking stitch is confusing me. Do you mean follow the ridge colours on the decreasing rows (which form the ridge) and the colours in stocking stich when you are not decreasing? Thanks.
31.05.2015 - 19:54DROPS Design a répondu:
Dear Ann, 1 ridge = 2 rounds in garter st (= K 1 round, P 1 round), M2 is worked in garter st ie you will work M2 in garter st a total of 22 rounds - 11 ridges), then continue working the other diagrams following the stripes in stocking st. Happy knitting!
01.06.2015 - 10:42
![]() Ann a écrit:
Ann a écrit:
I love the pattern but its so complicated. You do M1 for row 1 then do you do M2 for 1 row then M3 for 1 row then repeat these 3 rows over and over, or do you do M1 in 1 colour then M2 in next colour then M3 in next and so on. I've knitted lots of things but never seen a pattern which gives lots of different things to do but no clear instructions. Very very disappointed after I bought all the materials then found the pattern so baffling. Can anyone help?
28.05.2015 - 19:49DROPS Design a répondu:
Dear Ann, you first work the 2 rows in M.1, then the 2 rows in M2 while working the stripes in garter st, then repeat the 2 rows in M3 with the stripes in stocking st until piece measures 18 cm, then work the 2 rows in M4 and repeat the 2 rows in M5 until piece measures 23 cm while continuing stripes in st st in M4 and M5. Then continue as stated in pattern. Happy knitting!
29.05.2015 - 09:32
![]() Lise a écrit:
Lise a écrit:
Har nå endelig knekt koden på denne toppen etter mang en gang å ha rekt opp, men hadde bestemt meg på at denne skulle jeg klare. Synes det er vanskelig å lese og forstå denne oppskriften men strikker nå min andre topp av dette mønsteret men lager den litt lengre enn oppskriften sier.
23.05.2015 - 13:42
|
|||||||||||||||||||
Breaking Waves Top#breakingwavestop |
|||||||||||||||||||
 |
 |
||||||||||||||||||
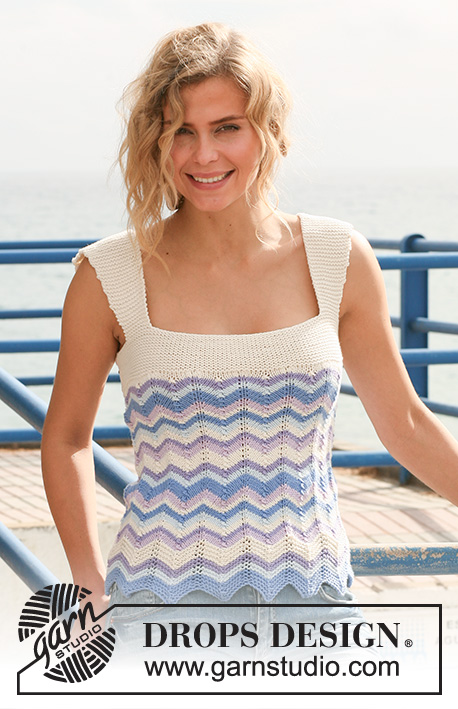
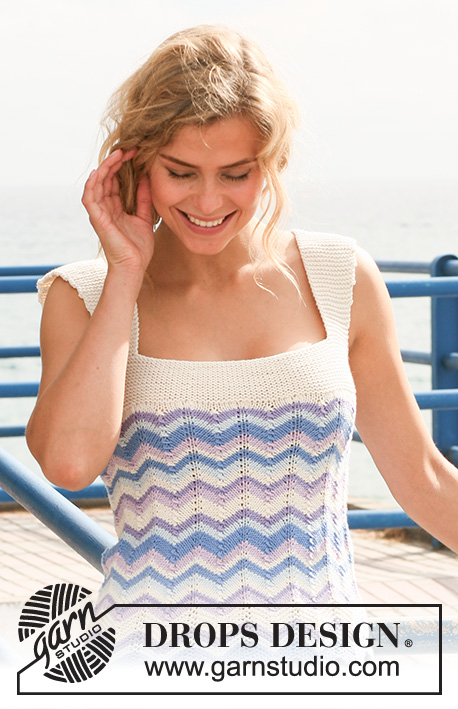
Débardeur DROPS au point de zigzag et rayures, en ”Muskat”. Du S au XXXL.
DROPS 128-3 |
|||||||||||||||||||
|
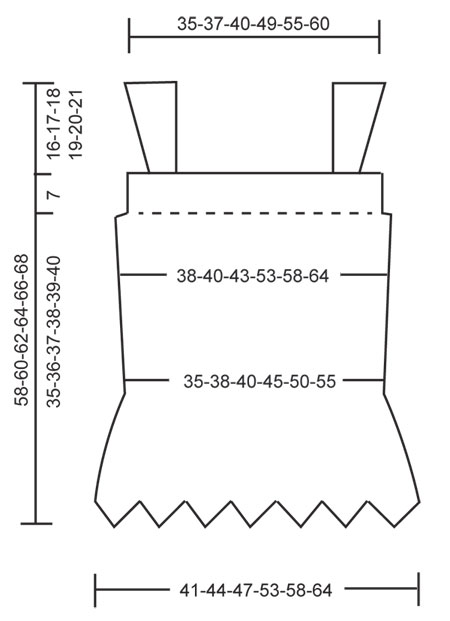
POINT MOUSSE (en rond sur l'aiguille circulaire) : * 1 tour end, 1 tour env *, répéter de *-*. POINT MOUSSE (en allers et retours) : Tricoter tous les rangs à l'endroit. POINT FANTAISIE : Voir diagrammes M.1 - M.8. RAYURES AU POINT MOUSSE : (1 fois M.2 en hauteur = 2 tours au point mousse) 6 tours en bleu clair 4 tours en bleu glacier 4 tours en bleu mauve clair 8 tours en écru RAYURES EN JERSEY : 3 tours en lilas 2 tours en bleu mauve clair 3 tours en écru 3 tours en bleu glacier 3 tours en bleu clair 2 tours en écru 3 tours en lilas 5 tours en bleu clair 3 tours en bleu glacier 3 tours en bleu mauve clair 5 tours en écru Répéter les séquences des rayures jusqu'à indication contraire. BOUTONNIÈRES : Ouvrir les boutonnières sur la bordure de boutonnage de droite. 1 boutonnière = tricoter ens à l'end la 2ème et la 3ème m à partir du bord sur l'endroit, 1 jeté. -------------------------------------------------------- DÉBARDEUR : Se tricote en rond sur l'aiguille circulaire. Monter 224-240-256-288-320-352 m avec l'aiguille circulaire 4 en bleu clair. Tricoter M.1 sur toutes les mailles - voir POINT FANTAISIE (= 14-15-16-18-20-22 fois M.1). Quand M.1 a été tricoté 1 fois en hauteur, on a 196-210-224-252-280-308 m. PENSER À BIEN CONSERVER LA MÊME TENSION QUE POUR L'ÉCHANTILLON ! Continuer en suivant M.2 au-dessus de M.1 EN MÊME TEMPS tricoter les RAYURES AU POINT MOUSSE - voir ci-dessus ! Continuer en suivant M.3 sur toutes les mailles EN MÊME TEMPS tricoter les RAYURES EN JERSEY - voir ci-dessus ! À 18 cm de hauteur totale, (arrêter après un motif complet de M.3 en hauteur), tricoter M.4 au-dessus de M.3. Quand M.4 a été tricoté 1 fois en hauteur, on a 168-180-192-216-240-264 m. Continuer en suivant M.5 au-dessus de M.4. À 23 cm de hauteur totale, tricoter ainsi dans les différentes tailles (début du tour = milieu dos) : TAILLE S-L : Continuer en M.5 sur les 4-4-4 premiers motifs comme avant, tricoter M.6 au-dessus des 6-7-8 motifs suivants, continuer M.5 au-dessus des 4-4-4 motifs restants comme avant (= 2 tours) = 180-194-208 m. Tricoter M.3 au-dessus de M.6, tricoter les autres motifs de M.5 comme avant (= 2 tours). Continuer ensuite en répétant les 2 derniers tours du point fantaisie. TAILLE XL-XXXL : Tricoter M.6 au-dessus de M.5. Quand M.6 a été tricoté 1 fois en hauteur (= 2 tours), on a 252-280-308 m sur l'aiguille. Tricoter ensuite M.3 au-dessus de M.6 (= 2 tours). Continuer ensuite à répéter les 2 derniers tours du point fantaisie. TOUTES LES TAILLES : À 35-36-37-38-39-40 cm de hauteur totale, terminer la dernière rayure et le point zigzag (après un motif complet en hauteur). Continuer avec l'aiguille circulaire 2.5 en écru. Tricoter ensuite ainsi à partir du début du tour (= milieu dos) : M.7 au-dessus de tous les motifs M.3 et M.8 au-dessus de tous les motifs M.5 = 152-164-176-216-240-264 m. Tricoter le tour suivant ainsi : 3 m end, tourner, et tricoter 1 rang end sur l'envers jusqu'au 3 m au milieu dos, puis monter 6 m à la fin du rang, au milieu dos pour la bordure de boutonnage = 158-170-182-222-246-270 m. Continuer au POINT MOUSSE en allers et retours sur toutes les mailles - voir ci-dessus ! À 2 cm de hauteur point mousse, ouvrir la 1ère BOUTONNIÈRE - voir ci-dessus ! Ouvrir une autre boutonnière à 5 cm de hauteur point mousse. À 7 cm en hauteur de point mousse (le débardeur mesure maintenant 42-43-44-45-46-47 cm de hauteur totale), tricoter le rang suivant sur l'endroit ainsi : Rabattre les 24-25-26-27-28-29 premières m. Tricoter ensuite une moitié de bretelle en allers et retours au-dessus des m suivantes m ainsi : 12-13-14-15-16-17 m end, tourner et tricoter le rang suivant au-dessus des 12-13-14-15-16-17 m, continuer à l'endroit en allers et retours sur ces mailles. EN MÊME TEMPS après 4 rangs point mousse en hauteur, augmenter 1 m en tricotant 2 fois à l'endroit la dernière m sur l'endroit. Répéter ces augmentations 9-9-9-10-10-10 fois au total tous les 8 rangs = 21-22-23-25-26-27 m. Rabattre à l'endroit quand la bretelle mesure 16-17-18-19-20-21 cm. Rabattre les 10-12-14-30-38-46 m suivantes du débardeur (1ère emmanchure). Tricoter la moitié de la bretelle au-dessus des 12-13-14-15-16-17 m suivantes, EN MÊME TEMPS augmenter en tricotant 2 fois à l'end la dernière m sur l'envers. Rabattre quand la bretelle mesure 16-17-18-19-20-21 cm. Rabattre les 42-44-46-48-50-52 m suivantes du milieu devant du débardeur. Tricoter une moitié de bretelle sur les 12-13-14-15-16-17 m suivantes (augmenter sur le côté en tricotant 2 fois à l'end la dernière m sur l'endroit). Rabattre quand la bretelle mesure 16-17-18-19-20-21 cm. Rabattre les 10-12-14-30-38-46 m suivantes du débardeur (2ème emmanchure). Tricoter une moitié de bretelle au-dessus des 12-13-14-15-16-17 m suivantes (augmenter sur le côté en tricotant 2 fois la dernière m sur l'envers). Rabattre quand la bretelle mesure 16-17-18-19-20-21 cm. Rabattre les 24-25-26-27-28-29 m restantes. L'ouvrage mesure maintenant environ 58-60-62-64-66-68 cm. ASSEMBLAGE : Faire la couture des épaules (bretelles). Coudre avec quelques points le bord de montage de la bordure de boutonnage devant le bas de la bordure de gauche. Coudre les boutons sur la bordure devant gauche. |
|||||||||||||||||||
Légende diagramme(s) |
|||||||||||||||||||
|
|||||||||||||||||||
 |
|||||||||||||||||||
 |
|||||||||||||||||||
Vous avez terminé ce modèle?Alors taguez vos photos avec #dropspattern #breakingwavestop ou bien présentez-les dans la galerie #dropsfan Vous avez besoin d'aide pour ce modèle ?Vous trouverez 19 tutoriels vidéo, une rubrique commentaires/questions et plus encore en vous rendant sur la page du modèle sur garnstudio.com © 1982-2026 DROPS Design A/S. Tous droits réservés. Ce document, y compris ces sous-sections, est protégé par les droits d'auteur (copyright). Apprenez-en davantage sur ce que vous pouvez faire avec nos modèles en bas de chacune des pages de notre site. |
|||||||||||||||||||


Avec plus de 40 ans dans la conception de modèles tricot et crochet, DROPS Design offre l'une des plus vastes collections de modèles gratuits sur internet - traduits dans 17 langues. À ce jour, on compte 324 catalogues et 12290 modèles en français.
Nous nous efforçons de vous apporter le meilleur de ce que le tricot et le crochet peuvent vous offrir, inspiration et conseils mais également des fils de haute qualité à des prix incroyables! Vous souhaiteriez utiliser nos modèles autrement que pour un usage personnel? Vous pouvez lire ce que vous êtes autorisés à faire dans le Copyright en bas de page de chacun de nos modèles. Bon tricot!
Poster un commentaire sur le modèle DROPS 128-3
Nous aimerions connaître votre avis sur ce modèle !
Si vous souhaitez poser une question, merci de bien vouloir vérifier que vous avez choisi la bonne catégorie dans le formulaire ci-dessous afin d'accélérer la réponse. Les champs obligatoires sont indiqués par une *.