
Catégories populaires
Vous cherchez un fil?


Commentaires / Questions (82)
![]() Delphine a écrit:
Delphine a écrit:
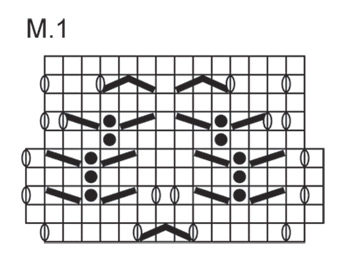
Bonjour, je tricote ce modèle et j'ai beaucoup d'incertitudes en passant du rang 5 au rang 6 avec les mailles envers. La 1ère maille envers du rang 6 doit être tricotée au bout de combien de mailles du bord ? Car j'ai souvent 1 maille de plus au début ou à la fin des rangs. Pourquoi sur les rangs de 1 à 4 y a t il une maille supplémentaire au début et à la fin et pas sur les autres rangs ? En vous remerciant par avance pour votre aide.
02.11.2020 - 19:08DROPS Design a répondu:
Bonjour Delphine, au rang 1, on fait 4 jetés et on diminue 2 m = on augmente 2 m. Aux rangs 2 à 4,o n va donc tricoter sur 16 m. Au rang 5, on diminue 4 m, mais on ne fait que 2 jetés = on se retrouve de nouveau avec 14 m. Les mailles envers des rangs 6 et 7 seront alignées au-dessus des précédentes, même si elles apparaissent décalées dans le diagramme . Pour vous aider, pensez à mettre un marqueur entre chaque diagramme à répéter, vous pourrez ainsi plus facilement vérifier votre nombre de mailles dans chaque motif à répéter, à chaque rang. Bon tricot!
03.11.2020 - 08:28
![]() Katarzyna Matejek a écrit:
Katarzyna Matejek a écrit:
Witam czy na lewej stronie sobutki robimy oczka lewe. A na prawej stronie robótki według schematu?
22.02.2019 - 15:27DROPS Design a répondu:
Witaj Kasiu, na prawej stronie robótki (rzędy nieparzyste schematu) przerabiamy wg schematu, a na lewej stronie robótki (rzędy parzyste) przerabiamy wszystkie oczka na lewo, za wyjątkiem tych które są oznaczone symbolem czarnej kropki, które są przerabiane na prawo na lewej stronie robótki. Powodzenia!
22.02.2019 - 16:54
![]() Rosy a écrit:
Rosy a écrit:
Bonjour, est-il possible de tricoter ce modèle avec de la laine "Lace" avec un fil en double, ou bien faut-il le laisser en simple fil ? Merci !
07.01.2019 - 12:58DROPS Design a répondu:
Bonjour Rosy, vous pouvez probablement tricoter ce modèle en DROPS Lace, en simple, mais le motif sera plus ajouré - il pourra être ensuite bloqué. N'hésitez pas à demander conseil à votre magasin - même par mail ou téléphone. Bon tricot!
07.01.2019 - 14:36
![]() Susanne Axelsen a écrit:
Susanne Axelsen a écrit:
Hej Når jeg skal starte pind 6, hvad gør jeg så efter de 4 retmasker .....?
31.12.2018 - 10:51DROPS Design a répondu:
Hei Susanne. Jeg antar du mener pinne 6 i M.1? Du følger diagrammet som vanlig (Pinne 6 strikkes fra vrangsiden): etter de 6 rillemaskene i siden strikker du altså 3 masker vrang, 1 maske rett, 5 masker vrang, 1 maske rett, 4 masker vrang. Første rapport av M.1 er ferdig og denne gjentar du til det gjenstår 4 masker på pinnen,. Strikk 4 masker i rille som vanlig (retmasker på dansk). God fornøyelse
04.01.2019 - 09:27
![]() Valeria a écrit:
Valeria a écrit:
Dit patroon klopt niet: als je 2 gebreide delen aan elkaar gaat breien, kloppen de rijen niet! Dit komt doordat de zijkanten verschillend zijn. Je moet eigenlijk bij deel 2 links en rechts omwisselen.
13.11.2018 - 23:42
![]() Clarissa Koeditz a écrit:
Clarissa Koeditz a écrit:
Have you actually made this piece?? If you had, you would know what I am talking about. If both of the outsides of each piece were exactly the same, then what you are telling me would work. But, they are not. One side has an extra stockinette stitch and if you simply put the right sides together, you would see that the extra stockinette stitch would be on opposite sides of each other.
01.04.2018 - 00:54DROPS Design a répondu:
Dear Mrs Koeditz, both pieces are the same: you finish M.1 with a WS row and K 3 rows (= 1 row from RS, 1 row from WS and 1 row from RS). Then graft sts from both pieces together from RS. For any further personnal assistance you are welcome to contact the store where you bought your yarn, even per mail or telephone, they will be able to explain you. Happy assembly!
03.04.2018 - 08:39
![]() Clarissa Koeditz a écrit:
Clarissa Koeditz a écrit:
I sewed each half exactly the same way, which means that when you hold them up side-by-side, they have that one stitch in stickinette on the same side. But when I turn one half to make the right sides together so I can graft them, that stockinette stitch on the half that I turned is now on the opposite side. I would basically have to make one half backward from the other to make the stockinette stitch on the same side when I graft them.
28.03.2018 - 20:29DROPS Design a répondu:
Dear Mrs Koeditz, last row on both pieces has been worked from RS, place both pieces from RS to graft them together with kitchener stitches. Happy assemby!
30.03.2018 - 11:51
![]() Halina Andruszkiewicz a écrit:
Halina Andruszkiewicz a écrit:
Witam nie mogę rozszyfrować tego wzoru nie zgadza mi się ilość oczek proszę o instrukcję wzór jest bardzo ładnyi chciałabym wykorzystać na swoją robótkę. Z góry dziękuję.
14.03.2018 - 07:46DROPS Design a répondu:
Witaj Halino! Niestety nie ma dokładnego opisu tego wzoru, a tylko schemat na dole. Nad schematem znajduje się legenda. Schemat odczytujemy od prawego dolnego rogu, od prawej do lewej strony na prawej stronie robótki, i od lewej do prawej strony na lewej stronie robótki. Najlepiej umieścić marker między każdym kolejnym powtarzanym motywem, aby uniknąć pomyłek. W razie pytań proszę o kontakt. Miłej pracy!
14.03.2018 - 14:04
![]() Clarissa Koeditz a écrit:
Clarissa Koeditz a écrit:
For pattern 127-39: In the chart pattern, on the 6th row, the pattern goes down by 2 sets {1 st at each end). How do I handle these missing stitches? Do I slip st?
04.02.2018 - 15:58DROPS Design a répondu:
Dear Mrs Koeditz, on row 5 in pattern you will dec 4 sts while only making 2 YOs, ie you will decrease 2 sts in each repetition of M.1. Happy knitting!
05.02.2018 - 09:44
![]() Laure B. a écrit:
Laure B. a écrit:
Bonjour, Est-il possible d'avoir la marche à suivre de ce modèle par écrit, et non avec le schéma. Je suis très nulle avec les schémas mais par contre si j'ai le détail avec les explications écrites j'y arrive. Merci d'avance. Cordialement, Laure
27.08.2017 - 23:17DROPS Design a répondu:
Bonjour Laure B, il n'existe qu'un diagramme pour les explications de ce motif, vous trouverez la légende juste au-dessus du diagramme. Lisez le diagramme en commençant en bas à droite, de droite à gauche sur l'endroit et de gauche à droite sur l'envers. N'hésitez pas à ajouter des marqueurs entre chaque motif à répéter pour bien vous repérer et éviter les erreurs. Bon tricot!
29.08.2017 - 11:58
|
|||||||||||||||||||
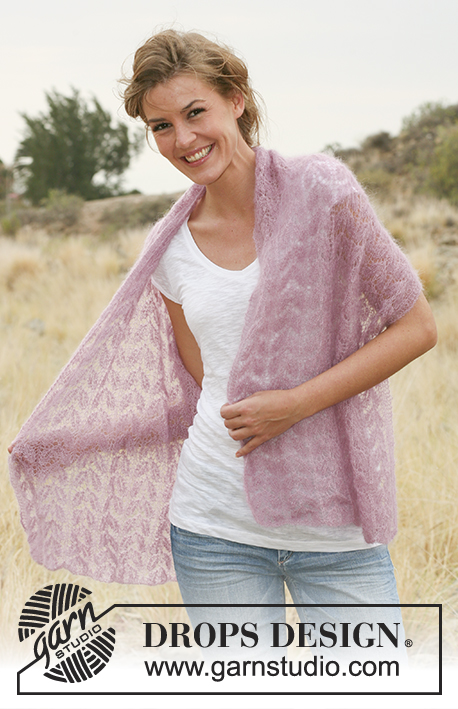
Silk Leaves#silkleavesshawl |
|||||||||||||||||||
 |
 |
||||||||||||||||||
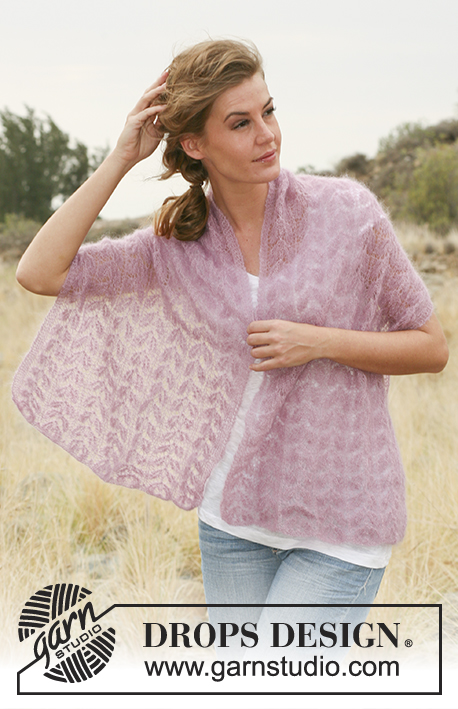
Étole ajourée DROPS tricotée en "Kid-Silk".
DROPS 127-39 |
|||||||||||||||||||
|
POINT FANTAISIE : Voir M.1 (le diagramme montre le motif sur l'endroit) POINT MOUSSE (en allers et retours) : Tricoter tous les rangs à l'endroit. ASTUCE : Le nombre de mailles varie en fonction du rang tricoté en point fantaisie. Il peut être sage de placer un marqueur entre chaque motif à répéter. -------------------------------------------------------- ÉTOLE : Se tricote en allers et retours sur aiguille circulaire pour avoir suffisamment de place pour y loger toutes les mailles. Monter 107 m sur l'aiguille circulaire 3.5 en Kid-Silk. Tricoter 4 rangs point mousse - voir ci-dessus. Continuer ainsi : 4 m au point mousse, M.1 (1er rang = endroit) sur les 98 m suivantes (= 7 fois – lire ASTUCE), 1 m end et 4 m au point mousse. Continuer ainsi jusqu'à environ 70 cm de hauteur totale (ajuster après un motif complet, le rang suivant doit être sur l'endroit). Tricoter ensuite 3 rangs endroit sur toutes les mailles avant de toutes les glisser en attente sur un arrêt de mailles. La 1ère moitié de l'étole a été tricotée. Tricoter la 2ème moitié de la même façon. Assembler les mailles en attente des 2 pièces ensemble en grafting. |
|||||||||||||||||||
Légende diagramme(s) |
|||||||||||||||||||
|
|||||||||||||||||||
 |
|||||||||||||||||||
Vous avez terminé ce modèle?Alors taguez vos photos avec #dropspattern #silkleavesshawl ou bien présentez-les dans la galerie #dropsfan Vous avez besoin d'aide pour ce modèle ?Vous trouverez 14 tutoriels vidéo, une rubrique commentaires/questions et plus encore en vous rendant sur la page du modèle sur garnstudio.com © 1982-2026 DROPS Design A/S. Tous droits réservés. Ce document, y compris ces sous-sections, est protégé par les droits d'auteur (copyright). Apprenez-en davantage sur ce que vous pouvez faire avec nos modèles en bas de chacune des pages de notre site. |
|||||||||||||||||||


Avec plus de 40 ans dans la conception de modèles tricot et crochet, DROPS Design offre l'une des plus vastes collections de modèles gratuits sur internet - traduits dans 17 langues. À ce jour, on compte 324 catalogues et 12291 modèles en français.
Nous nous efforçons de vous apporter le meilleur de ce que le tricot et le crochet peuvent vous offrir, inspiration et conseils mais également des fils de haute qualité à des prix incroyables! Vous souhaiteriez utiliser nos modèles autrement que pour un usage personnel? Vous pouvez lire ce que vous êtes autorisés à faire dans le Copyright en bas de page de chacun de nos modèles. Bon tricot!
Poster un commentaire sur le modèle DROPS 127-39
Nous aimerions connaître votre avis sur ce modèle !
Si vous souhaitez poser une question, merci de bien vouloir vérifier que vous avez choisi la bonne catégorie dans le formulaire ci-dessous afin d'accélérer la réponse. Les champs obligatoires sont indiqués par une *.