
Catégories populaires
Vous cherchez un fil?


Commentaires / Questions (21)
![]() Julia Schueler a écrit:
Julia Schueler a écrit:
Hallo, ich habe nicht richtig aufgepasst und den Kragenteil nicht rund sondern hin und her gestrickt. Nach 27cm aufgeteilt und eine Seite nun in Hin und Her fertig gestellt. Ich kann mir irgendwie nicht vorstellen, wie das Teil nachher aussieht oder angezogen wird. Ich werde nun den Kragen zusammen naehen, damit er rund wird. Haben Sie noch einen Tipp? Danke im Voraus, Julia
12.12.2014 - 13:42DROPS Design a répondu:
Antwort siehe unten! :-)
14.12.2014 - 10:24
![]() Julia Schueler a écrit:
Julia Schueler a écrit:
Hallo, ich habe nicht richtig aufgepasst und den Kragenteil nicht rund sondern hin und her gestrickt. Nach 27cm aufgeteilt und eine Seite nun in Hin und Her fertig gestellt. Ich kann mir irgendwie nicht vorstellen, wie das Teil nachher aussieht oder angezogen wird. Ich werde nun den Kragen zusammen naehen, damit er rund wird. Haben Sie noch einen Tipp? Danke im Voraus, Julia
12.12.2014 - 10:48DROPS Design a répondu:
Sie können auf dem Foto ja das Vorderteil sehen, dieser "Lappen", der sich an den Halsteil anschließt. Das sieht auf der Rückseite, im Nacken den Rücken runter, ebenso aus. Wenn Ihnen das hinten zu lang ist, können Sie den hinteren Teil auch einfach kürzer stricken. Sie können den oberen Teil des Kragens, den Halsteil, einfach zusammennähen, das ist kein Problem.
14.12.2014 - 10:01
![]() Kate a écrit:
Kate a écrit:
V popisu je spatna delka lanka, ma byt 60cm ne 80cm, pro zacatecnika to muze byti matouci. Diky za opravu.
08.12.2014 - 14:52DROPS Design a répondu:
Dobrý den, díky za upozornění - opraveno.
10.12.2014 - 00:10Diane Carlson a écrit:
Hi again. I just posted a question but have found my answer in the other comments made for this pattern. Looks like I have to rip out a row and get back to 120 stitches. Oh well, live and learn!
23.11.2014 - 03:08Diane Carlson a écrit:
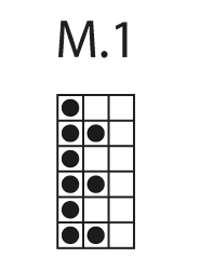
I have started this pattern but am confused about the M1 on all stitches. Will I have 240 stitches on my needle after I M1 on all stitches? Thank you for your help.
23.11.2014 - 03:00DROPS Design a répondu:
Dear Mrss Carlson, you have 120 sts for the neck warmer (ie "collar"), you work M1 on all sts, ie you repeat the 3 sts in diagram a total of 40 times around (Row 1 = *K1, P2* repeat from *-* around). When piece measures 27 cm, divide work in 2 pieces and finished each piece (front & back piece = 60 sts each) separately back and forth on needle. Happy knitting!
24.11.2014 - 11:04
![]() Carole a écrit:
Carole a écrit:
It did not say in the pattern to start at the bottom right square and read from right to left every round . Now I am dividing the stitches. My last right side row was K1P2 reading from right to left. Now going back on the wrong side am I going to K1P2 or am I going to P2K1? Pattern just not matching.
20.01.2014 - 01:43DROPS Design a répondu:
Dear Carole, look at your last st worked from RS at the end of row and mark it on the diagram, you will then know how where to start from WS. Happy knitting!
20.01.2014 - 09:24
![]() Carole a écrit:
Carole a écrit:
My last row on right side on 60 stitches was Purl 2 Knit 1 and then I added a stitch on the end to make 61. Please just tell me what to do going back across on the wrong side. I have worked on this all day and keep ripping out. I did not have any trouble until I divided the stitches. Thank you.
04.01.2014 - 06:14DROPS Design a répondu:
Dear Carole, just mark in diagram where you stopped from RS and continue following diag back and forth, reading from right to left the RS rows and from right to left the WS rows. the first 2 sts each side should be worked in garter st. Happy knitting!
04.01.2014 - 10:52
![]() Carole Lewis a écrit:
Carole Lewis a écrit:
After you cast on stitches, are the first 4 rows worked in the round--Rnd 1-k, Rnd-2 p, Rnd-3 k, and Rnd-4 p. Then do you start working back and forth or continue in the round. Diagram is confusing to me.
28.12.2013 - 02:03DROPS Design a répondu:
Dear Mrs Lewis, after cast on sts, continue in the round until work measures 27 cm, then divide in 2 pieces and work each part separately. In the diagram, 1 square = 1st x 1row, in the round, start on the bottom corner on the right side towards the left every round. When working in rows, read WS rows from left towards the right. Happy knitting!
30.12.2013 - 15:21
![]() Colleen a écrit:
Colleen a écrit:
Confused when switching from knitting in the round to knitting back and forth. Cannot get the pattern to match. Last row worked (RS) was P1K2 across. What would be the pattern going from row 2 (WS)? Thanks.
09.02.2013 - 14:44DROPS Design a répondu:
Dear Colleen, it seems last round you work was a row 2 in the diagram, so that you have to continue with row 3 in the diagram, seen from WS. Happy knitting!
11.02.2013 - 09:19Maria Del Consuelo Hernandez a écrit:
Hola me gustaria que me dijeran como terminar mi prenda gracias
30.11.2011 - 03:13
|
|||||||
Snuggles#snugglesneckwarmer |
|||||||
|
|
|||||||
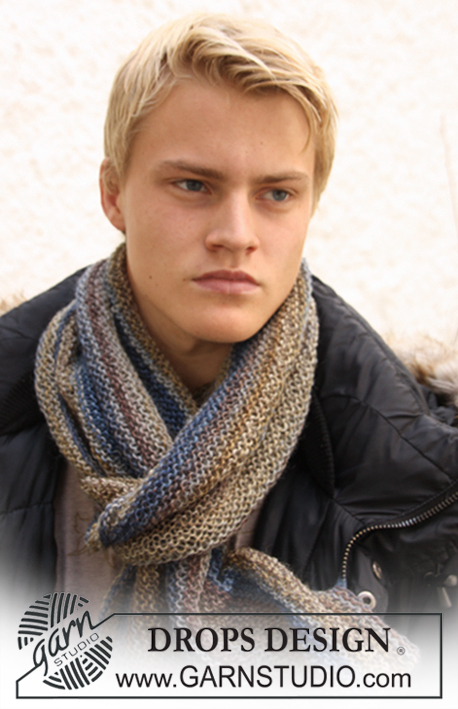
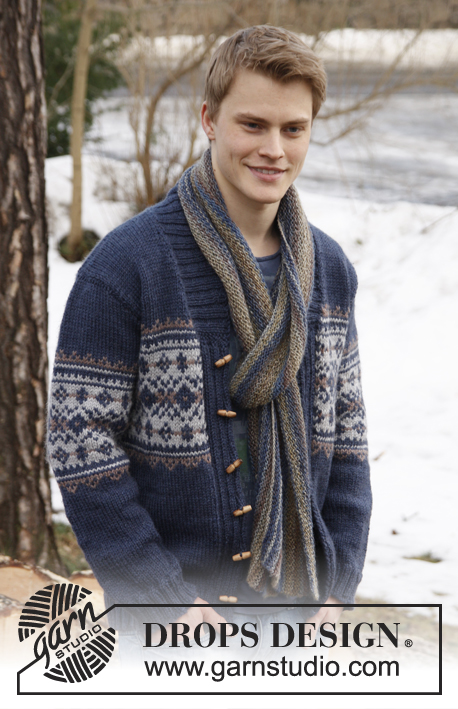
Plastron homme tricoté en point texturé, en DROPS Karisma.
DROPS 135-30 |
|||||||
|
POINT MOUSSE (en allers retours) : Tricoter tous les rangs à l'endroit. POINT MOUSSE (en rond) : 1 tour end, 1 tour env. POINT FANTAISIE : Voir diagramme M.1. Le diagramme montre le motif sur l'endroit. -------------------------------------------------------- PLASTRON : Se tricote de haut en bas. PENSER À BIEN CONSERVER LA MÊME TENSION QUE POUR L'ÉCHANTILLON ! Monter 120 m avec l'aiguille circulaire 4 et le fil Karisma. Tricoter 4 rangs POINT MOUSSE– voir ci-dessus ! Continuer ensuite en suivant M.1 sur toutes les mailles. À 27 cm de hauteur totale, diviser l'ouvrage en 2, pour le devant et le dos. Conserver sur l'aiguille les 60 premières m et glisser en attente sur un arrêt de mailles les 60 m restantes. DEVANT : Se tricote en allers retours sur les 60 m de l'aiguille, en point fantaisie comme avant. EN MÊME TEMPS, au 1er rang, monter 1 m en fin de rang = 61 m. Continuer en suivant M.1 comme avant avec 2 m POINT MOUSSE - voir ci-dessus - de chaque côté. Continuer ainsi jusqu'à environ 12 cm de hauteur à partir de la division de l'ouvrage. Tricoter ensuite 4 rangs point mousse sur toutes les mailles et rabattre souplement. L'ouvrage mesure environ 40 cm de hauteur totale. DOS : Reprendre les mailles en attente et tricoter comme pour le devant. |
|||||||
Légende diagramme(s) |
|||||||
|
|||||||
 |
|||||||
Vous avez terminé ce modèle?Alors taguez vos photos avec #dropspattern #snugglesneckwarmer ou bien présentez-les dans la galerie #dropsfan Vous avez besoin d'aide pour ce modèle ?Vous trouverez 11 tutoriels vidéo, une rubrique commentaires/questions et plus encore en vous rendant sur la page du modèle sur garnstudio.com © 1982-2026 DROPS Design A/S. Tous droits réservés. Ce document, y compris ces sous-sections, est protégé par les droits d'auteur (copyright). Apprenez-en davantage sur ce que vous pouvez faire avec nos modèles en bas de chacune des pages de notre site. |
|||||||


Avec plus de 40 ans dans la conception de modèles tricot et crochet, DROPS Design offre l'une des plus vastes collections de modèles gratuits sur internet - traduits dans 17 langues. À ce jour, on compte 324 catalogues et 12290 modèles en français.
Nous nous efforçons de vous apporter le meilleur de ce que le tricot et le crochet peuvent vous offrir, inspiration et conseils mais également des fils de haute qualité à des prix incroyables! Vous souhaiteriez utiliser nos modèles autrement que pour un usage personnel? Vous pouvez lire ce que vous êtes autorisés à faire dans le Copyright en bas de page de chacun de nos modèles. Bon tricot!
Poster un commentaire sur le modèle DROPS 135-30
Nous aimerions connaître votre avis sur ce modèle !
Si vous souhaitez poser une question, merci de bien vouloir vérifier que vous avez choisi la bonne catégorie dans le formulaire ci-dessous afin d'accélérer la réponse. Les champs obligatoires sont indiqués par une *.