
Catégories populaires
Vous cherchez un fil?


Commentaires / Questions (9)
![]() Greet a écrit:
Greet a écrit:
Ik zou niet in het rond breien. Dus alles met 2 naalden. Hoe brei ik dan de even naalden?
11.03.2026 - 09:49DROPS Design a répondu:
Dag Greet,
Naald 1 en alle andere oneven naalden in het telpatroon brei je aan de goede kant, alle even naalden in het telpatroon brei je aan de verkeerde kant. De steken die je recht aan de goede kant breit brei je averecht aan de verkeerde kant en de steken die je averecht aan de goede kant breit brei je recht aan de verkeerde kant. Je breit de omslag en afgehaalde steek averecht samen (in plaats van recht).
11.03.2026 - 19:38
![]() Anuka a écrit:
Anuka a écrit:
Hi, thanks so much for answering my question! I am doing exactly as suggested [from WS then work (P1, K2, Purl together YO + slipped stitch (so that they look as K tog as before), K2, P5, K2, Purl together YO + slipped stitch, K2, P1] but still where I P5 it looks flatter - when knitting in the round and instead doing K5 the stitches look more horizontal, now they are more like V's. Maybe I need to somehow twist them?
19.05.2022 - 16:54DROPS Design a répondu:
Dear Anuka, it might be a matter of difference in the tension, when working in the round or flat - show your work to your store (send them a picture per mail for ex.) or show it in a forum such as our DROPS Workshop, it might be easier for other knitters to help you seing your work. Hope it can help. Happy knitting!
20.05.2022 - 07:57
![]() Anuka a écrit:
Anuka a écrit:
Hi, I'm making this at the moment and have reached the point where I switch from in the round to flat. So from the right side I'm following the chart (odd number rows) and on the wrong side I am purling instead of knitting, and so forth. However, my middle section is looking a little flatter than when I did it in the round. [Slip 1 st as if to knit, K1, psso, yo, knit1, yo, K2 tog] - this looks wrong. What should I do differently? I'm purling this on the WS.
19.05.2022 - 15:21DROPS Design a répondu:
Dear Anuka, make sure that the odd rows will be worked from RS - from WS then work (P1, K2, Purl together YO + slipped stitch (so that they look as K tog as before), K2, P5, K2, Purl together YO + slipped stitch, K2, P1). Happy knitting!
19.05.2022 - 16:38
![]() Lies a écrit:
Lies a écrit:
Hallo......vraagje...als ik rondbrei snap ik dat je het patroon moet volgen.....als je bij het gedeelte komt dat je het voor en achterkant apart verder moet breien dan brei je dus niet in de rondte maar heen en weer.....hoe brei je dan de teruggaande naalden....want daar is dan geen teltekening voor.....gr lies
30.06.2020 - 13:00DROPS Design a répondu:
Dag Lies,
Bij de teruggaande naalden brei je dan averecht waar je recht op de goede kant breit, en recht waar je averecht op de goede kant breit. Zorg ervoor dat je steeds de even naalden van het patroon aan de verkeerde kant breit.
30.06.2020 - 15:56
![]() Anne Loveday a écrit:
Anne Loveday a écrit:
Can you explain the decrease for armhole on front/back? is this worked in the round? only 8 stitches are involved and these seem to end up all being on one armhole (right or left). Thank you
07.08.2017 - 19:14DROPS Design a répondu:
Dear Mrs Loveday, you are casting off for armhole at the beginning of each row in each side 2 sts 1-2 times and 1 st 1 time, so that you will cast off 3-5 sts on each side = 6-10 sts in total. Happy knitting!
08.08.2017 - 08:42
![]() Carmella a écrit:
Carmella a écrit:
Bedankt voor de snelle reactie. Super!
13.01.2017 - 11:31
![]() Carmella a écrit:
Carmella a écrit:
Is het mogelijk om de telpatroon en het patroon toe te voegen ze staan er niet op.
11.01.2017 - 19:00DROPS Design a répondu:
Hoi Carmella. Probeer opnieuw nu, het telpatroon is aangepast.
12.01.2017 - 14:49
![]() T.Melchior a écrit:
T.Melchior a écrit:
De teltekening wordt bij dit patroon niet aangegeven. Staat alleen een klein vierkantje
30.01.2015 - 17:32
![]() Heidrun Bitsch a écrit:
Heidrun Bitsch a écrit:
Wie werden die abnahmen bei Modell 46 -19 gegen das armloch die 4 Maschen beidseitig abgenommen?bitte dringend um Antwort lg
01.10.2014 - 14:40DROPS Design a répondu:
Liebe Heidrun, die Anleitung ist etwas älteren Datums und wird gleich noch mal sprachlich überarbeitet, dann wird es hoffentlich klar, wie es gemeint ist. Sie können dann natürlich gerne noch mal fragen, falls noch etwas unklar geblieben ist.
01.10.2014 - 17:04
|
||||||||||||||||||||||
Pink Profusion |
||||||||||||||||||||||
|
|
||||||||||||||||||||||
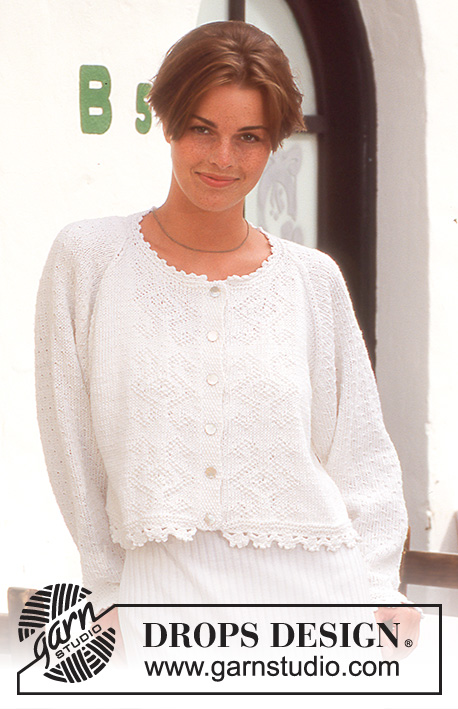
Pull DROPS en Muskat, en point structuré. Du S au L.
DROPS 46-19 |
||||||||||||||||||||||
|
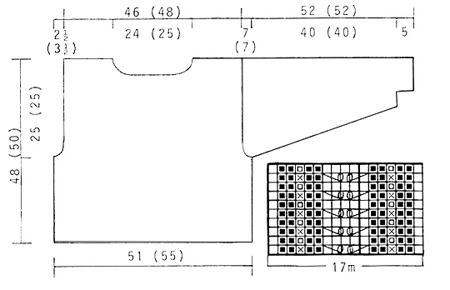
Échantillon : 20 m x 26 rangs = 10 x 10 cm en jersey avec les aiguilles 4. Adapter le cas échéant la taille des aiguilles pour obtenir l'échantillon. Point fantaisie : Voir diagramme ci-dessous. Le diagramme montre le motif sur l'end. Point mousse (en rond) : 1 tour end, 1 tour env Dos et devant : Se tricote en rond sur aiguille circulaire. Avec le fil rose et l'aiguille circulaire 4 monter 204-221 m. Tricoter en point fantaisie. PENSER À BIEN CONSERVER LA MÊME TENSION QUE POUR L'ÉCHANTILLON ! À 23-25 cm de hauteur totale, rabattre 4 m de chaque côté pour les emmanchures soit 98-106 m pour le devant et 98-107 m pour le dos. - centrer 2 m end au milieu devant. Terminer chaque partie séparément. Devant : = 98-106 m. Rabattre pour les emmanchures de chaque côté tous les 2 rangs : 1-2 fois 2 m et 1 fois 1 m = 92-96 m. À 42-44 cm de hauteur totale, rabattre pour l'encolure les 26-28 m centrales puis côté encolure tous les 2 rangs : 1 fois 4 m, 1 fois 3 m, 1 fois 2 m et 2 fois 1 m. À 48-50 cm de hauteur totale, rabattre toutes les mailles. Dos : = 98-107 m. Former les emmanchures comme pour le dos = 92-97 m. À 46-48 cm de hauteur totale, rabattre pour l'encolure les 44-47 m centrales puis 2 m côté encolure au rang suivant. À 48-50 cm de hauteur totale, rabattre toutes les mailles. Manches : Avec le fil rose et les aiguilles doubles pointes 4 monter 43 m pour les 2 tailles.. Tricoter en point fantaisie (centrer un motif sur la manche). EN MÊME TEMPS, à 5 cm de hauteur totale, augmenter 2 m sous la manche 29 fois tous les 3 tours = 101 m. À 45 cm de hauteur totale, rabattre 4 m sous la manche et continuer en allers retours en rabattant de chaque côté tous les 2 rangs 8 fois 4 m, rabattre les mailles restantes, la manche mesure environ 52 cm de hauteur totale. Assemblage : Coudre les épaules. Avec le fil rose et les aiguilles doubles pointes 3 relever autour de l'encolure environ 100-106 m et tricoter 2 tours au point mousse, rabattre. Coudre les manches. |
||||||||||||||||||||||
Légende diagramme(s) |
||||||||||||||||||||||
|
||||||||||||||||||||||
 |
||||||||||||||||||||||
Vous avez terminé ce modèle?Alors taguez vos photos avec #dropspattern ou bien présentez-les dans la galerie #dropsfan Vous avez besoin d'aide pour ce modèle ?Vous trouverez 20 tutoriels vidéo, une rubrique commentaires/questions et plus encore en vous rendant sur la page du modèle sur garnstudio.com © 1982-2026 DROPS Design A/S. Tous droits réservés. Ce document, y compris ces sous-sections, est protégé par les droits d'auteur (copyright). Apprenez-en davantage sur ce que vous pouvez faire avec nos modèles en bas de chacune des pages de notre site. |
||||||||||||||||||||||


Avec plus de 40 ans dans la conception de modèles tricot et crochet, DROPS Design offre l'une des plus vastes collections de modèles gratuits sur internet - traduits dans 17 langues. À ce jour, on compte 324 catalogues et 12290 modèles en français.
Nous nous efforçons de vous apporter le meilleur de ce que le tricot et le crochet peuvent vous offrir, inspiration et conseils mais également des fils de haute qualité à des prix incroyables! Vous souhaiteriez utiliser nos modèles autrement que pour un usage personnel? Vous pouvez lire ce que vous êtes autorisés à faire dans le Copyright en bas de page de chacun de nos modèles. Bon tricot!
Poster un commentaire sur le modèle DROPS 46-19
Nous aimerions connaître votre avis sur ce modèle !
Si vous souhaitez poser une question, merci de bien vouloir vérifier que vous avez choisi la bonne catégorie dans le formulaire ci-dessous afin d'accélérer la réponse. Les champs obligatoires sont indiqués par une *.