
Catégories populaires
Vous cherchez un fil?


Commentaires / Questions (7)
![]() Mercedes Cuadra a écrit:
Mercedes Cuadra a écrit:
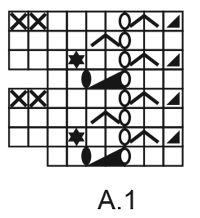
Thanks, this is my first knitting with a diagram. Now I understand well. Another thing that confuses me is if the "knit" symbol in the diagram means the same thing for the right side and the wrong side. The instruction says "knit from the right side, knit from the wrong side". In other words, you don't do a purl on the wrong side, on this 9 stitches. Is that correct? Cheers, Mercedes
20.07.2023 - 22:00DROPS Design a répondu:
Hi Mercedes, there is 1 purl, second yarn over is purled. Happy knitting!
20.07.2023 - 22:27
![]() Mercedes Cuadra a écrit:
Mercedes Cuadra a écrit:
Hello, my question is about how to knit the wrong side of diagram A1. The pattern says that diagram A1 shows all rows from the right side. So, for example, in row 1, how should I knit those 9 stitches from the wrong side? Thank you. Mercedes
20.07.2023 - 17:27DROPS Design a répondu:
Hi Mercedes, 1st row (on the right side; read the diagram from right to left): knit 3, yarn over, purl 2 together, between 2 stitches make 2 yarn overs, knit 2. 2nd row (on the wrong side; read the diagram from left to right): knit 2, knit 1 in the first yarn over, purl 1 in the 2nd yarn over, knit 2, yarn over, knit 2 twisted together, knit 1 twisted. More about how to read knitting diagrams you will find HERE. Happy knitting!
20.07.2023 - 19:42
![]() Mercedes Cuadra a écrit:
Mercedes Cuadra a écrit:
Hello, thank you for your previous answer. I am a beginner in knitting, so I appreciate your help with another question, When I finish the first row I have 86 stitches in total, I understand that there are 9, A1 stitches, (instead of 7), 76 stockinette and 1 garter. I understand that I am going to knit these 9 stitches like this: 3 garter stitch, 1 purl (2nd YO), and 5 garter stitches. Let me know is that's right. Have a nice day. Mercedes
19.07.2023 - 19:37DROPS Design a répondu:
Dear Mercedes, the first row is correct. Now we work as follows: knit 3, purl 1 in the 2nd yo, knit 2, 1 yarn over, knit 2 stitches twisted together and knit 1 stitch twisted. Now work over the stockinette stitches and the garter stitch as before. Happy knitting!
20.07.2023 - 12:18
![]() Mercedes Cuadra a écrit:
Mercedes Cuadra a écrit:
Hi, its a pleasure to greet you! Thank you for your help. 1. When you say that I have to do 76 stockinette stitches on the first row, do you mean knit 76 stitches on the right side, and make purl stitches (84) on the back or 2nd row? 2. The diagram shows 7 stitches on the first row and 9 stitches on the next 3 rows. Does this mean that every four rows on the RS, I am going to repeat those stitches after knitting 76 or 74 stitches? Thank you again. Mercedes
09.07.2023 - 22:10DROPS Design a répondu:
Hi Mercedes, Yes, stockinette is knitted on the right side and purled on the wrong side. You work 1 garter stitch at the beginning of the row, stockinette over the middle 76 stitches and A.1 over the last 7 stitches on the right side. This will be reversed from the wrong side, with A.1 first, then 76 stockinette (purl) and finish with 1 garter stitch. Happy knitting!
10.07.2023 - 07:41
![]() Cornelia a écrit:
Cornelia a écrit:
Hallo.Kann ein Fehler in der Strickschrift sein?In der 4.Reihe (Hinreihe) nach den zwei M rechts abketten ist es nicht möglich 4 M rechts zu Stricken, es ist eine zu viel angegeben. Zum abketten von 2 M am Rundenbeginn benötigt man 3 M nicht zwei. Zählt man das Muster kommt man auf 8 nicht auf 7 LG
12.05.2022 - 08:01DROPS Design a répondu:
Liebe Cornelia, ja richtig, bei der 4. Reihe (= Rückreihe), ketten Sie 2 Maschen ab, dann stricken Sie insgesamt 4 Maschen links, aber die erste ist schon auf der Nadel nach der Abketten, so stricken Sie nur 3 Maschen links (es sind 4 glatt rechte Maschen auf der rechten Nadel). Viel Spaß beim stricken!
12.05.2022 - 09:16
![]() Agnes a écrit:
Agnes a écrit:
Hej Skulle ni vilja lägga upp en video på hur man stickar diagrammet. Får ingen rätsida på det
14.12.2021 - 09:20
![]() Hannelore Goormans a écrit:
Hannelore Goormans a écrit:
Wie kann ich eine Anleitung per PDF runter laden
16.07.2021 - 10:26DROPS Design a répondu:
Liebe Frau Goormans, unsere Anleitungen können nur ausgedruckt werden, aber wenn Sie eine virtuelle Drucker wählen, dann können Sie als .PDF speichern. Viel Spaß beim stricken!
16.07.2021 - 11:42
|
|||||||||||||||||||||||||
Warm Delights#warmdelightsbag |
|||||||||||||||||||||||||
 |
 |
||||||||||||||||||||||||
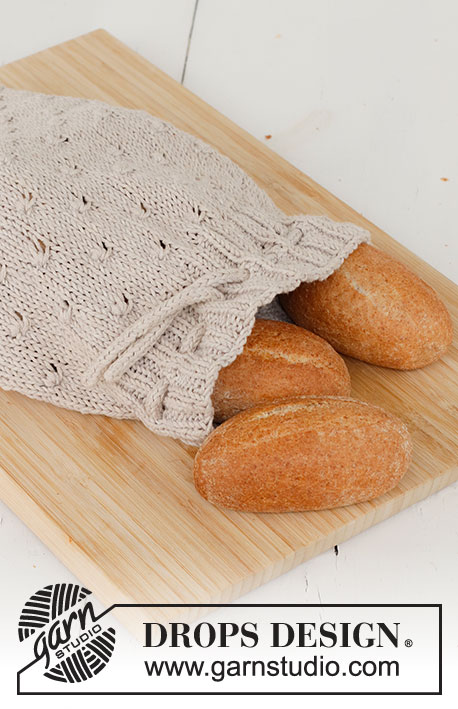
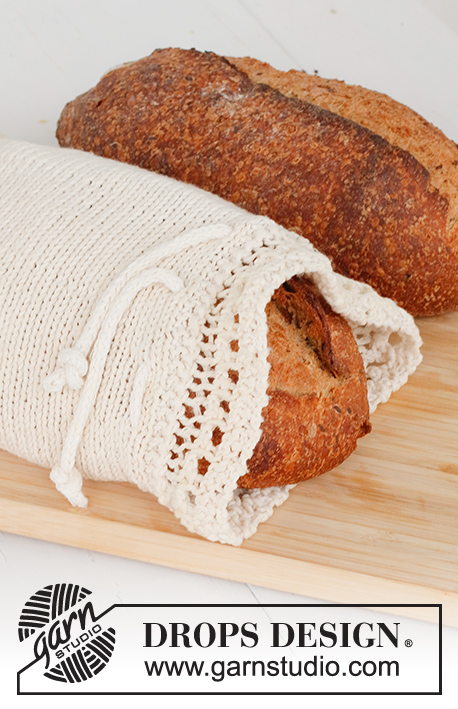
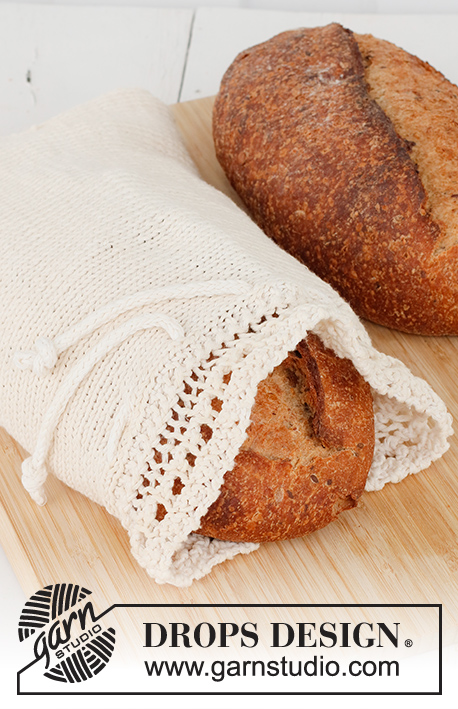
Sac à pain tricoté avec volants, en DROPS Cotton Light.
DROPS 221-53 |
|||||||||||||||||||||||||
|
------------------------------------------------------- TECHNIQUES EMPLOYÉES: ------------------------------------------------------- POINT MOUSSE (en allers et retours): Tricoter tous les rangs à l'endroit. 1 côte mousse = tricoter 2 rangs endroit. POINT FANTAISIE: Voir diagramme A.1. Le diagramme montre tous les rangs, vus sur l'endroit. ------------------------------------------------------- L'OUVRAGE COMMENCE ICI: ------------------------------------------------------- SAC À PAIN – PETIT APERÇU DE L'OUVRAGE: Se tricote dans le sens de la longueur, en allers et retours avec une couture le long du côté et dans le fond. SAC À PAIN: Monter 84 mailles avec les aiguilles 4,5 en DROPS Cotton Light. Tricoter 2 CÔTES MOUSSE sur toutes les mailles – voir ci-dessus. Placer 1 marqueur – MESURER DÉSORMAIS L'OUVRAGE À PARTIR D'ICI. Tricoter le rang suivant ainsi sur l'endroit: 1 maille lisière au point mousse, 76 mailles jersey et A.1 au-dessus des 7 dernières mailles. BIEN CONSERVER LA MÊME TENSION QUE POUR L'ÉCHANTILLON! Continuer ainsi avec A.1 d'un côté, en jersey et point mousse de l'autre côté jusqu'à ce que l'ouvrage mesure environ 48 cm depuis le marqueur – ajuster pour arrêter après un rang 4 ou 8 de A.1. Tricoter 2 côtes mousse sur toutes les mailles. Rabattre souplement, couper le fil. LIEN: Se tricote en allers et retours sur aiguille circulaire. Monter 3 mailles avec l'aiguille circulaire 3,5 en DROPS Cotton Light. Tricoter 3 mailles endroit, *ne pas tourner mais pousser les mailles à l'autre extrémité de l'aiguille, passer le fil derrière les mailles, serrer et tricoter de nouveau les mailles à l'endroit sur l'endroit*, tricoter de *-* jusqu'à ce que le lien mesure environ 60 cm, rabattre, couper et rentrer le fil. ASSEMBLAGE: Plier l'ouvrage en double pour que les volants soient les uns contre les autres; c'est l'ouverture du sac. Coudre les mailles rabattues à celles du rang de montage dans le brin le plus à l'extérieur des mailles. Plier l'ouvrage pour que cette couture se trouve au milieu. Coudre le fond à 1 maille lisière des bords. Enfiler le lien dans les mailles jersey quelques cm sous A.1 – voir photo. Faire un nœud à chaque extrémité du lien. |
|||||||||||||||||||||||||
Légende diagramme(s) |
|||||||||||||||||||||||||
|
|||||||||||||||||||||||||
 |
|||||||||||||||||||||||||
Vous avez terminé ce modèle?Alors taguez vos photos avec #dropspattern #warmdelightsbag ou bien présentez-les dans la galerie #dropsfan Vous avez besoin d'aide pour ce modèle ?Vous trouverez 18 tutoriels vidéo, une rubrique commentaires/questions et plus encore en vous rendant sur la page du modèle sur garnstudio.com © 1982-2026 DROPS Design A/S. Tous droits réservés. Ce document, y compris ces sous-sections, est protégé par les droits d'auteur (copyright). Apprenez-en davantage sur ce que vous pouvez faire avec nos modèles en bas de chacune des pages de notre site. |
|||||||||||||||||||||||||


Avec plus de 40 ans dans la conception de modèles tricot et crochet, DROPS Design offre l'une des plus vastes collections de modèles gratuits sur internet - traduits dans 17 langues. À ce jour, on compte 324 catalogues et 12290 modèles en français.
Nous nous efforçons de vous apporter le meilleur de ce que le tricot et le crochet peuvent vous offrir, inspiration et conseils mais également des fils de haute qualité à des prix incroyables! Vous souhaiteriez utiliser nos modèles autrement que pour un usage personnel? Vous pouvez lire ce que vous êtes autorisés à faire dans le Copyright en bas de page de chacun de nos modèles. Bon tricot!
Poster un commentaire sur le modèle DROPS 221-53
Nous aimerions connaître votre avis sur ce modèle !
Si vous souhaitez poser une question, merci de bien vouloir vérifier que vous avez choisi la bonne catégorie dans le formulaire ci-dessous afin d'accélérer la réponse. Les champs obligatoires sont indiqués par une *.