
Oblíbené kategorie
Hledáte přízi?


Komentáře / Otázky (48)
![]() RS napsala:
RS napsala:
Hi This is a follow-up question to my previous one regarding tension. I did wash and block my swatch and the tension was 24sts to 10cm. Would you recommend using a double strand of brushed alpaca silk instead and a smaller needle to try and achieve the right tension? I am not sure how tricky it would be to use a double strand of yarn for a lace knitting.
29.09.2020 - 13:14Odpověď DROPS Design :
Dear RS, if you don't get the correct tension with needle size 4 mm, try again with larger needles until you get the right tension - read more about tension here - Happy knitting!
29.09.2020 - 14:49
![]() RS napsala:
RS napsala:
The pattern recommends 4mm needles but this is for Drops Vivaldi. Drops recommend Brushed Alpaca Silk as a substitute and for this yarn 5mm needles are suggested. I'm having trouble with the tension. When I swatched I had 24sts to 10cm with 5mm needles. I don't want to increase the needle size as this will produce a loose fabric in the finished item and this does not look nice with a lace pattern. Would it be possible to use a double strand of yarn instead and a smaller needle to get tension?
28.09.2020 - 12:14Odpověď DROPS Design :
Dear RS, Brushed Alpaca Silk is a good choice as alternative to Vivaldi (same weight/meterage). To get the finished measurements you need to have the correct tension, you can block your swatch first and check measurements after blocking - read more about tension here. Happy knitting!
28.09.2020 - 12:37
![]() RS napsala:
RS napsala:
Hi On some rows in the pattern, row 1 for example, there is a YO between A1a and A1b and A1b and A1c (this is also the case in A2). I'm not exactly sure how to handle this given that I need to repeat A1b 4 times. I think that you would do the following: Do a YO at the end of A1a and then start A1b with a knit stitch and then end A1b with a YO and then when you start A1b for the second time you start with a knit stitch? Is this correct?
14.08.2020 - 13:34Odpověď DROPS Design :
Dear RS, you should always have the same number of sts in each diagram, ie each decrease will be compensate by a yarn over. work a over 20 sts, each b over 12 sts and c over 19 sts. Adding a marker between each repeat can help you to keep the correct number of sts. Happy knitting!
14.08.2020 - 13:43
![]() RS napsala:
RS napsala:
Hi, You sent me a response yesterday about how to handle A2b row 19 which ends part way through a slip 1 st as if to K, K2 tog, psso. You wrote: "On the row with the double decrease, work the last 2 sts in a/b together with the first stich in b/next b/c." Do you mean that you end A2a with a slip 1 st as if to K, K2 tog, psso and then you end A2b in the same way and then when you go back to start A2b for the 2nd time you start it with a knit stitch? Is that correct?
14.08.2020 - 13:12Odpověď DROPS Design :
Dear RS, you end A.2a with slip the next to last st in a as if to K, K tog the last st in a + the first st in b, psso = this is now the first stitch in b. Work b until 2 sts remain, slip the next st as if to K, Ktog the last st in b + first stitch next b (then c), psso = this is now the first stitch in next b (and c at the end of the row). Do not hesitate to add markers between the repeats so that you can count the stitches and check that you still get the same number of sts in each repeat in width. Happy knitting!
14.08.2020 - 13:38
![]() RS napsala:
RS napsala:
Please clarify: "When A-1 has been worked 1 time vertically, continue with A-2 the same way." Do you mean that for A-2 you also knit diagram a over the first 20 sts, diagram b 4 times in breadth and then diagram c over the last 19 sts? If yes, how do you handle A2 diagram b from row 19 onwards, as on the odd rows diagram b ends part way through a slip 1 st as if to K, K 2 tog, psso. How do you tackle this?
13.08.2020 - 12:48Odpověď DROPS Design :
Dear RS, correct, you will work (from RS): A.2a, A.2b a total of 4 times in width and A.2c - (from WS read from the left towards the right and work: A.2c, A.2b a total of 4 times and finish with A.2a). On the row with the double decrease, work the last 2 sts in a/b together with the first stich in b/next b/c. Happy knitting!
13.08.2020 - 15:46
![]() RHS napsala:
RHS napsala:
Hi Could you please tell me if there is a correction to this pattern, as I got the impression from some of the comments that there was an error in the diagram? Thank you.
13.07.2020 - 18:21Odpověď DROPS Design :
Dear RHS, pattern and diagrams are right - this could help you to understand how to read diagrams. Happy knitting!
14.07.2020 - 09:02
![]() Silvia napsala:
Silvia napsala:
Ho realizzato questo modello con lana alpaka silk e con tanta fatica ma purtroppo al primo lavaggio a 30° si è completamente infeltrito e ora è inutilizzabile.
22.05.2019 - 18:56
![]() Marie Nilsson napsala:
Marie Nilsson napsala:
Det står i början att alla varv ska stickas räta men i diagramet står det vid en symbol ”rät från rätsidan och avig från avigsidan... hur stickar man då?
02.10.2018 - 12:43Odpověď DROPS Design :
Hei Marie. Hvis du refererer til forklaringen av RILLE, så gjelder dette kun der det står i oppskriften at du skal strikke rille. Jeg kan se at i akkurat denne oppskriften er det ikke noen steder det skal strikkes riller, så akkurat her er den informasjonen irrelevant - vi skal få fjernet den. Du skal følge diagrammet som anvist, og strikke rett fra retten og vrang fra vrangen der det symbolet står. God fornøyelse.
03.10.2018 - 11:16
![]() Silvia Desiderio napsala:
Silvia Desiderio napsala:
Salve, ho iniziato a lavorare questo scialle. Potreste spiegarmi come lavorare la parte b del diagramma A1? Siccome si deve ripetere 4 volte, inizio con 1 gettata, 4 m. a rovescio, 1 m passata senza lavorarla, 2 insieme a dir, accavallo la m passata, 4 rov, 1 gett.,1 dir e poi? Ricomincio o devo fare 2 gettate? Grazie
30.08.2018 - 17:14Odpověď DROPS Design :
Buongiorno Silvia. Il primo ferro della parte b si lavora così, sul diritto del lavoro: 1 gettato, 4 m diritto, 1 m passata,2 insieme a dir, accavalla, 4 m diritto, 1 gettato, 1 dir e poi ricomincia con 1 gettato, 4 m dir e così via. Il numero delle maglie resta lo stesso su tutti i ferri. Buon lavoro!
30.08.2018 - 18:49
![]() Silvia Desiderio napsala:
Silvia Desiderio napsala:
Volevo chiedere un'altra cosa. Siccome questo scialle mi serve per un matrimonio, ho preso il colore nero (Vivaldi non era disponibile e allora ho preso brushed alpaca silk). C'è un filato da abbinare che dia un pò di luminosità? tipo un filo lurex o qualcosa del genere...
28.08.2018 - 13:11Odpověď DROPS Design :
Buongiorno Silvia. Può aggiungere un filo di glitter. Buon lavoro!
28.08.2018 - 14:09
|
|||||||||||||||||||
Fiona#fionascarf |
|||||||||||||||||||
 |
 |
||||||||||||||||||
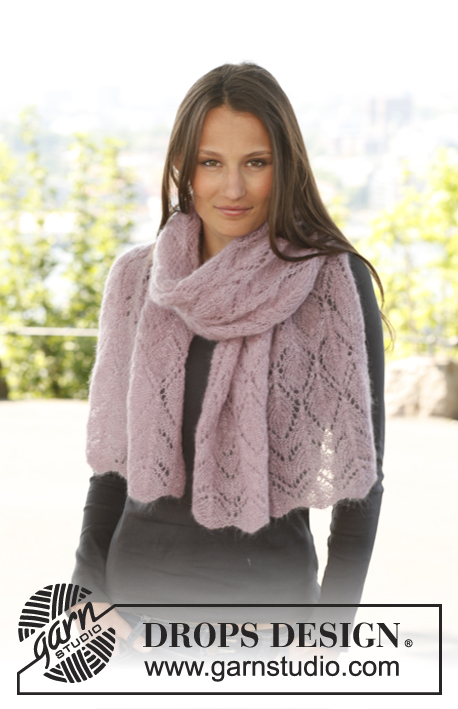
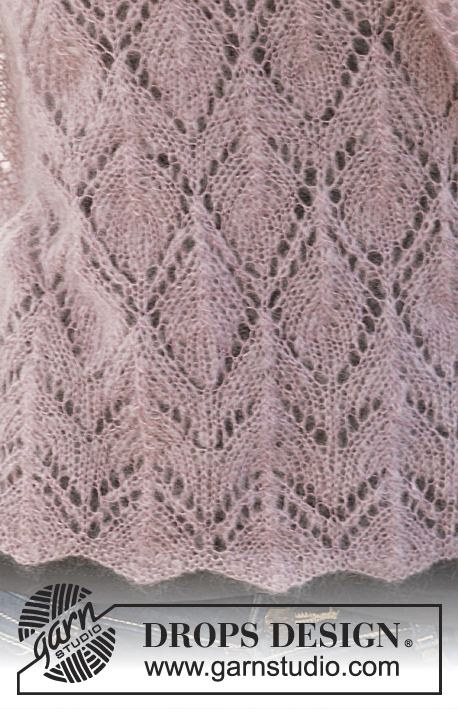
DROPS krajkový šál pletený z příze "Vivaldi".
DROPS 141-11 |
|||||||||||||||||||
|
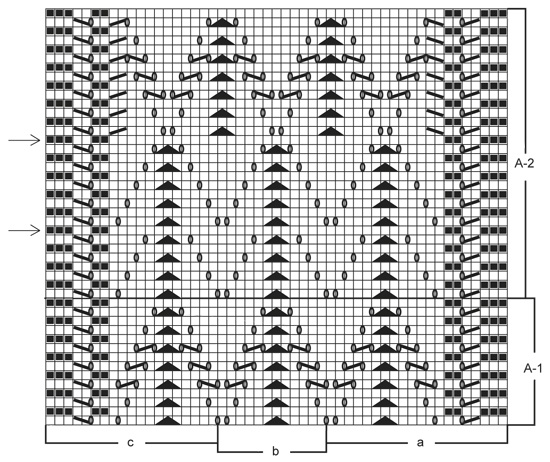
VROUBKOVÝ VZOR: Pleteme stále hladce, lícové i rubové řady. 1 vroubek = 2 řady hladce. KRAJKOVÝ VZOR: Viz schémata A-1 a A-2. Vzor je nahlížen z lícové strany. -------------------------------------------------------- -------------------------------------------------------- ŠÁL: Pleteme v řadách; upleteme 2 stejné díly, které nakonec sešijeme. Na jehlice č.4 VOLNĚ nahodíme přízí Vivaldi 99 ok a pleteme první řadu (lícovou), takto: 13 ok hladce, *1 oko sejmeme hladce, 2 oka spleteme hladce a sejmuté přes ně přetáhneme, 11 ok hladce*, *-* opakujeme po poslední 2 oka v řadě, tato 2 oka upleteme hladce = 87 ok. Upleteme 3 řady hladce nad všemi oky. Pokračujeme vzorem A-1, takto: část „a“ pleteme nad prvními 20 oky, pak 4x část „b“, nakonec nad posledními 19 oky část „c“. Po dokončení jedné celé sekvence vzoru A-1 (na výšku) pokračujeme stejným způsobem vzorem A-2. Vzor A-2 pleteme tak dlouho, až díl měří asi 85 cm – poslední upletená řada musí být jedna z těch, které jsou ve schématu označeny šipkou. Všechna oka odložíme na pomocnou jehlici. Stejným způsobem upleteme druhý díl. Oba díly sešijeme – nejlépe pletacím stehem, aby byl šev co nejméně patrný. |
|||||||||||||||||||
Vysvětlivky ke schématu |
|||||||||||||||||||
|
|||||||||||||||||||
 |
|||||||||||||||||||
Dokončili jste tento model?Pak označte své fotky tagem #dropspattern #fionascarf nebo je pošlete do galerie #dropsfan. Potřebujete s tímto návodem poradit?Otevřete-li si návod na stránce garnstudio.com, najdete tam 6 výukových video-ukázek, Komentáře/Dotazy a další užitečné informace. © 1982-2026 DROPS Design A/S. Vyhrazujeme si veškerá práva. Tento dokument, včetně všech jeho dílčích částí, podléhá autorským právům. Podrobnější komentář k možnostem užití našich návodů najdete dole pod každým návodem na našich stránkách. |
|||||||||||||||||||


V oblasti pletené a háčkované módy působí DROPS Design více než 40 let. Díky tomu vám můžeme nabídnout jednu z nejrozsáhlejších kolekcí modelů s bezplatnými návody dostupnými na internetu - navíc v 17 jazycích. K dnešnímu dni máme na 324 katalogů a 12290 návodů celkem - z nich je už 7606 dostupných v [češtině].
We work hard to bring you the best knitting and crochet have to offer, inspiration and advice as well as great quality yarns at incredible prices! Would you like to use our patterns for other than personal use? You can read what you are allowed to do in the Copyright text at the bottom of all our patterns. Happy crafting!
Přidejte komentář k návodu DROPS 141-11
Rádi bychom věděli, co si o tomto modelu myslíte!
Pokud se chcete na něco zeptat, dbejte prosím na to, abyste ve formuláři níže vybrali správnou kategorii - díky tomu se dříve dozvíte, co potřebujete vědět. Povinná pole jsou označena *.