
Oblíbené kategorie
Hledáte přízi?


Komentáře / Otázky (59)
![]() Lara napsala:
Lara napsala:
Muss ich den Zopf dann auch erst links und danach rechts sricken? Weil bei mir flicht sich das Muster nicht.
19.01.2013 - 20:44Odpověď DROPS Design :
Hallo Lara, in der Legende zum Diagramm finden Sie beschrieben, wie die Verzopfung entsteht (die M abwechselnd VOR und HINTER die Arbeit legen).
20.01.2013 - 19:08
![]() Saar napsala:
Saar napsala:
Er ontstaat geen gat in het breiwerk zelf maar onderin de kabel ontstaat er een soort van hol
18.01.2013 - 14:38Odpověď DROPS Design :
Dat is ook wat ik bedoelde in mijn vorige antwoord ;o) Ik denk dat jij de kabel wat strakker moet breien. Zie video of ga naar de winkel voor persoonlijke ondersteuning.
18.01.2013 - 16:07
![]() Lara napsala:
Lara napsala:
Hallo! Muss ich während dem Muster auch abwechselnd re. li. stricken oder nur am Ende? LG
17.01.2013 - 18:50Odpověď DROPS Design :
Hallo Lara, es wird in den Hin-R rechts gestrickt und in den Rück-R links. Viel Erfolg!
18.01.2013 - 07:54
![]() Saar napsala:
Saar napsala:
Aan het begin van het patroon als ik een naald heb gemaakt, begin ik met de kabel maar er ontstaat na de eerste naald een gat in het breiwerk.
17.01.2013 - 18:32Odpověď DROPS Design :
Er ontstaat een gat in de kabel zelf? Dan moet je het kabeltje een beetje strakker breien. Zie evt de instructievideo hoe u het kan breien.
18.01.2013 - 13:37
![]() Sofie napsala:
Sofie napsala:
Je n'arrive pas à faire la torsade :( Pourtant je sais les tricoter mais je crois que je ne comprends pas bien les explications. Faut-il d'abord tricoter 5 mailles endroit et ensuite en passer 5 sur aiguilles auxiliaire ??? Merci par avance !
27.11.2012 - 21:05Odpověď DROPS Design :
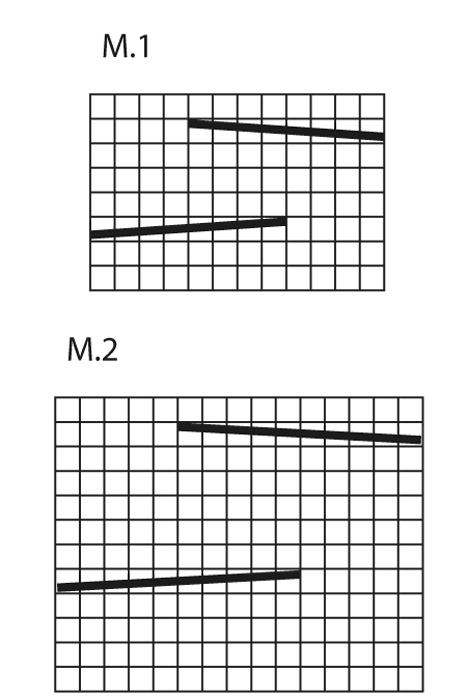
Bonjour Sofie, dans les diagrammes 1 case= 1mx1 rang. Au rang 5 de M.2, vous tricotez : 5 m end, puis la torsade : glissez 5 m sur l'aiguille auxiliaire devant l'ouvrage, tricotez 5 m end, reprenez les 5 m en attente et tricotez les à l'end. Au rang 11, vous commencez par la torsade : glissez 5 m sur l'aiguille auxiliaire derrière l'ouvrage, tricotez 5 m end, reprenez les 5 m en attente et tricotez les à l'end, terminez par 5 m end. Bon tricot !
28.11.2012 - 09:27
![]() Ulla napsala:
Ulla napsala:
Meget flot og smart
22.10.2012 - 10:59
![]() Steffi napsala:
Steffi napsala:
Was für eine Randmasche muss ich denn stricken? vielen dank!
21.06.2012 - 18:03Odpověď DROPS Design :
Am besten sticken Sie die Randmasche immer rechts.
25.06.2012 - 22:11Anastasia napsala:
I wanna knit this lovely scarf , but can't understand how to read the diagram: from what side and what corner? Thanks!
08.06.2012 - 13:55Odpověď DROPS Design :
Dear Anastasia, the diagrams are read begninng in the lower right-hand corner and work towards the left (1st row = RS). On return row, work from the left to the right. Happy Knitting !
06.12.2012 - 11:20
![]() Wallry napsala:
Wallry napsala:
Il est indique sur les explications qu'il faut 300g de laine pour le tour du cou.
02.02.2012 - 12:19
![]() Drops Design France napsala:
Drops Design France napsala:
Bonjour Lange et merci. Cliquez en haut sur "détaillants" puis choisissez votre pays pour accéder à la liste des détaillants. La quantité nécessaire est toujours indiquée au poids, cliquez sur "voir le nuancier" pour voir les couleurs et en savoir plus sur la laine, en l’occurrence, Polaris se présente sous forme de pelote de 100 g. Bon tricot !
03.01.2012 - 09:18
|
||||||||||||||||
Braidy#braidyset |
||||||||||||||||
 |
 |
|||||||||||||||
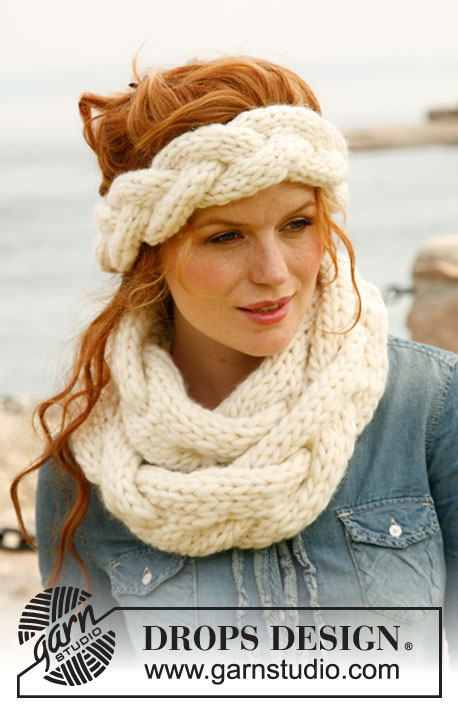
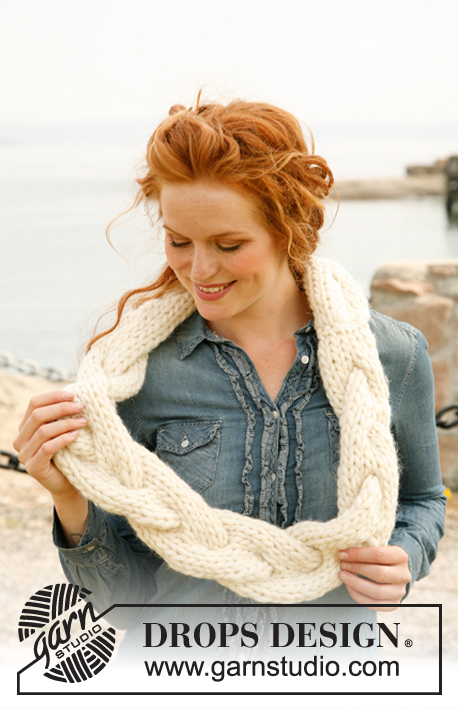
DROPS čelenka a nákrčník s velkým copánkem pletená z příze „Polaris“.
DROPS 134-7 |
||||||||||||||||
|
VZOR: Čelenka viz schéma M. 1, nákrčník viz schéma M. 2. Vzor je nahlížen z lícové strany. TIP - NAVAZOVÁNÍ NOVÉ PŘÍZE: Při navazování nové příze rozdělíme konec na 2 vlákna o délce asi 15 cm. Jedno vlákno ustřihneme. Stejný postup opakujeme u vlákna, které budeme navazovat. Obě 15 cm vlákna položíme na sebe tak, že výsledná tloušťka je stejná jako původní vlákno a pleteme jako doposud – takto docílíme neviditelného navázání nové příze. ---------------------------------------------------------------------- ČELENKA: Pleteme jeden dlouhý díl, který na závěr sešijeme. Na jehlici č. 12 nahodíme přízí Polaris 12 ok. Pleteme vzorem M. 1 do výšky asi 50 cm – končíme dokončením celého vzoru. Upleteme 1 řadu lícovým žerzejem a oka VOLNĚ uzavřeme. Sešijeme k sobě oka nahozené a oka uzavřené řady matracovým stehem. NÁKRČNÍK: Na jehlici č. 15 nahodíme dvojitou přízí 47 ok. Nad všemi oky pleteme 3 řady hladce. Dále pleteme vzorem M. 1 (1. řada = lícová) do výšky asi 148 cm – končíme dokončením celého vzoru (= 47 ok na jehlici). Nad všemi oky upleteme 3 řady hladce a oka VOLNĚ uzavřeme. |
||||||||||||||||
Vysvětlivky ke schématu |
||||||||||||||||
|
||||||||||||||||
 |
||||||||||||||||
Dokončili jste tento model?Pak označte své fotky tagem #dropspattern #braidyset nebo je pošlete do galerie #dropsfan. Potřebujete s tímto návodem poradit?Otevřete-li si návod na stránce garnstudio.com, najdete tam 3 výukových video-ukázek, Komentáře/Dotazy a další užitečné informace. © 1982-2026 DROPS Design A/S. Vyhrazujeme si veškerá práva. Tento dokument, včetně všech jeho dílčích částí, podléhá autorským právům. Podrobnější komentář k možnostem užití našich návodů najdete dole pod každým návodem na našich stránkách. |
||||||||||||||||


V oblasti pletené a háčkované módy působí DROPS Design více než 40 let. Díky tomu vám můžeme nabídnout jednu z nejrozsáhlejších kolekcí modelů s bezplatnými návody dostupnými na internetu - navíc v 17 jazycích. K dnešnímu dni máme na 324 katalogů a 12290 návodů celkem - z nich je už 7606 dostupných v [češtině].
We work hard to bring you the best knitting and crochet have to offer, inspiration and advice as well as great quality yarns at incredible prices! Would you like to use our patterns for other than personal use? You can read what you are allowed to do in the Copyright text at the bottom of all our patterns. Happy crafting!
Přidejte komentář k návodu DROPS 134-7
Rádi bychom věděli, co si o tomto modelu myslíte!
Pokud se chcete na něco zeptat, dbejte prosím na to, abyste ve formuláři níže vybrali správnou kategorii - díky tomu se dříve dozvíte, co potřebujete vědět. Povinná pole jsou označena *.