
Oblíbené kategorie
Hledáte přízi?


Komentáře / Otázky (59)
![]() Camilla napsala:
Camilla napsala:
Jeg er ved at lave pandebåndet. I diagrammet står der man skal strikke ret over ret og vrang over vrang. Når jeg har slået de 12 masker op er 1. pind på vrang-siden, den næste pind på ret-siden. Dvs. snoninger bliver lavet fra vrang siden? Hvorfor skal jeg så strikke ret på hjælpepinden og de resterende masker?
02.11.2014 - 23:31Odpověď DROPS Design :
Hej Camilla. 1. pind er retsiden. Snoningerne laves paa retsiden.
06.11.2014 - 13:42
![]() Carla napsala:
Carla napsala:
Il modello è bellissimo, ma devo mettere il doppio dei punti. Come costruire lo schema? Devo farlo speculare? Grazie per la risposta
07.09.2014 - 10:29Odpověď DROPS Design :
Deve mettere il doppio dei punti perché utilizza un filato più sottile? Nel caso in cui dovesse fare così potrebbe lavorare la treccia più larga (con più maglie ogni fascia della treccia) per esempio. Se deve fare la fascia deve fare prima un campione per capire quanto rende con il filato che utilizzerà.
11.09.2014 - 16:31
![]() Klára S napsala:
Klára S napsala:
Dobrý den, v českém návodu neodpovídá popis vzorku originálu. Hezký den Klára S
01.02.2014 - 20:23Odpověď DROPS Design :
Dobrý den, děkuji za upozornění - opraveno!
08.02.2014 - 01:06
![]() Isabel napsala:
Isabel napsala:
Hallo, Maakt het nog uit wat voor maat kabelnaald ik gebruik voor de hoofdband? Bedankt
26.10.2013 - 14:06Odpověď DROPS Design :
Hoi Isabel. De kabelnld moet niet te dun zijn. Heb je niet een hele dikke kabelnld, dan kan je eventueel een sokkenbreinld gebruiken.
28.10.2013 - 19:13
![]() Jan napsala:
Jan napsala:
Got it - thank you - sorry to be so dense :)
30.01.2013 - 00:43
![]() Jan napsala:
Jan napsala:
Yes, I have checked your video which is great for a cable stitch in the middle of a row, not as the first stitch in the row. The difference is that the skein side of the wrapping yarn is on the cable needle not the right hand needle so i am not sure if that yarn should go behind the cable needle or infront of the cable needle prior to knitting the next/6th stitch.
29.01.2013 - 18:49Odpověď DROPS Design :
In front, because stitches you have to knit next are in front of slipped sts.
29.01.2013 - 21:49
![]() Jan napsala:
Jan napsala:
Another source of my confustion -the wrap over yarn is on the cable needle since it is the first 5 stiches being slipped, when a cable is worked in the middle of a piece, the wrap over yarn is on the right hand knitting needle. Thank you again.
29.01.2013 - 13:41Odpověď DROPS Design :
Have you checked out our Video tutorials for cable knitting?
29.01.2013 - 14:58
![]() Jan napsala:
Jan napsala:
Thank you for your response and clarification. One more question - does the wrapping yarn for the 11th row go behind the cable needle and slipped stiches or in front? Thank you
29.01.2013 - 13:35Odpověď DROPS Design :
The yarn should not run over stitches in front and should not be visible. When you slip first 5 sts to cable needle behind piece, keep yarn front to knit next st from left needle.
29.01.2013 - 14:48
![]() Jan napsala:
Jan napsala:
I am making the neckwarmer and have a question regarding the 11th row. If I read the pattern correctly, this row starts with the 5 stitches slipped off to the cable needle. I find this awkward since the first stitch has the wrapping yarn (for lack of a better term). Am I reading the pattern correctly? I hope I am explaining myself properly.
28.01.2013 - 23:43Odpověď DROPS Design :
Dear Jan, you are correct, on row 11 the first 5 sts are slipped on cable needle behind piece for the cable. Happy knitting!
29.01.2013 - 09:02
![]() Isabel Hicks napsala:
Isabel Hicks napsala:
Would be grateful for some help! Am doing this lovely headband but- cast on 12 stitches K1 then cabled 4 back knitted 4 . Three stitches left - please tell me how do I get the braiding as no stitches left to do the other half of the chart - where am I going wrong?.. Many thanks
20.01.2013 - 00:32Odpověď DROPS Design :
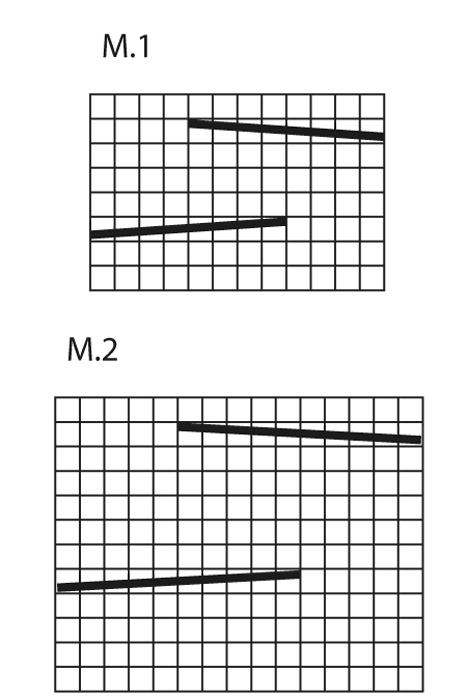
Dear Mrs Hicks, diagram is read from bottom right towards the left (RS) and left towards right side (WS), and M1 =12 sts, row 3 is : K4, cable on the next 8 sts. R7 : cable on the first 8 sts, K4. Happy knitting!
21.01.2013 - 18:21
|
||||||||||||||||
Braidy#braidyset |
||||||||||||||||
 |
 |
|||||||||||||||
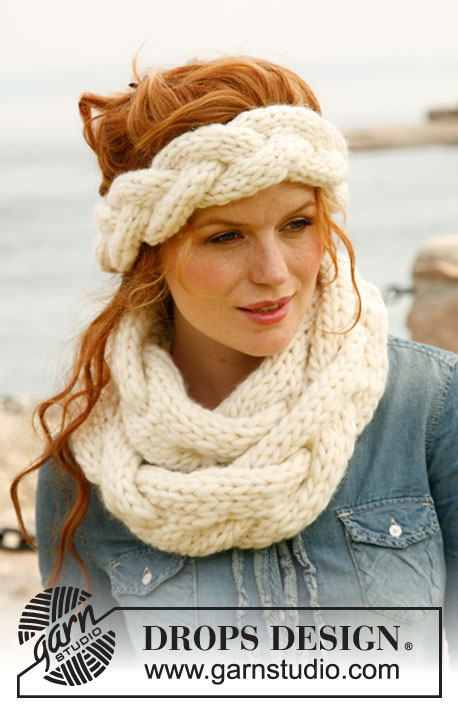
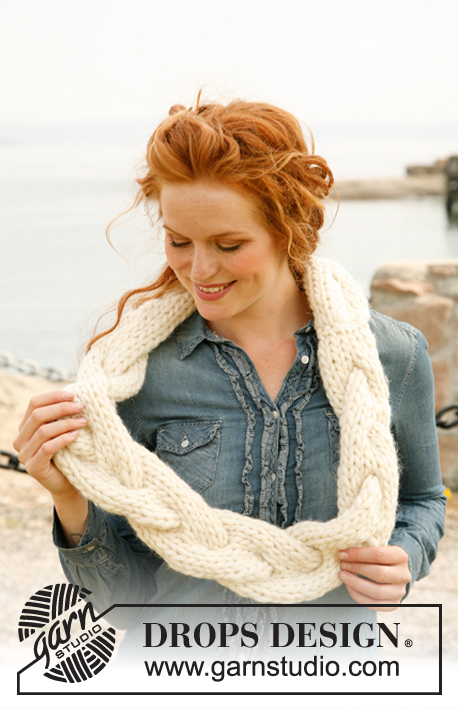
DROPS čelenka a nákrčník s velkým copánkem pletená z příze „Polaris“.
DROPS 134-7 |
||||||||||||||||
|
VZOR: Čelenka viz schéma M. 1, nákrčník viz schéma M. 2. Vzor je nahlížen z lícové strany. TIP - NAVAZOVÁNÍ NOVÉ PŘÍZE: Při navazování nové příze rozdělíme konec na 2 vlákna o délce asi 15 cm. Jedno vlákno ustřihneme. Stejný postup opakujeme u vlákna, které budeme navazovat. Obě 15 cm vlákna položíme na sebe tak, že výsledná tloušťka je stejná jako původní vlákno a pleteme jako doposud – takto docílíme neviditelného navázání nové příze. ---------------------------------------------------------------------- ČELENKA: Pleteme jeden dlouhý díl, který na závěr sešijeme. Na jehlici č. 12 nahodíme přízí Polaris 12 ok. Pleteme vzorem M. 1 do výšky asi 50 cm – končíme dokončením celého vzoru. Upleteme 1 řadu lícovým žerzejem a oka VOLNĚ uzavřeme. Sešijeme k sobě oka nahozené a oka uzavřené řady matracovým stehem. NÁKRČNÍK: Na jehlici č. 15 nahodíme dvojitou přízí 47 ok. Nad všemi oky pleteme 3 řady hladce. Dále pleteme vzorem M. 1 (1. řada = lícová) do výšky asi 148 cm – končíme dokončením celého vzoru (= 47 ok na jehlici). Nad všemi oky upleteme 3 řady hladce a oka VOLNĚ uzavřeme. |
||||||||||||||||
Vysvětlivky ke schématu |
||||||||||||||||
|
||||||||||||||||
 |
||||||||||||||||
Dokončili jste tento model?Pak označte své fotky tagem #dropspattern #braidyset nebo je pošlete do galerie #dropsfan. Potřebujete s tímto návodem poradit?Otevřete-li si návod na stránce garnstudio.com, najdete tam 3 výukových video-ukázek, Komentáře/Dotazy a další užitečné informace. © 1982-2026 DROPS Design A/S. Vyhrazujeme si veškerá práva. Tento dokument, včetně všech jeho dílčích částí, podléhá autorským právům. Podrobnější komentář k možnostem užití našich návodů najdete dole pod každým návodem na našich stránkách. |
||||||||||||||||


V oblasti pletené a háčkované módy působí DROPS Design více než 40 let. Díky tomu vám můžeme nabídnout jednu z nejrozsáhlejších kolekcí modelů s bezplatnými návody dostupnými na internetu - navíc v 17 jazycích. K dnešnímu dni máme na 324 katalogů a 12290 návodů celkem - z nich je už 7606 dostupných v [češtině].
We work hard to bring you the best knitting and crochet have to offer, inspiration and advice as well as great quality yarns at incredible prices! Would you like to use our patterns for other than personal use? You can read what you are allowed to do in the Copyright text at the bottom of all our patterns. Happy crafting!
Přidejte komentář k návodu DROPS 134-7
Rádi bychom věděli, co si o tomto modelu myslíte!
Pokud se chcete na něco zeptat, dbejte prosím na to, abyste ve formuláři níže vybrali správnou kategorii - díky tomu se dříve dozvíte, co potřebujete vědět. Povinná pole jsou označena *.