
Oblíbené kategorie
Hledáte přízi?


Komentáře / Otázky (46)
![]() Anick napsala:
Anick napsala:
Thank you very much for your quick reply. I'm very embarrassed to ask for clarifications: 1) R1 is RS and WS is R2 and every even rows? 2) is R2 : K2,YO,K1,YO,K1, P6, K1, P6, K1,YO,K1,YO,K2 ? 3) are increases made every even rows except the M.1 section and garter on every odd number row? 4) Am I reading correctly that R1 is Knit all stitches? Thanking you in advance
24.11.2025 - 14:52Odpověď DROPS Design :
Dear Anick, in this pattern, first row in M.1 is worked from WS, so that the cable (6th row) is worked from RS. So from WS work all odd numbered rows: K1, P6, K1, P6, K1 (with garter stitch on each side); Your 2) is right, that's how you will work the 2nd row from WS. The increases are worked after the first 2 sts, before and after M.1 and before the last 2 sts on every other row.. You start knitting 1 row on all sts, then start with 1st row M.1 increasing 6 sts (your row 2 above). Happy knitting!
25.11.2025 - 08:44
![]() Anick napsala:
Anick napsala:
Hi! Please can you tell me if i understood the pattern from Row 3 correctly please as I'm a new knitter? Row 2 is WS , Row 3 as I understand it is Knit all , work M.1 according to RS pattern, Row 4 : increases on both sides + knit all st on M.1. Row 5: Knit all st on both sides and knit all on M.1. Then, I am not sure after row 6 and cable. Thank you for your help
23.11.2025 - 16:26Odpověď DROPS Design :
Dear Anick, on first row (and all further rows from WS ), work as follows: K1, P6, K1, P6, K1. Work the row from RS (except cable row): P1, K6, P1, K6, P1 (every even numbered row) workCross stitches as explained under 3rd and 4th symbol on 6th row then every 10th row (work 9 rows in total between each cable). All stitches before/after M.1 are worked in garter stitch = knit all rows. Happy knitting!
24.11.2025 - 09:49
![]() Stacie napsala:
Stacie napsala:
For the first row in which you knit into the yarn overs (YO) on the previous row, it says to knit through the back loop; however, the remainder of the pattern does not state this. Should you knit through back loop on YO throughout the whole pattern or only the 3rd row where it specifically states to do so?
21.01.2025 - 05:12Odpověď DROPS Design :
Dear Stacie, yes, do knit the yarnocers through the back loops later on as well. Happy Knitting!
21.01.2025 - 08:16
![]() Ferlay Bernadette napsala:
Ferlay Bernadette napsala:
Je recherche un modèle tout simple de liseuse (dos en triangle) au point mousse aiguille 6 ou 7 ? Merci
13.06.2024 - 08:01Odpověď DROPS Design :
Bonjour Mme Ferlay, retrouvez nos modèles de châles avec une tension de 15 à 12 mailles ici, l'un d'eux pourra peut-être vous inspirer. Bon tricot!
13.06.2024 - 13:21
![]() MC Gelvé napsala:
MC Gelvé napsala:
Bonjour! 1-Je ne trouve pas sur le site une aiguille circulaire n°15 de 80 cm. Comment l'avoir ? 2- L'échantillon est 7mx12 rgs. Pour avoir 6 M1 on arrive à 62 rangs et 169mailles soit 51,6cm de long et 241cm de large or le patron indique 65 cm de long et 176 de large. Pouvez-vous m'expliquer ? 3- À la 12e ligne d'explication, il y a "1 jeté, M1" en trop !! Merci d'avance pour votre réponse. Cordialement.
06.04.2022 - 22:35
![]() Ana Cortés napsala:
Ana Cortés napsala:
Maravilloso , Me quedó perfecto y muy claras las explicaciones.Muchas gracias
16.07.2021 - 23:37
![]() Jane napsala:
Jane napsala:
Hi, love the pattern, just one quick question: in the first half of the pattern does "inc 6 sts on every other row" mean every WS row, or every other WS row? Thank you in advance!
19.04.2021 - 10:45Odpověď DROPS Design :
Dear Jane, if you read "every other row" in a pattern, it means every second row, i.e. every RS, or every WS row (depending on which row you have started. ). Happy Knitting!
19.04.2021 - 11:34
![]() Sofia napsala:
Sofia napsala:
Como se lê o gráfico M1 logo no início, quando ele começa (e estamos na carreira do avesso)? Primeiro pomos as três malhas do primeiro torcido por trás da peça? Ou pomos pela frente?
15.02.2020 - 00:45Odpověď DROPS Design :
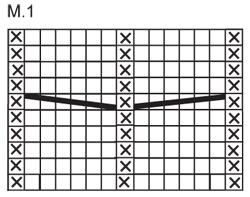
Começa-se o gráfico pelo avesso, porque é a carreira de "preparação" para o torcido. Nota importante: o gráfico mostra apenas as carreiras do direito. Sendo assim, na 1.ª carreira de M.1 é tricotada da seguinte maneira: 1 malha meia, 6 malhas liga, 1 malha meia, 6 malhas liga, 1 malha meia. Quanto aos torcidos, pomos primeiro as 3 malhas pela frente e, depois, por trás. Bom tricô!
19.02.2020 - 10:45
![]() Barbara napsala:
Barbara napsala:
Hello- I would like to know if it’s possible to make the Home on the Range shawl using stockinette stitch instead of garter stitch (excluding the cable section in the middle). In the photo, it looks like the two sections to the left or the right of the cable could be done in either garter or stockinette (stockinette would have a smoother/ flatter appearance)? I have made swatches in both stitches and both are the correct gauge, so wanted to ask for your professional opinion. Thank you!
03.09.2018 - 01:21Odpověď DROPS Design :
Dear Barbara, gauge in stocking stitch is not the same as in garter stitch, you need 12 rows in garter stitch to get 10 cm, you will need less row for 10 cm working with garter stitch. The increases have been calculated/designed for garter stitch, you might have to adjust some more things. Do not hessitate to contact your DROPS store, they might help you, even per mail or telephone. Happy knitting!
03.09.2018 - 15:36
![]() Holli napsala:
Holli napsala:
I’m confused because this pattern neither specifies if it is knitted in the round or flat and then sewn up a side? I’d love to cast on now. Pleas and thank you.
04.12.2017 - 04:38Odpověď DROPS Design :
Dear Holli, this shawl is worked back and forth on circular needle from top down. There will be no seam, just work as explained increasing as stated in the pattern to get a large triangle (= shawl). Happy knitting!
04.12.2017 - 10:43
|
|||||||||||||
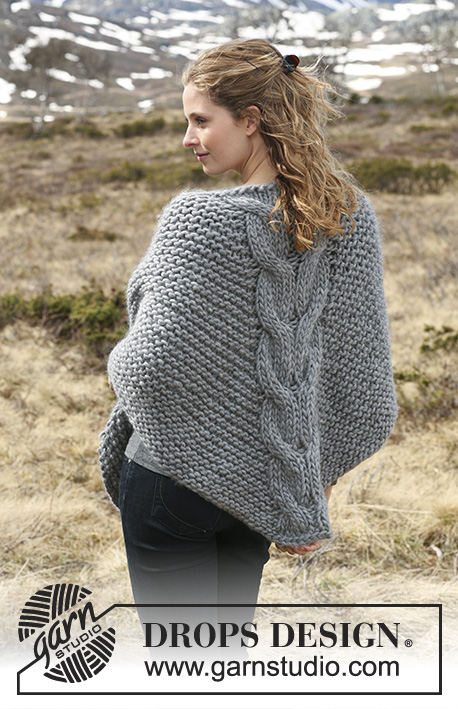
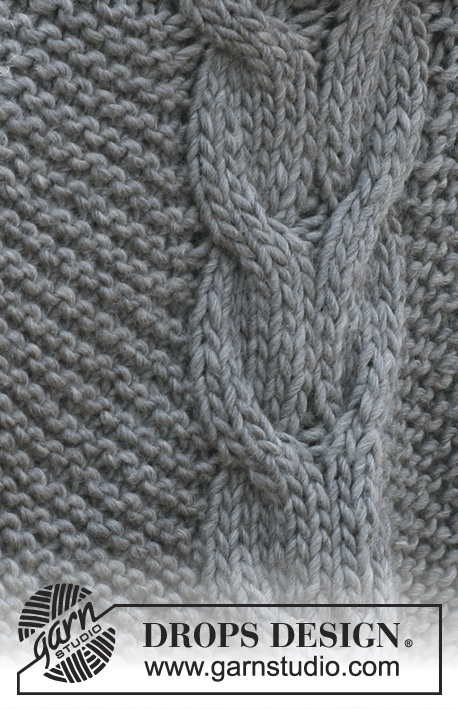
Home on the Range |
|||||||||||||
 |
 |
||||||||||||
DROPS šátek s copem pletený vroubkovým vzorem z příze "Polaris".
DROPS 116-14 |
|||||||||||||
|
VROUBKOVÝ VZOR: Pleteme stále hladce, lícové i rubové řady. 1 vroubek = 2 řady hladce. NOVÉ KLUBKO VLNY: Začínáte-li plést z nového klubka vlny, rozdělte konce na vlákna, přeložte je přes sebe, navlhčete a stočte dohromady. VZOR: Viz schéma M.1; vzor je nahlížen z lícové strany. První řada = rubová. ---------------------------------------------------------- ŠÁTEK: Pleteme v řadách na kruhové jehlici, od horního okraje k cípu. Na kruhovou jehlici č.15 nahodíme přízí Polaris 21 ok a upleteme 1 řadu hladce. Následující řadu – rubovou - pleteme takto: 2 oka hladce, 1x nahodíme, 1 oko hladce, 1x nahodíme, vzor M.1 (= 15 ok), 1x nahodíme, 1 oko hladce, 1x nahodíme, 2 oka hladce = 25 ok. V následující řadě pleteme nahození hladce za zadní nit, aby se v pletenině netvořily dírky. Pokračujeme takto: vroubkovým vzorem- viz výše - pleteme až ke vzoru M.1, vzor M.1 nad prostředními 15 oky, řadu dopleteme vroubkovým vzorem. SOUČASNĚ přidáváme v každé 2. řadě 6 ok, takto: 2 oka hladce, 1x nahodíme, 1 oko hladce, 1x nahodíme, hladce až ke vzoru M.1, 1x nahodíme, vzor M.1, 1x nahodíme, hladce po poslední 3 oka, 1x nahodíme, 1 oko hladce, 1x nahodíme, končíme 2 oky hladce. Takto upleteme celkem 3 sekvence vzoru M.1 (na výšku), pak pleteme takto: vroubkový vzor až ke vzoru M.1, vzor M.1 nad prostředními 15 oky, řadu dopleteme vroubkovým vzorem. SOUČASNĚ pokračujeme v přidávání 4 ok v každé 2. řadě, takto: 2 oka hladce, 1x nahodíme, hladce až ke vzoru M.1, 1x nahodíme, vzor M.1, 1x nahodíme, hladce až po poslední 2 oka, 1x nahodíme, končíme 2 oky hladce. Pokračujeme, až máme upletených celkem 6 sekvencí vzoru M.1 (na výšku; končíme po dopletení celé sekvence vzoru). Díl měří asi 65 cm (měřeno uprostřed, v cípu). Všechna oka nyní uzavřeme. |
|||||||||||||
Vysvětlivky ke schématu |
|||||||||||||
|
|||||||||||||
 |
|||||||||||||
Dokončili jste tento model?Pak označte své fotky tagem #dropspattern nebo je pošlete do galerie #dropsfan. Potřebujete s tímto návodem poradit?Otevřete-li si návod na stránce garnstudio.com, najdete tam 13 výukových video-ukázek, Komentáře/Dotazy a další užitečné informace. © 1982-2026 DROPS Design A/S. Vyhrazujeme si veškerá práva. Tento dokument, včetně všech jeho dílčích částí, podléhá autorským právům. Podrobnější komentář k možnostem užití našich návodů najdete dole pod každým návodem na našich stránkách. |
|||||||||||||


V oblasti pletené a háčkované módy působí DROPS Design více než 40 let. Díky tomu vám můžeme nabídnout jednu z nejrozsáhlejších kolekcí modelů s bezplatnými návody dostupnými na internetu - navíc v 17 jazycích. K dnešnímu dni máme na 324 katalogů a 12290 návodů celkem - z nich je už 7606 dostupných v [češtině].
We work hard to bring you the best knitting and crochet have to offer, inspiration and advice as well as great quality yarns at incredible prices! Would you like to use our patterns for other than personal use? You can read what you are allowed to do in the Copyright text at the bottom of all our patterns. Happy crafting!
Přidejte komentář k návodu DROPS 116-14
Rádi bychom věděli, co si o tomto modelu myslíte!
Pokud se chcete na něco zeptat, dbejte prosím na to, abyste ve formuláři níže vybrali správnou kategorii - díky tomu se dříve dozvíte, co potřebujete vědět. Povinná pole jsou označena *.