
Populaarsed kategooriad
Otsid lõnga?


Kommentaarid / Küsimused (64)
![]() Allinson Sherratt kirjutas:
Allinson Sherratt kirjutas:
Further to your answer to my earlier question, I would confirm I did do a tension square & it was fine. I'm mainly concerned that I'm interpreting the pattern correctly IE am I correct to increase the yo marker increases on the right side only - for the largest side this would equate to 76 rows. Thanks
06.08.2021 - 14:04DROPS Design vastas:
Dear Allinson, you are right, you only increase on the right side. About the amount of rows to work, you need to check the measurements for your sizes with the ones in the diagram below the pattern; but there should be 76 rows, yes. The texture of the work should be loose and light.
07.08.2021 - 11:13
![]() Allinson Sherratt kirjutas:
Allinson Sherratt kirjutas:
If you only increase around the markers on every right sided row, you knit 38 X 2(for the largest size), 76 rows in total. I have used 6 balls of Muskat so far & need to knit 30 more rows. Can you please confirm the quantity of yarn required ?
06.08.2021 - 12:41DROPS Design vastas:
Dear Allison, the amount of yarn we use dto knit the modell is stated in the pattern. However the amount of yarn a knitter catually uses depends on many factors, mostly on the gauge she is knitting with. If you knit with gauge given, the amount of yarn should be enough. Happy stitching!
06.08.2021 - 13:15
![]() Nathalie kirjutas:
Nathalie kirjutas:
Buongiorno, non ho capito il passaggio del retro dx e sx . Si ripete spalla destra, immagino ci sia un errore e volevo capire se tutte e due le spalle e’ corretto lavorarle in modo diverso Io per le due parti davanti ho lavorato i due pezzi insieme sullo stesso ferro Posso farlo anche per il dietro? Grazie mille ♥️
06.05.2020 - 11:59DROPS Design vastas:
Buongiorno Nathalie, abbiamo corretto il testo. Deve lavorare prima la spalla sinistra e poi la destra, e quando le viene chiesto unirà le maglie della spalla sinistra. Buon lavoro!
06.05.2020 - 12:40
![]() Laura Crockarell kirjutas:
Laura Crockarell kirjutas:
When doing the increases for the arm hole from the WS, should i still do a Knit front and back or another type increase stitch?
24.03.2019 - 23:15DROPS Design vastas:
Dear Mrs Crockarell, when increasing from the WS you can purl front and back to keep the same kind of increase -seen from RS all the way. Happy knitting!
25.03.2019 - 12:12
![]() Debbie Owen kirjutas:
Debbie Owen kirjutas:
When doing the YO, do we need to move the marker? I am not but do have the correct increases each time. Marker started at 37 and after 2 rows of increases it is now in 39. Is that correct.
25.04.2018 - 16:18DROPS Design vastas:
Dear Mrs Owen, marker should stay in the same st all the way (just move it upwards when working), ie after 2 rows increase you have increased 2 sts and there are now 38 sts before marker (= marker is in the 39th st) in 5th size. Happy knitting!
25.04.2018 - 16:39
![]() Connie Ruebling kirjutas:
Connie Ruebling kirjutas:
While making this vest I have noticed by looking at the finished projects, there are two different ways people are knitting the yarn over increases. The pattern says in the body to increase in the 24-42nd stitch depending on your size in from each side. As you continue, that number does not stay the same. The next knit row after you have purled back, the increase will be in the 25-43rd stitch, then the 26-44th stitch and so on. Not the 24-42nd stitch throughout.
17.06.2015 - 21:18DROPS Design vastas:
Dear Mr Ruebling, the marker on body has to be inserted in the 24th st in each side, and inc are done each side of the marker, so that you will have 23 sts for front piece before 1st inc, 24 sts after 1st inc and so on. Let marker follow this st and inc each side of this st will make the front pieces inc with 1 st and back piece with 2 sts on each inc row. Happy knitting!
18.06.2015 - 09:08
![]() Tamila kirjutas:
Tamila kirjutas:
I have made it, and mine curls so much being stockinette stitch. The picture with the model doesn't seem to curl so much. Is that because of blocking? Or is there something I can do to keep it from curling. I tried doing a rib edge, but didn't like it, and it still curled some.
05.05.2015 - 18:08DROPS Design vastas:
Dear Tamila, blocking will prevent curling, you can also add a crocheted edge.
06.05.2015 - 09:17
![]() Neuling kirjutas:
Neuling kirjutas:
Hallo liebes Drops-Team! Sie schreiben in der Anleitung "...glatt stricken...". Meinen Sie damit glatt rechts, also Vorderseite rechte Maschen, Rückseite linke Maschen. Oder meinen Sie damit wirklich Vorder- und Rückseite rechte Maschen? Jetzt schon vielen lieben Dank für Ihre Antwort.
23.09.2014 - 16:23DROPS Design vastas:
"glatt" bedeutet bei uns immer glatt rechts. Gutes Gelingen!
23.09.2014 - 22:16
![]() Cherry kirjutas:
Cherry kirjutas:
Hallo liebes Drops-Team! Ich habe gerade das linke Vorderteil gestrickt und es rollt sich an den Seiten sehr ein. Ist das so gewollt (auf dem Bild ist das für mich nicht ersichtlich!)oder sollte ich einfach ein/zwei Maschen am Rand als kraus rechts dazustricken (oder einfach von den anfänglichen 17 Maschen vier als Randmaschen (kraus rechts) einplanen - also auf jeder Seite 2?)???? Für eine Antwort wäre ich sehr dankbar.
02.08.2014 - 11:39DROPS Design vastas:
Sie können die Weste nach dem Stricken anfeuchten und spannen oder unter feuchten Tüchern trocknen lassen, dann rollen sich die Ränder weniger stark. Sie können ein Probestück stricken und ausprobieren, wie stark es sich nach solch einer Behandlung noch einrollt. Falls das nicht reicht, können Sie wie von Ihnen vorgeschlagen ein paar Maschen am Rand kraus rechts stricken statt glatt rechts (nicht zusätzlich), ich würde 3-4 M kraus re pro Seite stricken.
04.08.2014 - 13:48
![]() Heike König kirjutas:
Heike König kirjutas:
150 g Wolle haben für die Größe S nicht ausgereicht. Ich habe noch 100 g dazubestellt.
01.06.2014 - 16:23
|
|
Take Me To Spain#takemetospainvest |
|
 |
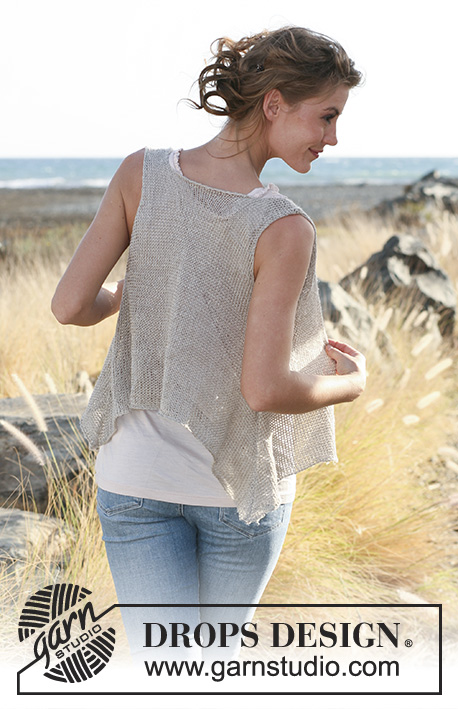 |
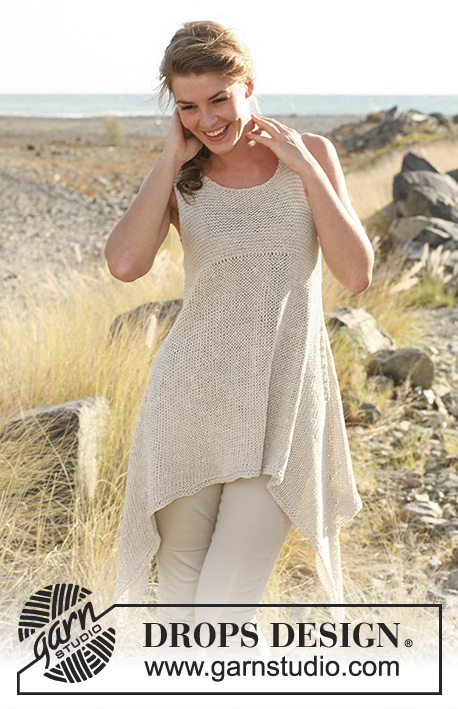
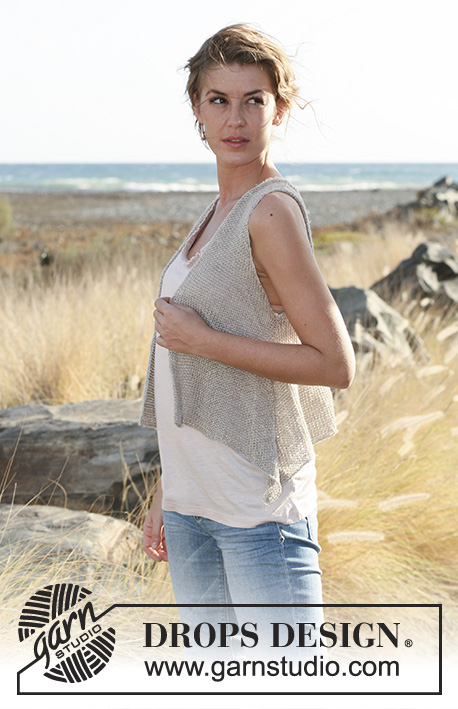
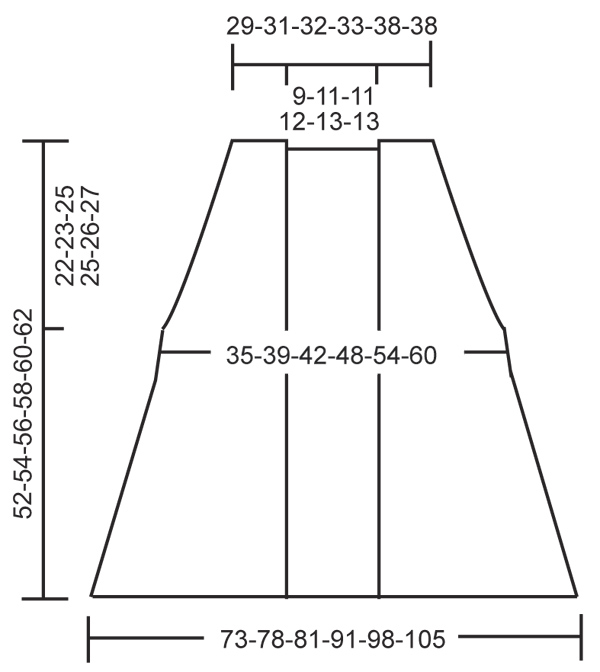
Ülevalt alla kootud DROPSi asümeetriline vest lõngast ”Lin” või ”Muskat”. Suurused S-XXXL.
DROPS 129-15 |
|
|
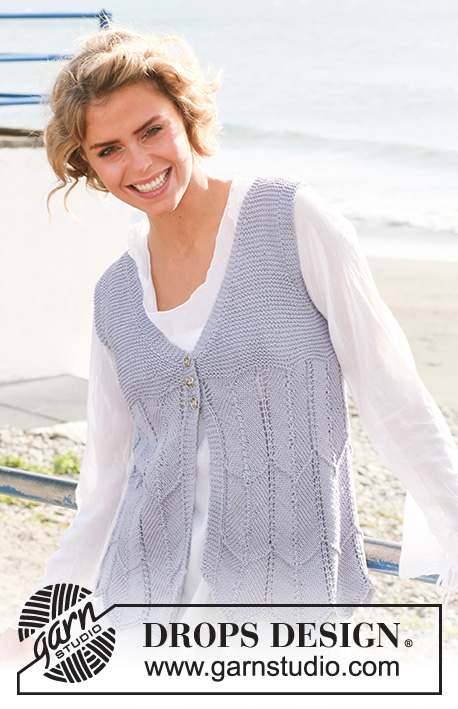
KASVATAMISE NIPP Kasvata tehes 1 õs mõlemal pool mõlemat silmusemärkijat (SM-i) järgmiselt: koo parempidises koes kuni SM-i, 1 õs, koo silmus SM-ga parempidises koes, 1 õs. Tagasireal koo õs pahempidi, et tekiks auk. VEST Kootakse ülevalt alla. Esi- ja seljaosad kootakse edasi-tagasi eraldi alla ja tehakse käeaugud. Siis asetatakse kõik silmused ühele ringvardale ning kootakse edasi-tagasi esiservast alustades. VASAK ESIOSA Kootakse edasi-tagasi ringvarrastega. Loo üles 17-17-18-18-21-21 silmust 5 mm ringvarrastele Lin lõngaga. Koo parempidises koes. Kui töö kõrgus on 2 cm, kasvata 1 silmus käeaugu serva poole kududes viimasest silmusest 2 silmust (vaadatuna töö PP). Korda kasvatamist ääresilmuses külje poole igal 9-7-6-4-4-3-al real (st. viimane silmus töö PP või esimene silmus töö VP) kokku 6-8-10-14-15-20 korda = 23-25-28-32-36-41 silmust. JÄLGI KOETIHEDUST! Pärast kõiki kasvatamisi küljel on töö kõrgus umbes 22-23-25-25-26-27 cm. Tõsta silmused silmusehoidjale. PAREM ESIOSA Koo nagu vasak esiosa, ainult kasvatamised tee teisele servale. SELJAOSA Vasak õlg Loo üles 17-17-18-18-21-21 silmust 5 mm ringvarrastele Lin lõngaga. Koo 5 rida parempidises koes, alusta töö PP. Katkesta lõng ja aseta töö kõrvale. Parem õlg Loo üles 17-17-18-18-21-21 silmust 5 mm ringvarrastele Lin lõngaga. Koo 5 rida parempidises koes, alusta töö PP, siis loo üles 16-18-18-20-22-22 silmust järgmise rea lõpus, töö VP = 33-35-36-38-43-43 silmust. Koo vasaku õla silmused samale vardale = 50-52-54-56-64-64 silmust. Jätka parempidises koes, SAMAL AJAL, kui töö kõrgus on 2 cm õlast, kasvata 1 silmus esimesel ja viimasel silmusel vardal. Korda kasvatamist mõlemal serval igal 9-7-6-4-4-3-al real kokku 6-8-10-14-15-20 korda = 62-68-74-84-94-104 silmust. Pärast kõiki kasvatamisi on töö kõrgus umbes 22-23-25-25-26-27 cm. Katkesta lõng. KEHAOSA Tõsta parem ja vasak osa seljaosaga samale vardale. Nüüd koo edasi-tagasi, alusta esiservast = 108-118-130-148-166-186 silmust. Paigalda 2 SM-i: 24-26-29-33-37-42-sse silmusesse mõlemast servast (seljaosa = 60-66-72-82-92-102 silmust). Koo 2 cm parempidises koes, töö kõrgus on umbes 24-25-27-27-28-29 cm. Järgmisel real, töö PP, kasvata 1 silmus mõlemal pool mõlemat SM-i - vaata KASVATAMISE NIPPI! Korda kasvatamist igal töö PP real, kuni töö lõpuni = umbes 32-33-33-36-37-38 rida kasvatamisega (umbes 28-29-29-31-32-33 cm). Pärast kõiki kasvatamisi vardal on umbes 236-250-262-292-314-338 silmust. Koo silmused lõdvalt maha. Töö kõrgus on umbes 52-54-56-58-60-62 cm mõõdetuna õlast otse alla (küljed on pikemad, kuna kasvatamised lisasid lisalaiust ja pikkust). ÜHENDAMINE Õmble õlaõmblused. |
|
 |
|
Kas oled teinud seda mustrit?Lisa oma piltidele viide #dropspattern #takemetospainvest või saada link projektile meie #dropsfan galeriisse. Vajad abi selle mustriga?Garnstudio.com kodulehel on 14 õppevideot, küsimuste/vastuste osa ja muudki. © 1982-2026 DROPS Design A/S. Kõik õigused kaitstud. See dokument, ning selle alajaotused on kaitsud autoriõigustega. Loe rohkem, mida meie mustritega võib teha, iga mustrilehe alt meie kodulehel. |
|


Tegeledes üle 40 aasta kudumise ja heegeldamise disainidega, pakub DROPS Design ühte suurimat tasuta mustrite kollektsiooni internetis - tõlgituna 17 keelde. Tänaseks on meil 325 kataloogi ja 12298 mustrit - millest 9439 on tõlgitud Eesti keelde.
Me anname endast parima, et tuua teieni kõike mida kudumine ja heegeldamine võib pakkuda - inspiratsiooni, nõuandeid ning ka kvaliteetseid lõngu parima hinnaga! Soovid kasutada mustreid muukski, kui ainult oma tarbeks? Loe infot meie Copyright osas iga lehekülje all. Rõõmsat loomist!
Jäta kommentaar mustrile DROPS 129-15
Ootame kommentaare selle mustri kohta!
Kui soovid midagi küsida, siis kiiremaks vastuse saamiseks veendu, et valid õige kategooria alloleval formil. Vajaliku väljad *.