
Populaarsed kategooriad
Otsid lõnga?


Kommentaarid / Küsimused (22)
![]() Monnier kirjutas:
Monnier kirjutas:
Bonjour, je ne comprends pas ce que vous appelez les sections : "augmenter une maille dans chacune des 3 sections". Merci d'avance
24.03.2025 - 15:44DROPS Design vastas:
Bonjour Mme Monnier, vous devez augmenter le nombre de mailles envers des côtes, autrement dit, les 3 fois 3 mailles envers à la pointe du châle doivent être augmentées à 4 mailles envers - gardez bien 3 mailles envers le long des 2 diagonales. Recommencez ensuite à 5 cm de bordure, vous aurez cette fois 5 mailles envers dans ces 3 sections en mailles envers des côtes, et toujours 3 mailles envers dans les autres le long des 2 diagonales. Bon tricot!
25.03.2025 - 08:51
![]() Marie Arlette Dubernet kirjutas:
Marie Arlette Dubernet kirjutas:
Faut il faire une augmentation de chaque côté tous les 2 rgs ou tous les rgs Jusqu'à 5cm . Je ne comprends pas la suite des explications après 5cm Modele drops 100-4
10.01.2025 - 17:09DROPS Design vastas:
Bonjour Mme Dubernet, vous augmentez 1 maille de chaque côté à 3 mailles du bord tous les 2 rangs (correction à venir) jusqu'à la fin, et, en même temps, vous augmentez le nombre de mailles envers: à 5 cm vous augmentez pour passer en côtes 3 m endroit, 4 m envers et à 9 cm, vous augmenter pour passer en côtes 3 m endroit, 5 m envers. Bon tricot!
13.01.2025 - 08:29
![]() Anni kirjutas:
Anni kirjutas:
I skriver nok å flot, at man blot kan bruge omregneren til at finde alternativt garn. Dette er ikke korrekt. Omregneren kan ikke finde ud af det, når der er tale om to forskellige slags garn. Selvom man angiver at det er to tråde af Vivaldi, kan den ikke finde et alternativ. I bedes derfor angive alternativt garn, tak.
27.12.2018 - 17:56DROPS Design vastas:
Hei Anni. Når du skal finne alternativer for 2 garn, må du skrive dem inn hver for deg. Vivaldi tilhører garngruppe C og kan derfor byttes med andre garn i den gruppen (feks Air), men det som gir likest resultat er Brushed Alpaca Silk. Cotton Merino tilhører garngruppe A, og kan byttes med et hvilket som helst garn i denne gruppen, men om du vil ha et bomullsgarn kan du bruke Safran. Du finner en overiskt over garngruppene her. Vi har nå testet begge disse garnene i garnkalkulatoren og det gikk fint- men de må som sagt puttes inn individuelt. God fornøyelse
02.01.2019 - 11:22
![]() Diana kirjutas:
Diana kirjutas:
Hi, as both yarns are not available any more I'd like to knit the shawl with just one yarn. Would you be able to let me know what options there are and how many grams I would need?
16.09.2018 - 20:27DROPS Design vastas:
Dear Diana, you can use our yarn converter to find an alternative for each yarn - read more about alternatives here. Happy knitting!
17.09.2018 - 09:32
![]() Bill Burris kirjutas:
Bill Burris kirjutas:
The way I understand this, after picking up stitches for the ribbing we begin with 3 knit stitches and end with 3 knit stitches all along so that they are always garter stitching at both ends. Do we increase in the garters starting with the first three knits or knit 3, ribbing, knit 3 with an increase inside the three then increase at the other end on the return trip? Also do we increase in the garters on every round?
18.02.2018 - 01:16DROPS Design vastas:
Dear Mrs Burris, you will increase after the first 3 sts in garter st on row and before the 3 sts in garter st at the end of row. You increase every other row (this will be added in the pattern) to the end. These new sts will be worked in rib. Then after 5 cm and 9 cm increase also in the 3 bottom P-sections. Happy knitting!
19.02.2018 - 09:39
![]() Bill kirjutas:
Bill kirjutas:
Where the instructions say to cast on 7 stitches with 1 strand of each quality, are you knitting with two yarns at the same time?
05.12.2017 - 17:11DROPS Design vastas:
Dear Bill, correct, you will work with 2 yarns at the same time all the way, ie with Cotton Viscose and Vivaldi. Happy knitting!
06.12.2017 - 08:49Athanasia kirjutas:
Hello again! Why is it necessary to chrochet the borders? Can I pick up the stiches without the chrochet part? Thank you
28.04.2017 - 12:57DROPS Design vastas:
Dear Athanasia, crocheting the edge first will help you to pick up sts evenly and will also make a nice eyelet row between shawl and ribbing. Happy knitting!
28.04.2017 - 13:52Athanasia kirjutas:
Hello, I have two questions to make. 1. The crochet is done to the three sides of the shawl or just the two sides where the pick-up stiches are made. 2. I don't understand the incorporation of the stiches at the rib. At 5 cm it says add 2 st. at the bottom 3 purl. Ok, I understand that. The 3 st become 5 add we add 6 st in total. At 9 cm says add 2st at the bottom 3 purl. Does it mean that the 5 st now becomes 7? Thank you
06.04.2017 - 12:47DROPS Design vastas:
Dear Athanasia, 1) you crochet the ch-spaces around the shawl, ie along the 3 sides. 2) You will have to inc 1 st each of the the bottom 3 P-sections only, so that you will have P4 after 5 cm in these P-sections and P5 after 9 cm in these P-sections (but still P3 in every other P sections, inc are only made at the bottom tip), pattern will be edited. Happy knitting!
06.04.2017 - 13:53
![]() Mae kirjutas:
Mae kirjutas:
Bonjour, Il y a deux choses que je ne comprends pas très bien dans les instructions: 1- quand vous dites "avec 1 fil de chaque qualité" ça veut dire que l'on double le fil? 2 - La bordure, il faut la tricoter à part et l'assembler ensuite? Est-il possible de réaliser ce modèle sans savoir crocheter? Merci de votre aide, Mae
12.12.2016 - 18:46DROPS Design vastas:
Bonjour Mae, le châle se réalise entièrement avec 2 fils: 1 fil Cotton Viscose + 1 fil Vivaldi. La bordure se réalise au tricot, en relevant les mailles le long des 2 diagonales du châle. Bon tricot!
13.12.2016 - 08:47Rebekah kirjutas:
I'm having trouble understanding how to pick up the stitches for the rib border - can anyone help?
29.04.2016 - 11:35DROPS Design vastas:
Dear Rebekah, the sts are picked up in the crocheted ch-spaces along the 2 diagonal of the shawl, in each ch-space work as follows; pick up 1 st, YO, pick 1 st (= 3 sts in each ch-space) - make sure your number of sts is divisible with 6 + 3. Happy knitting!
29.04.2016 - 11:44
|
|
Upstate#upstateshawl |
|
|
|
|
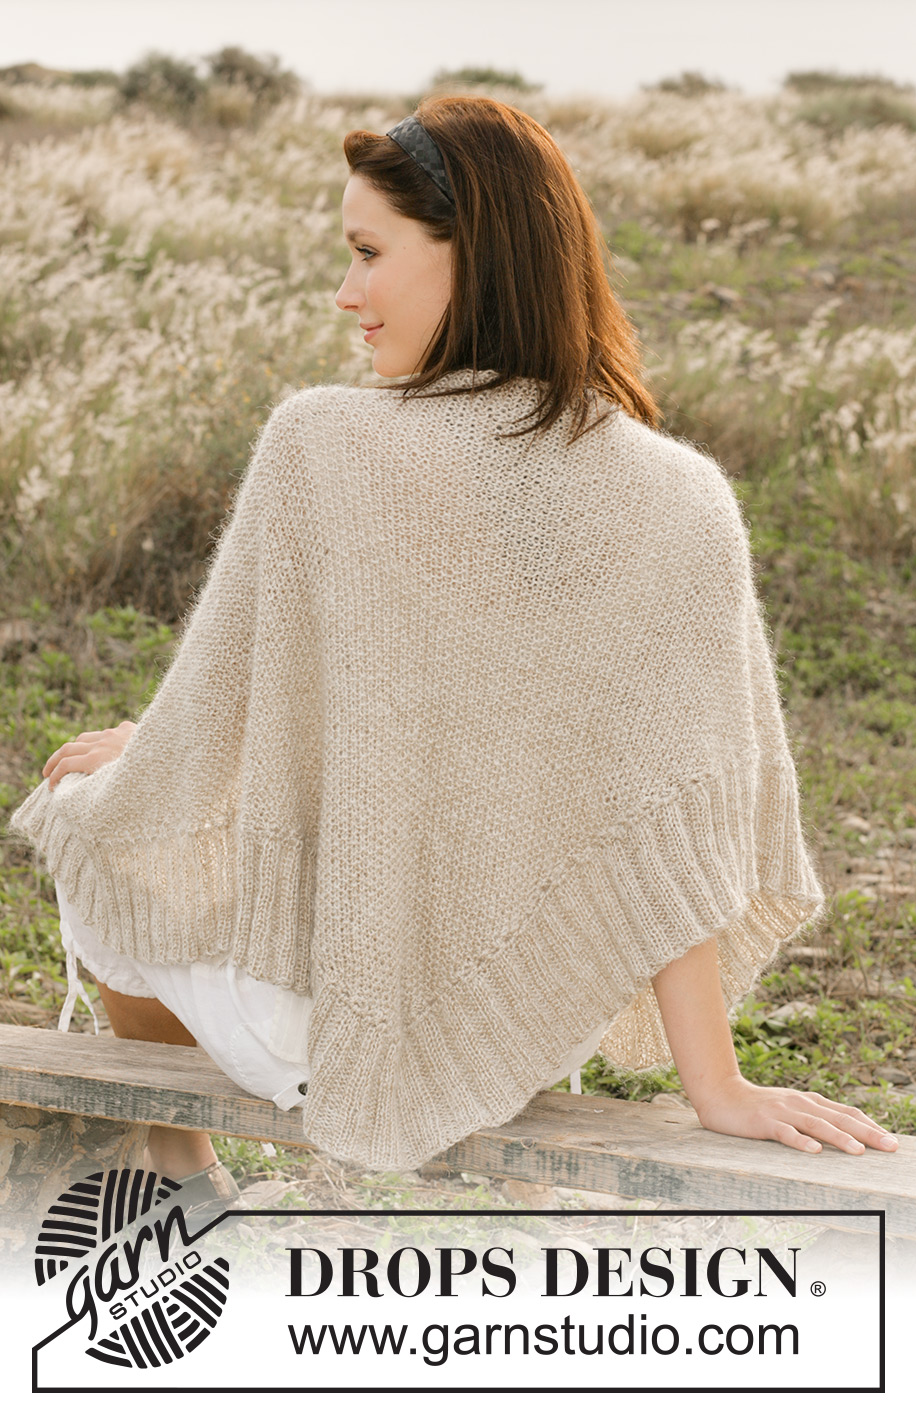
DROPS Vivaldi ja Cotton Viscose lõngadest kootud pärlkoes sall
DROPS 100-4 |
|
|
PÄRLKUDE 1. RIDA: * 1 pr, 1ph *, korda * kuni * rea lõpuni. 2. RIDA: koo parempidised silmused pahempidi ja pahempidised silmused parempidi. Korda 2. rida. KASVATAMISE NIPP 1 Rea lõpus kasvata nii, et kood rea viimasesse silmusesse 2 silmust. Kasvatatud silmused koo mustri järgi. KASVATAMISE NIPP 2 Kasvata kolme ripskoes silmuse kõrvalt järgnevalt: 1 õs, järgmisel real koo see pr keerdsilmusena (s.t koo läbi silmuse tagumise aasa). MÕÕTMISE NIPP Töö raskuse tõttu pane sall mõõtmiseks rippuma. RIPSKUDE (edasi-tagasi kududes): koo kõik read parempidi . ------------------------- SALL Loo kahekordse lõngaga (1 x Cotton Viscose + 1 x Vivaldi) 6 mm ringvarrastele 7 silmust. Koo pärlkoes ja SAMAL AJAL kasvata iga rea lõpus 1 silmus juurde – vaata KASVATAMISE NIPPI 1- kuni töö kõrgus on u 66 cm – vaata MÕÕTMISE NIPPI. Salli laius ülevalt on nüüd u 127 cm. Koo silmused lõdvalt maha. HEEGELÄÄRIS Heegelda piki ühte salli serva alla suunas kahekordse lõngaga (1 x Cotton Viscose + 1 x Vivaldi) ja 5 mm heegelnõelaga ääris järgnevalt: 1 kinnissilmus (ks) esimesse nurgasilmusesse (üles salli nurka) * 2 ahelsilmust (ahels), jäta 2 silmust vahele ja heegelda 1 ks järgmisesse silmusesse*, korda *-* = 39 - 41 (peab jaguma 2-ga +1 silmus) ahels-kaart – lõpeta rida 1 ks-ga loomisääre nurgas. Edasi heegelda piki loomisäärt järgnevalt: * 2 ahels, jäta 1 silmus vahele, 1 ks järgmisesse silmusesse *, korda *-* kokku 3 korda = 3 ahels-kaart loomisäärde. Seejärel heegelda piki teist salli serva suunaga üles nii, nagu teise serva heegeldasid – lõpeta rida 1 ks-ga üleval nurgas = 39 - 41 (peab jaguma 2-ga +1 silmus) ahels-kaart. Piki mahakootud silmuste serva heegelda ääris järgnevalt: * 2 ahels, jäta 2 silmust vahele, 1 ks järgmisesse silmusesse *, korda *-* ja lõpeta ääris ühe aassilmusega esimesse ks-sse. SOONIK Koo piki mõlemat salli külge kahekordse lõngaga (1 x Cotton Viscose + 1 x Vivaldi) ja 5,5 mm ringvarrastega soonikut. Korja igast ahels-kaarest üles 3 silmust järgnevalt: 1 silmus, 1 õs, 1 silmus = 243 – 261 silmust (peab jaguma 6-ga + 3 silmust). Loe kogu järgnev tekst läbi, enne kui jätkad kudumisega! Koo järgmine rida järgnevalt (töö paremal pool (PP)): 3 silmust ripskoes – vaata selgitust ülevalt * 3 pr, 3 ph *, korda *-* ning lõpeta rida, kududes 3 silmust pr ja 3 viimast silmust ripskoes. SAMAL AJAL kasvata 1 silmus igal teisel real 3 ripskoes silmuse kõrvalt mõlemal küljel – vaata KASVATAMISE NIPP 2. Uued silmused koo soonikkoes. Kui sooniku kõrgus on 5 cm, kasvata igal kolmel keskmisel (salli keskkoht) pahempidi soonikutriibul 1 silmus juurde, korda kasvatusi, kui sooniku kõrgus on 9 cm. Koo silmused lõdvalt maha, kui sooniku kõrgus on 12 cm. |
|
Kas oled teinud seda mustrit?Lisa oma piltidele viide #dropspattern #upstateshawl või saada link projektile meie #dropsfan galeriisse. Vajad abi selle mustriga?Garnstudio.com kodulehel on 19 õppevideot, küsimuste/vastuste osa ja muudki. © 1982-2026 DROPS Design A/S. Kõik õigused kaitstud. See dokument, ning selle alajaotused on kaitsud autoriõigustega. Loe rohkem, mida meie mustritega võib teha, iga mustrilehe alt meie kodulehel. |


Tegeledes üle 40 aasta kudumise ja heegeldamise disainidega, pakub DROPS Design ühte suurimat tasuta mustrite kollektsiooni internetis - tõlgituna 17 keelde. Tänaseks on meil 325 kataloogi ja 12298 mustrit - millest 9442 on tõlgitud Eesti keelde.
Me anname endast parima, et tuua teieni kõike mida kudumine ja heegeldamine võib pakkuda - inspiratsiooni, nõuandeid ning ka kvaliteetseid lõngu parima hinnaga! Soovid kasutada mustreid muukski, kui ainult oma tarbeks? Loe infot meie Copyright osas iga lehekülje all. Rõõmsat loomist!
Jäta kommentaar mustrile DROPS 100-4
Ootame kommentaare selle mustri kohta!
Kui soovid midagi küsida, siis kiiremaks vastuse saamiseks veendu, et valid õige kategooria alloleval formil. Vajaliku väljad *.