
Categorias populares
Procura um fio?


Comentários / Perguntas (9)
![]() Michelle escreveu:
Michelle escreveu:
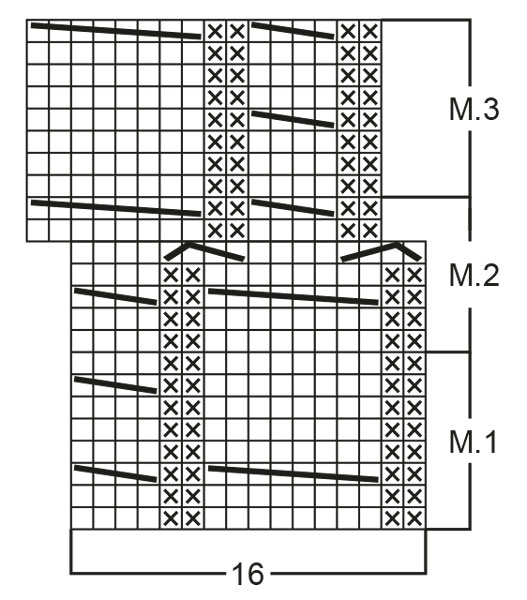
When moving from m1 to m2 what do I do with the first two stitches when they move over
24.02.2026 - 18:19DROPS Design respondeu:
Hi Maichelle, row 13: at the beginning put 2 sts on a cable needle behind the work (2 first sts in M1 diagram), then K 2, P 2 from the cable needle. Happy knitting!
08.04.2026 - 15:29
![]() Barbara Vagianos escreveu:
Barbara Vagianos escreveu:
How is the best way to adjust this pattern for a larger size? I want to make it for a 34.5 inch bust. Should I try to get a larger gauge and following the instructions for size L or should I add more cable repeats? Thanks for your help.
29.08.2025 - 16:59DROPS Design respondeu:
Dear Barbara, if you modify the gauge then it will be difficult to ensure that you have the correct gauge when working the different steps of the pattern. It would be best to cast on more initial stitches and work more cable repeats for a larger size. Happy knitting!
31.08.2025 - 20:54
![]() Petra Mannsshardt escreveu:
Petra Mannsshardt escreveu:
Wie ist das zu verstehen? Ich habe die Schultern zusammen genäht und wollte jetzt den Halsausschnitt sticken. 80 Maschen Plus die ca 88 Maschen vom hilfsfaden aufnehmen? Das kommt mir so viel vor. Da ich „Anfängerin“ bin , kenne ich mich da nicht so aus.
09.04.2024 - 13:29
![]() Jean Grimble escreveu:
Jean Grimble escreveu:
I am reading the chart. I have 208 stitches on my needles. The chart says to knit 5 repeats of Pattern 1 (80 sts) , then Pattern 2 one time (16 stiches) for a total of 96 stitches. Repeat that sequence and you have 192 stitches, leaving 16 stitches. Am I to knit 8 stiches either side of the cables????? The photo of the pattern does not indicate this. Bear with me, this is my first time reading a chart!!! I am sure this is my confusion!!
30.06.2023 - 17:05DROPS Design respondeu:
Dear Jean, the repeats are not horizontally but rather vertically. That is, you will work 1st row of M.1 on the whole row, then the 2nd row of M.1, e.t.c. After working all rows of M.1, instead of working M.2 you need to work M.1 again, until you have worked all of M.1 5 times vertically in total. On the next row, work 1st row of M.2, which will displace the pattern slightly, as explained in the pattern. After the last row of M.2, start working M.3 and repeat M.3 until you reach the final measurements. Happy knitting!
30.06.2023 - 21:09
![]() Ellen Rachich escreveu:
Ellen Rachich escreveu:
Your instructions are not very clear when decreasing or armholes...please explain when we start knitting front And start decreasing
03.04.2021 - 22:22DROPS Design respondeu:
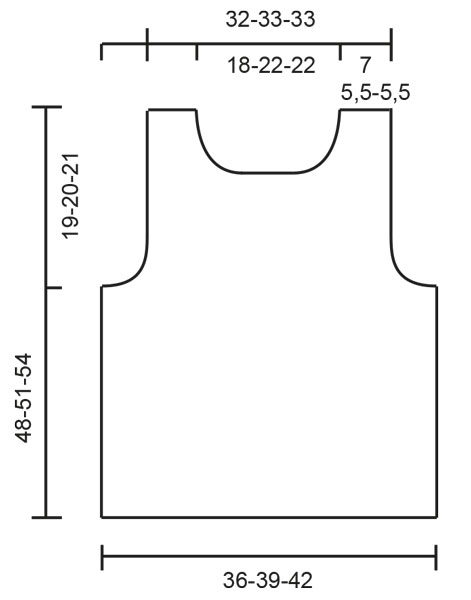
Dear Ellen, the numbers that are not in the description can be calculated from teh schematic drawing: you start decreasing for the armhole, when the piece is 29-31-33 cm long (depending on the size you are making). Happy Knitting!
04.04.2021 - 21:30
![]() Ellen Rachich escreveu:
Ellen Rachich escreveu:
How can I make this into a vneck for size small?
16.03.2021 - 20:12DROPS Design respondeu:
Dear Mrs Rachich, we are unfortunately not able to adjust every pattern to every single request - please contact your yarn store for any assistance adjusting the pattern to your own wishes. Thanks for your comprehension. Happy knitting!
17.03.2021 - 08:37
![]() Robyn escreveu:
Robyn escreveu:
For shaping the shoulders; since the middle 28 stitches are on a stitch holder how can I continue knitting in full rows? Surely I'll have to focus on one shoulder at a time rejoining the yarn for the second shoulder? Can you clarify?
21.06.2020 - 23:23DROPS Design respondeu:
Dear Robyn, after you have slipped the middle 28 sts for neck on a thread/stitch holder, continue each shoulder separately continuing dec for armhole as before and slipping more sts on same thread for neck. When first shoulder is finished, just work the 2nd one the same way but mirrored. Happy knitting!
22.06.2020 - 08:45
![]() Robyn escreveu:
Robyn escreveu:
I don't understand how to continue after the last part of the Body instruction, "Knit the rest of each part separately." Doesn't that mean I'll have to cut and rejoin the yarn for the back? Thank you
16.06.2020 - 00:18DROPS Design respondeu:
Dear Robyn, that's right you will slip all stitches for back piece on a thread or on a extra needle and continue first front piece, then join yarn to work back piece to the end. Happy knitting!
16.06.2020 - 09:04Heather escreveu:
What does this mean at the front "then put sts at each neck edge on the st holder every other row: 2 sts 2 times, 1 st 2 times = 40-48-48 sts on the st holder and 19-17-17 sts on each shoulder". I normally bind off for neck shaping, not sure about the way this is worded. Can you explain a little more in detail what I am to do here. I am stuck at this point and no local yarn store to assist. Thanks.!
19.07.2017 - 20:48DROPS Design respondeu:
Dear Heather, When working rows from neckline work the first 2 sts, then put them on the same st holder as sts for neckline, work to the end of row, work next row as before, then at the beg of next row work the first 2 sts and slip them on the st holder, continue row as before, work next row, then at the beg of next row, work the first st and slip it on the st holder. Repeat the last 2 rows = 6 sts are slipped on the st holder. Happy knitting!
20.07.2017 - 09:34
|
|||||||||||||||||||
Whiteout#whiteouttop |
|||||||||||||||||||
 |
 |
||||||||||||||||||
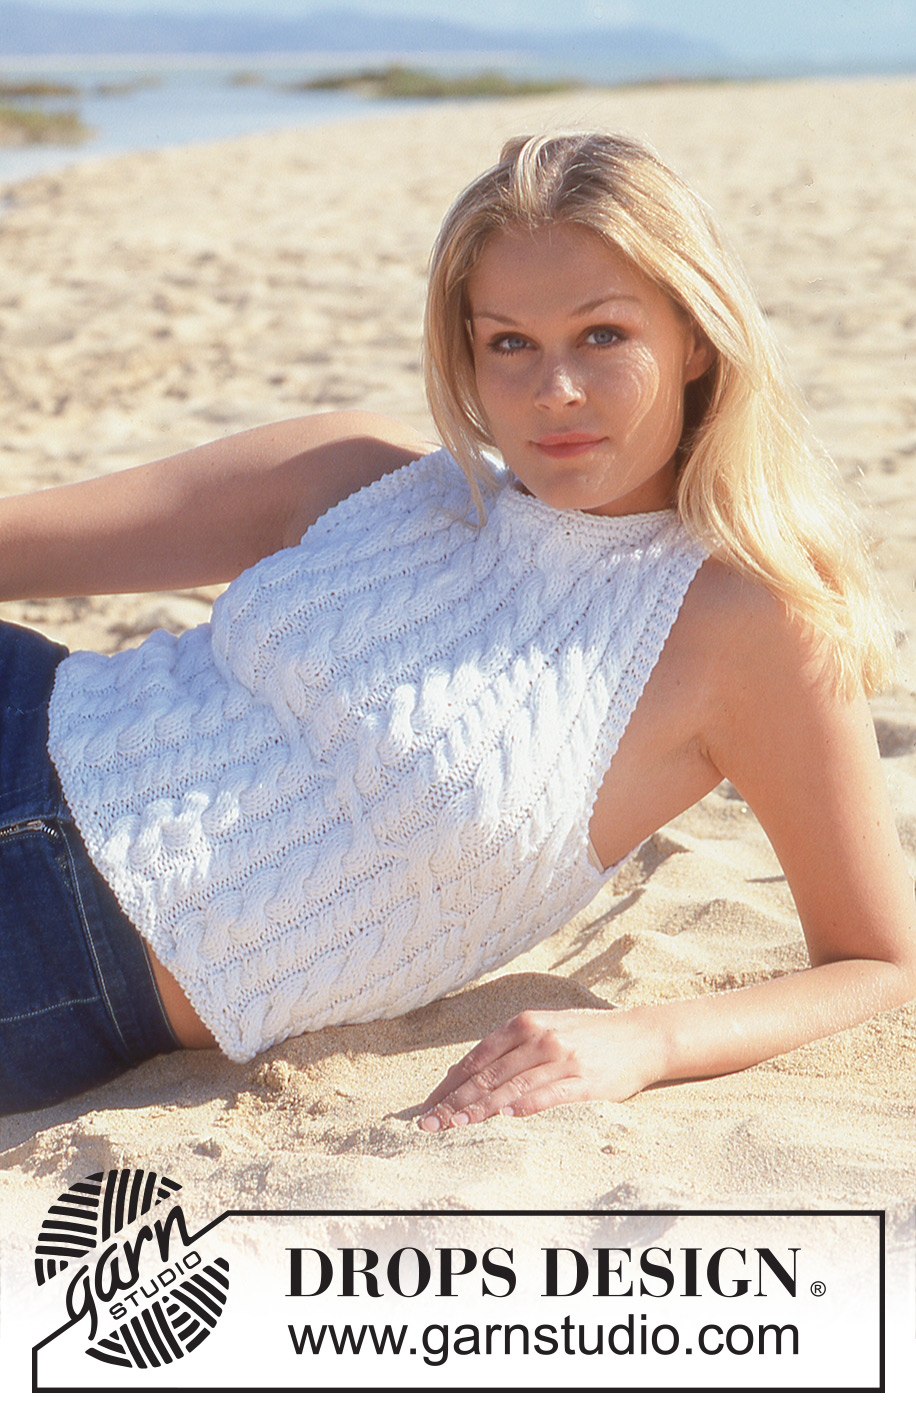
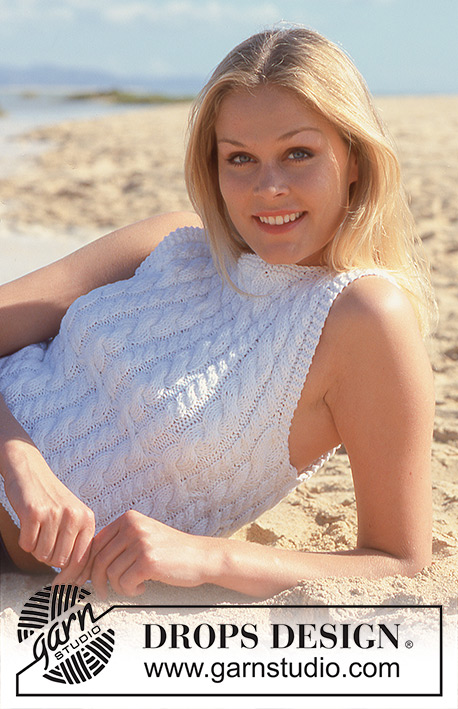
Top DROPS com torcidos em Paris
DROPS 64-9 |
|||||||||||||||||||
|
---------------------------------------------------------- NOTA: Existem termos diferentes de tricô e croché em português de Portugal e do Brasil. Malha = Ponto Canelado = Barra Ponto Jarreteira = Cordões de Tricô Ponto Liga = Ponto Tricô Croché: mpa – meio ponto alto pa – ponto alto pad – ponto alto duplo pat – ponto alto triplo pb – ponto baixo pbx – ponto baixíssimo pc – ponto corrente ---------------------------------------------------------- Amostra: 18 ms/pts x 23 carreiras = 10 x 10 cm em ponto meia 1 motivo do ponto fantasia = cerca de 6 cm de largura Diminuições: Todas as diminuições são feitas pelo direito. Diminuir 2 ms/pts: Depois das 3 ms/pts: deslizar 1 m/p em meia, 2 ms/pts tricotadas juntamente em meia, passar a m/p deslizada por cima da m/p tricotada Antes das 3 ms/pts: 3 ms/pts tricotadas juntamente em meia Diminuir 1 m/p: Depois das 3 ms/pts: deslizar 1 m/p em meia, 1m meia, passar a m/p deslizada por cima da m/p tricotada Antes das 3 ms/pts: 2 ms/pts tricotadas juntamente em meia Ponto fantasia: Ver diagrama abaixo. O diagrama mostra o ponto fantasia pelo direito. Ponto jarreteira tricotado em idas e voltas: Tricotar todas as carreiras em meia Ponto jarreteira tricotado em redondo: *1 carreira meia, 1 carreira liga/tricô * repetir de * a * Explicações Costas & frente Com a agulha circular montar 130-140-152 ms/pts, unir e tricotar 4 carreiras em ponto jarreteira distribuindo 62-68-72 aumentos na última carreira = 192-208-224 ms/pts. Tricotar 5 vezes M1 depois 1 vez M2 (M2 desvia o ponto fantasia em 2 ms/pts – os torcidos pequenos tornam-se grandes e vice versa). Tricotar então M3 até ao fim. A 28-30-32 cm de altura total, colocar marcadores nos lados (ou seja, 96-104-112 ms/pts entre os marcadores para as costas e a frente). Ter cuidado para os colocar de maneira a que: Tamanho S: haja um pequeno torcido a meio da frente Tamanhos M e L: haja um torcido grande a meio da frente. Continuar no ponto fantasia como antes, mas tricotar 14 ms/pts de cada lado da peça (7 ms/pts de cada lado de cada marcador) em ponto jarreteira, depois, arrematar 8 ms/pts de cada lado da peça (= 4 ms/pts de cada lado do marcador) para as cavas. Terminar cada parte separadamente. Frente: = 88-96-104 ms/pts. Continuar com 3 ms/pts em ponto jarreteira no lado da cava e diminuir para as cavas a 3 ms/pts dos rebordos a cada 2 carreiras: 2-2-4 vezes 2 ms/pts e 1-3-3 vezes 1 m/p = 78-82-82 ms/pts. A 42-45-48 cm de altura total, colocar em espera num alfinete de ms/pts as 28-36-36 ms/pts centrais para o decote, depois, a cada 2 carreiras colocar em espera 2 vezes 2 ms/pts e 2 vezes 1 m/p = 40-48-48 ms/pts em espera e 19-17-17 ms/pts para cada ombro. A 47-50-53 cm de altura total, Tricotar 1 carreira meia (pelo direito) nas ms/pts dos ombros distribuindo 3-2-2 diminuições = 16-15-15 ms/pts. Tricotar 2 carreiras em ponto jarreteira e arrematar. Costas: = 88-96-104 ms/pts. Formar as cavas de cada lado da peça como se fez para a frente = 78-82-82 ms/pts. A 46-49-52 cm de altura total, colocar em espera num alfinete de ms/pts as 36-44-44 ms/pts centrais para o decote e, depois, 2 ms/pts no lado do decote na carreira seguinte = 19-17-17 ms/pts para cada ombro. A 47-50-53 cm de altura total, tricotar 1 carreira meia pelo direito nas ms/pts dos ombros distribuindo 3-2-2 diminuições = 16-15-15 ms/pts. Tricotar 2 carreiras em ponto jarreteira e arrematar. Montagem: Costurar os ombros. Com as agulhas de pontas duplas levantar à volta do decote cerca de 80-100 ms/pts (incluindo as ms/pts em espera). Unir e tricotar 1 carreira meia distribuindo 14-20-20 diminuições e, depois, 4 carreiras em ponto jarreteira e arrematar. |
|||||||||||||||||||
Explicações do diagrama |
|||||||||||||||||||
|
|||||||||||||||||||
 |
|||||||||||||||||||
 |
|||||||||||||||||||
Terminou este projecto?Então, identifique as suas fotos com as tags #dropspattern #whiteouttop ou mostre-as na galeria #dropsfan. Precisa de ajuda para este modelo?Encontrará 24 turotiais em vídeo, uma rubrica Comentários/Perguntas e muito mais ao visitar a página do modelo em www.garnstudio.com © 1982-2026 DROPS Design A/S. Todos os direitos reservados. Este documento, incluuindo as suas su-secções, tem copyrights. Saia mais o que pode fazer com os nossos modelos no fim de cada uma das páginas do nosso site. |
|||||||||||||||||||


Com mais de 40 anos no design de modelos de tricô e de croché, a DROPS Design oferece uma das mais vastas colecções demodelos gratuitos na Internet - traduzidos em 17 línguas. Neste dia de hoje, temos 325 catálogos e 12298 modelos - dos quais 12279 estão traduzidos em português.
Trabalhamos com muito empenho para lhe proporcionar o melhor que o tricô e o croché têm para oferecer, para lhe fornecer inspiração e conselhos bem como fios da mais elevada qualidade a preços incríveis! Gostaria de usar os nossos modelos para outros fins que não uso pessoal? Pode ler o que lhe é permitido fazer no Copyright texto que se encontra na parte de baixo de todos os nossos modelos. Bom tricô! Bom croché!
Deixe um comentário acerca do modelo DROPS 64-9
Gostaríamos muito de saber o que tem a dizer-nos acerca deste modelo!
Se deixar uma pergunta acerca do modelo, certifique-se de que escolhe a categoria adequada no formulário abaixo para acelerar o processo relativo à resposta. Os campos obrigatórios estão assinalados com um *.