
Categorias populares
Procura um fio?


Comentários / Perguntas (11)
![]() Claudine escreveu:
Claudine escreveu:
I have issues with the top right & left front with extra stitches and cannot do the assembly correctly. Reading the comments below I agree the increases should be decreases. I am about to frog both tops of the front pieces.
03.01.2025 - 18:32DROPS Design respondeu:
Dear Claudine, the pattern is correct; these increases are only for the neck which is raised kind of like a lapel, as seen in the picture. If you have a different thread or gauge than that of the pattern the resulting effect may be too loose and it will fall instead of staying straight. Happy knitting!
05.01.2025 - 19:33
![]() DROPS Design escreveu:
DROPS Design escreveu:
Molly, your are right that the shawl collar piece that goes around the neck will have a height measure of approx 5 inch. This drapes up along your neck, and you fold the upper edge only. Depending on which yarn you are using the collar might drape differently. In SilkeTweed which is very drapey and crisp this works beautifully. SilkeTweed used in this design holds it's shape and doesn't "fall" down.
17.04.2009 - 18:10
![]() Molly escreveu:
Molly escreveu:
Correction to my last comment: The gauge for this project is more like 6 sts per inch (which is what I'm getting) so that 32-34 stitch collar is over 5 inches in width (height).
17.04.2009 - 08:31
![]() Molly escreveu:
Molly escreveu:
If 9 stitches is 1 inch in Silke-Tweed (and that is what I'm getting) then the collar, which is 33 stitches, is over 3.5 inches before the 2 thread part. This does seem quite tall-- does it scrunch up behind under the more rigid 2 thread detail? Is it possible there is a detail picture of the back of the collar? Or perhaps a clearer close-up of the collar on the existing picture? I've done the front right panel and, other than my back collar questions, it looks like the picture.
17.04.2009 - 05:56
![]() DROPS Design escreveu:
DROPS Design escreveu:
The inc for collar is also made at the center front edge. Pattern is edited.
14.04.2009 - 19:27
![]() Molly escreveu:
Molly escreveu:
Could you clarify this: "At the same time when the piece measures 32-33-34 cm [12-5/8" - 13" - 13-3/8"] inc 1 st at the center front 8-9-10 times every 7-6-6 rows = 60-61-63 sts." Elsewhere in the pattern it says specifically "center front edge" yet the instruction above says only "center front." Does that mean the increases should no longer be on the edge? That I should put them in the middle, like a bust dart?
14.04.2009 - 18:05
![]() Karen escreveu:
Karen escreveu:
We did post a reply on the 11 November 2006, please check further down this page. As we said in our reply, 66-11 is a 5-year-old pattern and no errors have been found to date. Also we have double checked the translation and this follows the original pattern. It may be that the photo doesn't reflect the true shape/design of the cardigan, and if you want a different look, your suggestions seem a good idea. Again if the instructions
05.01.2007 - 10:16
![]() MKelly escreveu:
MKelly escreveu:
Hi this is the 2nd time that I've written to you regarding 66-11 but noone has emailed me back and I don't see any corrections posted. I have knit this pattern and found numerous errors in it. A novice knitter or even an intermediate knitter would not be able to maneuver this pattern. The front has errors where it says" When piece measures 13" inc.1 st. at the center front 9 times. This should be a decrease not an increas as by the time you get to the collar you have a big lapel shape. It needs to be consistently decreasing at the front to give the v shaping needed. Not increasing and getting larger. The way the collar is described makes absolutely no sense whatso ever if the instructions for the front are not changed. It only will work if the front decreases to end with only the 28 st at the shoulder. As well knitting 2.75 " for the collar is too long and will not stand up as shown in the picture on the website. 35 stitches is not enough for the collar either. I used 95 sts.on a smaller (2.25) needle and double yarn and it then had the length and weith needed to stand up. I also made it 1.5 " instead of 2.75.There is no shaping included in this pattern to allow for the gradual sloping from the front edge to the stand up collar so that it is incorporated smoothly. The sleeves work fine until the underarm decrease of 3 st. either side of marker, but then it says to just knit back and forthe which is not adequate instruction because it doesn't say for how long. also it moves directly to the cap shaping and if I had not knit before I would end up with a 6" arm opening when a 9" arm opening to fit the body is needed. I ended up at the underarm decrease shaping it myself aas for the arm shaping on the body and then added 6 extra rows and then the cap shaping then it worked out a novice would be unable to figure all this out. In the end this is going to be fine but it is a painful pattern and I think there needs to be corrections made.
30.12.2006 - 19:54
![]() karen escreveu:
karen escreveu:
Hi Ya Ya, The Scandinavian version of this pattern is 5 years old and no errors have been found or noted to date. I've checked the translation against the original pattern and Frederikka's translation is word perfect and the instructions in full accordance with the original pattern. The jacket is meant to have a collar/lapel. You increase 9 sts for the collar which in Silketweed amounts to just over 1 inch (the width of the collar on front pieces) and continue over 33 sts for the collar to be sewn tog at the back. Silketweed is a rather rugged quality and the collar will "stand" rather than fall when you have completed the edge in 2 threads and folded it double. I hope this helps. If you don't get the desired look by following the pattern, your alternative sounds a good idea. Kind regards Karen
19.11.2006 - 23:34
![]() Ya Ya escreveu:
Ya Ya escreveu:
I am writing regarding pattern 66-11 the wrap around cardigan in Silke Tweed. There is an error in the pattern for the left and right fronts. Where the pattern reads,"At the same time when the piece measures 13 " inc. 1 st. at the centre front 9 times every 6 rows. This adds far too much material which then actually crosses over at the top instead of angling back towards the shoulder as it shows in the picture and the diagram.As well the next section tells us to leave 33 st on the needle for the collar and knit it an additional 2.75 " When the project is knit in this exact fashion it ends up being huge at the front with a lapel effect. I have since ripped it out and am now doing dec. every 6 rows instead of increases and will continue this until I reach 28 st. and will then put the front and back together and do a 3 needle bind off of the 28sts. to form the shoulder instead of casting off and then sewing it together. I then plan to pick up the cast off 28 sts. on the back for the neck and pick up enough stitches to begin making a collar that looks like the picture using short rows to achieve this. Then I will pick up the stitches all the way around the front and knit in reverse stockinette stitch the last 5 rows. If You have already found the errors and have a correction sheet for this would you please send it to me. I would appreciate hearing back from you either way regarding this pattern. Thanks so much have a good day....Ya Ya
17.11.2006 - 05:42
|
|
Kathmandu |
|
|
|
|
Casaco cache-coeur DROPS em Silke Tweed
DROPS 66-11 |
|
|
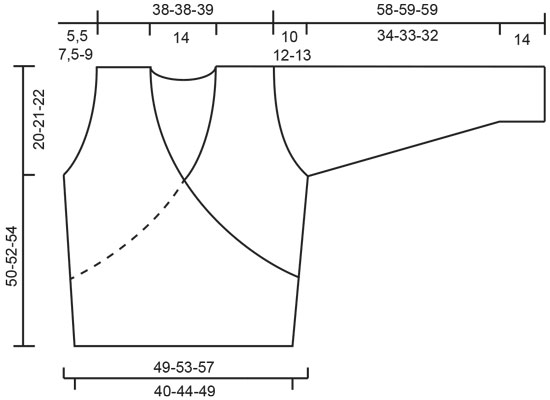
---------------------------------------------------------- NOTA: Existem termos diferentes de tricô e croché em português de Portugal e do Brasil. Malha = Ponto Canelado = Barra Ponto Jarreteira = Cordões de Tricô Ponto Liga = Ponto Tricô Croché: mpa – meio ponto alto pa – ponto alto pad – ponto alto duplo pat – ponto alto triplo pb – ponto baixo pbx – ponto baixíssimo pc – ponto corrente ---------------------------------------------------------- Amostra: 23 ms/pts x 30 carreiras = 10 x 10 cm em ponto meia com as agulhas 3,5 mm Canelado/barra: *1 m/p meia, 1 m/p liga/tricô * repetir de * a * Ponto fantasia: repetir as 6 carreiras seguintes: *3 carreiras ponto meia agulhas 2,5 mm com 1 fio verde, 3 carreiras ponto liga/tricô agulhas 3,5 mm com 1 fio verde + 1 fio verde musgo * repetir de * a * Explicações Frente direita Com as agulhas 2,5 mm e o fio verde montar 94-104-114 ms/pts. Tricotar 7 cm de canelado/barra – ver acima. Continuar em ponto meia com as agulhas 3,5 mm aumentando 1 m/p no lado 10 vezes a cada 7-7-8 carreiras, e 1 m/p no meio do lado da frente 2 vezes a cada 7-7-8 carreiras. A cerca de 13,5 cm de altura total (temos 98-108-118 ms/pts) começar as diminuições do decote da frente (continuar com os aumentos no lado): arrematar a cada 2 carreiras: 2 vezes 8 ms/pts, 6-9-12 vezes 2 ms/pts, 11-10-9 vezes 1 m/p e a cada 4 carreiras: 2 vezes 1 m/p = 65-70-75 ms/pts. A 30-31-32 cm de altura total, arrematar para a cava a cada 2 carreiras: 1-2-3 vezes 3 ms/pts, 3-3-4 vezes 2 ms/pts e 4-6-5 vezes 1 m/p. AO MESMO TEMPO, a 32-33-34 cm de altura total, aumentar 1 m/p no meio do lado da frente 8-9-10 vezes 1 m/p a cada 7-6-6 carreiras. A 50-52-54 cm de altura total, arrematar para o ombro 28-28-29 ms/pts = 32-33-34 ms/pts. Continuar em ponto meia nestas ms/pts para a gola durante mais 7 cm e arrematar. Frente esquerda Montar e tricotar como se fez para a frente direita, mas em sentido contrário. Costas Com o fio verde e as agulhas 2,5 mm montar 94-104-114 ms/pts. Tricotar 7 cm de canelado/barra depois continuar em ponto meia com as agulhas 3,5 mm, aumentando de cada lado da peça 10 vezes 1 m/p a cada 7-7-8 carreiras = 114-124-134 ms/pts. A 30-31-32 cm de altura total, arrematar para as cavas de cada lado da peça como se fez para a frente = 88-88-90 ms/pts. A 49-51-53 cm de altura total, arrematar para o decote as 28 ms/pts centrais, depois, 2 ms/pts no lado do decote na carreira seguinte = 28-28-29 ms/pts para cada ombro. A 50-52-54 cm de altura total, arrematar todas as ms/pts. Mangas Com as agulhas de pontas duplas 2,5 mm e o fio verde montar 58-60-62 ms/pts. Unir e colocar um marcador no princípio da carreira. Tricotar 4 carreiras em ponto jarreteira, depois, continuar no ponto fantasia – ver acima - até 14 cm de altura total. Continuar com as agulhas de pontas duplas 3,5 mm e terminar em ponto meia. AO MESMO TEMPO, depois do ponto fantasia, aumentar 1 m/p de cada lado do marcador 13-15-16 vezes: Tamanho S: a cada 8 carreiras Tamanho M: alternadamente a cada 6 e 7 carreiras Tamanhos L: a cada 6 carreiras = 84-90-94 ms/pts. A 48-47-46 cm de altura total, arrematar 3 ms/pts de cada lado do marcador e terminar em idas e voltas arrematando de cada lado da peça a cada 2 carreiras: 1 vez 3 ms/pts, 2 vezes 2 ms/pts, 7-10-12 vezes 1 m/p, 2 vezes 2 ms/pts e 2 vezes 3 ms/pts. Arrematar as restantes ms/pts. A manga mede cerca de 58-59-59 cm de altura total. Montagem: costurar os ombros. Pelo direito com o fio verde, levantar cerca de 140-160 ms/pts ao longo da frente direita até meio da parte de trás. Mudar para 1 fio verde + 1 fio verde musgo e tricotar 5 carreiras em ponto liga/tricô e arrematar. Repetir ao longo da frente esquerda. Unir a gola a meio da parte de trás. Dobrar a banda tricotada com 2 fios pelo avesso e costurar. Costurar os lados deixando uma abertura de 4 cm acima do canelado/barra no lado direito (para o cinto), bordar a abertura em ponto de casas para as fechar. Unir as mangas. Cinto: com o fio verde e as agulhas 2,5 mm levantar 19 ms/pts na frente direita (não levantar ao longo do canelado/barra). Tricotar em canelado/barra com 1 m/p em ponto jarreteira de cada lado da peça. A 3,6 e 9 cm de altura total diminuir 1 m/p de cada lado da peça (a 1 m/p dos rebordos) = 13 ms/pts. A cerca de 70 cm de altura total, arrematar as ms/pts como elas se apresentam. Fazer um cordão igual na frente esquerda. |
|
 |
|
Terminou este projecto?Então, identifique as suas fotos com as tags #dropspattern ou mostre-as na galeria #dropsfan. Precisa de ajuda para este modelo?Encontrará 19 turotiais em vídeo, uma rubrica Comentários/Perguntas e muito mais ao visitar a página do modelo em www.garnstudio.com © 1982-2026 DROPS Design A/S. Todos os direitos reservados. Este documento, incluuindo as suas su-secções, tem copyrights. Saia mais o que pode fazer com os nossos modelos no fim de cada uma das páginas do nosso site. |


Com mais de 40 anos no design de modelos de tricô e de croché, a DROPS Design oferece uma das mais vastas colecções demodelos gratuitos na Internet - traduzidos em 17 línguas. Neste dia de hoje, temos 324 catálogos e 12290 modelos - dos quais 12271 estão traduzidos em português.
Trabalhamos com muito empenho para lhe proporcionar o melhor que o tricô e o croché têm para oferecer, para lhe fornecer inspiração e conselhos bem como fios da mais elevada qualidade a preços incríveis! Gostaria de usar os nossos modelos para outros fins que não uso pessoal? Pode ler o que lhe é permitido fazer no Copyright texto que se encontra na parte de baixo de todos os nossos modelos. Bom tricô! Bom croché!
Deixe um comentário acerca do modelo DROPS 66-11
Gostaríamos muito de saber o que tem a dizer-nos acerca deste modelo!
Se deixar uma pergunta acerca do modelo, certifique-se de que escolhe a categoria adequada no formulário abaixo para acelerar o processo relativo à resposta. Os campos obrigatórios estão assinalados com um *.