
Categorias populares
Procura um fio?


Comentários / Perguntas (6)
![]() Barbara Kamm escreveu:
Barbara Kamm escreveu:
Thanks you for those latest instructions. So the cable is not really a cable but I. Your last instructions I still don’t see the pattern for the o dented cable like pattern but I guess I can try to figure it out. Are there only 3 stitches in the cable like pattern?
05.09.2023 - 04:41DROPS Design respondeu:
Dear Mrs Kamm, the cable is a real cable but you will either cross the first 6 sts or the last 6 sts - work 3rd row A.1 as follows: slip 3 sts on cable needle behind piece, K 3, K 3 from cable needle, K3, and work 11th row as follows: K3, slip 3 sts on cable needle behind piece, K 3, K 3 from cable needle. Happy knitting!
05.09.2023 - 13:35
![]() Barbara Kamm escreveu:
Barbara Kamm escreveu:
Wow, that I do not understand. I’m going to have to look for an American pattern. I don’t know how to read diagrams. It’s greek to me. So frustrating
03.09.2023 - 22:39
![]() Barbara Kamm escreveu:
Barbara Kamm escreveu:
I have 46 stitches on my needles, 4 stitches in garter, purl 1, 29 stitches in stocking knit, that 34 stitches than plus 3 at the end of the row =37, the other nine must be for the cable pattern. Which is on a diagonal. I don’t see any instructions on how to work the cable and the other stitches ?
02.09.2023 - 04:21DROPS Design respondeu:
Dear Mrs Kamm, on right front piece in larger size, work the 46 sts as follows from right side: 4 front band stitches in garter stitch, work the 9 sts A.1 (= knit on 1st row, cable on 3rd row), then purl 1 and knit to the end of the row. from wrong side, work: K3, P29, K1, P9, K4. In A.1 as well as in A.2 all the stitches will not be crossed for the cable; in A.1 cross the first 6 sts and knit the last 3; then knit the first 3 and cross the last 6. Happy knitting!
04.09.2023 - 09:20
![]() Barbara Kamm escreveu:
Barbara Kamm escreveu:
I am sorry to keep bothering you. But I don’t see in The instructions how to do the cable pattern. I am totally lost
02.09.2023 - 03:57DROPS Design respondeu:
Dear Barbara, the instructions for the cable pattern are in the charts A.1 and A.2, where, on specific rows, you will slip 3 stitches to the cable needle, knit 3 and place the stitches back onto the main needle. So you will have 1 stitch in garter stitch before the cable in A.2 and purl 1 after A.2. On the other front piece you will have A.1 instead of A.2 and 1 purl before the cable and the edge stitch after the cable. Happy knitting!
03.09.2023 - 20:08
![]() Barbara Kamm escreveu:
Barbara Kamm escreveu:
Hi: I am starting the right front and I am confused with the instructions. I am making the 3X size. I have knitted the first 4 stitches that you call Band. Then it states A.2, P1 which I assume is for pearl 1. That confuses me. Then it states 29 stitches in stocking knit. If I am looking at the picture and the right side is on the left, I am not sure what kind of stitch you do before and after the cable? I would think I would do pearl stitches bebore the cable and the cable is zig zag about
29.08.2023 - 05:39DROPS Design respondeu:
Dear Mrs Kamm, on right front piece, work from RS as follows: 4 sts in garter stitch (K them on every row), then work A.2 (see diagram, read from right towards the left from RS and from the left towards the right from WS), purl 1 (this stitch will be knitted from WS), and work the next 29 sts in stocking stitch (= these stitches will be knitted from RS and purled from WS), end with 3 sts in garter stitch (knit them on every row). Happy knitting!
29.08.2023 - 09:27
![]() Barbara Kamm escreveu:
Barbara Kamm escreveu:
It confuses me that on the back piece of this sweater it say to do garter stitch on 3 stitches on each side and I interpret that at the beginning and end of the back ?? Why is that? I understand using it on the front pieces
19.08.2023 - 18:05DROPS Design respondeu:
Dear Barbara, the 3 stitches in garter stitch in each side of the back form a small border for the vent at the lower part of the jacket. After finishing the vent, you will have a single edge stitch in garter stitch, which will be used for the seam. Happy knitting!
20.08.2023 - 17:19
|
||||||||||
Winter Sparkle Cardigan |
||||||||||
|
|
||||||||||
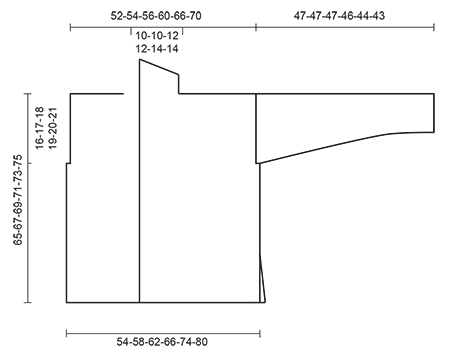
Casaco DROPS com tranças, com 1 fio Cloud ou 2 fios Air. Do S ao XXXL.
DROPS Extra 0-1188 |
||||||||||
|
---------------------------------------------------------- NOTA: Existem termos diferentes de tricô e croché em português de Portugal e do Brasil. Malha = Ponto Canelado = Barra Ponto Jarreteira = Cordões de Tricô Ponto Liga = Ponto Tricô Croché : mpa – meio ponto alto pa – ponto alto pad – ponto alto duplo pat – ponto alto triplo pb – ponto baixo pbx – ponto baixíssimo pc – ponto corrente ---------------------------------------------------------- PONTO JARRETEIRA (em idas e voltas): Tricotar todas as carreiras em meia. 1 barra jarreteira = 2 carreiras meia. PONTO FANTASIA: Ver os diagramas A.1-A.2. Os diagramas mostram todas as carreiras do ponto fantasia, vistas pelo direito. CASAS: Fazer 4 casas pelo direito, na orla da frente direita. 1 CASA = tricotar 2 ms/pts a partir do rebordo, fazer 1 laçada, tricotar as 2 ms/pts seguintes juntamente em meia. Na carreira seguinte, tricotar a laçada em meia. Fazer as casas quando a peça medir (em cm de altura total) a cerca de.: TAMANHO S: 20, 29, 38 e 47 cm TAMANHO M: 20, 29, 38 e 47 cm TAMANHO L: 24, 33, 42 e 51 cm TAMANHO XL: 24, 33, 42 e 51 cm TAMANHO XXL: 25, 35, 45 e 55 cm TAMANHO XXXL: 25, 35, 45 e 55 cm ---------------------------------------------------------- COSTAS: Tricota-se em idas e voltas na agulha circular. Montar 54-58-62-66-74-80 ms/pts com a agulha circular 8 mm com 1 fio Cloud ou 2 fios Air e tricotar 2 barras em ponto jarreteira - ver acima. Continuar com a agulha circular 9 mm em ponto meia com 3 ms/pts ponto jarreteira de cada lado da peça. A 14 cm de altura total (= fendas), tricotar as 3 ms/pts em ponto jarreteira de cada lado da peça em ponto meia, e, AO MESMO TEMPO, montar 1 m/p ourela de cada lado da peça no fim das 2 carreiras seguintes = 56-60-64-68-76-82 ms/pts. Tricotar as ms/pts ourela em ponto jarreteira. NÃO ESQUECER DE MANTER A MESMA TENSÃO DA INDICADA NA AMOSTRA! A 49-50-51-52-53-54 cm de altura total, arrematar para as cavas 2-3-4-4-5-6 ms/pts de cada lado da peça no princípio das 2 carreiras seguintes = 52-54-56-60-66-70 ms/pts. A 63-65-67-69-71-73 cm de altura total, arrematar as 10-10-12-12-14-14 ms/pts centrais para o decote = restam 21-22-22-24-26-28 ms/pts para o ombro. Continuar em ponto meia até a peça medir 64-66-68-70-72-74 cm. Tricotar 1 barra jarreteira e arrematar. Tricotar o outro ombro da mesma maneira. FRENTE DIREITA: Montar 31-33-35-37-41-44 ms/pts (incluindo 4 ms/pts de orla da frente em ponto jarreteira) com a agulha circular 8 mm com 1 fio Cloud ou 2 fios Air. Tricotar 2 barras jarreteira - AO MESMO TEMPO, na última carreira, distribuir 2 aumentos = 33-35-37-39-43-46 ms/pts. Continuar com a agulha circular 9 mm e tricotar da seguinte maneira pelo direito: 4 ms/pts de orla da frente em ponto jarreteira, A.2, 1 m/p liga/tricô, 16-18-20-22-26-29 ms/pts em ponto meia, 3 ms/pts em ponto jarreteira. A 14 cm de altura total, tricotar as 3 ms/pts em ponto jarreteira no fim da carreira pelo direito em ponto meia e, AO MESMO TEMPO, montar 1 m/p ourela no fim da carreira pelo direito = 34-36-38-40-44-47 ms/pts. Tricotar a m/p ourela em ponto jarreteira. Não esquecer as CASAS - ver acima. A 49-50-51-52-53-54 cm de altura total, arrematar para a cava 2-3-4-4-5-6 ms/pts no princípio da carreira seguinte pelo avesso =32-33-34-36-39-41 ms/pts. A 64-66-68-70-72-74 cm de altura total - ajustar para que a carreira seguinte seja pelo avesso -, tricotar 1 barra jarreteira em todas as ms/pts. Arrematar então as 21-22-22-24-26-28 primeiras ms/pts para o ombro = restam 11-11-12-12-13-13 ms/pts para a gola xaile. Continuar nestas ms/pts em ponto jarreteira - AO MESMO TEMPO, tricotar carreiras encurtadas, começando pelo lado da gola (pelo direito) da seguinte maneira: *1 barra jarreteira em todas as ms/pts (= 2 carreiras meia). Na carreira seguinte pelo direito, tricotar 9 ms/pts meia, virar e tricotar a carreira de volta em meia*, repetir de * a * até a peça medir 7-7-8-8-9-9 cm a partir das ms/pts arrematadas para o ombro (lado mais pequeno). Arrematar frouxamente todas as ms/pts. FRENTE ESQUERDA: Tricota-se como a frente direita mas em sentido contrário, e tricotar A.1 em vez de A.2. Montar a m/p ourela no fim da carreira pelo avesso. Arrematar para a cava no princípio da carreira pelo direito. Arrematar para o ombro no princípio da carreira pelo direito. MANGAS: Tricotam-se em idas e voltas na agulha circular. Montar 24-24-24-26-26-26 ms/pts com a agulha circular 8 mm com 1 fio Cloud ou 2 fios Air. Tricotar 2 barras jarreteira. Continuar com a agulha circular 9 mm em ponto meia com 1 m/p ourela em ponto jarreteira de cada lado da peça. A 9 cm de altura total, aumentar 1 m/p a 1 m/p do rebordo de cada lado da peça, e repetir estes aumentos mais 4-5-6-6-7-8 vezes a cada 9-7-6-5½-4½-4 cm = 34-36-38-40-42-44 ms/pts. Arrematar quando a peça medir 47-47-47-46-44-43 cm. NOTA! Mais curto nos tamanhos grandes porque os ombros são mais largos. Tricotar a outra manga. MONTAGEM: Fazer a costura dos ombros. Montar as mangas. Fazer a costura das mangas e dos lados a 1 m/p dos rebordos até às ms/pts ourela (ou seja, cerca de 14 cm de fendas). Unir a gola a meio das costas. Costurar a gola ao longo do decote das costas, orla com orla, para evitar uma costura demasiado grossa. Costurar os botões na frente esquerda. |
||||||||||
Explicações do diagrama |
||||||||||
|
||||||||||
 |
||||||||||
 |
||||||||||
Terminou este projecto?Então, identifique as suas fotos com as tags #dropspattern ou mostre-as na galeria #dropsfan. Precisa de ajuda para este modelo?Encontrará 26 turotiais em vídeo, uma rubrica Comentários/Perguntas e muito mais ao visitar a página do modelo em www.garnstudio.com © 1982-2026 DROPS Design A/S. Todos os direitos reservados. Este documento, incluuindo as suas su-secções, tem copyrights. Saia mais o que pode fazer com os nossos modelos no fim de cada uma das páginas do nosso site. |
||||||||||


Com mais de 40 anos no design de modelos de tricô e de croché, a DROPS Design oferece uma das mais vastas colecções demodelos gratuitos na Internet - traduzidos em 17 línguas. Neste dia de hoje, temos 324 catálogos e 12291 modelos - dos quais 12272 estão traduzidos em português.
Trabalhamos com muito empenho para lhe proporcionar o melhor que o tricô e o croché têm para oferecer, para lhe fornecer inspiração e conselhos bem como fios da mais elevada qualidade a preços incríveis! Gostaria de usar os nossos modelos para outros fins que não uso pessoal? Pode ler o que lhe é permitido fazer no Copyright texto que se encontra na parte de baixo de todos os nossos modelos. Bom tricô! Bom croché!
Deixe um comentário acerca do modelo DROPS Extra 0-1188
Gostaríamos muito de saber o que tem a dizer-nos acerca deste modelo!
Se deixar uma pergunta acerca do modelo, certifique-se de que escolhe a categoria adequada no formulário abaixo para acelerar o processo relativo à resposta. Os campos obrigatórios estão assinalados com um *.