
Categorias populares
Procura um fio?


Comentários / Perguntas (109)
![]() CHATILLON escreveu:
CHATILLON escreveu:
Bonjour, nous aimerions avoir le diagramme complet pour realiser ce pull. Merci par avance Cordialement Me CHATILLON
18.11.2018 - 17:00DROPS Design respondeu:
Bonjour Mme Chatillon, nous n'avons pas de diagramme complet pour chaque taille, suivez bien attentivement en même temps les diagrammes et les explications pour votre taille. Bon crochet!
19.11.2018 - 09:08
![]() Dina escreveu:
Dina escreveu:
I am sorry to say that my yoke size is small to start the diagram so May I add more rows to increase its length and to be under bust as shown in the photo ...or I had to repeat work by adding more rows in the WS ie working row 1RS then 3more rows then row 2RS then 3more rows and so on????!please advice
06.08.2018 - 17:02DROPS Design respondeu:
Dear Dina, make sure to check and keep your tension, you should have 18 dc x 9 rows = 10 x 10 cm - if your tension is still too tight in height you can adjust the yoke length working some more rows evenly between the rows with increases. Hapy crocheting!
07.08.2018 - 09:44
![]() Dina escreveu:
Dina escreveu:
I am sorry to say that my yoke size is small to start the diagram so May I add more rows to increase its length and to be under bust as shown in the photo ...or I had to repeat work by adding more rows in the WS ie working row 1RS then 3more rows then row 2RS then 3more rows and so on????!please advice
06.08.2018 - 16:59
![]() Carrie escreveu:
Carrie escreveu:
On next row from RS, inc as follows: Inc 1 dc on each side of every marker (= 24 dc inc), repeat inc on every row from RS 3-3-4-6-7-9 times in total, then inc before every marker (= 12 dc inc), repeat inc on every row from RS 4-4-4-2-2-0 times in total I'm having trouble with this part. I did the 1st row but don't understand how many more rows I am supposed yo do or how exactly to increase... Can you please help?
31.07.2018 - 03:25DROPS Design respondeu:
Dear Carrie, you will now increase for the round yoke 1 dc on each side of each marker (= 24 sts increased). Depending on your size you will work these increases on every row 3-3 times in total in size S and M, 4 times in total in size L, 6 times in total in size XL, 7 times in total in size XXL, 9 times in total in size XXXL. Then repeat these increase every other row 4 times in total in size S, M and L and 2 times in total in total in size XL and XXL (no increase every other row in the largest size). Happy crocheting!
31.07.2018 - 10:01
![]() Ellen escreveu:
Ellen escreveu:
Your explanation on the chains at beginning of pattern A1 is very confusing!! Looking through peoples questions you haven't answered simply you just say follow A1,A2,A3 then join. BUT the chain shows especially on bobble row. Does the starting point after the joins veer to left each time and not run vertically down the back of jumper? The start of the row of bobbles is particually confusing. To recap PLEASE explain starting chains IN VERY EASY DIALOGUE.
29.06.2018 - 18:03DROPS Design respondeu:
Dear Ellen, you start either A.1 depending on the row with either 1, 3 or4 chains and finish each round with 1 sl st in the 1st, 3rd or 4th chain from beg of round. On the row with bobbles you start with 4 ch (then work 4 ch = 1st sch-space and 1 boblle, 3 ch = A.1) and finish with 1 sl st in the 4th ch from beg of round. Happy crocheting!
02.07.2018 - 08:49
![]() Sarah escreveu:
Sarah escreveu:
When doing the row before bobble it starts 3 chains then 2 chains 4 trebles 2 chains etc. At end of row 2 chains and sl st into previous 3 chains. I am left with a single line of chains where I have joined!!! Which doesn't look right! To recap- 4 trebles,2 Ch joined into 3 Ch at start which looks as if I have one line treble in the pattern. Please explain step by step where I am going wrong with the starting chains
28.06.2018 - 14:54DROPS Design respondeu:
Dear Sarah, when working A.z you start round with A.1 and finish the round with A.3 = 2 chains at the end of last repeat before the sl st joining the beg of round. Happy crocheting!
28.06.2018 - 18:00
![]() Paula M escreveu:
Paula M escreveu:
Es muy enredada la explicación, mucha palabras, especialmente para el canesu, debieran colocar un video de cómo aumentar los puntos y especificar bien dónde comienzan los marcadores,los puntos se aumentan antes o después. Prefiero los patrones y no tanta letra sin sentido, dice repetir de *-* y ves cuentos de asteriscos(✴), al final no sabes de donde a dónde se repite!
27.06.2018 - 20:23
![]() Sarah escreveu:
Sarah escreveu:
WHEN STARTING THE PATTERN ARE THE 3 CHAINS AT BEGINNING TO BE USED AS THE FIRST TREBLE STITCH? IF NOT I AM CONFUSED ON WHAT TO DO WITH THEM AT THE JOINS????
26.06.2018 - 17:42DROPS Design respondeu:
Dear Sarah, the 3 ch replace the first st at beg of row only when working piece back and forth, finish then each row with a sl st in the 3rd ch from beg of row, turn piece, work 3 ch at the beg of row and finish with 1 sl st in the 3rd ch from beg of round. When working diagrams, the first st in A.1 shows how to start and finish the round. Happy crocheting!
27.06.2018 - 08:19
![]() Yvonne escreveu:
Yvonne escreveu:
On lacey days jumper continuing with my previous question i cannot get neck size correct, far to wide and it is shoulder high not neck height?? i am determined to get it right but struggling how to do it!! i have unpicked it endlesss times! tension, chains and hook all correct!!!!
19.06.2018 - 15:14DROPS Design respondeu:
Deaer Yvonne, see previous answer and check the number of chains and number of sts in your size. Hapy crocheting!
19.06.2018 - 15:54
![]() Yvonne escreveu:
Yvonne escreveu:
On lacey days jumper i am not getting on too good,!!!! I have correct amount of chains at the start,correct tension, i have just finished yoke, but the neck opening is far too big and it is too far down my back??? there is no way when i do neck edge it will be as high as the picture. what have i done wrong.?
19.06.2018 - 14:25DROPS Design respondeu:
Dear Yvonne, at the very first round on yoke, you will skip chains evenly so that you should have 124-124-132-136-140-148 tr at the end of this first round over the 153-153-163-168-173-183 ch (this is to avoid that the foundation chain is too tight and prevent a tight neck edge). Happy crocheting!
19.06.2018 - 15:53
|
||||||||||||||||||||||||||||||||||
Lacey Days Jumper#laceydaysjumper |
||||||||||||||||||||||||||||||||||
 |
 |
|||||||||||||||||||||||||||||||||
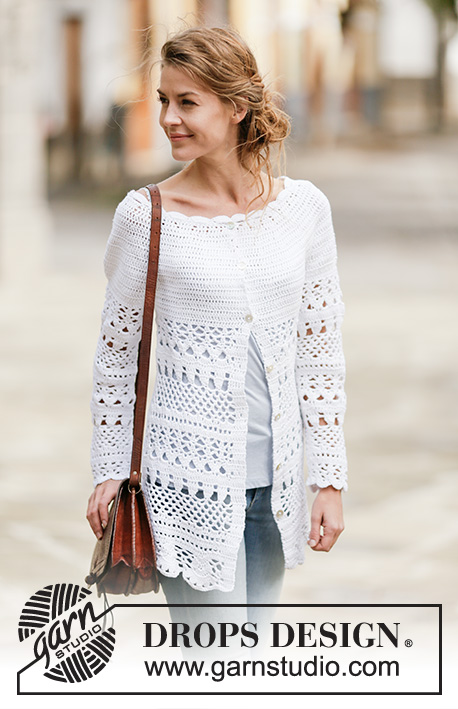
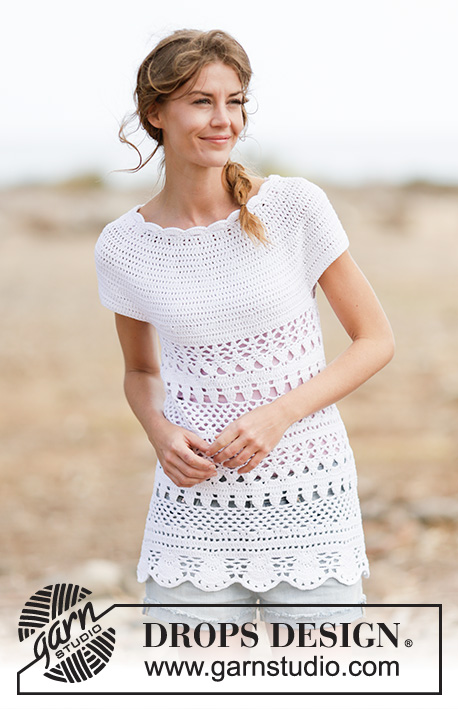
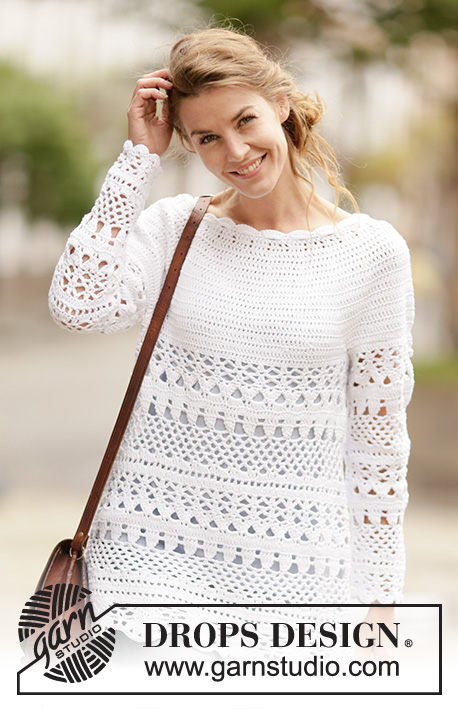
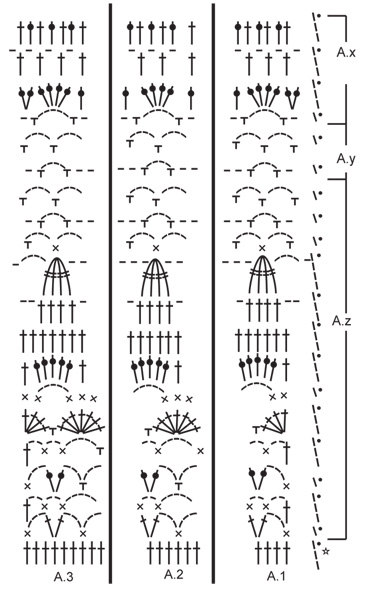
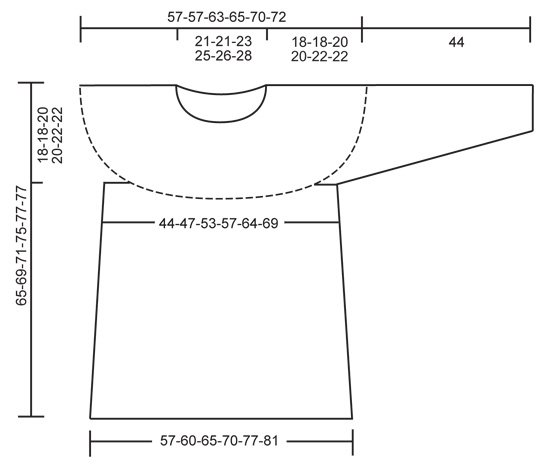
Pulôver rendado DROPS em croché com encaixe arredondado, crochetado de cima para baixo (top down), em ”Cotton Light”. Do S ao XXXL.
DROPS 162-27 |
||||||||||||||||||||||||||||||||||
|
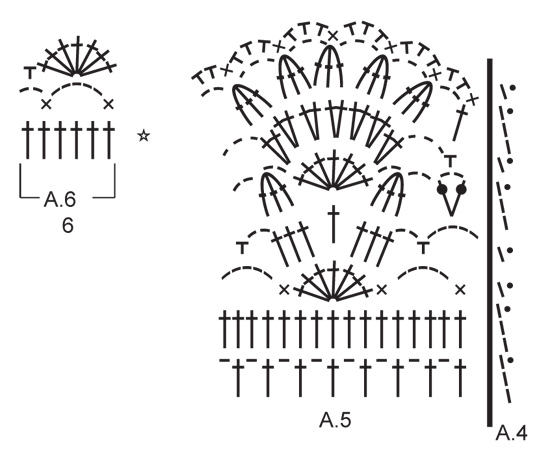
---------------------------------------------------------- NOTA: Existem termos diferentes de tricô e croché em português de Portugal e do Brasil. Malha = Ponto Canelado = Barra Ponto Jarreteira = Cordões de Tricô Ponto Liga = Ponto Tricô Croché : mpa – meio ponto alto pa – ponto alto pad – ponto alto duplo pat – ponto alto triplo pb – ponto baixo pbx – ponto baixíssimo pc – ponto corrente ---------------------------------------------------------- DICA CROCHÉ: (quando se crocheta apenas em idas e voltas). Substituir o 1.º pa de todas as carreiras de pa por 3 pc, terminar a carreira com 1 pbx no 3.º pc. AUMENTOS: Para aumentar 1 pa, crochetar 2 pa num pa. DIMINUIÇÕES: Crochetar 1 pa mas não fazer a última laçada (= 2 argolas na agulha de croché), crochetar então o pa seguinte mas na última laçada, crochetar juntamente todas as argolas que estão na agulha de croché = 1 pa diminuído. PONTO FANTASIA: Ver diagramas A.1 a A.6 - A.4 mostra como começar e terminar o motivo quando se crocheta em redondo. ---------------------------------------------------------- ENCAIXE: Crocheta-se de cima para baixo, a partir do meio das costas. Montar uma corrente de 153-153-163-168-173-183 pc com a agulha de croché 4 mm em Cotton Light e unir em redondo com 1 pbx no 1.º pc. Crochetar a carreira seguinte da seguinte maneira: 3 pc (= 1 pa), 1 pa no 1.º pc do aro de pc, 1 pa em cada um dos 2 pc seguintes, *saltar 1 pc, 1 pa em cada um dos 4 pc seguintes*, repetir de * a * = 124-124-132-136-140-148 pa. Continuar então em idas e voltas. Terminar todas as carreiras com 1 pbx no 3.º pc do princípio da carreira. Virar. VER DICA CROCHÉ! Colocar 12 marcadores da seguinte maneira: Crochetar 15-15-17-18-19-21 pa e, AO MESMO TEMPO, aumentar 1-5-3-3-4-2 pa a intervalos regulares – VER AUMENTOS, colocar o 1.º marcador, *crochetar 4 pa, colocar o marcador seguinte*, repetir de * a * mais 1 vez, crochetar 16 pa, colocar o marcador seguinte, *crochetar 4 pa, colocar o marcador seguinte*, repetir de * a * mais 1 vez, crochetar 30-30-34-36-38-42 pa e, AO MESMO TEMPO, aumentar 2-10-6-6-8-4 pa a intervalos regulares, colocar o marcador seguinte, *crochetar 4 pa, colocar o marcador seguinte*, repetir de * a * mais 1 vez, crochetar 16 pa, colocar o marcador seguinte, *crochetar 4 pa, colocar o marcador seguinte*, repetir de * a * mais 1 vez, crochetar 15-15-17-18-19-21 pa e, AO MESMO TEMPO, aumentar 1-5-3-3-4-2 pa a intervalos regulares = 128-144-144-148-156-156 pa. NÃO ESQUECER DE MANTER A MESMA TENSÃO DA INDICADA PARA A AMOSTRA! Virar. Na carreira seguinte pelo direito, aumentar da seguinte maneira: aumentar 1 pa de cada lado de cada marcador (= 24 pa aumentados), e repetir estes aumentos em todas as carreiras pelo direito 3-3-4-6-7-9 vezes ao todo. Aumentar então antes de cada marcador (= 12 pa aumentados), e repetir estes aumentos em todas as carreiras pelo direito 4-4-4-2-2-0 vezes ao todo = 248-264-288-316-348-372 pa. A peça mede cerca de 17-17-19-19-21-21 cm. Na carreira seguinte, crochetar da seguinte maneira: 35-38-42-47-53-57 pa (meias costas), 8 pc (cava), saltar 54-56-60-64-68-72 pa da carreira precedente (utilizados depois para a manga), 70-76-84-94-106-114 pa, AO MESMO TEMPO, aumentar 1-1-3-1-1-3 pa a intervalos regulares (frente), 8 pc (cava), saltar 54-56-60-64-68-72 pa da carreira precedente (utilizados mais tarde para a manga) e 35-38-42-47-53-57 pa (meias costas) = 157-169-187-205-229-247 pa/pc. Crochetar , então, em redondo, sem virar. Continuar da seguinte maneira: A.1, 24-26-29-32-36-39 vezes A.2 ao todo em largura, e terminar com A.3. Crochetar as 7 primeiras carreiras de A.z. Na 8.ª carreira de A.z (= 1 carreira de pa) aumentar 6 pa a intervalos regulares – VER AUMENTOS = 163-175-193-211-235-253 pa. Continuar a crochetar A.z como antes mas, crochetar então, 25-27-30-33-37-40 vezes A.2 em largura. Quando A.z tiver sido crochetado 1 vez em altura, crochetar 1-2-2-3-3-3 vezes A.y acima de A.z ao todo, em altura. Crochetar então A.x acima de A.y. Na 2.ª carreira de A.x, aumentar 12 pa a intervalos regulares = 175-187-205-223-247-265 pa. Continuar a crochetar A.x como antes mas crochetar, então, 27-29-32-35-39-42 vezes A.2 em largura. Na última carreira de A.x, aumentar 6 pa a intervalos regulares = 181-193-211-229-253-271 pa. Crochetar então A.z acima de A.x (crochetar , então, 28-30-33-36-40-43 vezes A.2 em largura). Na 8.ª carreira de A.z, aumentar 12 pa a intervalos regulares = 193-205-223-241-265-283 pa. Continuar a crochetar A.z como antes mas crochetar, então, 30-32-35-38-42-45 vezes A.2 em largura. Quando A.z tiver sido crochetado 1 vez em altura, crochetar 1-2-2-3-3-3 vezes A.y acima de A.z ao todo em altura. Crochetar então A.x acima de A.y. Na 2.ª carreira de A.x, aumentar 6 pa a intervalos regulares = 199-211-229-247-271-289 pa. Continuar a crochetar A.x como antes mas crochetar, então, 31-33-36-39-43-46 vezes A.2 em largura. Na última carreira de A.x, aumentar 9-13-11-9-17-15 pa a intervalos regulares = 208-224-240-256-288-304 pa. Crochetar então da seguinte maneira: 13-14-15-16-18-19 vezes A.5 ao todo (A.4 mostra como começar e terminar cada carreira). Arrematar quando A.5 tiver sido crochetado 1 vez em altura. A peça mede cerca de 65-69-71-75-77-77 cm. MANGAS: As mangas crochetam-se em redondo, de cima para baixo. Começar a meio sob a manga da seguinte maneira: 1 pb no 5.º dos 8 pc crochetados para a cava, 3 pc (= 1 pa), depois, 1 pa em cada um dos 3 pc seguintes, 1 pa em cada pa acima da manga e, AO MESMO TEMPO, diminuir 1-3-1-5-3-1 pa a intervalos regulares – VER DIMINUIÇÕES, e 1 pa em cada um dos 4 pc restantes sob a manga = 61-61-67-67-73-79 pa. Continuar da seguinte maneira: A.1, 8-8-9-9-10-11 vez A.2 em largura, terminar com A.3. Na 8.ª carreira de A.z (= 1 carreira de pa), diminuir 6 pa a intervalos regulares = 55-55-61-61-67-73 pa. Continuar a crochetar A.z como antes mas crochetar, então, 7-7-8-8-9-10 vezes A.2 em largura. Quando A.z tiver sido crochetado 1 vez em altura, crochetar A.y acima de A.z. Quando A.y tiver sido crochetado 1 vez em altura, crochetar A.x acima de A.y. Na última carreira de A.x, diminuir 6 pa a intervalos regulares = 49-49-55-55-61-67 pa. Crochetar então A.z acima de A.x. A.2 est , então, crocheté 6-6-7-7-8-9 vezes em largura. Au 8e carreira, diminuir 6 pa a intervalos regulares = 43-43-49-49-55-61 pa. Quando A.z tiver sido crochetadoé 1 vez em altura, crochetar A.y acima de A.z. Crochetar então A.x acima de A.y. Na última carreira de A.x, diminuir 0-0-0-0-6-6 pa a intervalos regulares = 43-43-49-49-49-55 pa. Crochetar então as 5 primeiras carreiras de A.z. A.2 é, então, crochetado 5-5-6-6-6-7 vezes em largura. Arrematar. A manga mede cerca de 44 cm para todos os tamanhos. Crochetar a outra manga da mesma maneira. GOLA: Crocheta-se em redondo. Crochetar 1 orla à volta do decote, na corrente de base, com a agulha de croché 4 mm em Cotton Light, começando a meio das costas, pelo direito, da seguinte maneira: 114-114-120-120-126-126 pa no corrente, depois, crochetar então 19-19-20-20-21-21 vezes A.6 em largura. Arrematar. |
||||||||||||||||||||||||||||||||||
Explicações do diagrama |
||||||||||||||||||||||||||||||||||
|
||||||||||||||||||||||||||||||||||
 |
||||||||||||||||||||||||||||||||||
 |
||||||||||||||||||||||||||||||||||
 |
||||||||||||||||||||||||||||||||||
Terminou este projecto?Então, identifique as suas fotos com as tags #dropspattern #laceydaysjumper ou mostre-as na galeria #dropsfan. Precisa de ajuda para este modelo?Encontrará 15 turotiais em vídeo, uma rubrica Comentários/Perguntas e muito mais ao visitar a página do modelo em www.garnstudio.com © 1982-2026 DROPS Design A/S. Todos os direitos reservados. Este documento, incluuindo as suas su-secções, tem copyrights. Saia mais o que pode fazer com os nossos modelos no fim de cada uma das páginas do nosso site. |
||||||||||||||||||||||||||||||||||


Com mais de 40 anos no design de modelos de tricô e de croché, a DROPS Design oferece uma das mais vastas colecções demodelos gratuitos na Internet - traduzidos em 17 línguas. Neste dia de hoje, temos 324 catálogos e 12290 modelos - dos quais 12271 estão traduzidos em português.
Trabalhamos com muito empenho para lhe proporcionar o melhor que o tricô e o croché têm para oferecer, para lhe fornecer inspiração e conselhos bem como fios da mais elevada qualidade a preços incríveis! Gostaria de usar os nossos modelos para outros fins que não uso pessoal? Pode ler o que lhe é permitido fazer no Copyright texto que se encontra na parte de baixo de todos os nossos modelos. Bom tricô! Bom croché!
Deixe um comentário acerca do modelo DROPS 162-27
Gostaríamos muito de saber o que tem a dizer-nos acerca deste modelo!
Se deixar uma pergunta acerca do modelo, certifique-se de que escolhe a categoria adequada no formulário abaixo para acelerar o processo relativo à resposta. Os campos obrigatórios estão assinalados com um *.