
Categorias populares
Procura um fio?


Comentários / Perguntas (34)
Menawatie Hardath escreveu:
Is it possible to separate the rows by actually stating "Row 1, 2,"etc? Also typing each new row on a new line?
08.10.2018 - 23:12DROPS Design respondeu:
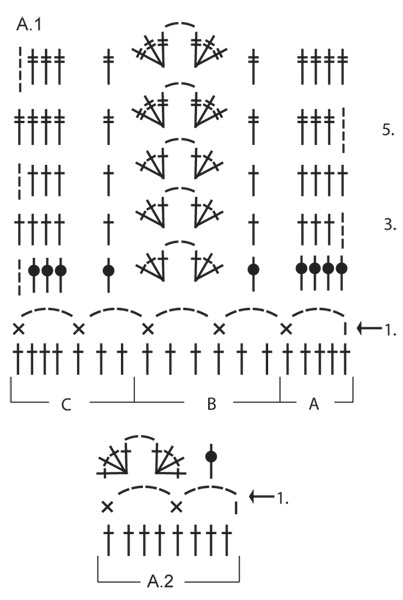
Dear Mrs Hardath, there is only diagrams to this pattern, when working diagrams, work each row in each diagram as follows: row 1 in A.1A, A.1B and A.1C (= read from the right towards the left), then row 2 in A.1C, A.1B, A.1A (= read from the left towards the right) and continue reading/working diagrams like this. Happy crocheting!
09.10.2018 - 09:43
![]() Paula escreveu:
Paula escreveu:
I am.having trouble figuring out the first part of the instructions for the fan pattern: A. 1A A.1B does that mean 5dc (A) and then 4ch 1sc(1A) 4dc (A) 4ch 1sc 4ch 1sc (1B)? I also tried just doing the chain SC row but it doesn\'t look right if I have to do that for rows 1-4. I\'m obviously fairly new to crocheting and I don\'t know anyone else who crochets.
16.06.2018 - 03:38DROPS Design respondeu:
Dear Paula, when working diagrams start at the bottom corner on the right side from RS and read towards the left: work A.1A over the first 5 sts (= row 1 = 1 turning ch, 4 ch, skip 3 sts, 1 sc in next st), then repeat A.1B over the next sts until 7 sts remain and work A.1C over these last sts. From WS read from the left towards the right: work A.1C, repeat A.1B and finish with A.1A. Happy crocheting!
18.06.2018 - 09:44
![]() Frida escreveu:
Frida escreveu:
Jag gillar verkligen cotton/viscose-blandningen men hittar inget lilvärdigt alternativ bland de garner man får upp som ersättning. Tycker att det är helt fel att ull-blandningar alls visas som alternativ! Kommer ni komma ut med ett nytt bomull/viskos-garn inom överskådlig tid eller måste jag leta efter andra än Drops garner?
30.04.2018 - 12:42DROPS Design respondeu:
Hej Frida, mange vil gerne strikke/hækle i modsvarende strikkefasthed i uld eller bomuld, så derfor har vi de alternativer med som kan erstatte strikkefastheden. Vi har ikke noget nyt Cotton Viscose på vej hjem desværre. God fornøjelse!
07.05.2018 - 16:47Lisa escreveu:
I recently made this. It turned out much larger. It worked out beautifully but just a large instead of medium. Has anyone else had this problem? Is this consistent across drops , as I would like to make more but am reluctant to .
25.06.2017 - 01:24DROPS Design respondeu:
Dear Lisa, sorry to hear that your piece ended up in a different size than expected. Every piece is different, the sizing depends a lot on the style of the garnment, the xarn and the pattern it is knittet with. You should ALWAYS make a gauge swatch and wash it and check the stitch count, and also check teh shematincs and compare your peiece to the given sizes there, often. Happy knitting.
25.06.2017 - 19:51
![]() Yvonne escreveu:
Yvonne escreveu:
Hi, are the rows under the sleeve included in the 22 rows for the yoke? Thanks
07.04.2016 - 12:12DROPS Design respondeu:
Dear Yvonne, all rows are written out separately, just follow the pattern! Happy crocheting!
07.04.2016 - 12:34
![]() Gerdien escreveu:
Gerdien escreveu:
Goedenavond, Ik ben bezig met het waaierpatroon en haak maat L, de eerste toer met de stokjes snap ik maar dan de toer met de 4 lossen en een vaste er tussen,hoe moet ik dan het getal 35 keer zien?? is dat het aantal dat je 1B herhaald, dat is bij mij 71 en A en C aan het begin en eind van de toer, ik hoop dat u mij kunt helpen! Vriendelijke groet Gerdien
04.04.2016 - 18:34DROPS Design respondeu:
Hoi Gerdien. Je haakt eerst A.1A (= 5 st), dan herhaal je A.1B (= 6 st) 35 keer = je herhaalt dus het patroon over 6 x 35 stokjes = 210 en eindigt met A.1C (= 7 st)
05.04.2016 - 12:42
![]() Yvonne escreveu:
Yvonne escreveu:
Hi, I am having trouble with the measurements of the piece. I'm making the cardigan using the 'Small' pattern. I have 26 rows of treble crochet in the section before the pattern fan. This makes the piece about 27cm rather than the 18cm mentioned in the pattern. Have I made a mistake with my counting? How many rows should there be in total before starting the pattern fan when using the 'Small' pattern? Many thanks
26.03.2016 - 12:49DROPS Design respondeu:
Dear Yvonne, you have to work a total of 22 rows for yoke in size S: 1 row (=112 tr) + 1 row (=140 tr) + 1 row (inserting markers+ inc evenly) + 1 row (+24 tr) + 18 rows (inc a total of 9 time every row from RS= 276 tr) = 22 rows and approx. 18 cm. Happy crocheting!
29.03.2016 - 09:20
![]() Eva escreveu:
Eva escreveu:
Thank you for your help. I have now finished the increases on each side of the markers. It now says "then inc before every marker (=12tr inc)". Could you please confirm whether this first row of 12tr increases is worked from the RS or the WS? Thank you.
08.03.2016 - 23:01DROPS Design respondeu:
Dear Eva, you inc before each marker (= 12 tr inc) every row from RS, ie every other row (as before), the first of these inc row will be worked from RS. Happy crocheting!
09.03.2016 - 08:57
![]() Eva escreveu:
Eva escreveu:
When it says "repeat increase on every row from RS" does this mean alternate rows? i.e. repeat increase on every second row?
07.03.2016 - 22:17DROPS Design respondeu:
Dear Eva, that's right, you work RS row with inc, and work next row from WS withouth inc. Happy crocheting!
08.03.2016 - 08:16
![]() Ikbenpietje Niet escreveu:
Ikbenpietje Niet escreveu:
Bedankt voor het antwoord! Ik had het patroon niet goed gelezen. Er staat a.1a, a.1b. Had de komma over geslagen, vandaar dat ik het niet snapte. Dank je wel hoor!
27.09.2015 - 10:10
|
||||||||||||||||||||||||||||
Lady Ascot Cardigan#ladyascotcardigan |
||||||||||||||||||||||||||||
 |
 |
|||||||||||||||||||||||||||
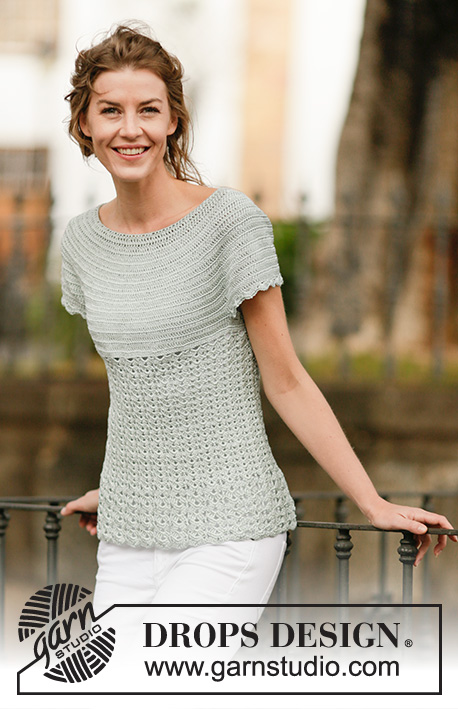
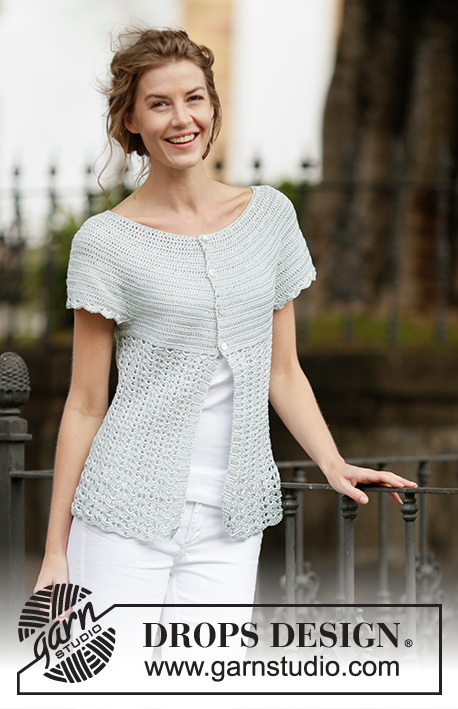
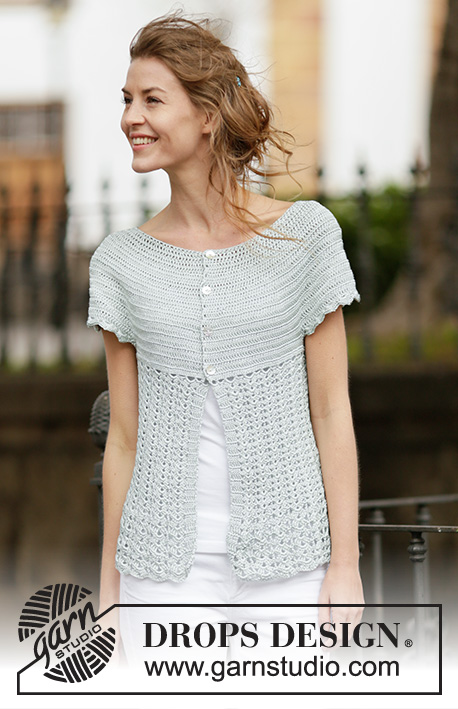
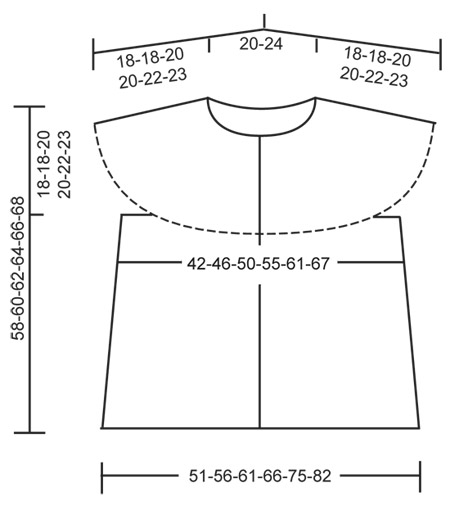
Casaco DROPS em croché com ponto de leques e encaixe arredondado, crochetado de cima para baixo (top down), em ”Cotton Viscose”. Do S ao XXXL.
DROPS 162-25 |
||||||||||||||||||||||||||||
|
---------------------------------------------------------- NOTA: Existem termos diferentes de tricô e croché em português de Portugal e do Brasil. Malha = Ponto Canelado = Barra Ponto Jarreteira = Cordões de Tricô Ponto Liga = Ponto Tricô Croché : mpa – meio ponto alto pa – ponto alto pad – ponto alto duplo pat – ponto alto triplo pb – ponto baixo pbx – ponto baixíssimo pc – ponto corrente ---------------------------------------------------------- PONTO FANTASIA: Ver diagramas A.1-A.2. DICA CROCHÉ: Substituir o 1.º pa de cada carreira de pa por 3 pc e terminar cada carreira de pa com 1 pa no 3.º pc do princípio da carreira. AUMENTOS: Para aumentar 1 pa, crochetar 2 pa num pa. ---------------------------------------------------------- CASACO: Crocheta-se de cima para baixo, em idas e voltas a partir do meio da frente. Montar uma corrente de 136-140-145-150-155-160 pc (incluindo 3 pc para virar) com a agulha de croché 3.5 mm em Cotton Viscose. Crochetar 1 pa no 4.º pc a partir da agulha de croché (= 2 pa), *saltar 1 pc, 1 pa em cada um dos 5 pc seguintes*, repetir de * a * até restarem 0-4-3-2-1-0 pc, 1 pa em cada um dos 0-4-3-2-1-0 últimas pc = 112-116-120-124-128-132 pa – VER DICA CROCHÉ. Crochetar 1 carreira de pa (= 1 pa em cada pa) E, AO MESMO TEMPO, aumentar 28 pa a intervalos regulares (ou seja, aumentar 1 pa depois DE cerca de cada 4e pa) – VER AUMENTOS = 140-144-148-152-156-160 pa. Colocar 12 marcadores da seguinte maneira: Crochetar 17-18-19-20-21-22 pa e, AO MESMO TEMPO, aumentar 1-0-0-2-2-1 pa a intervalos regulares, colocar o 1.º marcador, *crochetar 4 pa, colocar o marcador seguinte*, repetir de * a * mais 1 vez, crochetar 20 pa, colocar o marcador seguinte, *crochetar 4 pa, colocar o marcador seguinte*, repetir de * a * mais 1 vez, crochetar 34-36-38-40-42-44 pa e, AO MESMO TEMPO, aumentar 2-0-0-4-4-2 pa a intervalos regulares, colocar o marcador seguinte, *crochetar 4 pa, colocar o marcador seguinte*, repetir de * a * mais 1 vez, crochetar 20 pa, colocar o marcador seguinte, *crochetar 4 pa, colocar o marcador seguinte*, repetir de * a * mais 1 vez, crochetar 17-18-19-20-21-22 pa AO MESMO TEMPO, aumentar 1-0-0-2-2-1 pa a intervalos regulares = 144-144-148-160-164-164 pa. NÃO ESQUECER DE MANTER A MESMA TENSÃO DA INDICADA PARA A AMOSTRA! Na carreira seguinte pelo direito, aumentar 1 pa de cada lado de cada marcador (= 24 pa aumentados), repetir estes aumentos 1-4-5-7-8-10 vezes ao todo em todas as carreiras pelo direito, depois, aumentar antes de cada marcador (= 12 pa aumentados), repetir estes aumentos 9-6-6-4-4-3 vezes ao todo em todas as carreiras pelo direito = 276-312-340-376-404-440 pa. A peça mede cerca de 18-18-20-20-22-23 cm. Crochetar a carreira seguinte da seguinte maneira: 36-43-48-54-59-66 pa (= frente), crochetar 12 pc (colocar 1 marcador a meio desses novos pc = sob a manga), saltar 66-70-74-80-84-88 pa da carreira precedente (= manga), crochetar 72-86-96-108-118-132 pa (= costas), 12 pc (colocar 1 marcador a meio desses novos pc = sob a manga), saltar 66-70-74-80-84-88 pa da carreira precedente e crochetar 36-43-48-54-59-66 pa (= frente) = 168-196-216-240-260-288 pa/pc (= 84-98-108-120-130-144 pa/pc para as costas e 42-49-54-60-65-72 pa/pc para cada frente). Colocar 1 marcador - MEDIR, ENTÃO, A PEÇA A PARTIR DAQUI! Crochetar 1 carreira de pa (= 1B em cada pa e 1 pa em cada pc sob a manga) e, AO MESMO TEMPO, aumentar 18-8-6-0-10-6 pa a intervalos regulares = 186-204-222-240-270-294 pa. Crochetar 1 carreira de pa. Continuar então em ponto de leques. PONTO DE LEQUES: Crochetar as carreiras 1 -4 do diagrama A.1 da seguinte maneira: A.1A, 29-32-35-38-43-47 vezes A.1B, terminar com A.1C. Repetir então as carreiras 3 e 4 até a peça medir 29-31-31-33-31-31 cm - ajustar a altura para que a última carreira seja uma carreira 4. Crochetar então as carreiras 5 -6 do diagrama A.1. Repetir as carreiras 5 e 6 até a peça medir cerca de 40-42-43-45-45-45 cm. Arrematar. ORLA DAS MANGAS: Começar a meio sob a manga da seguinte maneira: 1 pb no 6.º dos 12 pc da cava, 3 pc (= 1 pa), 1 pa em cada um dos 6 pc seguintes, 1 pa na carreira de pa em que a corrente da manga foi crochetada, 1 pa em cada um dos 66-70-74-80-84-88 pa (= acima da manga) AO MESMO TEMPO, aumentar 0-4-0-2-6-2 pa a intervalos regulares, 1 pa na carreira de pa em que a corrente da manga foi crochetada, 1 pa em cada um dos 5 pc restantes sob a manga = 80-88-88-96-104-104 pa. Crochetar então 10-11-11-12-13-13 vezes A.2. Arrematar quando A.2 tiver sido crochetado 1 vez em altura. Crochetar a outra orla da manga da mesma maneira. MONTAGEM: Costurar os botões na frente esquerda – o de cima a cerca de 1 cm da gola, distribuir os outros com um espaço de cerca de 6 cm. Abotoar entre 2 pa da frente direita. |
||||||||||||||||||||||||||||
Explicações do diagrama |
||||||||||||||||||||||||||||
|
||||||||||||||||||||||||||||
 |
||||||||||||||||||||||||||||
 |
||||||||||||||||||||||||||||
Terminou este projecto?Então, identifique as suas fotos com as tags #dropspattern #ladyascotcardigan ou mostre-as na galeria #dropsfan. Precisa de ajuda para este modelo?Encontrará 9 turotiais em vídeo, uma rubrica Comentários/Perguntas e muito mais ao visitar a página do modelo em www.garnstudio.com © 1982-2026 DROPS Design A/S. Todos os direitos reservados. Este documento, incluuindo as suas su-secções, tem copyrights. Saia mais o que pode fazer com os nossos modelos no fim de cada uma das páginas do nosso site. |
||||||||||||||||||||||||||||


Com mais de 40 anos no design de modelos de tricô e de croché, a DROPS Design oferece uma das mais vastas colecções demodelos gratuitos na Internet - traduzidos em 17 línguas. Neste dia de hoje, temos 324 catálogos e 12290 modelos - dos quais 12271 estão traduzidos em português.
Trabalhamos com muito empenho para lhe proporcionar o melhor que o tricô e o croché têm para oferecer, para lhe fornecer inspiração e conselhos bem como fios da mais elevada qualidade a preços incríveis! Gostaria de usar os nossos modelos para outros fins que não uso pessoal? Pode ler o que lhe é permitido fazer no Copyright texto que se encontra na parte de baixo de todos os nossos modelos. Bom tricô! Bom croché!
Deixe um comentário acerca do modelo DROPS 162-25
Gostaríamos muito de saber o que tem a dizer-nos acerca deste modelo!
Se deixar uma pergunta acerca do modelo, certifique-se de que escolhe a categoria adequada no formulário abaixo para acelerar o processo relativo à resposta. Os campos obrigatórios estão assinalados com um *.