
Categorias populares
Procura um fio?


Comentários / Perguntas (50)
![]() Niva escreveu:
Niva escreveu:
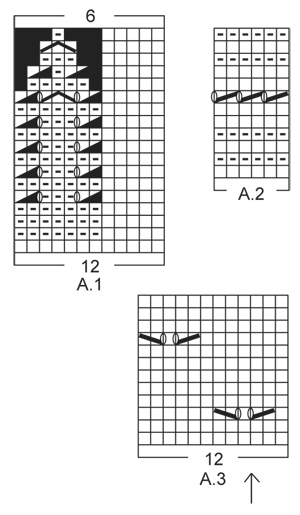
Must admit this is the most confusing pattern I’ve ever tried and I’m an accomplished knitter. I’ve read it so many times to work it out and I’m almost there. Does the A4 pattern stop after the 12 rows in the graph?
08.04.2021 - 04:33DROPS Design respondeu:
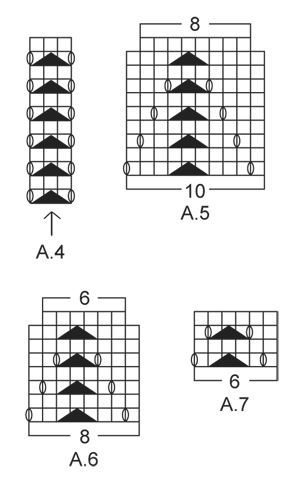
Dear Niva, A.4 will be repeated in height until all decreases for raglan are done. Happy knitting!
08.04.2021 - 07:51
![]() Nova escreveu:
Nova escreveu:
At the beginning of the A4 graph is the YO between the last stitch on the body and the first stitch on the sleeve?
07.04.2021 - 13:43DROPS Design respondeu:
Dear Nova, the stitch with the arrow in A.4 should be the one with the marker at the transitions, so that you will have 1 yarn over, the double decrease with marker in the middle stitch, 1 yarn over; this means there will be one hole (yarn over) on body and on sleeve. Happy knitting!
07.04.2021 - 14:26
![]() Nova escreveu:
Nova escreveu:
After attaching the sleeves for size L and beginning middle back for the first round, it says to start on the same row for the sleeve as for the body. Does this mean if I’m on row 4 on the body (A1) that I start on row 4 for the sleeves (A3)? Also A1 the arrow designates the middle of the sleeve but the graph starts with A4 which is 3 stitches and A3 is another 3 sts total 6 sts wouldn't the middle be half of 68 sts which is 34 sts?
06.04.2021 - 14:03DROPS Design respondeu:
Dear Nova, you should finish the sleeves 8adjust its length) so you will end up in the same row if the pattern as on the body, so you can continue the pattern without disrupting it. The arrow should match the middle of the sleeves, the upper middle line, put the stitch marked there, and count outwards to find out where you should start. Happy Knitting!
06.04.2021 - 14:26
![]() Nova escreveu:
Nova escreveu:
This is becoming a real challenge but I’m not going to give up! I am attaching the sleeves to the body but notice you don’t mention double pointed needles in your materials needed for this project. How are you supposed to knit these sleeves together with the body without them? It won’t work.
25.03.2021 - 01:52DROPS Design respondeu:
Dear Nova, when you have knitted the sleeves, you put all the stitches on one curcular needle, (back, sleeve, fron, sleeve), and knot the circular needle on the round. You don't knit "together" as a three needle bind off, but along with the body, in one big circle, that is getting decreased as you get to the neckline. Happy Knitting!
25.03.2021 - 02:26
![]() Nova escreveu:
Nova escreveu:
Hi again. I’m up to the yoke and I’m really confused about this section of the pattern. The fact that there are 3 graphs to be worked is a challenge in itself. The confusion is in the A4 graph between the body and the sleeves, does this have to do with the shaping of the raglan?
09.03.2021 - 13:31DROPS Design respondeu:
Dear Nova, pattern A.4 is between each body and sleeve, right at the raglan line. Shaping happens before and after this pattern. Happy Knitting!
09.03.2021 - 13:57
![]() Nova escreveu:
Nova escreveu:
When you get to the side where the first increases have been worked you have two extra stitches so to keep the eyelet pattern uniform, the space between the next eyelet is 9 stitches and that throws the whole eyelet pattern out. I don’t know how you can keep the eyelet pattern 7 stitches between with these increases on the side. The new repeat would make more sense at the beginning of the round.
26.02.2021 - 23:15DROPS Design respondeu:
See answer below - if you can't work a part of decrease (K2 tog, YO), over the new stitches, just work these stitches in stocking stitch without the lace pattern. You shoulud have the correct number of sts between each eyelet in width. Hope this will help. Happy knitting!
01.03.2021 - 08:00
![]() Nova escreveu:
Nova escreveu:
The beginning of the round the increases can be worked out but it’s the increases halfway on the side marker those stitches throw the whole eyelet pattern out. You can’t do 7 stitches between the pattern it doesn’t work out I’ve tried it
26.02.2021 - 22:52DROPS Design respondeu:
Dear Nova, if you don't have enough stitches to work the whole lace pattern on the side, this means there are not enough stitches yet, just work these stitches in stocking stitch. Work the lace pattern over the new stitches only if you have enough stitches to work them. This means each lace pattern should be worked with 7 knit stitches in between. Happy knitting!
01.03.2021 - 07:58
![]() Nova escreveu:
Nova escreveu:
Are you saying to read the graph from left to right and then right to left alternately and the added stitches will work out with the eyelet pattern?
26.02.2021 - 16:33DROPS Design respondeu:
Hi Nova, when working in the round all rounds are worked from the right side, and the diagram is read solely from right to left. When starting a new round, simply start working the first symbol on the next row in diagram. Happy knitting!
28.02.2021 - 21:14
![]() Nova escreveu:
Nova escreveu:
For example on the 3rd round after the first increases there are 4 stitches left at the end of the round and I’m not sure whether to knit those stitches as normal or do the pattern.
26.02.2021 - 15:19DROPS Design respondeu:
Dear Nova, see previous answer, make always sure that the eyelet pattern fit in height, it shouldn't be displaced. Happy knitting!
26.02.2021 - 16:17
![]() Nova escreveu:
Nova escreveu:
When doing the body and the A3 and making the increases on either side of the markers I notice that those extra stitches will throw the alternate pattern out where the holes should be. Is that how it’s supposed to be?
26.02.2021 - 15:08DROPS Design respondeu:
Dear Nova, the increased stitches should be worked in A.3, this means at the beg of A.3 work the new stitches as a new repeat reading diagram from the left towards the right (= there should be always 7 sts before the next K2 tog, YO in the lace pattern. And at the end of A.3, work the new stitches as a new repeat of A.3 (reading from the right towards the left). Hope this will help. Happy knitting!
26.02.2021 - 16:16
|
||||||||||||||||||||||||||||
White Romance#whiteromancetop |
||||||||||||||||||||||||||||
 |
 |
|||||||||||||||||||||||||||
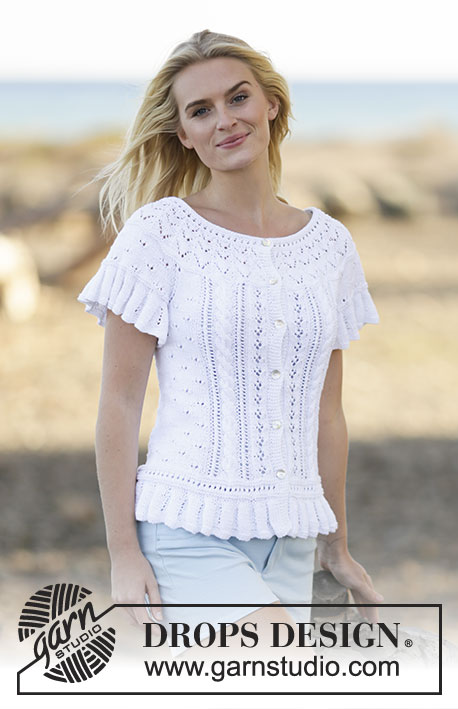
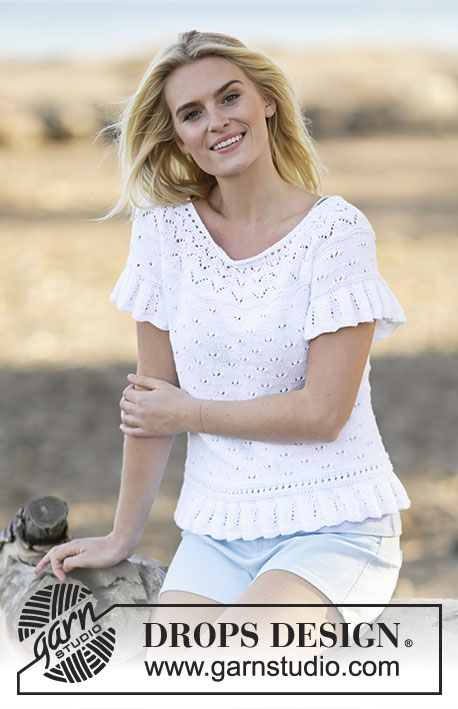
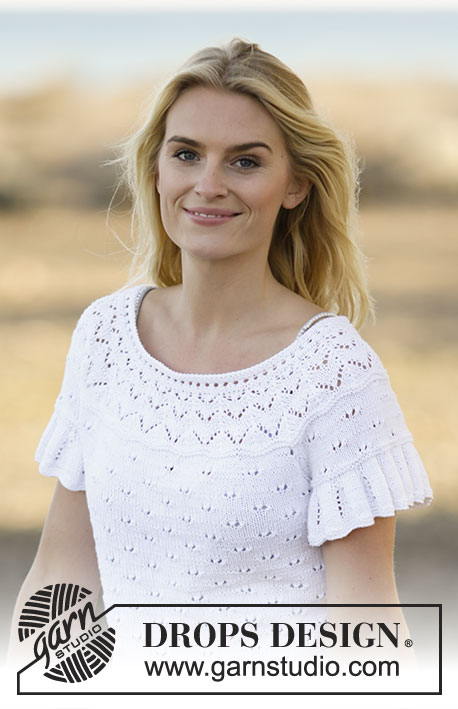
Top rendado DROPS com mangas curtas e encaixe arredondado, em ”Safran”. Do S ao XXXL.
DROPS 159-12 |
||||||||||||||||||||||||||||
|
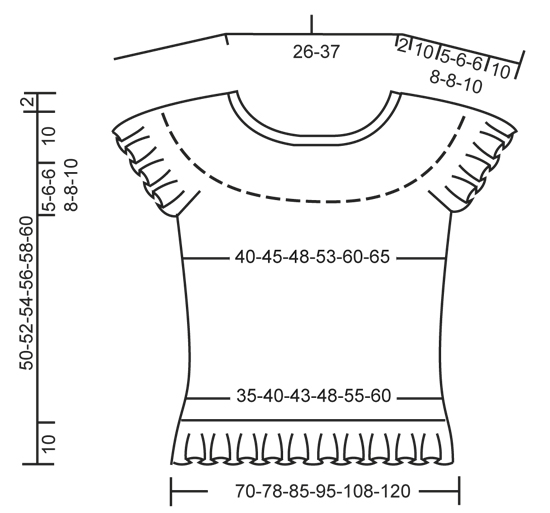
---------------------------------------------------------- NOTA: Existem termos diferentes de tricô e croché em português de Portugal e do Brasil. Malha = Ponto Canelado = Barra Ponto Jarreteira = Cordões de Tricô Ponto Liga = Ponto Tricô Croché : mpa – meio ponto alto pa – ponto alto pad – ponto alto duplo pat – ponto alto triplo pb – ponto baixo pbx – ponto baixíssimo pc – ponto corrente ---------------------------------------------------------- PONTO JARRETEIRA (em redondo na agulha circular): Tricotar: *1 carreira meia, 1 carreira liga/tricô*, repetir de * a *. 1 barra jarreteira = 2 carreiras. PONTO FANTASIA: Ver os diagramas A.1 a A.7. Os diagramas mostram todas as carreiras do ponto fantasia, vistas pelo direito. AUMENTOS: Aumentar 1 m/p fazendo 1 laçada. Na carreira seguinte, tricotar a laçada torcida para evitar buracos - tricotar os aumentos em ponto meia. RAGLAN: Diminuir para o raglan de cada lado de A.4, a cada transição entre as mangas, as costas e a frente. Diminuir da seguinte maneira depois de A.4: Deslizar 1 m/p em meia, 1 m/p meia, passar a m/p deslizada por cima da m/p tricotada. Diminuir da seguinte maneira 2 ms/pts antes de A.4: 2 ms/pts tricotadas juntamente em meia. ---------------------------------------------------------- COSTAS & FRENTE: Tricotam-se em redondo na agulha circular. Montar 336-372-408-456-516-576 ms/pts com a agulha circular 2.5 mm em Safran. Tricotar 2 barras em PONTO JARRETEIRA - ver acima. Continuar com a agulha circular 3 mm e tricotar no ponto fantasia do diagrama A.1. Quando A.1 tiver sido tricotado 1 vez em altura, restam 168-186-204-228-258-288 ms/pts. Continuar, então, seguindo o diagrama A.2. Depois de A.2, tricotar 2 carreiras meia e, AO MESMO TEMPO, distribuir 0-6-0-0-6-0 aumentos na última carreira = 168-192-204-228-264-288 ms/pts. Colocar 1 marcador no princípio da carreira e 1 outro marcador depois de 84-96-102-114-132-144 ms/pts (= referências para os lados). Continuar então seguindo o diagrama A.3. NÃO ESQUECER DE MANTER A MESMA TENSÃO DA INDICADA PARA A AMOSTRA AO MESMO TEMPO, quando a peça medir 12 cm, aumentar 1 m/p de cada lado dos 2 marcadores - VER AUMENTOS (= 4 aumentos). Repetir estes aumentos de cada lado da peça 6 vezes ao todo a cada 4-4-4-5-5-5 cm = 192-216-228-252-288-312 ms/pts - NOTA: Tricotar os aumentos em ponto meia. Continuar até a peça medir 35-36-38-38-40-40 cm. Tricotar então a carreira seguinte da seguinte maneira: Arrematar 5-5-5-6-6-6 ms/pts para a cava, tricotar 86-98-104-114-132-144 ms/pts (= frente), arrematar 10-10-10-12-12-12 ms/pts para a cava (ou seja, 5-5-5-6-6-6 ms/pts de cada lado do marcador), tricotar 86-98-104-114-132-144 ms/pts (= costas) e arrematar as 5-5-5-6-6-6 restantes ms/pts. Colocar em espera e tricotar as mangas. MANGAS: Tricotam-se em redondo na agulha circular. Montar 144-156-156-168-168-180 ms/pts com a agulha circular 2.5 mm em Safran. Tricotar 2 barras em PONTO JARRETEIRA - ver acima. Continuar com a agulha circular 3 mm e tricotar seguindo o diagrama A.1. Depois de A.1, restam 72-78-78-84-84-90 ms/pts. Tricotar 2 barras jarreteira e, AO MESMO TEMPO, na última carreira, arrematar as 10-10-10-12-12-12 ms/pts a meio sob a manga = restam 62-68-68-72-72-78 ms/pts. Colocar em espera e tricotar a outra manga. ENCAIXE: Colocar as ms/pts das mangas na mesma agulha circular que as costas e a frente, acima das ms/pts arrematadas para as cavas (sem as tricotar) = 296-332-344-372-408-444 ms/pts. AO MESMO TEMPO, colocar 1 marcador na 1.ª e 1 marcador na última m/p de cada uma das mangas (= 4 marcadores). Começar a meio das costas e continuar as costas e a frente em ponto fantasia como antes e, AO MESMO TEMPO, tricotar A.3 nas mangas (a flecha no diagrama deve corresponder a meio da manga – começar na mesma carreira do diagrama que a frente e as costas). Tricotar também A.4 a cada transição entre as costas/a frente e as mangas (a flecha no diagrama deve corresponder à m/p com o marcador). Quando 2 carreiras tiverem sido tricotadas em redondo em todas as ms/pts, começar a diminuir para o RAGLAN - ver acima (= 8 diminuições). Repetir estas diminuições 4-5-5-7-7-8 vezes ao todo a cada 4 carreiras = 264-292-304-316-352-380 ms/pts. Tricotar 2 barras jarreteira em todas as ms/pts e, AO MESMO TEMPO, distribuir 4-12-4-6-12-10 diminuições na 1.ª carreira = 260-280-300-310-340-370 ms/pts. Tricotar 2 carreiras meia. Começar, então, a diminuir para o encaixe arredondado e tricotar em redondo, seguindo o diagrama A.5 (= 26-28-30-31-34-37 vezes em toda a carreira – NOTA: Mudar para uma agulha circular mais pequena quando for necessário). Quando A.5 tiver sido tricotado 1 vez em altura, tricotar A.6 em vez de A.5. Quando A.6 tiver sido tricotado 1 vez em altura, temos 156-168-180-186-204-222 ms/pts. Tricotar então A.7 em vez de A.6. Quando A.7 tiver sido tricotado 1 vez em altura, tricotar uma elevação para o decote das costas. Colocar 1 marcador a meio da frente. Começar a meio das costas e tricotar em meia até restarem 14-14-16-16-18-20 ms/pts antes do marcador. Virar, tricotar a carreira de volta em meia até restarem 14-14-16-16-18-20 ms/pts antes do marcador do outro lado. Virar, tricotar em meia até restarem 30-30-34-34-38-42 ms/pts antes do marcador. Virar, tricotar a carreira de volta em meia até restarem 30-30-34-34-38-42 ms/pts antes do marcador do outro lado. Virar, tricotar em meia até restarem 46-46-52-52-58-64 ms/pts antes do marcador. Virar, tricotar a carreira de volta em meia até restarem 46-46-52-52-58-64 ms/pts antes do marcador do outro lado. Virar, tricotar em meia até restarem 62-62-70-70-76-86 ms/pts antes do marcador. Virar, tricotar a carreira de volta em meia até restarem 62-62-70-70-76-86 ms/pts antes do marcador do outro lado. Virar e tricotar a carreira de volta em meia até ao princípio da carreira. GOLA: Continuar com a agulha circular 2.5 mm e tricotar em redondo em todas as ms/pts seguindo o diagrama A.2. AO MESMO TEMPO, na 1.ª carreira, distribuir 22-24-24-26-30-32 diminuições = 134-144-156-160-174-190 ms/pts. Depois de A.2, arrematar frouxamente as ms/pts em meia pelo direito. O top mede cerca de 52-54-56-58-60-62 cm desde o ombro até ao rebordo inferior. MONTAGEM: Fechar a abertura sob as mangas com uma costura |
||||||||||||||||||||||||||||
Explicações do diagrama |
||||||||||||||||||||||||||||
|
||||||||||||||||||||||||||||
 |
||||||||||||||||||||||||||||
 |
||||||||||||||||||||||||||||
 |
||||||||||||||||||||||||||||
Terminou este projecto?Então, identifique as suas fotos com as tags #dropspattern #whiteromancetop ou mostre-as na galeria #dropsfan. Precisa de ajuda para este modelo?Encontrará 30 turotiais em vídeo, uma rubrica Comentários/Perguntas e muito mais ao visitar a página do modelo em www.garnstudio.com © 1982-2026 DROPS Design A/S. Todos os direitos reservados. Este documento, incluuindo as suas su-secções, tem copyrights. Saia mais o que pode fazer com os nossos modelos no fim de cada uma das páginas do nosso site. |
||||||||||||||||||||||||||||


Com mais de 40 anos no design de modelos de tricô e de croché, a DROPS Design oferece uma das mais vastas colecções demodelos gratuitos na Internet - traduzidos em 17 línguas. Neste dia de hoje, temos 324 catálogos e 12290 modelos - dos quais 12271 estão traduzidos em português.
Trabalhamos com muito empenho para lhe proporcionar o melhor que o tricô e o croché têm para oferecer, para lhe fornecer inspiração e conselhos bem como fios da mais elevada qualidade a preços incríveis! Gostaria de usar os nossos modelos para outros fins que não uso pessoal? Pode ler o que lhe é permitido fazer no Copyright texto que se encontra na parte de baixo de todos os nossos modelos. Bom tricô! Bom croché!
Deixe um comentário acerca do modelo DROPS 159-12
Gostaríamos muito de saber o que tem a dizer-nos acerca deste modelo!
Se deixar uma pergunta acerca do modelo, certifique-se de que escolhe a categoria adequada no formulário abaixo para acelerar o processo relativo à resposta. Os campos obrigatórios estão assinalados com um *.