
Categorias populares
Procura um fio?


Comentários / Perguntas (127)
![]() Debbie escreveu:
Debbie escreveu:
Can you make a you tube video showing how this is made?
20.05.2015 - 01:53DROPS Design respondeu:
Dear Debbie, you will find videos related to the sts used under tab "videos", you can work either following diagram or written pattern. Should you need any further assistance, you are welcome to ask your question here or to contact your DROPS store. Happy crocheting!
20.05.2015 - 10:02
![]() Judi Ames escreveu:
Judi Ames escreveu:
For Ruth, to put it more clearly, at end of first row, you turn, chain 3 (= first stitch) for turning chain...after the ch stitch do 2 more stitches, then stitch in ch-sp, ch 3 and continue...I was wondering why I had no turning chain and the rows were getting wider, too...does this help?
07.05.2015 - 22:35
![]() Lia escreveu:
Lia escreveu:
Ik ben met het voorpand bezig .Moet ik 3 stokjes in de 3 lossen tussen de tussen de stokjes in de hoek maken of in het eerst losse boogje? Keer de tweede toer 1st. in de eerst 3losse maar er zijn toch gen losse alleen 3 stokjes ? Moet je om een om aan het begin van de toer 3 stokjes haken of alleen maar boogjes?
30.04.2015 - 20:32
![]() Vivian escreveu:
Vivian escreveu:
Thx for the response about the sleeves! I woke up this morning and reread the instructions and understand them completely now!
27.04.2015 - 17:03
![]() Vivian escreveu:
Vivian escreveu:
I have the question about the increase every sixth round on the back panel. I think I understand what the instructions say…every 6th round you would have a DC ch3 DC all in the same ch sp on either side of the corners as you go round equaling 8 extra DC & ch3 per sixth round? BUT, I do not see that in the picture, which makes me question whether I understand clearly.
27.04.2015 - 17:01DROPS Design respondeu:
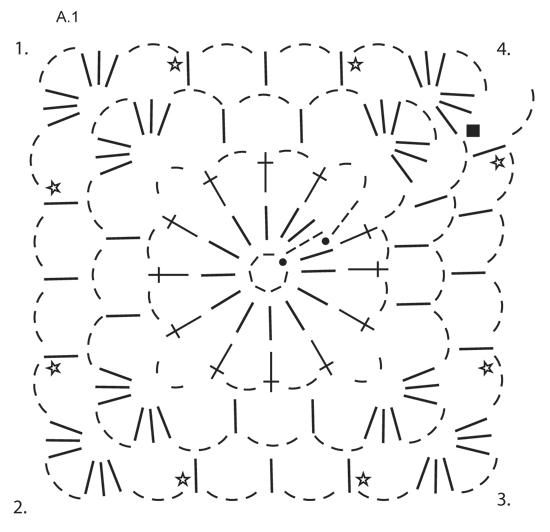
Dear Vivian, diagram shows only first 4 rounds, increase starts on round 5, then every 6th round where you will work 1 dc + 3ch +1dc +3 ch in same ch-space each side of each corner (= 2 dc more per side = 8 dc inc per inc round). Happy crocheting!
27.04.2015 - 17:14
![]() Vivian escreveu:
Vivian escreveu:
I am totally lost on the directions for the sleeves. Is there any possibility I could get a simplified explanation on dec the sleeves? I just don't understand the way it is written. Also, when I enlarge the picture of the back piece, I don't see where the inc are in the example? I don't think I did that part right :( , all I did was put in one extra DC, but I am plowing ahead anyhow. thx!
27.04.2015 - 07:06DROPS Design respondeu:
Dear Vivian, mid under sleeve replace 1 dc+3 ch that way: work next dc in next ch-space but wait with last pull through (2 sts on hook, work next dc in next ch space and on last pull through, pull yarn through all sts on hook. For any individual assistance, remember you can get help from your DROPS store. Happy crocheting!
27.04.2015 - 11:42
![]() Ruth escreveu:
Ruth escreveu:
Nope, sorry, still don't understand what you do at the turn after the first row...any chance of a picture? To clarify - I finish the first row with 3ch, 3 tr in ch-loop in the corner, I turn and then....what??!!
26.04.2015 - 23:22DROPS Design respondeu:
Dear Ruth, on 2nd row start with 3 ch (= 1st tr), 1 tr in each of the first 2 tr, then repeat *1 tr in ch-space, 3 ch* to the end of row and finish with 1 tr in the last ch-space, 1 tr in each of the last 3 tr. On 3rd row, turn and work 3 ch, 1 tr in each of the next 2 tr, *3 ch, 1 tr in next ch-space*, repeat to the end of row and finish with 1 tr in each of the last 3 tr. Repeat then row 2 and 3. Happy crocheting!
27.04.2015 - 14:19
![]() Ruth escreveu:
Ruth escreveu:
Nope, sorry, still don't understand what you do at the turn after the first row...any chance of a picture?
26.04.2015 - 23:10
![]() Ruth escreveu:
Ruth escreveu:
I am struggling to understand what happens at the corners when you turn on the frontpiece. A close up picture might help - the pattern makes no sense to me and I am so close! After severalf restarts I have done the main body and arms and it's looking good, but I can't figure out the turns. Help!.
24.04.2015 - 22:44DROPS Design respondeu:
Dear Ruth, when you work only on front piece, crochet 3 tr in 1st ch-loop in the corner, then repeat *3 ch, 1 tr around ch-loop*, finish with 3ch, 3 tr in ch-loop in the corner. And continue then repeating row 2 and 3 - remember to replace 1st tr with 3 ch at the beg of row. Happy crocheting!
25.04.2015 - 10:19
![]() Lelel Mas escreveu:
Lelel Mas escreveu:
En el delantero, como se continua el patrón sin que salgan aumentos, si se trabaja un punto alto en cada arco aumenta igual que antes.
01.04.2015 - 09:34DROPS Design respondeu:
Hola Lelel, gracias por escribir. Repasando el patrón he encontrado una corrección del delantero sin actualizar en español. Ahora está actualizado. Sentimos las molestias y esperamos que la corrección te ayude a realizar el delantero.
05.04.2015 - 12:12
|
||||||||||||||||||||||
Around the World#aroundtheworldcardigan |
||||||||||||||||||||||
 |
 |
|||||||||||||||||||||
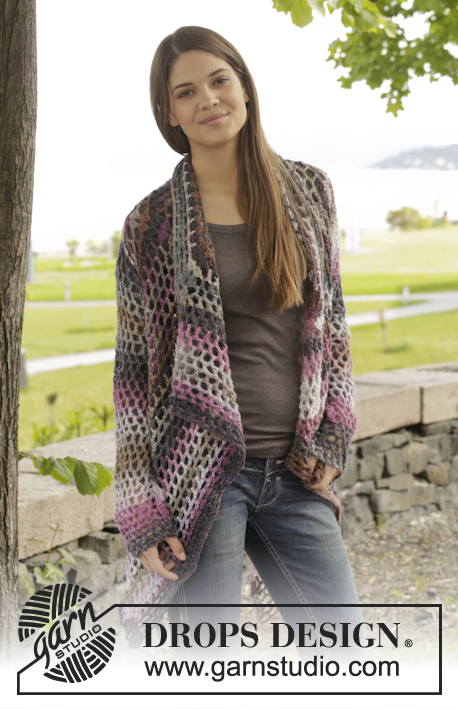
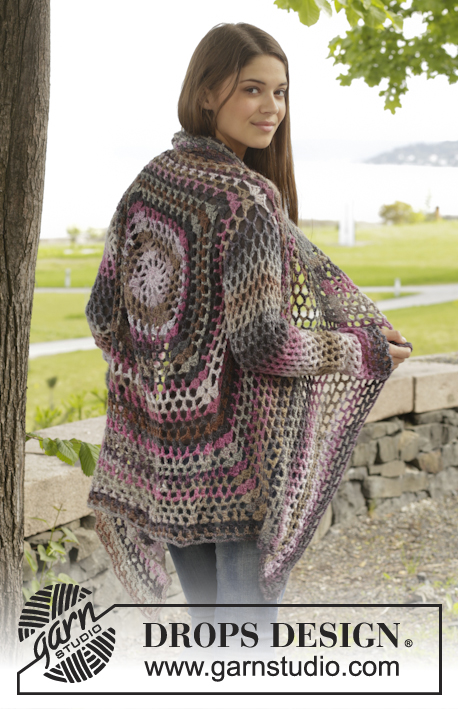
Casaco rendado DROPS em croché, em ”Big Delight”. Do S ao XXXL
DROPS 156-42 |
||||||||||||||||||||||
|
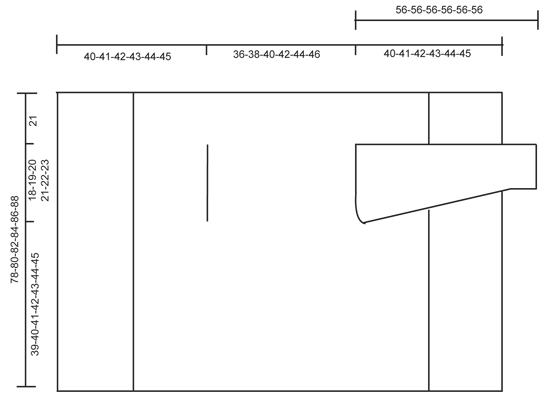
---------------------------------------------------------- NOTA: Existem termos diferentes de tricô e croché em português de Portugal e do Brasil. TRICÔ : Malha = Ponto Canelado = Barra Ponto Jarreteira = Cordões de Tricô Ponto Liga = Ponto Tricô CROCHÉ : mpa – meio ponto alto pa – ponto alto pad – ponto alto duplo pat – ponto alto triplo pb – ponto baixo pbx – ponto baixíssimo pc – ponto corrente ---------------------------------------------------------- PONTO FANTASIA: Ver diagrama A.1. DIMINUIÇÕES (mangas): Diminuir 1 motivo (= 1 pa + 3 pc) não fazendo os pc, mas crochetar juntamente 2 pa da seguinte maneira: Crochetar 1 pa mas não fazer a última laçada (= 2 argolas na agulha de croché), crochetar então o pa seguinte mas na última laçada, crochetar juntamente todas as argolas que estão na agulha de croché. ---------------------------------------------------------- COSTAS & FRENTES: Crochetam-se em redondo, a partir do meio das costas. Montar uma corrente de 6 pc com a agulha de croché 5 mm em Big Delight e unir em redondo com 1 pbx no 1.º pc. Crochetar seguindo o diagrama A.1, ou seja, da seguinte maneira: CARREIRA 1: 3 pc, 13 pa no aro de pc, terminar com 1 pbx no 3.º pc do princípio da carreira. CARREIRA 2: 5 pc, saltar 1 pa, 1 pa no pa seguinte, *2 pc, 1 pa no pa seguinte *, repetir de * a * em toda a carreira, terminar com 2 pc = 12 pa + 2 pc. CARREIRA 3: Crochetar, então, o círculo num quadrado, ou seja, crochetar da seguinte maneira: 3 pa + 3 pc + 3 pa (= canto) no 1.º aro, 3 pc, 1 pa no aro seguinte, 3 pc, 1 pa no aro seguinte, 3 pc, *3 pa + 3 pc + 3 pa (= canto) no aro seguinte, 3 pc, 1 pa no aro seguinte, 3 pc, 1 pa no aro seguinte, 3 pc*, repetir de * a * 3 vezes ao todo, 1 pa no aro seguinte (= 2 últimos pc da carreira precedente), 3 pc. CARREIRA 4: 3 pa + 3 pc + 3 pa (= canto) no 1.º aro, *3 pc, 1 pa no aro seguinte, 3 pc, 1 pa no aro seguinte, 3 pc, 1 pa no aro seguinte, 3 pc, 3 pa + 3 pc + 3 pa (= canto) no aro seguinte*, repetir de * a * 3 vezes ao todo, 3 pc, 1 pa no aro seguinte, 3 pc, 1 pa no aro seguinte, 3 pc, 1 pa no aro seguinte, 3 pc, 1 pa no aro seguinte, 3 pc. NÃO ESQUECER DE MANTER A MESMA TENSÃO DA INDICADA PARA A AMOSTRA! Repetir a carreira 4 com os aumentos, ou seja, crochetar 1 pa + 3 pc a mais entre cada canto a cada carreira (= 4 aumentos por carreira) e, AO MESMO TEMPO, a cada 6 carreiras, aumentar 1 pa + 3 pc a mais de cada lado dos cantos - ver estrela no diagrama (= 8 aumentos a mais por carreira). Continuar desta maneira até o quadrado medir 36-38-40-42-44-46 cm x 36-38-40-42-44-46 cm. Crochetar, então, as cavas da seguinte maneira: continuar como antes até ao 1.º canto, crochetar 3 pa + 3 pc + 3 pa no aro do canto. Crochetar, então, pc até meio do lado seguinte (ou seja, a meio entre o 1.º e o 2.º canto) da seguinte maneira: 1 pc para cada pc/pa saltado. Continuar então como antes até meio entre o 3.º e o 4.º canto. Crochetar então pc até ao princípio da carreira da seguinte maneira: 1 pc para cada pc/pa saltado. Na carreira seguinte, crochetar e aumentar como antes em todos os pontos, e nas correntes das cavas. Continuar desta maneira até o quadrado medir 78-80-82-84-86-88 cm x 78-80-82-84-86-88 cm (ou seja, 21 cm depois das cavas em todos as tamanhos). Arrematar. FRENTES: Continuar, então, em idas e voltas entre o 1.º e o 2.º canto. NOTA! Crochetar a frente sem aumentar. CARREIRA 1 : Crochetar a partir do 1.º canto da seguinte maneira: 3 pa no aro do canto, * 3 pc, 1 pa no aro * repetir de * a * e terminar com 3 pa no canto. CARREIRA 2: Virar e crochetar da seguinte maneira: 1 pa em cada um 3 primeiros pa, * 1 pa no aro de pc, 3 pc *, repetir de * a * e terminar com 1 pa no último aro de pc e 1 pa em cada um dos últimos 3 pa. CARREIRA 3: Virar e crochetar da seguinte maneira: 1 pa em cada um dos 3 primeiros pa, * 3 pc, 1 pa no aro de pc *, repetir de *a * e terminar com 3 pc e 1 pa em cada um dos 3 últimos pa. Continuar, repetindo as carreiras 2-3. Continuar a crochetar desta maneira até 19-20-21-22-23-24 cm terem sido crochetados em idas e voltas, arrematar. Repetir no outro lado: crochetar, então, em idas e voltas a partir do 3.º canto até ao 4.º canto. Terminar com uma carreira a toda a volta do quadrado, como antes, mas no aro em cada canto crochetar 6 pa. Arrematar. MANGAS: Crochetam-se em redondo, de cima para baixo, a partir das cavas, começando a meio sob a manga, pelo direito. CARREIRA 1: 6 pc (= 1 pa + 3 pc), *1 pa no aro seguinte, 3 pc*, repetir de * a * 16-17-18-19-20-21 vezes ao todo, terminar com 1 pbx no 3.º pc. CARREIRA 2: 5 pc, *1 pa no aro seguinte, 3 pc*, repetir de * a * 16-17-18-19-20-21 vezes ao todo, 1 pc, terminar com 1 pbx no 3.º pc no princípio da carreira. Repetir as carreiras 1 e 2 - AO MESMO TEMPO, diminuir 1 pa + 3 pc no princípio da 4.ª-6.ª-6.ª-8.ª-8.ª-6.ª carreira, crochetando 2 pa juntamente – VER DIMINUIÇÕES – a meio sob a manga. Repetir estas diminuições a cada 6-6-6-4-4-4 carreiras = 12-12-13-13-14-14 pa. Continuar em redondo sem diminuir até a manga medir cerca de 56 cm em todos os tamanhos. Arrematar. Crochetar a outra manga da mesma maneira. |
||||||||||||||||||||||
Explicações do diagrama |
||||||||||||||||||||||
|
||||||||||||||||||||||
 |
||||||||||||||||||||||
 |
||||||||||||||||||||||
Terminou este projecto?Então, identifique as suas fotos com as tags #dropspattern #aroundtheworldcardigan ou mostre-as na galeria #dropsfan. Precisa de ajuda para este modelo?Encontrará 7 turotiais em vídeo, uma rubrica Comentários/Perguntas e muito mais ao visitar a página do modelo em www.garnstudio.com © 1982-2026 DROPS Design A/S. Todos os direitos reservados. Este documento, incluuindo as suas su-secções, tem copyrights. Saia mais o que pode fazer com os nossos modelos no fim de cada uma das páginas do nosso site. |
||||||||||||||||||||||


Com mais de 40 anos no design de modelos de tricô e de croché, a DROPS Design oferece uma das mais vastas colecções demodelos gratuitos na Internet - traduzidos em 17 línguas. Neste dia de hoje, temos 324 catálogos e 12290 modelos - dos quais 12271 estão traduzidos em português.
Trabalhamos com muito empenho para lhe proporcionar o melhor que o tricô e o croché têm para oferecer, para lhe fornecer inspiração e conselhos bem como fios da mais elevada qualidade a preços incríveis! Gostaria de usar os nossos modelos para outros fins que não uso pessoal? Pode ler o que lhe é permitido fazer no Copyright texto que se encontra na parte de baixo de todos os nossos modelos. Bom tricô! Bom croché!
Deixe um comentário acerca do modelo DROPS 156-42
Gostaríamos muito de saber o que tem a dizer-nos acerca deste modelo!
Se deixar uma pergunta acerca do modelo, certifique-se de que escolhe a categoria adequada no formulário abaixo para acelerar o processo relativo à resposta. Os campos obrigatórios estão assinalados com um *.