
Categorias populares
Procura um fio?


Comentários / Perguntas (127)
![]() Barbara escreveu:
Barbara escreveu:
Moet je na de armsgaten als je verder haakt in het patroon ook elke zesde toer extra blijven meerderen?
26.10.2015 - 17:18DROPS Design respondeu:
Hoi Barbara. Ja, jeg gaat door met de vierkant tot het vierkantje 21 cm meet vanaf het armsgat. Pas bij het haken van de voorpanden maak je geen meerderingen meer.
27.10.2015 - 14:40
![]() Barbara escreveu:
Barbara escreveu:
Ik heb een vraag over de toer ná de armsgaten. Je moet volgens het patroon haken, ook over de losse van de armsgaten. Dus drie lossen en een stokje neem ik aan. Als ik op de losse haak, om de hoeveel steken komt dan mijn stokje?
23.10.2015 - 13:08DROPS Design respondeu:
Hoi Barbara. Je haakt om de lossen, je hoeft ze niet te tellen en in te haken.
23.10.2015 - 13:47Theresa Lambert escreveu:
I'm not understanding what to do on row 4 would you please help me says something and adding another dc? Please help me out.
20.10.2015 - 00:23DROPS Design respondeu:
Dear Theresa, it is just to clear, that there is 1 dc + 3 ch more between each corner on every round. Just follow previous instructions.
18.12.2015 - 11:53
![]() Lorraine De Maria escreveu:
Lorraine De Maria escreveu:
I think this is my last question on the armholes- thank you for all your help - I understand I am counting the side of the pattern and then chaining that many for the hole in the sleeve- do I attach it in the middle between both corners on the side of this or do I attached it to the other corner before doing my pattern again??
19.10.2015 - 13:43DROPS Design respondeu:
Dear Mrs De Maria, when you have crocheted the chain for armhole and skipped the number of sts matching between first (1st armhole) corner and mid between 1st and 2nd corner, crochet as before from middle between 1st and 2nd corner to the 2nd corner. For 2nd armhole, crochet as before from 3rd corner to middle side before 4th corner, crochet a chain skipping the matching number of sts to the 4th corner. Happy crocheting!
19.10.2015 - 14:10Lorraine De Maria escreveu:
Thank you so much - I think I understand now- I will get back to you if I have any questions in the future - Love your site!!
16.10.2015 - 19:38
![]() Lorraine De Maria escreveu:
Lorraine De Maria escreveu:
Maybe this is a better way to ask- I will follow for the armhole on the answer that says to chain as many chains as it would take to reach the middle of the square - then do I attach it with a chain where I counted 1/2 before the corner?? or do I attach it in the corner I am working on? and how many sets of double crochets and chains do I put in the corner before doing this long chain??
15.10.2015 - 22:38DROPS Design respondeu:
Dear Mrs De Maria, after you have skipped half the side (from the corner to middle between both corners), continue in pattern as before to next corner. Number of chains will depend of number of sts you will skip - count the number of sts skipped to the middle between both corners and chain this number. Happy crocheting!
16.10.2015 - 09:28
![]() Lorraine De Maria escreveu:
Lorraine De Maria escreveu:
I sent a question early about the sleeves (armholes) and I see others have wrote for help on the same subject and I have been crocheting for years and I am still confused- one answer is saying to decrease - the other is saying count the stitches half way to the next corner and chain that amount - then attach it where? and which one is it?
15.10.2015 - 22:10DROPS Design respondeu:
Dear Mrs De Maria, when working armhole, work as before until first corner, then work 3 dc+3 ch+ 3 dc in corner (as before), then crochet a ch to create armhole (number of ch = number of sts skipped from 1st corner to the middle of the side between 1st and 2nd corner), and continue as before and repeat armhole between 3rd and 4th corner: work from 3rd corner as before to middle of side between both corners, ch same number of ch as for 1st armhole and 3dc,3ch,3dc in 4th corner, then work as before to the beg of round. Happy crocheting!
16.10.2015 - 09:24
![]() Lorraine De Maria escreveu:
Lorraine De Maria escreveu:
I bought the yarn for the drops Pattern (around the world) I had no trouble with it until I got to the Sleeves - I don't understand - do I just do a DC and then ch 3 in each of the corners on the square of the Pattern instead of the 3dc, ch3 and 3dc??
15.10.2015 - 21:20DROPS Design respondeu:
Dear Mrs De Maria, on 1st round of sleeve, work around armhole, ie in last row on square (skipped sts when working armhole) + in the ch/1st row after armhole and work around 1 dc in each ch-space with 3 ch between each dc. Happy crocheting!
16.10.2015 - 09:14
![]() Helen escreveu:
Helen escreveu:
Please can to tell me where I can find instructions on how to do a crochet tension square. In relation to this pattern. As I can only find how too do Knitted ones.
14.10.2015 - 14:20DROPS Design respondeu:
Dear Helen, you can work the first 7 rounds to check your tension as stated on the tab "materials" at the right side of the picture. Happy crocheting!
14.10.2015 - 16:42Kathie escreveu:
This is the most confusing pattern I have ever tried to follow. No matter how many times I start over I end up with an extra DC and Ch 3 space on the final side of the A-1 Diagram. It does not matter if I follow the written pattern or the chart. If this is so easily written I would think that you would just make a video of how to do the actual pattern instead of videos just showing the stitches that are used.
01.10.2015 - 02:35
|
||||||||||||||||||||||
Around the World#aroundtheworldcardigan |
||||||||||||||||||||||
 |
 |
|||||||||||||||||||||
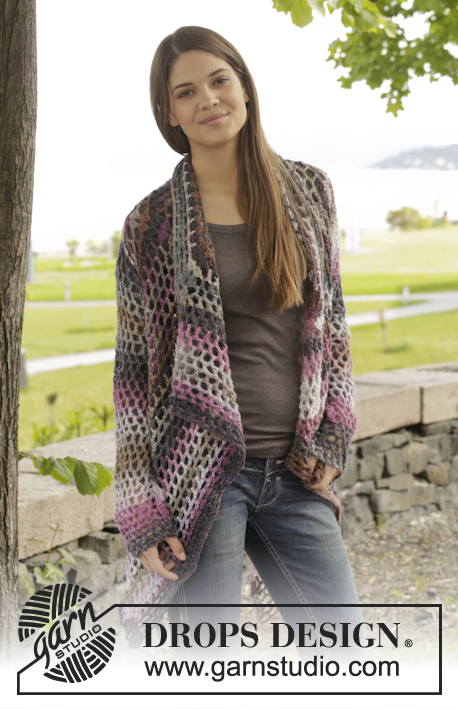
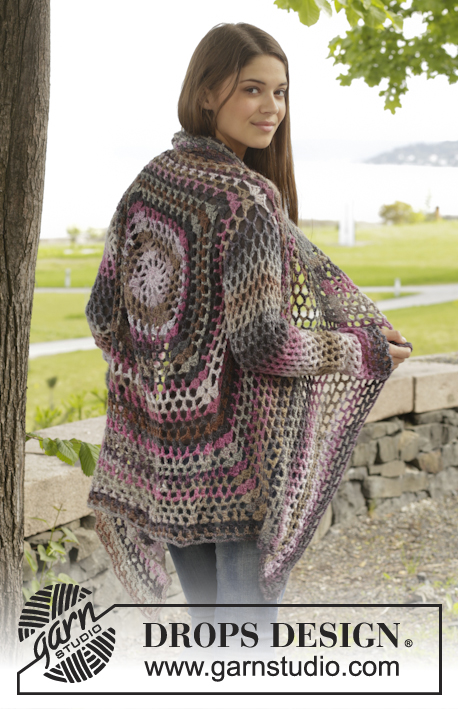
Casaco rendado DROPS em croché, em ”Big Delight”. Do S ao XXXL
DROPS 156-42 |
||||||||||||||||||||||
|
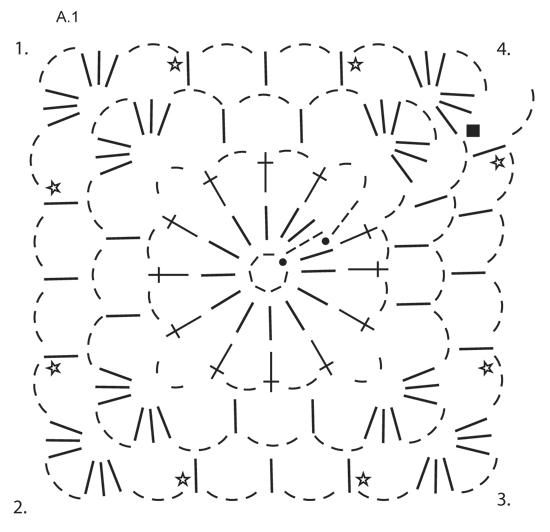
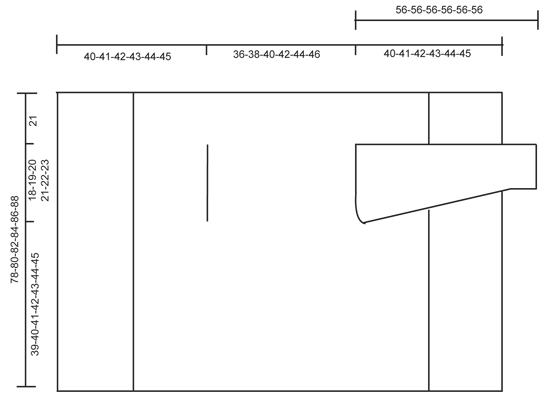
---------------------------------------------------------- NOTA: Existem termos diferentes de tricô e croché em português de Portugal e do Brasil. TRICÔ : Malha = Ponto Canelado = Barra Ponto Jarreteira = Cordões de Tricô Ponto Liga = Ponto Tricô CROCHÉ : mpa – meio ponto alto pa – ponto alto pad – ponto alto duplo pat – ponto alto triplo pb – ponto baixo pbx – ponto baixíssimo pc – ponto corrente ---------------------------------------------------------- PONTO FANTASIA: Ver diagrama A.1. DIMINUIÇÕES (mangas): Diminuir 1 motivo (= 1 pa + 3 pc) não fazendo os pc, mas crochetar juntamente 2 pa da seguinte maneira: Crochetar 1 pa mas não fazer a última laçada (= 2 argolas na agulha de croché), crochetar então o pa seguinte mas na última laçada, crochetar juntamente todas as argolas que estão na agulha de croché. ---------------------------------------------------------- COSTAS & FRENTES: Crochetam-se em redondo, a partir do meio das costas. Montar uma corrente de 6 pc com a agulha de croché 5 mm em Big Delight e unir em redondo com 1 pbx no 1.º pc. Crochetar seguindo o diagrama A.1, ou seja, da seguinte maneira: CARREIRA 1: 3 pc, 13 pa no aro de pc, terminar com 1 pbx no 3.º pc do princípio da carreira. CARREIRA 2: 5 pc, saltar 1 pa, 1 pa no pa seguinte, *2 pc, 1 pa no pa seguinte *, repetir de * a * em toda a carreira, terminar com 2 pc = 12 pa + 2 pc. CARREIRA 3: Crochetar, então, o círculo num quadrado, ou seja, crochetar da seguinte maneira: 3 pa + 3 pc + 3 pa (= canto) no 1.º aro, 3 pc, 1 pa no aro seguinte, 3 pc, 1 pa no aro seguinte, 3 pc, *3 pa + 3 pc + 3 pa (= canto) no aro seguinte, 3 pc, 1 pa no aro seguinte, 3 pc, 1 pa no aro seguinte, 3 pc*, repetir de * a * 3 vezes ao todo, 1 pa no aro seguinte (= 2 últimos pc da carreira precedente), 3 pc. CARREIRA 4: 3 pa + 3 pc + 3 pa (= canto) no 1.º aro, *3 pc, 1 pa no aro seguinte, 3 pc, 1 pa no aro seguinte, 3 pc, 1 pa no aro seguinte, 3 pc, 3 pa + 3 pc + 3 pa (= canto) no aro seguinte*, repetir de * a * 3 vezes ao todo, 3 pc, 1 pa no aro seguinte, 3 pc, 1 pa no aro seguinte, 3 pc, 1 pa no aro seguinte, 3 pc, 1 pa no aro seguinte, 3 pc. NÃO ESQUECER DE MANTER A MESMA TENSÃO DA INDICADA PARA A AMOSTRA! Repetir a carreira 4 com os aumentos, ou seja, crochetar 1 pa + 3 pc a mais entre cada canto a cada carreira (= 4 aumentos por carreira) e, AO MESMO TEMPO, a cada 6 carreiras, aumentar 1 pa + 3 pc a mais de cada lado dos cantos - ver estrela no diagrama (= 8 aumentos a mais por carreira). Continuar desta maneira até o quadrado medir 36-38-40-42-44-46 cm x 36-38-40-42-44-46 cm. Crochetar, então, as cavas da seguinte maneira: continuar como antes até ao 1.º canto, crochetar 3 pa + 3 pc + 3 pa no aro do canto. Crochetar, então, pc até meio do lado seguinte (ou seja, a meio entre o 1.º e o 2.º canto) da seguinte maneira: 1 pc para cada pc/pa saltado. Continuar então como antes até meio entre o 3.º e o 4.º canto. Crochetar então pc até ao princípio da carreira da seguinte maneira: 1 pc para cada pc/pa saltado. Na carreira seguinte, crochetar e aumentar como antes em todos os pontos, e nas correntes das cavas. Continuar desta maneira até o quadrado medir 78-80-82-84-86-88 cm x 78-80-82-84-86-88 cm (ou seja, 21 cm depois das cavas em todos as tamanhos). Arrematar. FRENTES: Continuar, então, em idas e voltas entre o 1.º e o 2.º canto. NOTA! Crochetar a frente sem aumentar. CARREIRA 1 : Crochetar a partir do 1.º canto da seguinte maneira: 3 pa no aro do canto, * 3 pc, 1 pa no aro * repetir de * a * e terminar com 3 pa no canto. CARREIRA 2: Virar e crochetar da seguinte maneira: 1 pa em cada um 3 primeiros pa, * 1 pa no aro de pc, 3 pc *, repetir de * a * e terminar com 1 pa no último aro de pc e 1 pa em cada um dos últimos 3 pa. CARREIRA 3: Virar e crochetar da seguinte maneira: 1 pa em cada um dos 3 primeiros pa, * 3 pc, 1 pa no aro de pc *, repetir de *a * e terminar com 3 pc e 1 pa em cada um dos 3 últimos pa. Continuar, repetindo as carreiras 2-3. Continuar a crochetar desta maneira até 19-20-21-22-23-24 cm terem sido crochetados em idas e voltas, arrematar. Repetir no outro lado: crochetar, então, em idas e voltas a partir do 3.º canto até ao 4.º canto. Terminar com uma carreira a toda a volta do quadrado, como antes, mas no aro em cada canto crochetar 6 pa. Arrematar. MANGAS: Crochetam-se em redondo, de cima para baixo, a partir das cavas, começando a meio sob a manga, pelo direito. CARREIRA 1: 6 pc (= 1 pa + 3 pc), *1 pa no aro seguinte, 3 pc*, repetir de * a * 16-17-18-19-20-21 vezes ao todo, terminar com 1 pbx no 3.º pc. CARREIRA 2: 5 pc, *1 pa no aro seguinte, 3 pc*, repetir de * a * 16-17-18-19-20-21 vezes ao todo, 1 pc, terminar com 1 pbx no 3.º pc no princípio da carreira. Repetir as carreiras 1 e 2 - AO MESMO TEMPO, diminuir 1 pa + 3 pc no princípio da 4.ª-6.ª-6.ª-8.ª-8.ª-6.ª carreira, crochetando 2 pa juntamente – VER DIMINUIÇÕES – a meio sob a manga. Repetir estas diminuições a cada 6-6-6-4-4-4 carreiras = 12-12-13-13-14-14 pa. Continuar em redondo sem diminuir até a manga medir cerca de 56 cm em todos os tamanhos. Arrematar. Crochetar a outra manga da mesma maneira. |
||||||||||||||||||||||
Explicações do diagrama |
||||||||||||||||||||||
|
||||||||||||||||||||||
 |
||||||||||||||||||||||
 |
||||||||||||||||||||||
Terminou este projecto?Então, identifique as suas fotos com as tags #dropspattern #aroundtheworldcardigan ou mostre-as na galeria #dropsfan. Precisa de ajuda para este modelo?Encontrará 7 turotiais em vídeo, uma rubrica Comentários/Perguntas e muito mais ao visitar a página do modelo em www.garnstudio.com © 1982-2026 DROPS Design A/S. Todos os direitos reservados. Este documento, incluuindo as suas su-secções, tem copyrights. Saia mais o que pode fazer com os nossos modelos no fim de cada uma das páginas do nosso site. |
||||||||||||||||||||||


Com mais de 40 anos no design de modelos de tricô e de croché, a DROPS Design oferece uma das mais vastas colecções demodelos gratuitos na Internet - traduzidos em 17 línguas. Neste dia de hoje, temos 324 catálogos e 12290 modelos - dos quais 12271 estão traduzidos em português.
Trabalhamos com muito empenho para lhe proporcionar o melhor que o tricô e o croché têm para oferecer, para lhe fornecer inspiração e conselhos bem como fios da mais elevada qualidade a preços incríveis! Gostaria de usar os nossos modelos para outros fins que não uso pessoal? Pode ler o que lhe é permitido fazer no Copyright texto que se encontra na parte de baixo de todos os nossos modelos. Bom tricô! Bom croché!
Deixe um comentário acerca do modelo DROPS 156-42
Gostaríamos muito de saber o que tem a dizer-nos acerca deste modelo!
Se deixar uma pergunta acerca do modelo, certifique-se de que escolhe a categoria adequada no formulário abaixo para acelerar o processo relativo à resposta. Os campos obrigatórios estão assinalados com um *.