
Categorias populares
Procura um fio?


Comentários / Perguntas (36)
![]() Lynn Hanrahan escreveu:
Lynn Hanrahan escreveu:
Dear Judy, Lynn Hanrahan here again . I just started the sleeve and got the rib pattern completed. I am now at the part of the pattern where i changed to larger needles. So now im susposed to continue as follows: 2 sts stockette st, p1 over 52 sts, stockinette st. When the piece measures 12cm inc 1 at each side a total of 18 times alternately every 4th and 5th row = 92 sts.
10.12.2022 - 16:28DROPS Design respondeu:
Dear Lynn, work 2 sts in stockinette stitch, repeat the pattern M.1 over 52 stitches and work the last 2 sts in stockinette stitch. Continue this way. When the piece measures 12 cm, start increasing 1 stitch at each side 18 times every 4th and 5th row alternately. That is, increase 1 st at the beginning and at the end of the row and repeat this increase every 4th and 5th row alternately. You need to work these increases 18 times (so you will have increased 36 sts after finishing all increases). 56 initial sts + 2 sts* 18 times = 92 sts. Happy knitting!
11.12.2022 - 21:16
![]() Lynn Hanrahan escreveu:
Lynn Hanrahan escreveu:
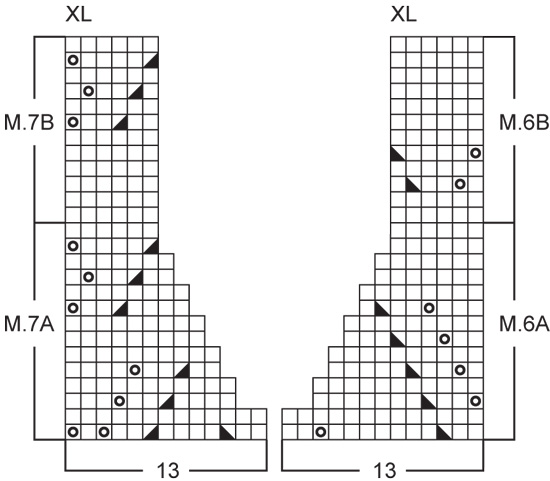
I am at the part of "when the piece measures approx 43 cm etc." How do i complete this part ? I am doing size XL
05.12.2022 - 14:56DROPS Design respondeu:
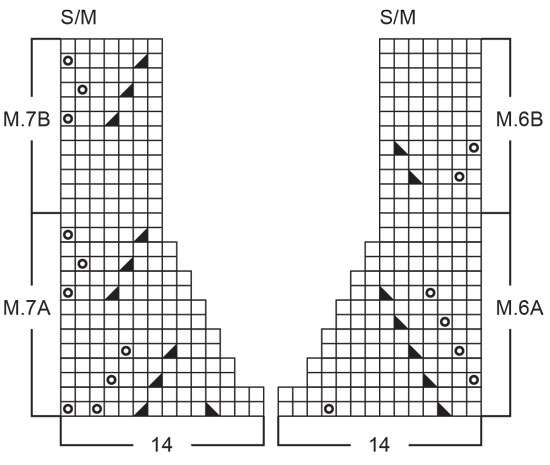
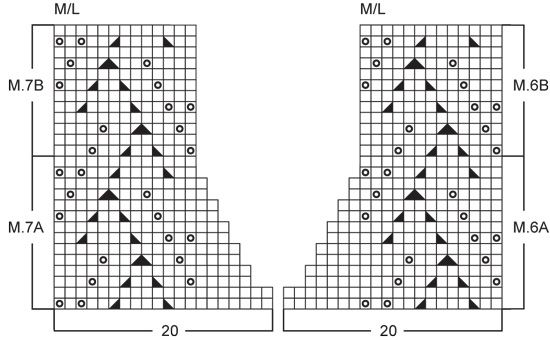
Dear Mrs Hanrahan, make sure you have finished a whole M.1 in height (work more or less cm if needed), then work: 1 st in stocking st, 26 sts in M.1, M.6A (13 sts in XL), bind off 13 sts for the neck, M.7A (13 sts in XL), work 26 sts of M.1 and 1 st in stocking stitch. Work now each shoulder separately, slip the stitches before the cast of sts (seen from RS) on a thread/st holder and work the first shoulder casting off for neck as shown in the diagram M.7/M.6. Happy knitting!
06.12.2022 - 10:35
![]() Lynn Hanrahan escreveu:
Lynn Hanrahan escreveu:
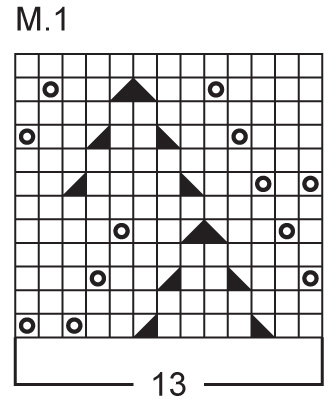
Can you explain to me what you do after the first row.The pattern is wisteria weaving
30.10.2022 - 20:50DROPS Design respondeu:
Hi Lynn, You work 6 rows of rib (K2, P4), with 1 edge stitch in garter stitch (knitted from both the right and wrong sides). After these 6 rows you change to needle size 4.5 mm and work M.1. Happy knitting!
31.10.2022 - 06:48
![]() Annette Kierkegaard Priess escreveu:
Annette Kierkegaard Priess escreveu:
Jeg er ved at strikke første ærme i str l/xl, og er nu færdig med at lukke af til ærmekuppel 4 x 1, 2 x 5 og 1x1, så står der at jeg videre skal lukke 2 masker af til arb måler 55 cm, er det stadig hver anden pind flere gange? Hvor mange masker ender man med, når ærmet er helt færdigt?
09.05.2022 - 15:33DROPS Design respondeu:
Hej Annette, ja det er på hver 2.pind til du når de 55 cm. Det gør du for at ærmekuplen skal blive afrundet. Antal masker du har tilbage er afhængig af hvor mange cm du har tilbage :)
11.05.2022 - 07:50
![]() Giorgia escreveu:
Giorgia escreveu:
Un'ulteriore domanda da principiante: per il modellamento del collo(taglia S/M) devo intrecciare le maglie? Sempre sul ferro rovescio per M6A, e invece per M7A sempre ad inizio ferro, quindi sul diritto del lavoro?
18.02.2022 - 09:50DROPS Design respondeu:
Buonasera Giorgia, deve seguire i motivo M6A e M7A per modellare il collo. Buon lavoro!
22.02.2022 - 22:43
![]() Angela escreveu:
Angela escreveu:
If I increase 2 stitches evenly across the first row of the pattern, then surely the subsequent pattern rows will not sit correctly above this evenly increased first row? I’m knitting the M/L size and the pattern will repeat 8 times with 2 stitches left over. Are these extra 2 stitches not meant to be edge stitches? Or should I knit an increase row and start the pattern rows after this, then I can naturally knit the extra stitches one at each end without compromising the pattern repeats?
17.02.2022 - 15:17DROPS Design respondeu:
Dear Angela, in the 2nd size you will work M.1 as follows: 1 edge stitch, repeat a total of 8 times the 13 stitches in the diagram M.1 and end with 1 edge stitch 1+ 8x13 + 1 =106 sts. Happy knitting!
17.02.2022 - 16:16
![]() Giorgia escreveu:
Giorgia escreveu:
Arrivata a 34 cm e finito interamente il Motivo1, lavoro 14 m. a m. rasata ad ogni lato del lavoro. Il successivo ferro lo lavoro tutto a rovescio. È dal 3° ferro che iniziò ad intrecciare ad ogni lato per lo scalfo? Grazie per la risposta
17.02.2022 - 12:30DROPS Design respondeu:
Buonasera Giorgia, può procedere in questo modo. Buon lavoro!
22.02.2022 - 22:46
![]() Giorgia escreveu:
Giorgia escreveu:
C'è un errore nella spiegazione delle maniche: avviare 56 m. (di cui 1 m. di vivagno a legaccio ad ogni lato). Dopo aver lavorato 10 cm a coste scrivete di passare ai ferri + grandi e lavorare come segue: "2 m. a m. rasata, il motivo 1 sulle 52 m. successive , 2 m. a m. rasata" ..per un totale quindi di 56 m. Ora le 2 maglie di vivagno da lavorare a legaccio che fine hanno fatto?
14.11.2021 - 15:35DROPS Design respondeu:
Buonasera Giorgia, abbiamo inoltrato la sua richiesta al settore design. Se ci saranno delle correzioni le potrà trovare direttamente online. Buon lavoro!
28.12.2021 - 16:57
![]() Bine escreveu:
Bine escreveu:
Wie wird das Dreieck im Diagramm gestrickt?
08.07.2021 - 12:57DROPS Design respondeu:
Liebe Bine, das Dreieck = das 4. Symbol (= 1 M re abheben, 1 re, die abgehobene M über die gestrickte ziehen) + das 3. Symbol (= 2 re zusammen), dh es sind 2 Abnahmen nebeneindander. Viel Spaß beim stricken!
08.07.2021 - 13:42
![]() Alessia escreveu:
Alessia escreveu:
Buonasera, sto lavorando una taglia S/M. Potreste aiutarmi a capire meglio questo passaggio? "intrecciare per l’arrotondamento della manica a ogni lato a f. alterni: 4 m. 1 volta, 2 m. 4 volte, 1 m. 2 volte, poi intrecciare 2 m. a ogni lato... e poi intrecciare 4 m. 1 volta." "A ogni lato a ferri alterni" significa che devo diminuire all'inizio di ogni ferro, cioè lato dx sempre a dritto e lato sx sempre a rovescio, fino alla fine delle diminuzioni? Grazie
16.02.2021 - 18:56DROPS Design respondeu:
Buonasera Alessia, si, esatto, è corretta la sua interpretazione. Buon lavoro!
16.02.2021 - 22:33
|
|||||||||||||
Wisteria Weaving |
|||||||||||||
|
|
|||||||||||||
Pulôver DROPS em Muskat
DROPS 73-5 |
|||||||||||||
|
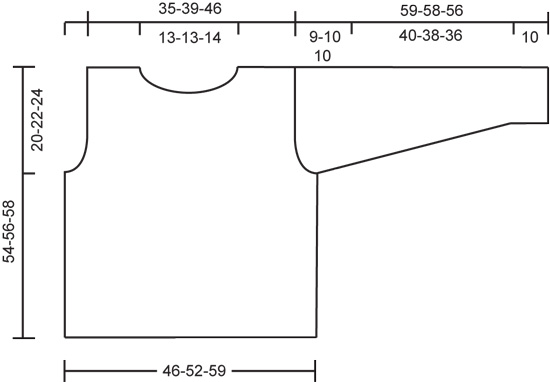
---------------------------------------------------------- NOTA: Existem termos diferentes de tricô e croché em português de Portugal e do Brasil. TRICÔ : Malha = Ponto Canelado = Barra Ponto Jarreteira = Cordões de Tricô Ponto Liga = Ponto Tricô CROCHÉ : mpa – meio ponto alto pa – ponto alto pad – ponto alto duplo pat – ponto alto triplo pb – ponto baixo pbx – ponto baixíssimo pc – ponto corrente ---------------------------------------------------------- AMOSTRA : 20 ms/pts x 26 carreiras = 10 x 10 cm com as agulhas 5 mm no ponto fantasia 1 motivo de M1 = 7 cm de largura CANELADO/BARRA : * 2 ms/pts meia, 4 ms/pts liga/tricô * repetir de * a * PONTO JARRETEIRA em idas e voltas : tricotar todas as carreiras em meia PONTO FANTASIA : ver os diagramas. Os diagramas mostram o ponto fantasia pelo direito. Nota : M6 e M7 (= decote) são diferentes consoante os tamanhos – usar o diagrama apropriado para o seu tamanho. FRENTE Com as agulhas 4 mm montar 92-104-116 ms/pts. Tricotar 6 carreiras em canelado/barra, com 1 m/p ourela em ponto jarreteira de cada lado. Continuar com as agulhas 5 mm e tricotar M1, distribuindo 1-2-3 aumentos na 1.ª carreira = 93-106-119 ms/pts (as ms/pts ourela não devem ser tricotadas no ponto fantasia M1). A cerca de 34 cm de altura total – ajustar a altura para depois de um motivo inteiro de M1 – tricotar a carreira seguinte (pelo direito) : 14 ms/pts em ponto meia, M1 nas 65-78-91 ms/pts seguintes, 14 ms/pts em ponto meia. Continuar no ponto fantasia M1 e em ponto meia de cada lado e arrematar para as cavas de cada lado a cada 2 carreiras : 1 x 4 ms/pts, 2 x 2 ms/pts e 3-5-5 x 1 m/p = 71-80-93 ms/pts. Continuar no ponto fantasia com 3-1-1 ms/pts em ponto meia de cada lado. A cerca de 43 cm de altura total (ajustar a altura para depois de um motivo inteiro de M1) tricotar a carreira seguinte : 3-1-1 ms/pts em ponto meia, 13-13-26 ms/pts em M1, M6A (ver diagrama apropriado para o seu tamanho) nas 14-20-23 ms/pts seguintes, arrematar 11-12-13 ms/pts para o decote, tricotar M7A (ver diagrama apropriado para o seu tamanho) nas 14-20-13 ms/pts seguintes, 13-13-26 ms/pts em M1 e 3-1-1 ms/pts em ponto meia. Formar o decote seguindo os diagramas M6A e M7A. Quando as diminuições para o decote estão acabadas, restam 23-27-33 ms/pts para cada ombro. Continuar em M6B e M7B nas 7-13-6 ms/pts no lado do decote até ao fim, tricotar as outras m/ps como antes. À 54-56-58 cm de altura total, arrematar todas as ms/pts. COSTAS Montar e tricotar como se fez para a frente. Formar as cavas como se fez para a frente e continuar até 52-54-56 cm de altura total. Arrematar, então, as 23-24-25 ms/pts centrais para o decote e, depois, 1 m/p no lado do decote na carreira seguinte = 23-27-33 ms/pts para cada ombro. A 54-56-58 cm de altura total, arrematar todas as ms/pts. MANGAS Com as agulhas 4 mm montar 56-56-56 ms/pts e tricotar em canelado/barra durante 10 cm, com 1 m/p ourela de cada lado em ponto jarreteira. Continuar com as agulhas 5 mm da seguinte maneira : 2 ms/pts em ponto meia, M1 nas 52 ms/pts seguintes, 2 ms/pts em ponto meia. A 12 cm de altura total, aumentar 1 m/p de cada lado 10-14-18 vezes : Tamanho S/M : a cada 10 carreiras Tamanho M/L : alternadamente a cada 6 e 7 carreiras Tamanho XL : alternadamente a cada 4 e 5 carreiras =76-84-92 ms/pts – tricotar os aumentos em ponto meia. A 50-48-46 cm de altura total, arrematar de cada lado a cada 2 carreiras (não fazer as laçadas do ponto mesmo se são tricotadas juntamente) : 1 x 4 ms/pts, 4-5-5 x 2 ms/pts, 2-2-1 x 1 m/p, depois, 2 ms/pts até 58-57-55 cm de altura total e, por fim, 1 x 4 ms/pts. Arrematar as restantes ms/pts A manga mede cerca de 59-58-6 cm MONTAGEM : Costurar o ombro direito GOLA : Com as agulhas 4 mm levantar cerca de 80-90 ms/pts à volta do decote. Tricotar 4 carreiras em ponto jarreteira e arrematar. Costurar o ombro esquerdo e a gola. Montar as mangas e costurar as mangas e os lados nas ms/pts ourela. CINTO : Com as agulhas de pontas duplas 3 mm, montar 7 ms/pts. Tricotar 1 carreira meia, *passar as ms/pts para o lado direito da agulha sem virar, puxar o fio para o avesso e tricotar 1 carreira da mesma maneira que a carreira precedente * repetir de * a *. Para um efeito mais perfeito, puxar o fio da carreira precedente à medida que for tricotando. Arrematar a cerca de 120-150 cm de altura total. |
|||||||||||||
Explicações do diagrama |
|||||||||||||
|
|||||||||||||
 |
|||||||||||||
 |
|||||||||||||
 |
|||||||||||||
 |
|||||||||||||
 |
|||||||||||||
Terminou este projecto?Então, identifique as suas fotos com as tags #dropspattern ou mostre-as na galeria #dropsfan. Precisa de ajuda para este modelo?Encontrará 19 turotiais em vídeo, uma rubrica Comentários/Perguntas e muito mais ao visitar a página do modelo em www.garnstudio.com © 1982-2026 DROPS Design A/S. Todos os direitos reservados. Este documento, incluuindo as suas su-secções, tem copyrights. Saia mais o que pode fazer com os nossos modelos no fim de cada uma das páginas do nosso site. |
|||||||||||||


Com mais de 40 anos no design de modelos de tricô e de croché, a DROPS Design oferece uma das mais vastas colecções demodelos gratuitos na Internet - traduzidos em 17 línguas. Neste dia de hoje, temos 324 catálogos e 12290 modelos - dos quais 12271 estão traduzidos em português.
Trabalhamos com muito empenho para lhe proporcionar o melhor que o tricô e o croché têm para oferecer, para lhe fornecer inspiração e conselhos bem como fios da mais elevada qualidade a preços incríveis! Gostaria de usar os nossos modelos para outros fins que não uso pessoal? Pode ler o que lhe é permitido fazer no Copyright texto que se encontra na parte de baixo de todos os nossos modelos. Bom tricô! Bom croché!
Deixe um comentário acerca do modelo DROPS 73-5
Gostaríamos muito de saber o que tem a dizer-nos acerca deste modelo!
Se deixar uma pergunta acerca do modelo, certifique-se de que escolhe a categoria adequada no formulário abaixo para acelerar o processo relativo à resposta. Os campos obrigatórios estão assinalados com um *.