
Categorias populares
Procura um fio?


Comentários / Perguntas (84)
![]() Kathrine Normann Olsen escreveu:
Kathrine Normann Olsen escreveu:
Rigtig fin hat, som det er lykkedes mig at få lavet efter denne opskrift og ved at læse svar på de mange spørgsmål. Jeg vil gerne foreslå, at diagrammet tilføjes rækkenumre eller en “start her pil”. Jeg troede nemlig, at jeg skulle starte med standmasker, som er det nederste i diagrammet. Det ville også have hjulpet, hvis der havde stået, at man skulle tilføje YDERLIGERE en dstgm ved hver af de sidste 4 rækker, så man har 7, 8, 9, 10 og 11 i hver gruppe.
09.08.2022 - 20:19DROPS Design respondeu:
Hej Kathrine, tak for tipset. Vi anbefaler at se på videoen vi har lavet til denne opskrift :)
10.08.2022 - 07:42
![]() Maria Afonso escreveu:
Maria Afonso escreveu:
I liked the pattern and will try making it for the first time. Thank You
14.05.2022 - 19:22
![]() Susanna Malmsten escreveu:
Susanna Malmsten escreveu:
Många riktigt usla drops mönster har jag försökte att tolka och själv göra om så att de fungerar i verkligen, men detta mönster slår verkligen alla rekord! Det måste vara något riktigt grundläggande fel! Nu har jag virkat om det 3 gånger och det blir INTE en hattliknande form utan snarare som en platt duk. Vad gör jag för fel alternativt vad är fel i mönstret?
30.09.2021 - 21:22
![]() Yu-Chi escreveu:
Yu-Chi escreveu:
Hi, I followed the pattern, but the hat turned out to be not so flat as the photo, especially the fans part , and the brim looks wider than the photo. What could be wrong? :(
11.09.2021 - 16:18
![]() Åsa escreveu:
Åsa escreveu:
Jag har precis samma problem som Klara har beskrivit tidigare i frågorna. Mitt arbete blir bara vidare hela tiden. När jag har virkat varv 9-10 (S/M) och gör minskningarna enl mönstret, så får hatten en mycket konstig form. Vad gör jag för fel?
28.06.2021 - 11:33DROPS Design respondeu:
Hej Åsa, har du set videon som ligger nederst i mönsteret ?
30.06.2021 - 13:45
![]() Maria Joly escreveu:
Maria Joly escreveu:
I love the pattern, it turned out very nice, thank you so much
14.05.2021 - 15:57
![]() Klara escreveu:
Klara escreveu:
Dear Garnstudio, I am working on Glimpse of spring hat. I have done the double crochet rounds and two rounds of diagram pattern. The hat is getting very wide, instead of making hat shape. Would you know what I might be doing wrong? Basicly I do shell stich: 5 tr, skip 2, sc, skip 2, 5tr, etc. Would you know why is my hat getting wide? It looks more like a placemat than a hat. Thank you for your reply. Klara
01.04.2021 - 21:06
![]() Anna Yafi escreveu:
Anna Yafi escreveu:
Thank you!!! I bought 4 balls of this exact drops serie and color to try reproduce the same result, we will see:)
16.02.2021 - 01:34
![]() Anna Yafi escreveu:
Anna Yafi escreveu:
Not sure I made myself clear on the first question, just wanted to ask, at the beginning, should we have overall 8 or 9 rows of double crochets? In other terms, after the increase row of 85 (size S), it says to continue in Pattern A1, A2 13 times ... Should we continue with the base of row of double crochet in the diagram? on directly with the shell stitches? If we do the double crochet base, then we would have only 1 remaining row of shell stitches, unlike the photo
12.02.2021 - 15:59DROPS Design respondeu:
Dear Mrs Yafi, when you have worked to row 8 and there are 85 sts on the round, you now crochet the pattern following diagrams with first row on fans (the row with dc at the beg just shows how to crochet the stitches on first round in the pattern). Happy crocheting!
15.02.2021 - 06:46
![]() Anna Yafi escreveu:
Anna Yafi escreveu:
Not sure I made myself clear on the first question, just wanted to ask, at the beginning, should we have overall 8 or 9 rows of double crochets? In other terms, after the increase row of 85 (size S), it says to continue in Pattern A1, A2 13 times ... Should we continue with the base of row of double crochet in the diagram? on directly with the shell stitches? If we do the double crochet base, then we would have only 1 remaining row of shell stitches, unlike the photo
12.02.2021 - 15:55
|
||||||||||||||||
Glimpse of Spring#glimpseofspringhat |
||||||||||||||||
|
|
||||||||||||||||
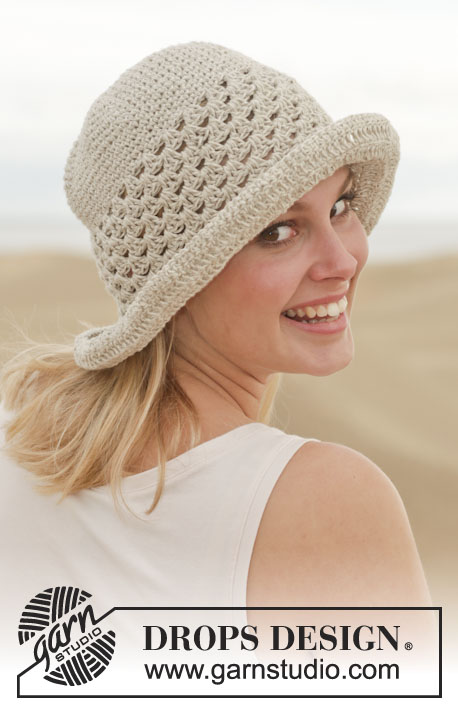
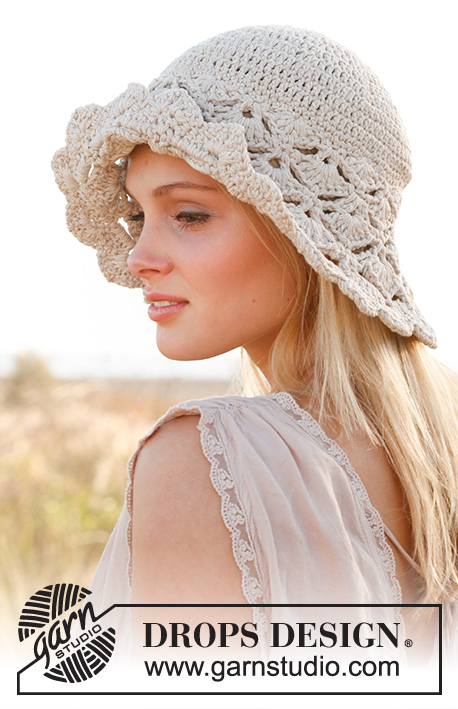
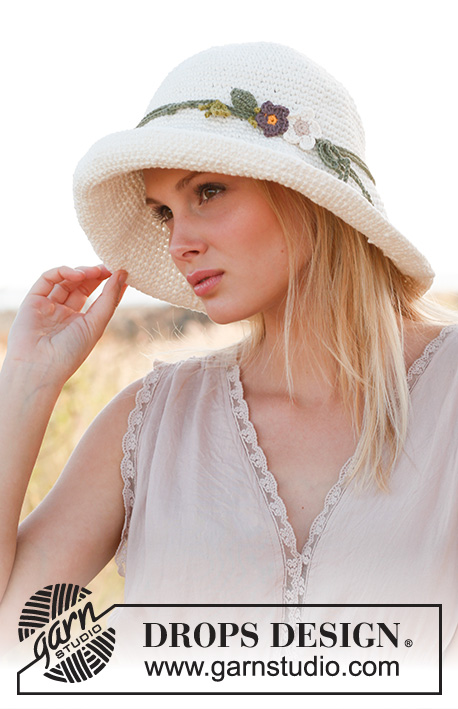
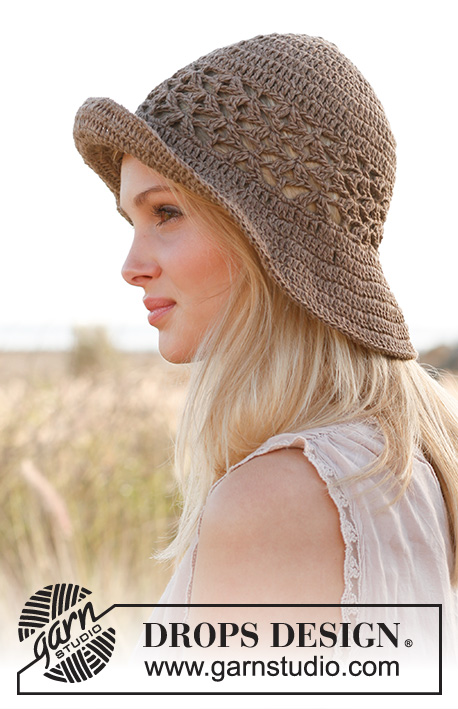
Chapéu DROPS em croché, em "Muskat".
DROPS 153-36 |
||||||||||||||||
|
---------------------------------------------------------- NOTA: Existem termos diferentes de tricô e croché em português de Portugal e do Brasil. TRICÔ : Malha = Ponto Canelado = Barra Ponto Jarreteira = Cordões de Tricô Ponto Liga = Ponto Tricô CROCHÉ : mpa – meio ponto alto pa – ponto alto pad – ponto alto duplo pat – ponto alto triplo pb – ponto baixo pbx – ponto baixíssimo pc – ponto corrente ---------------------------------------------------------- DICA CROCHÉ: No princípio de cada carreira de pa, substituir o 1.º pa por 3 pc. Terminar cada carreira de pa com 1 pbx no 3.º pc do princípio da carreira (= no 1.º pa). No princípio de cada carreira de pb, substituir o 1.º pb por 1 pc. Terminar cada carreira de pb com 1 pbx no pc do princípio da carreira. AUMENTOS: Para aumentar 1 pa ou 1 pb, crochetar 2 pa/pb no mesmo ponto. PONTO FANTASIA: Ver diagramas A.1 a A.3. ---------------------------------------------------------- CHAPÉU : Montar uma corrente de 5 pc com a agulha de croché 4 mm e 1 fio Muskat e unir em redondo com 1 pbx no 1.º pc. VER DICA CROCHÉ! CARREIRA 1: 10 (10) pa no aro de pc. CARREIRA 2: 2 pa em cada pa = 20 (20) pa. CARREIRA 3: *1 pa no pa seguinte, 2 pa no pa seguinte*, repetir de * a * = 30 (30) pa. CARREIRA 4: *1 pa em cada um dos 2 pa seguintes, 2 pa no pa seguinte*, repetir de * a * = 40 (40) pa. CARREIRAS 5-8 (5-9): Continuar a aumentar da mesma maneira, ou seja, aumentar 10 pa em cada carreira, colocar os aumentos uns acima dos outros, ou seja, temos 1 pa a mais entre os aumentos em cada carreira. Aumentar como antes com 2 pa num pa e, AO MESMO TEMPO, na carreira 8 (9), aumentar mais 5 (1) pa a intervalos regulares – VER AUMENTOS = 85 (91) pa. A peça mede 9 (10) cm. CARREIRAS 9-10 (10-11): Continuar então no PONTO FANTASIA da seguinte maneira: Crochetar A.1, depois, 13 (14) vezes A.2, e terminar com A.3. Na carreira seguinte, crochetar da seguinte maneira: CARREIRA 1: 1 pb no 1.º pb da carreira precedente, saltar 1 pad, 1 pb em cada um dos 2 pad seguintes, *1 pb em cada um dos 3 pad seguintes, saltar 1 pad, 1 pb no pb seguinte, saltar 1 pad, 1 pb em cada um dos 2 pad seguintes*, repetir de * a * até restarem 4 pad, 1 pb em cada um dos 4 últimos pad = 85 (91) pb. CARREIRA 2: 1 pc, * 1 pb no pb seguinte, 1 pc, saltar 1 pb*, repetir de * a * em toda a carreira e terminar com 1 pbx no 1.º pc do princípio da carreira. CARREIRA 3: 1 pb no pc seguinte, *1 pb no pb seguinte, 1 pb no pc seguinte*, repetir de * a * em toda a carreira e, ao mesmo tempo, aumentar 6 (12) pb a intervalos regulares = 91 (103) pb. Terminar com 1 pbx no 1.º pb do princípio da carreira. ORLA : Continuar para a orla da seguinte maneira: CARREIRA 1: Crochetar, então, no PONTO FANTASIA da seguinte maneira: A.1, depois, 14 (16) vezes A.2, e terminar com A.3. CARREIRAS 2-5: Continuar no ponto fantasia A.1, A.2 e A.3 e, AO MESMO TEMPO, aumentar 1 pad em cada grupo de pad (ou seja, a partir da 2.ª carreira, crochetar 8 pad para cada grupo de pad). Continuar da mesma maneira e aumentar cada grupo de pad com 1 pad em todas as carreiras. Depois da 5.ª carreira da orla estar feita, crochetar 1 pb em cada pad da carreira precedente. Arrematar. CORDÃO: Cortar 8 fios com 3 metros de comprimento cada um. Torcê-los juntamente até oferecerem resistência, dobrar o cordão ao meio e deixá-lo enrolar-se. Fazer um nó numa das extremidades, enfiar o cordão entre os pequenos buracos da 2.ª carreira depois da 1.ª secção de grupos de pa. Ajustar o comprimento do cordão e fazer um nó na outra extremidade. |
||||||||||||||||
Explicações do diagrama |
||||||||||||||||
|
||||||||||||||||
 |
||||||||||||||||
Terminou este projecto?Então, identifique as suas fotos com as tags #dropspattern #glimpseofspringhat ou mostre-as na galeria #dropsfan. Precisa de ajuda para este modelo?Encontrará 11 turotiais em vídeo, uma rubrica Comentários/Perguntas e muito mais ao visitar a página do modelo em www.garnstudio.com © 1982-2026 DROPS Design A/S. Todos os direitos reservados. Este documento, incluuindo as suas su-secções, tem copyrights. Saia mais o que pode fazer com os nossos modelos no fim de cada uma das páginas do nosso site. |
||||||||||||||||


Com mais de 40 anos no design de modelos de tricô e de croché, a DROPS Design oferece uma das mais vastas colecções demodelos gratuitos na Internet - traduzidos em 17 línguas. Neste dia de hoje, temos 324 catálogos e 12290 modelos - dos quais 12271 estão traduzidos em português.
Trabalhamos com muito empenho para lhe proporcionar o melhor que o tricô e o croché têm para oferecer, para lhe fornecer inspiração e conselhos bem como fios da mais elevada qualidade a preços incríveis! Gostaria de usar os nossos modelos para outros fins que não uso pessoal? Pode ler o que lhe é permitido fazer no Copyright texto que se encontra na parte de baixo de todos os nossos modelos. Bom tricô! Bom croché!
Deixe um comentário acerca do modelo DROPS 153-36
Gostaríamos muito de saber o que tem a dizer-nos acerca deste modelo!
Se deixar uma pergunta acerca do modelo, certifique-se de que escolhe a categoria adequada no formulário abaixo para acelerar o processo relativo à resposta. Os campos obrigatórios estão assinalados com um *.