
Categorias populares
Procura um fio?


Comentários / Perguntas (59)
Sandra escreveu:
I'm a beginner and the finished product was too tight at the end. What did I do wrong?
12.12.2018 - 15:21DROPS Design respondeu:
Dear Sandra, did you get the correct tension? You should have 17 dc (UK)/ sc (US) = 10 cm/4" in width - and keep the same tension while working the hat. Happy crocheting!
12.12.2018 - 16:10Libby escreveu:
Hi, first of all great pattern it comes out really good! My question is, do I keep decrease as I go along from the black or do I decrease only once in the black row in this pattern? I hope you understand my question
14.11.2018 - 14:24DROPS Design respondeu:
Dear Libby, you decrease only 1 time 12-14 sts on one round (the first round after the 3 rounds with medium brown) = there are now 76-82 sts continue working the last 6 rounds without decreasing anymore. Happy crocheting!
14.11.2018 - 15:04
![]() Angelina escreveu:
Angelina escreveu:
How do I stop the spiral? There's not obvious transition from the beginning of the spiral to the end, so I can't tell where to put my sl st before I change colors.
16.08.2018 - 02:12DROPS Design respondeu:
Dear Angelina, for a nicer transition for the stripes, add a marker in the first st of every round and let the marker follow the piece so that you can sl st the last st with first colour in this stitch. You can also continue working in the round in a spiral with the new colour, the transition will be quite smooth. Happy crocheting!
16.08.2018 - 09:37Lyn escreveu:
Thanks for your prompt reply and video. I understand working in the round but it doesn't work the same in a spiral for me. Is the jog unavoidable in this situation
23.05.2018 - 15:02DROPS Design respondeu:
Dear Lynn, when working stripes, stop the spiral and join in the round with the technique shown in the video will avoid you a jog at the beg of round. Happy crocheting!
23.05.2018 - 16:07Lyn escreveu:
I am failing to be able to join my spiral stripes without the "jog" despite reading an earlier comment you made. "before changing colour you can join with a sl st with the new colour and continue as before without joining until next stripe, you will then avoid a jog at the back of hat" It sounds simple enough but not working for me. Can you suggest what I'm missing in the interpretation n explain again
23.05.2018 - 14:24Lyn escreveu:
I'm failing to be able to join my spiral stripes without the "jog" despite reading your earlier answer to Lori. I'm obviously not interpreting something correctly "before changing colour you can join with a sl st with the new colour and continue as before without joining until next stripe, you will then avoid a jog at the back of hat" It sounds simple enough but it's not working for me..any suggestions what I'm missing.
23.05.2018 - 14:18DROPS Design respondeu:
Dear Lynn, this video shows how to change colour at the end of round, ie work the beg of st with first colour (same of the round you are finishing) and make the last pull through with the colour used on next round. Happy crocheting!
23.05.2018 - 14:39
![]() Lori escreveu:
Lori escreveu:
Because the rows are worked in a spiral, my stripes are not straight at the join. Any advice?
06.04.2018 - 06:21DROPS Design respondeu:
Dear Lori, before changing colour you can join with a sl st with the new colour and continue as before without joining until next stripe, you will then avoid a jog at the back of hat. Happy crocheting!
06.04.2018 - 08:47
![]() Sciakath escreveu:
Sciakath escreveu:
I have made two of these now and am on my third -- and I NEVER usually repeat a pattern! These beanies have such a nice weight to them -- not too bulky. I used yarn I had in my stash (Loops & Threads Impeccable) and it worked great. Thanks for the EXCELLENT pattern!
04.03.2018 - 22:12Margarita Lucero Apolonio escreveu:
Podría mandarme el patrón de este gorro
19.03.2017 - 06:55DROPS Design respondeu:
Hola Margarita. Con este línk puedes descargar el patrón gratis: https://www.garnstudio.com/pattern.php?id=6379&cid=23
27.03.2017 - 20:49Danielle escreveu:
It seems to me that this is worked in single crochet, am I wrong?
27.01.2017 - 21:58DROPS Design respondeu:
Dear Danielle, you are right, this hat is worked in sc, crocheting in back loop of sts. See US-English pattern here. Happy crocheting!
30.01.2017 - 10:33
|
|
Carmel |
|
 |
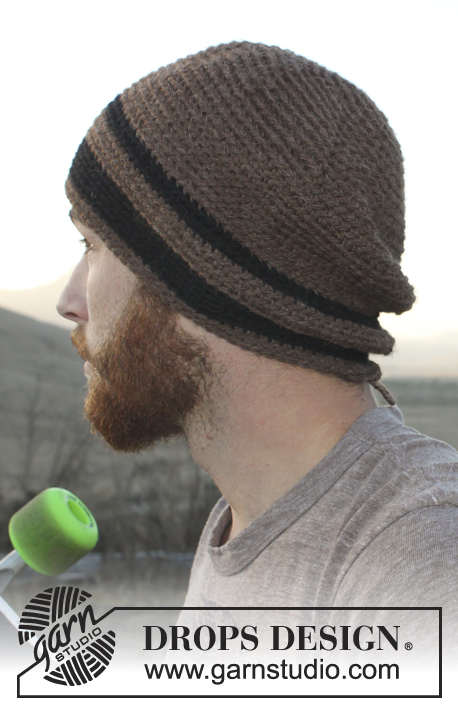 |
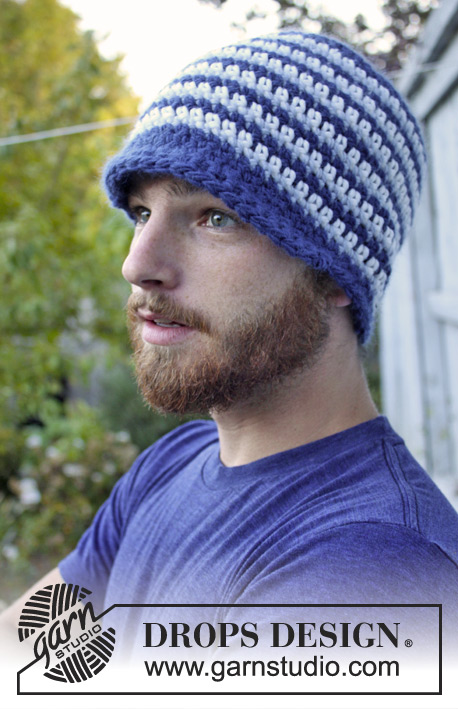
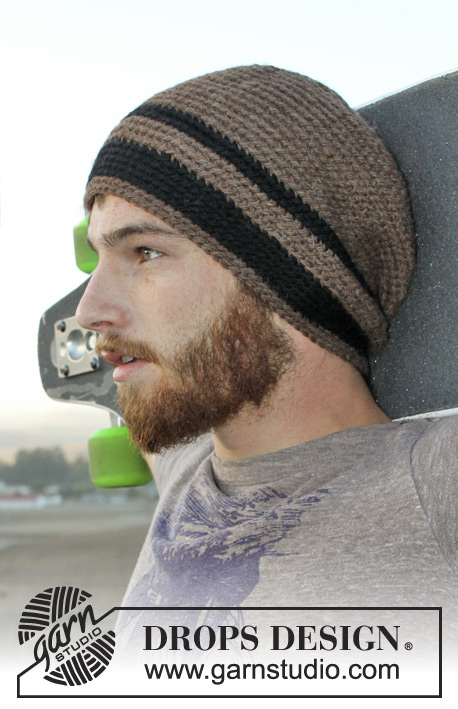
Gorro homem DROPS em croché, em “Nepal”. Do S ao XL
DROPS Extra 0-980 |
|
|
-------------------------------------------------------- DICA CROCHÉ: Depois do último pb da carreira, continuar a carreira seguinte com 1 pb no pb seguinte (= 1.º pb da carreira precedente). NOTA: Colocar um marcador no princípio da carreira entre o último pb e o 1.º pb da carreira, fazer deslizar o marcador à medida que for crochetando. Crochetar os pb no pau de trás dos pontos para criar uma textura às riscas. ARO MÁGICO : Quando se crocheta em redondo, começar com esta técnica permite evitar um buraco ao meio (em vez do aro de pc) : Segurar na extremidade do fio e enrolá-la uma vez à volta do dedo indicador para formar um aro. Segurar na argola com o polegar e o dedo médio esquerdo, colocar o fio por cima do dedo indicador esquerdo, enfiar a agulha de croché no aro, fazer 1 laçada e passar o fio pelo aro, crochetar 1 pc, depois, continuar em pb à volta do aro. Quando o número de pb desejado está feito, puxar a extremidade do fio para fechar o aro e continuar a crochetar em redondo, em espiral. DIMINUIÇÕES: Crochetar juntamente aproximadamente a cada 7.º /8.º pb – 6.º /7.º pb da carreira. Crochetar juntamente 2 pb da seguinte maneira: Enfiar a agulha de croché no 1.º pb e puxar 1 argola, enfiar a agulha de croché no pb seguinte e puxar 1 argola, fazer 1 laçada e crochetar juntamente todas as argolas que estão na agulha de croché. -------------------------------------------------------- GORRO: Com a agulha de croché 5 mm e o fio castanho, fazer um ARO MÁGICO – ver acima -, ou montar uma corrente de pc e unir em redondo com 1 pbx no 1.º pc. VER DICA CROCHÉ! CARREIRA 1: 8 pb no aro mágico/aro de pc. Crochetar então em pb enfiando apenas a agulha no pau de trás de cada um dos pontos. CARREIRA 2: 2 pb em cada pb = 16 pb. CARREIRA 3: *1 pb no 1.º pb, 2 pb no pb seguinte*, repetir de * a * = 24 pb. CARREIRA 4: *1 pb em cada um dos 2 pb seguintes, 2 pb no pb seguinte*, repetir de * a * = 32 pb. CARREIRA 5: 1 pb em cada pb = 32 pb. NÃO ESQUECER DE MANTER A MESMA TENSÃO DA INDICADA PARA A AMOSTRA! CARREIRA 6: *1 pb em cada um dos 3 pb seguintes, 2 pb no pb seguinte *, repetir de * a * = 40 pb. CARREIRA 7: *1 pb em cada um dos 4 pb seguintes, 2 pb no pb seguinte *, repetir de * a * = 48 pb. CARREIRA 8: *1 pb em cada um dos 5 pb seguintes, 2 pb no pb seguinte *, repetir de * a * = 56 pb. CARREIRA 9: *1 pb em cada um dos 6 pb seguintes, 2 pb no pb seguinte *, repetir de * a * = 64 pb. CARREIRA 10: * 1 pb em cada um dos 7 pb seguintes, 2 pb no pb seguinte *, repetir de * a * = 72 pb. CARREIRA 11: *1 pb em cada um dos 8 pb seguintes, 2 pb no pb seguinte *, repetir de * a * = 80 pb. CARREIRA 12: *1 pb em cada um dos 9 pb seguintes, 2 pb no pb seguinte *, repetir de * a * = 88 pb. Os aumentos para o tamanho S/M acabam aqui, continuar em pb, em redondo,. CARREIRA 13: *1 pb em cada um dos 10 pb seguintes, 2 pb no pb seguinte *, repetir de * a * = 96 pb. Os aumentos para o tamanho L/XL acabam aqui, continuar em pb, em redondo,. A 12-15 cm de altura total, crochetar em pb como antes e mudar de cor da seguinte maneira: 2 carreiras em preto, 3 carreiras em castanho, 1 carreira em preto e nesta carreira, diminuir 12-14 pb a intervalos regulares – VER DIMINUIÇÕES (= restam 76-82 pb), 4 carreiras em preto, 2 carreiras em castanho. O gorro mede cerca de 20-23 cm a partir do alto. Arrematar. |
|
Terminou este projecto?Então, identifique as suas fotos com as tags #dropspattern ou mostre-as na galeria #dropsfan. Precisa de ajuda para este modelo?Encontrará 7 turotiais em vídeo, uma rubrica Comentários/Perguntas e muito mais ao visitar a página do modelo em www.garnstudio.com © 1982-2026 DROPS Design A/S. Todos os direitos reservados. Este documento, incluuindo as suas su-secções, tem copyrights. Saia mais o que pode fazer com os nossos modelos no fim de cada uma das páginas do nosso site. |
|


Com mais de 40 anos no design de modelos de tricô e de croché, a DROPS Design oferece uma das mais vastas colecções demodelos gratuitos na Internet - traduzidos em 17 línguas. Neste dia de hoje, temos 324 catálogos e 12290 modelos - dos quais 12271 estão traduzidos em português.
Trabalhamos com muito empenho para lhe proporcionar o melhor que o tricô e o croché têm para oferecer, para lhe fornecer inspiração e conselhos bem como fios da mais elevada qualidade a preços incríveis! Gostaria de usar os nossos modelos para outros fins que não uso pessoal? Pode ler o que lhe é permitido fazer no Copyright texto que se encontra na parte de baixo de todos os nossos modelos. Bom tricô! Bom croché!
Deixe um comentário acerca do modelo DROPS Extra 0-980
Gostaríamos muito de saber o que tem a dizer-nos acerca deste modelo!
Se deixar uma pergunta acerca do modelo, certifique-se de que escolhe a categoria adequada no formulário abaixo para acelerar o processo relativo à resposta. Os campos obrigatórios estão assinalados com um *.