
Categorias populares
Procura um fio?


Comentários / Perguntas (59)
![]() Nataliia escreveu:
Nataliia escreveu:
Hello, could you explain how do I pick the size correctly? I see the widest part S/M has 88 dc and L/XL 96dc. Taking the tension of 17dc/10cm that product width will measure roughly 52cm and 56 respectively. In the meantime the size chart says S/M -58/60 cm and L/XL – 62/64 cm. Is there any mistake?
16.12.2025 - 10:39DROPS Design respondeu:
Dear Natallia, the hat needs to be somewhat tighter than the circumference of the head to stay nicely on place, reason why it's smaller, but piece is elastic enough to stretch around the head. Happy crocheting!
17.12.2025 - 10:14
![]() Brigitte escreveu:
Brigitte escreveu:
Hi do you have a version of this hat for regular hat not a beanie
10.12.2025 - 12:09DROPS Design respondeu:
Dear Brigitte, you will find all our crochet patterns for hat here, for men. One of them might inspire you. Happy crocheting!
11.12.2025 - 08:51
![]() Lydia escreveu:
Lydia escreveu:
He leído la sección del anillo mágico y la información para la elaboración de trabajo, pero no me queda claro cuántos puntos bajos tengo que hacer en el anillo mágico para formarlo. ¿La primera vuelta corresponde a que debo hacer 8 puntos bajos en ese anillo como primer trabajo? Gracias.
01.09.2025 - 13:52
![]() Jeannie escreveu:
Jeannie escreveu:
I see a tip regarding decreases, but I never see the pattern call for any decreases?
22.12.2024 - 03:12DROPS Design respondeu:
Dear Jeannie, you work the decreases at the very end of the pattern: "When piece measures 12-15 cm, work dc as before and change colour as follows: 2 rounds black, 3 rounds medium brown, 1 round black and on this round dec 12-14 dc evenly – READ DECREASE TIP (= 76-82 dc remain)" or, for the US version, "(When piece measures 12-15 cm, work dc as before and change colour as follows: 2 rounds black, 3 rounds medium brown, 1 round black and on this round dec 12-14 dc evenly – READ DECREASE TIP (= 76-82 dc remain)". Happy crochetting!
22.12.2024 - 20:35
![]() Don Lynne escreveu:
Don Lynne escreveu:
I am confused by the decrease section. I want to make the small hat, will I decrease each of the color changing rows by the same number of stitches? How do I know if I work together every 6, 7, or 8th stitch?
11.02.2024 - 19:16DROPS Design respondeu:
Dear Don, for the smallest size you work always as indicated first in a sequence. In the case of the decreases, as indicated in DECREASE TIP, work together every 7th and 8th dc. That is, *6 dc, work the next 2 dc together*. Repeat from * to * 12 times. This is worked only in the black round, where there are no color changes. Happy crochetting!
12.02.2024 - 00:00
![]() Don escreveu:
Don escreveu:
When decreasing for the small hat, do I decrease each row by the same number of work together stitches? I am doing the small hat do I decrease every 6, 7, or 8 stitches?
11.02.2024 - 19:14DROPS Design respondeu:
Dear Don, for the smallest size you work always as indicated first in a sequence. In the case of the decreases, as indicated in DECREASE TIP, work together every 7th and 8th dc. That is, *6 dc, work the next 2 dc together*. Repeat from * to * 12 times. This is worked only in the black round, where there are no color changes. Happy crochetting!
11.02.2024 - 23:59
![]() Anna escreveu:
Anna escreveu:
Ja det har jeg. Ok men det er fellingen jeg trenger hjelp med. Jeg får det ikke til når jeg teller. Kan dere hjelpe meg med det?
22.01.2024 - 14:59DROPS Design respondeu:
Hei Anna. Beklager, men skjønner ikke hva du ikke får til når du teller? Om du har 96 masker og skal felle 14 masker jevnt fordelt, hekler du en omgang der du hekler 2 fastmasker sammen 14 ganger jevnt over omgangen (du hekler ca 4 fastmasker, så 2 fastmasker sammen, så hekler du 5 fastmasker, så 2 fastmasker sammen, så gjentar du dette omgangen ut). Du skal da få 82 masker. mvh DROPS Design
29.01.2024 - 13:16
![]() Anna Johansson escreveu:
Anna Johansson escreveu:
Hei,har et spørsmål om når jeg skall felle av str. L/XL Det står at man skal hekle sammen 7,8-6,7 masker på omgangen. Skal bli 82 masker og 14 masker som felles av. Har tellt mange ganger. For ikke det at stemme. Det blir masker til overs. Hva gjør jeg for feil?
19.01.2024 - 18:48DROPS Design respondeu:
Hei Anna. I str. L/XL har du 96 masker når økningene / 13. omg er ferdig. Så hekler du til arbeidet måler 15 cm, bytt farge og samtidig skal det felles 14 fastmasker jevnt fordelt i str. L/XL = 96 - 14 = 82 fastmasker. mvh DROPS Design
22.01.2024 - 14:08
![]() Abby escreveu:
Abby escreveu:
Row 5 makes the hat have a strange bump … is this meant to be that way?? I don’t understand why it doesn’t just increase evenly … I’m already on row 14 and don’t want to pull it out …
05.01.2024 - 06:03DROPS Design respondeu:
Dear Abby, make sure your tension is right and you still keep it, on 5th round you won't increase, but you will then continue increasing. Happy crocheting!
05.01.2024 - 08:25
![]() Julia escreveu:
Julia escreveu:
Hallo, super tolle und einfache Anleitung allerdings habe ich Probleme mit der Größe. Ich bin Anfänger und das wäre meine zweite Mütze. Der Kopfumfang ist 60 cm und ich habe naach der Anleitung für L/XL gehäkelt. War auch eigentlich schon fertig aber leider war die Mütze immer noch zu Eng. Die hat mir gepasst, ich habe ca einen Umfang von 58 cm. Kann es daran liegen, dass ich vielleicht zu eng gehäkelt habe? Die erste Mütze war nämlich auch zu eng.
03.01.2022 - 08:43DROPS Design respondeu:
Liebe Julia, die Mütze soll immer etwas fester sein, damit die Mütze richtig hält, aber gerne können Sie weniger Maschen abnehmen, je nach der gewünschte Größe/Umfang. Gerne wird Ihnen Ihr Laden damit helfen, auch telefonisch oder per E-Mail. Viel Spaß beim häkeln!
03.01.2022 - 13:17
|
|
Carmel |
|
 |
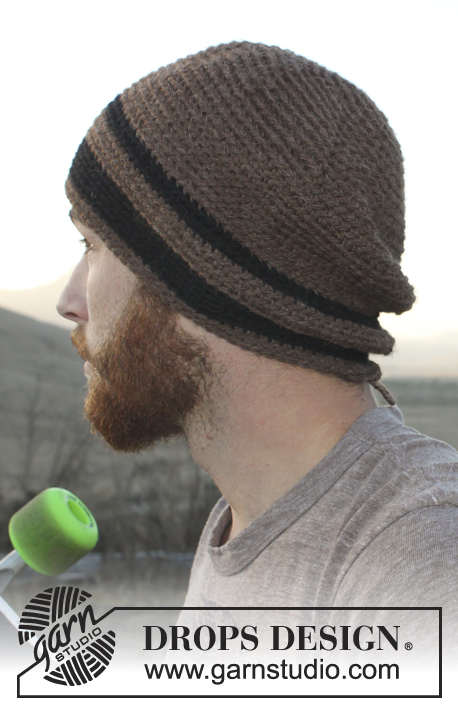 |
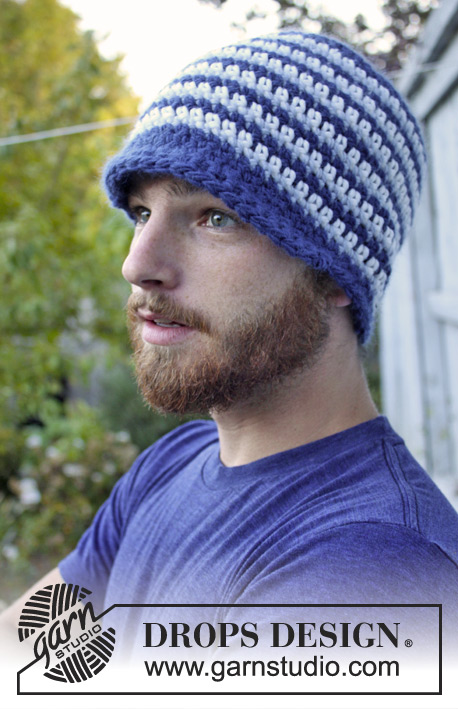
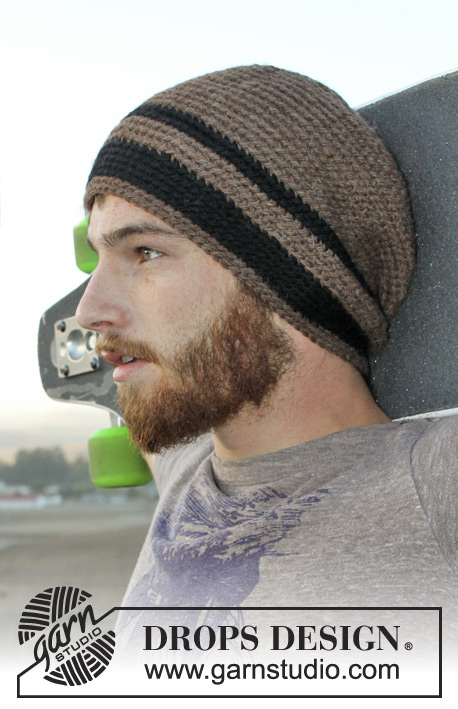
Gorro homem DROPS em croché, em “Nepal”. Do S ao XL
DROPS Extra 0-980 |
|
|
-------------------------------------------------------- DICA CROCHÉ: Depois do último pb da carreira, continuar a carreira seguinte com 1 pb no pb seguinte (= 1.º pb da carreira precedente). NOTA: Colocar um marcador no princípio da carreira entre o último pb e o 1.º pb da carreira, fazer deslizar o marcador à medida que for crochetando. Crochetar os pb no pau de trás dos pontos para criar uma textura às riscas. ARO MÁGICO : Quando se crocheta em redondo, começar com esta técnica permite evitar um buraco ao meio (em vez do aro de pc) : Segurar na extremidade do fio e enrolá-la uma vez à volta do dedo indicador para formar um aro. Segurar na argola com o polegar e o dedo médio esquerdo, colocar o fio por cima do dedo indicador esquerdo, enfiar a agulha de croché no aro, fazer 1 laçada e passar o fio pelo aro, crochetar 1 pc, depois, continuar em pb à volta do aro. Quando o número de pb desejado está feito, puxar a extremidade do fio para fechar o aro e continuar a crochetar em redondo, em espiral. DIMINUIÇÕES: Crochetar juntamente aproximadamente a cada 7.º /8.º pb – 6.º /7.º pb da carreira. Crochetar juntamente 2 pb da seguinte maneira: Enfiar a agulha de croché no 1.º pb e puxar 1 argola, enfiar a agulha de croché no pb seguinte e puxar 1 argola, fazer 1 laçada e crochetar juntamente todas as argolas que estão na agulha de croché. -------------------------------------------------------- GORRO: Com a agulha de croché 5 mm e o fio castanho, fazer um ARO MÁGICO – ver acima -, ou montar uma corrente de pc e unir em redondo com 1 pbx no 1.º pc. VER DICA CROCHÉ! CARREIRA 1: 8 pb no aro mágico/aro de pc. Crochetar então em pb enfiando apenas a agulha no pau de trás de cada um dos pontos. CARREIRA 2: 2 pb em cada pb = 16 pb. CARREIRA 3: *1 pb no 1.º pb, 2 pb no pb seguinte*, repetir de * a * = 24 pb. CARREIRA 4: *1 pb em cada um dos 2 pb seguintes, 2 pb no pb seguinte*, repetir de * a * = 32 pb. CARREIRA 5: 1 pb em cada pb = 32 pb. NÃO ESQUECER DE MANTER A MESMA TENSÃO DA INDICADA PARA A AMOSTRA! CARREIRA 6: *1 pb em cada um dos 3 pb seguintes, 2 pb no pb seguinte *, repetir de * a * = 40 pb. CARREIRA 7: *1 pb em cada um dos 4 pb seguintes, 2 pb no pb seguinte *, repetir de * a * = 48 pb. CARREIRA 8: *1 pb em cada um dos 5 pb seguintes, 2 pb no pb seguinte *, repetir de * a * = 56 pb. CARREIRA 9: *1 pb em cada um dos 6 pb seguintes, 2 pb no pb seguinte *, repetir de * a * = 64 pb. CARREIRA 10: * 1 pb em cada um dos 7 pb seguintes, 2 pb no pb seguinte *, repetir de * a * = 72 pb. CARREIRA 11: *1 pb em cada um dos 8 pb seguintes, 2 pb no pb seguinte *, repetir de * a * = 80 pb. CARREIRA 12: *1 pb em cada um dos 9 pb seguintes, 2 pb no pb seguinte *, repetir de * a * = 88 pb. Os aumentos para o tamanho S/M acabam aqui, continuar em pb, em redondo,. CARREIRA 13: *1 pb em cada um dos 10 pb seguintes, 2 pb no pb seguinte *, repetir de * a * = 96 pb. Os aumentos para o tamanho L/XL acabam aqui, continuar em pb, em redondo,. A 12-15 cm de altura total, crochetar em pb como antes e mudar de cor da seguinte maneira: 2 carreiras em preto, 3 carreiras em castanho, 1 carreira em preto e nesta carreira, diminuir 12-14 pb a intervalos regulares – VER DIMINUIÇÕES (= restam 76-82 pb), 4 carreiras em preto, 2 carreiras em castanho. O gorro mede cerca de 20-23 cm a partir do alto. Arrematar. |
|
Terminou este projecto?Então, identifique as suas fotos com as tags #dropspattern ou mostre-as na galeria #dropsfan. Precisa de ajuda para este modelo?Encontrará 7 turotiais em vídeo, uma rubrica Comentários/Perguntas e muito mais ao visitar a página do modelo em www.garnstudio.com © 1982-2026 DROPS Design A/S. Todos os direitos reservados. Este documento, incluuindo as suas su-secções, tem copyrights. Saia mais o que pode fazer com os nossos modelos no fim de cada uma das páginas do nosso site. |
|


Com mais de 40 anos no design de modelos de tricô e de croché, a DROPS Design oferece uma das mais vastas colecções demodelos gratuitos na Internet - traduzidos em 17 línguas. Neste dia de hoje, temos 324 catálogos e 12290 modelos - dos quais 12271 estão traduzidos em português.
Trabalhamos com muito empenho para lhe proporcionar o melhor que o tricô e o croché têm para oferecer, para lhe fornecer inspiração e conselhos bem como fios da mais elevada qualidade a preços incríveis! Gostaria de usar os nossos modelos para outros fins que não uso pessoal? Pode ler o que lhe é permitido fazer no Copyright texto que se encontra na parte de baixo de todos os nossos modelos. Bom tricô! Bom croché!
Deixe um comentário acerca do modelo DROPS Extra 0-980
Gostaríamos muito de saber o que tem a dizer-nos acerca deste modelo!
Se deixar uma pergunta acerca do modelo, certifique-se de que escolhe a categoria adequada no formulário abaixo para acelerar o processo relativo à resposta. Os campos obrigatórios estão assinalados com um *.