
Categorias populares
Procura um fio?


Comentários / Perguntas (38)
![]() Uta Wolf escreveu:
Uta Wolf escreveu:
Ich hatte anfangs auch Probleme, das Muster richtig zu stricken, es wurden entweder immer mehr Maschen auf der oder weniger. Die Aussage, dass die Rückreihe "verkehrt herum" gesehen werden muss, macht es nicht einfacher. Wenn man es aber erst mal kapiert hat, ist es ein sehr schönes, schnell zu strickendes Muster, das auch mal für einen Sommerpulli oder eine Weste geeignet ist.
10.11.2015 - 12:42Sue escreveu:
Sorry I am posting twice. I put my question under the wrong section. I tried to make this, but it doesn't look right. Mine looks very tight and small. How do you count the 13 stitches of the lace to get it to measure 4 inches? I am thinking this may be where I messed up. I have a picture, but I don't see how I can post it to show. I am new to knitting and I love how this pattern looks and want to really get it to work out.
27.03.2015 - 01:16DROPS Design respondeu:
Dear Sue, for your gauge you can cast on 13 sts + 2 edge sts each side (worked in garter st), then measure your sts in width and in height and adjust needle size if necessary. Happy knitting!
30.03.2015 - 14:17Sue escreveu:
I tried to make this, but it doesn't look right. Mine looks very tight and small. How do you count the 13 stitches of the lace to get it to measure 4 inches? I am thinking this may be where I messed up. I have a picture, but I don't see how I can post it to show. I am new to knitting and I love how this pattern looks and want to really get it to work out.
27.03.2015 - 01:14
![]() Monique escreveu:
Monique escreveu:
Reactie op uitleg van drops 22.01.2014: naald 3: 2 recht samenbreien, 2 omslagen, 2 recht samenbreien..... toch?
22.01.2014 - 22:01DROPS Design respondeu:
Hoi Monique, Ja, twee omslagen.
23.01.2014 - 10:52
![]() Lenie escreveu:
Lenie escreveu:
Heb het al gevonden misschien voortaan een tekening over meerdere steken laten zien
17.01.2014 - 08:26
![]() Lenie escreveu:
Lenie escreveu:
Hoe moet de 3e naald gebreid worden hetzelfde als de 1e nld? als ik brei volgens tekening krijg ik meer steken.doe ik iets verkeerd
16.01.2014 - 15:31DROPS Design respondeu:
Hoi Lenie. Nee, die brei je als volgt: *2 r samen, 1 omslag, 2 r samen* Herhaal *-* (zie ook de teltekening). Het is dezelfde werkwijze als nld 1 alleen is het motief (de omslag) 2 st verschoven. Door zo te breien onstaat het "zigzag" motief je ook ziet op de foto.
22.01.2014 - 17:29
![]() Michelle escreveu:
Michelle escreveu:
Does anyone have any suggestions... I an new to needle knitting and I can not seem to get a row to come out with 42 stitches when I get past the ribbing. I have spent 6 hours trying this and at first I wasn't counting the stitches each row, and I was dropping stitches and was down to 30 stitches on the needle. I tried again and I ended up with 43 stitches on the needle multiple times. Then again last night, I ended up with only 38 stitches multiple times.
07.01.2013 - 14:44DROPS Design respondeu:
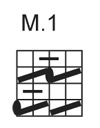
Dear Michelle, M.1 is worked this way : R1 : K2 tog, K2 tog, 2 yo (= 2 sts, 2 yos). R2 : K the first yo into front loop and K the 2nd yo into back loop, K3 (= 4 sts). R3 : K2 tog, 2 yos, K2 tog (2 sts, 2yos). R4 : K1, K the first yo into front loop, and K the 2nd yo into back loopl, K1 (= 4 sts). Repeat each row these 4 sts all the row as stated. You should then have always same number of sts. Happy Knitting !
07.01.2013 - 16:59
![]() MARTINA escreveu:
MARTINA escreveu:
Help.. non capisco come si interpreta il diagramma.. ovvero dopo le 2 maglie a legaggio..con quale punti devo proseguire....grazie mille Martina
27.11.2012 - 09:34DROPS Design respondeu:
I diagrammi si lavorano da destra verso sinistra, quindi devi fare 2 m legaccio, 2 m insieme a dir, 2 m insieme a dir, 2 gettati, poi si inizia da 2 m insieme a dir, 2 m insieme a dir, 2 gettati ancora per 28 m e terminare con 2 m leg. Si lavora avanti e indietro, quindi al f successivo, inizia da sinistra e lavora verso destra sul rovescio del lavoro.
28.11.2012 - 14:41Rut escreveu:
Du ska inte börja raden med "kast" utan sluta med detta. Man stickar diagrammet från höger till vänster som vanligt
24.11.2012 - 14:05
![]() Liv escreveu:
Liv escreveu:
Ok, da syns jeg oppskriften er litt dårlig forklart. Diagrammet sier ingenting om jeg skal begynne med kast. Jeg får prøve å strikke på skjønn. Takk for hjelpen.
24.11.2012 - 01:45
|
|||||||||||||
Petula#petulashawl |
|||||||||||||
 |
 |
||||||||||||
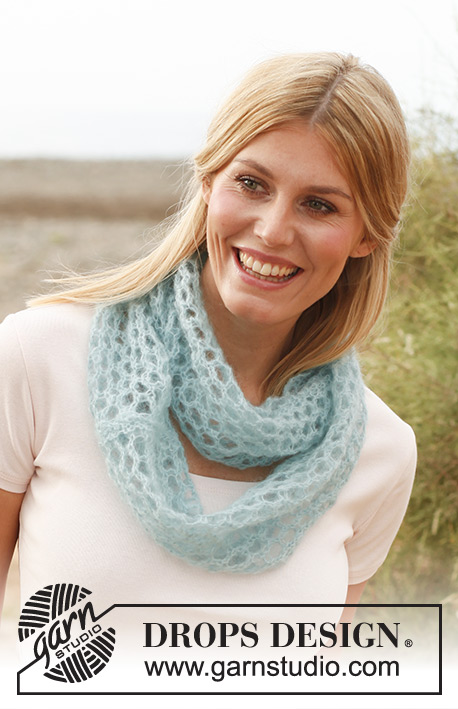
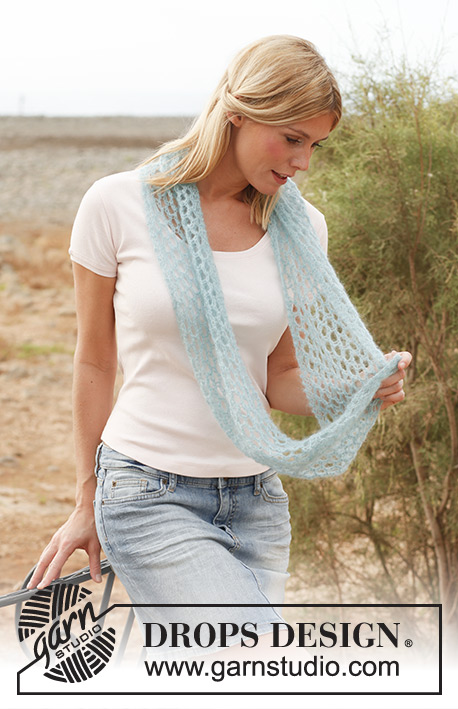
Gola DROPS em ponto de ajouts, em ”Vivaldi”.
DROPS 137-11 |
|||||||||||||
|
-------------------------------------------------------- NOTA: Existem termos diferentes de tricô e croché em português de Portugal e do Brasil. TRICÔ : Malha = Ponto Canelado = Barra Ponto Jarreteira = Cordões de Tricô Ponto Liga = Ponto Tricô CROCHÉ : mpa – meio ponto alto pa – ponto alto pad – ponto alto duplo pat – ponto alto triplo pb – ponto baixo pbx – ponto baixíssimo pc – ponto corrente -------------------------------------------------------- PONTO JARRETEIRA (em idas e voltas) : Tricotar todas as carreiras em meia. PONTO FANTASIA : Ver diagrama M.1. O diagrama mostra o ponto fantasia pelo direito. -------------------------------------------------------- GOLA : Tricota-se em idas e voltas. Montar 32 ms/pts com as agulhas 5 mm e o fio Vivaldi. Tricotar 4 carreiras meia e continuar, depois, da seguinte maneira pelo direito : 2 ms/pts em ponto jarreteira, M.1 nas 28 ms/pts seguintes e terminar com 2 ms/pts em ponto jarreteira. NÃO ESQUECER DE MANTER A MESMA TENSÃO DA INDICADA PARA A AMOSTRA ! Continuar desta maneira até a peça medir cerca de 138 cm, tricotar 4 carreiras meia e arrematar frouxamente. Fazer a costura das ms/pts montadas às ms/pts arrematadas para formar um círculo. Costurar na alça da frente das ms/pts mais exteriores para evitar que a costura seja demasiado grossa. |
|||||||||||||
Explicações do diagrama |
|||||||||||||
|
|||||||||||||
 |
|||||||||||||
Terminou este projecto?Então, identifique as suas fotos com as tags #dropspattern #petulashawl ou mostre-as na galeria #dropsfan. Precisa de ajuda para este modelo?Encontrará 6 turotiais em vídeo, uma rubrica Comentários/Perguntas e muito mais ao visitar a página do modelo em www.garnstudio.com © 1982-2026 DROPS Design A/S. Todos os direitos reservados. Este documento, incluuindo as suas su-secções, tem copyrights. Saia mais o que pode fazer com os nossos modelos no fim de cada uma das páginas do nosso site. |
|||||||||||||


Com mais de 40 anos no design de modelos de tricô e de croché, a DROPS Design oferece uma das mais vastas colecções demodelos gratuitos na Internet - traduzidos em 17 línguas. Neste dia de hoje, temos 324 catálogos e 12290 modelos - dos quais 12271 estão traduzidos em português.
Trabalhamos com muito empenho para lhe proporcionar o melhor que o tricô e o croché têm para oferecer, para lhe fornecer inspiração e conselhos bem como fios da mais elevada qualidade a preços incríveis! Gostaria de usar os nossos modelos para outros fins que não uso pessoal? Pode ler o que lhe é permitido fazer no Copyright texto que se encontra na parte de baixo de todos os nossos modelos. Bom tricô! Bom croché!
Deixe um comentário acerca do modelo DROPS 137-11
Gostaríamos muito de saber o que tem a dizer-nos acerca deste modelo!
Se deixar uma pergunta acerca do modelo, certifique-se de que escolhe a categoria adequada no formulário abaixo para acelerar o processo relativo à resposta. Os campos obrigatórios estão assinalados com um *.