
Categorias populares
Procura um fio?


Comentários / Perguntas (60)
![]() Catherine escreveu:
Catherine escreveu:
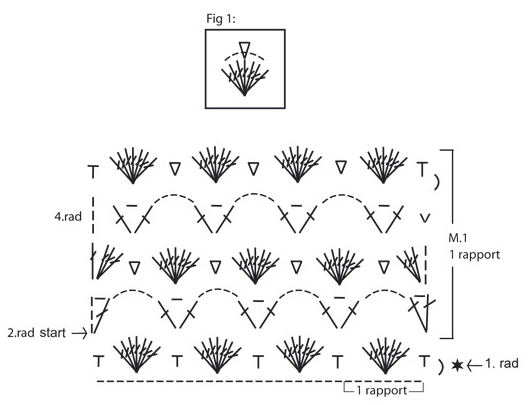
Bonjour, Je ne comprends absolument rien aux lignes 2 et 4 du diagramme...serait-il possible d'avoir plus d'explications? Merci
29.01.2013 - 09:47DROPS Design respondeu:
Bonjour Catherine, rang 2: 4 ml, 1B dans la même m, *5 ml, sauter le groupe de B et dans la ms suiv : 1 B, 1 ml, 1B*. R3 :3ml, 3B dans la même m,*1 ms dans la ml du r2 + dans la 4ème B du groupe de B, 1 groupe de B dans la ml suiv*. R4 :3 ml, *1B,1ml,1B dans la ms, 5 ml*. Répétez de *-* tous les rangs. Bon crochet !
29.01.2013 - 09:58
![]() DROPS Design escreveu:
DROPS Design escreveu:
Ashlee - that symbol is just a bent dash that is the symbol for a chain st taking you to next row.
09.06.2010 - 18:41
![]() Ashlee escreveu:
Ashlee escreveu:
Ok, I took a break from this pattern, cleared my head and started again, it's working wonderfully. Only problem is there is a symbol in the M1 that doesn't have an explanation. On the 5th row (top) of the diagram, there's a comma looking thing in the first step, no where in the instructions can I find that.
08.06.2010 - 19:25
![]() DROPS Design escreveu:
DROPS Design escreveu:
You are supposed to have 5 chains go over the 7 tc (US dc), then in next dc work 1 tc, ch 1, 1 tc, then chain 5 and so on.
26.02.2010 - 17:48
![]() Ashlee escreveu:
Ashlee escreveu:
I understand that the pattern is in a different language and the english translation is above but in the diagram...the second row doesn't add up to me. If the 2 tc at the dc are right next to each other (as shown) there there should be at least 7 chains...there's only 5...or am I supposed to have 5 chains go over the 7tcs? I don't get it. And is that right? 5 chains over the 7 with no attachment? I'm sorry...I really don't get it.
26.02.2010 - 17:18
![]() DROPS Design escreveu:
DROPS Design escreveu:
Hej, Enligt diagram skall börjar du 4. rad i vänster sida, då ser du att varvet blir lika i början och slutet.
29.01.2010 - 12:21
![]() Camilla escreveu:
Camilla escreveu:
Jag älskar detta mönster och väskan blir otroligt söt. Undrar dock över 4.rad i M.1 rapport. Varvet påbörjas med 3 luftmaskor och avslutas med en smygmaska. Då blir ju varvet olika i början och slutet. Har jag missuppfattat mönstret? Vore tacksam för vägledning.
16.01.2010 - 13:53
![]() DROPS Design escreveu:
DROPS Design escreveu:
If you don't get the patterns to work, we would like to ask you to go to the retailer where you bought the yarn. Our retailers are there to give you help when you don’t know how to continue. If you have bought original Garnstudio yarn, you can be sure that you have bought yarn from a shop that are specialized on DROPS patterns, and you have also supported our work with our webpages.
21.05.2008 - 17:31
![]() Jen escreveu:
Jen escreveu:
The diagram is really hard to understand, is there anyone who has completed this bag that could explain it in simpler instructions. I see the translation and know what each of the symbols represents, but I don't understand how to put it all together.
21.05.2008 - 17:27
![]() DROPS Design escreveu:
DROPS Design escreveu:
The translations for the Diagrams for all Garnstudio patterns are included within the text of the Pattern itself. If you look immediately above the diagram, you will find lines starting with an = sign. These are the translations, and they are given in the same vertical order as the chart symbols within the diagram.
14.04.2008 - 16:29
|
||||||||||||||||||||||
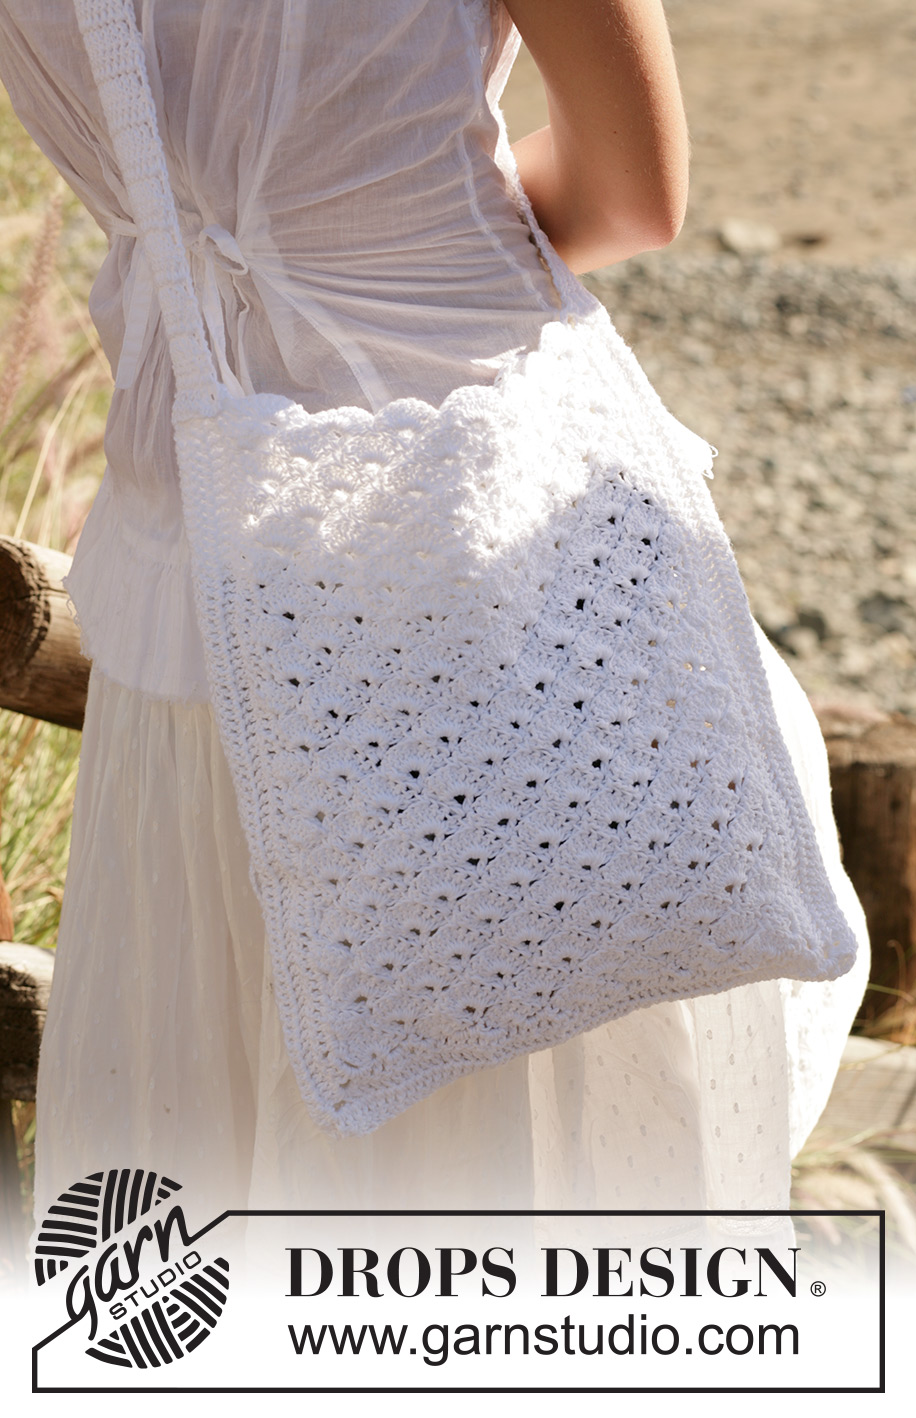
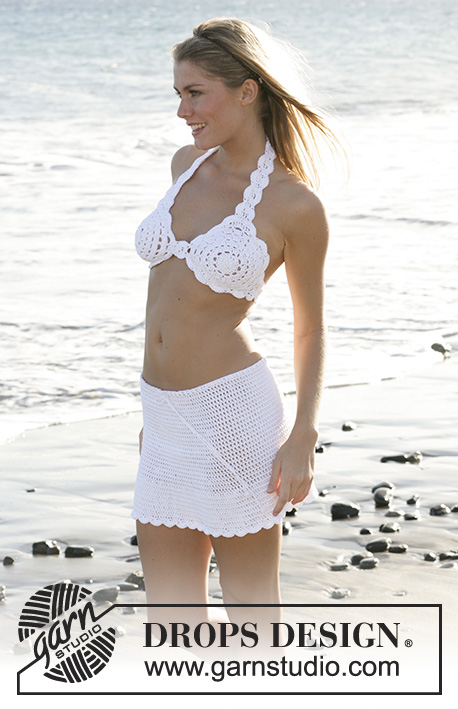
White Honey Comb#whitehoneycombbag |
||||||||||||||||||||||
|
|
||||||||||||||||||||||
Bolsa DROPS em croché em “Bomull-Lin”
DROPS 99-24 |
||||||||||||||||||||||
|
NOTA: Existem termos diferentes de tricô e croché em português de Portugal e do Brasil. TRICÔ : Malha = Ponto Canelado = Barra Ponto Jarreteira = Cordões de Tricô Ponto Liga = Ponto Tricô CROCHÉ : mpa – meio ponto alto pa – ponto alto pad – ponto alto duplo pat – ponto alto triplo pb – ponto baixo pbx – ponto baixíssimo pc – ponto corrente AMOSTRA 3 motivos em largura x 2,5 motivos em altura = 10 x 10 cm MOTIVO Ver diagrama M1. O diagrama mostra o ponto pelo direito. DICA CROCHÉ : 1 motivo = 8 pc Se desejar uma bolsa maior, deverá fazer 8 pc suplementares para cada motivo a mais. Substituir o 1.º pa de cada carreira por 3 pc. Também se pode fazer uma orla à volta da alça da bolsa :*6 pa num dos pa da alça, saltar 2 cm, 1 pb, saltar 2cm * repetir de * a * INSTRUÇÕES A bolsa é crochetada em 2 parte, uma para a frente e outra para trás. FRENTE Com o fio Bomull-lin e a agulha de croché 4 mm, montar 58 pc (incluindo 1 pc para virar), fazer 1 pb no 2.º pc a partir da agulha de croché, * saltar 3 pc, 7 pa no pc seguinte, saltar 3 pc, 1 pb no pc seguinte * repetir de * a * 7 vezes. Depois, continuar com M1. Cortar e arrematar o fio a 33 cm de altura total – ajustar a altura para que termine depois de 1 motivo do ponto. Depois, fazer 3 carreiras de pa – ver dica croché - ao longo do rebordo inferior e ao longo dos 2 lados. Para os cantos, fazer da seguinte maneira: 1 pa, 3 pc, 1 pa COSTAS Fazer como para a frente ALÇA Montar 12 pc (incluindo 3 pc para virar) – ver dica croché. Fazer 1 pa em cada pc e continuar com 1 pa em cada pc = 10 pa. Continuar em pa até a alça medir cerca de 80 cm de altura total. Cortar e arrematar o fio. MONTAGEM Costurar as 2 partes uma à outra na parte de baixo e nos lados. Costurar a alça da bolsa às 2 partes, com pa em cada um dos lados. |
||||||||||||||||||||||
Explicações do diagrama |
||||||||||||||||||||||
|
||||||||||||||||||||||
 |
||||||||||||||||||||||
Terminou este projecto?Então, identifique as suas fotos com as tags #dropspattern #whitehoneycombbag ou mostre-as na galeria #dropsfan. Precisa de ajuda para este modelo?Encontrará 4 turotiais em vídeo, uma rubrica Comentários/Perguntas e muito mais ao visitar a página do modelo em www.garnstudio.com © 1982-2026 DROPS Design A/S. Todos os direitos reservados. Este documento, incluuindo as suas su-secções, tem copyrights. Saia mais o que pode fazer com os nossos modelos no fim de cada uma das páginas do nosso site. |
||||||||||||||||||||||


Com mais de 40 anos no design de modelos de tricô e de croché, a DROPS Design oferece uma das mais vastas colecções demodelos gratuitos na Internet - traduzidos em 17 línguas. Neste dia de hoje, temos 324 catálogos e 12290 modelos - dos quais 12271 estão traduzidos em português.
Trabalhamos com muito empenho para lhe proporcionar o melhor que o tricô e o croché têm para oferecer, para lhe fornecer inspiração e conselhos bem como fios da mais elevada qualidade a preços incríveis! Gostaria de usar os nossos modelos para outros fins que não uso pessoal? Pode ler o que lhe é permitido fazer no Copyright texto que se encontra na parte de baixo de todos os nossos modelos. Bom tricô! Bom croché!
Deixe um comentário acerca do modelo DROPS 99-24
Gostaríamos muito de saber o que tem a dizer-nos acerca deste modelo!
Se deixar uma pergunta acerca do modelo, certifique-se de que escolhe a categoria adequada no formulário abaixo para acelerar o processo relativo à resposta. Os campos obrigatórios estão assinalados com um *.