
Categorias populares
Procura um fio?


Comentários / Perguntas (11)
![]() Fia escreveu:
Fia escreveu:
Jag skriver igen, då min fråga råkade komma som en kommentar. Men om det står att 250g Marakech (1 tråd) = 230g Belle (2 trådar), ska jag då ha 460g Belle?
12.07.2025 - 08:58DROPS Design respondeu:
Hej Fia. Du ska då totalt ha 230 g Belle. Mvh DROPS Design
28.07.2025 - 14:45
![]() Fia escreveu:
Fia escreveu:
Men om det står att 250g Marakech (1 tråd) = 230g Belle (2 trådar), ska jag då ha 460g Belle?
12.07.2025 - 08:57
![]() Fia escreveu:
Fia escreveu:
Garnkonverteraren säger att jag kan byta till 230g Belle (2 trådar) i stället för 250g Marakech (1 tråd). Innebär det att jag ska sticka med dubbelt garn av Belle? Skulle vara tacksam för hjälp. Vill gärna sticka i Belle.
10.07.2025 - 20:32DROPS Design respondeu:
Hej Fia. Ja det stämmer, du stickar då med dubbelt garn DROPS Belle. Mvh DROPS Design
11.07.2025 - 09:07
![]() Jeanne escreveu:
Jeanne escreveu:
Thank you for the quick response. I’m confused on how I get 15 sts increased after first 15 rows. As per the pattern, adding 1 st on R 5, 10, and 15 only adds 3 sts. If I am increasing only on rows 5, 10, and 15, I would need to add 5 sts on each of those rows. Is that correct? Also, pattern says to decrease every row but your response indicates you are only decreasing every other row. Thanks for clarifying whether the decrease is every row at beginning or end or every other row.
16.10.2023 - 12:15
![]() Jeanne escreveu:
Jeanne escreveu:
Side A - I’m confused on how get to 79 stitches after completing left side increases. I finish left side additions at Row 49 (including first 2 moss rows). I’ve added 30 stitches on left side and dropped 46 on right. My net stitches are 54 not 79 (70 - 46 + 30). What am I doing wrong? Thanks!
15.10.2023 - 15:50DROPS Design respondeu:
Dear Jeanne, increase 1 st 3 times on every 5 th rows (= 15 rows, 7 sts decreased, 15 sts increased) then 1 st 10 times every 2nd row (20 rows, 10 sts dec, 10 sts inc), then 1 st 3 times and 2 sts.1 time (4 rows, 2 sts dec, 5 sts inc) x 2, then increase 1 st 4 times on every row (4 rows, 2 sts dec, 4 sts inc), then 2 sts 1 time on every row (1 row 1 st dec, 2 sts inc) and 1 st 1 time (1 row, no st decreased 1 st increased) = 70 sts cast on - 24 sts decreased + 33 sts increased = 79 sts. Happy knitting!
16.10.2023 - 09:57Christine Marozick escreveu:
One more clarification please. On the cast off section for the neck on Front Piece B, could you clarify “complete each side separately” please? The cast offs are all happening 60 stitches from the sleeve edge as directed so I’m not sure what “each side” is referring to. Thanks!
05.11.2018 - 03:26DROPS Design respondeu:
Dear Mrs Marozick, when you cast off the 10 sts for the neck, you have sts on each side of these 10 sts for each shoulder. you will now work each shoulder separately bindng off for neck at the beg of each row from neck. When first shoulder has been finished, work the 2nd shoulder the same way, binding off the sts for neck at the beg of each row from neck. Happy knitting!
05.11.2018 - 10:03Christine Marozick escreveu:
Thank you I think I understand now!
16.10.2018 - 16:28
![]() Christine Marozick escreveu:
Christine Marozick escreveu:
Thank you. That makes sense. I am still confused however by the description and order of the increases. It seems the increases all happen on the left side of the piece, when it says “1st 3 times” are those increases all happening together? So it would be the last 3 stitches of the row? Also, when it says every 5 row...every other row...then every row, how do I know how many times to do every 5th row before I switch to every other row and then to every row?
15.10.2018 - 16:25DROPS Design respondeu:
Dear Mrs Marozick, you will work *1 row increasing 1 stitch on the left side of piece seen from RS, 4 rows without increase* and repeat these 5 rows a total of 2 times, then work one more row while increasing = 3 sts have been now increased on every 5th row. Just make sure that you will increase on the correct side, ie it will be at the end of row from RS or at the beg of row from WS. Then increase 1 st every other row (= 1 row with inc, 1 row without inc) a total of 10 times. Then increase every row = alternately from RS and from WS. Happy knitting!
16.10.2018 - 08:51Christine Marozick escreveu:
I am confused by the increase instructions. Does the “left side” mean the “wrong side?” Also when it says every 5th row...every 10th row...etc that is only happening once, correct? And on every other row then means every other WRONG side row?
14.10.2018 - 00:37DROPS Design respondeu:
Dear Mrs Marozick, right and left side are the sides you can see when you look at the pice from RS: for front piece A, you will cast off on the right- hand side of piece on every row (= beg of row from RS + end of row from WS) and increase new stitches for sleeve on the left-hand side of piece (= at the end of row from RS/beg of row from WS - depending on the increases). Happy knitting!
15.10.2018 - 09:27
![]() Conni escreveu:
Conni escreveu:
Hej. Jeg er en ivrig bruger af jeres skønne hjemmeside, og har fundet denne flotte bluse, som jeg godt kunne tænke mig at strikke. Men der står at man skal bruge rundpind nr. 60. Er det nr. 6 der menes? På forhånd tak. Venligst Conni
07.01.2013 - 10:10DROPS Design respondeu:
Hej Conni. Det skal vaere pind nr. 6. God fornöjelse
18.01.2013 - 10:11
|
|
DROPS Extra 0-209 |
|
|
|
|
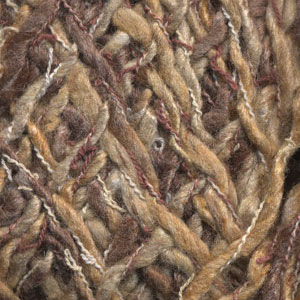
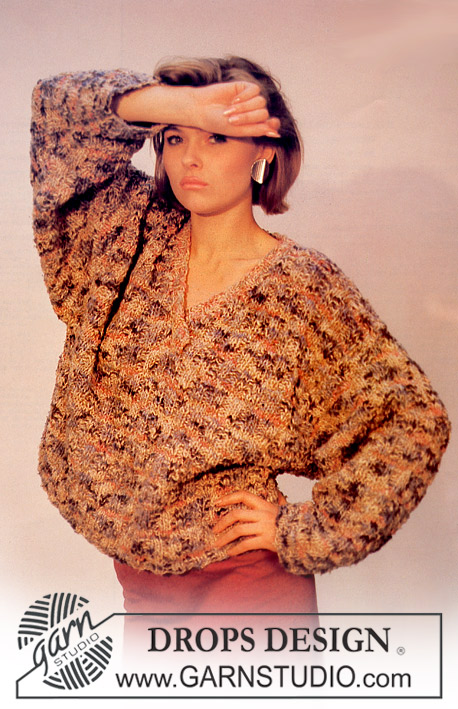
Pulôver DROPS em “Marrakech” com ponto fantasia diagonal em 2 cores. Tamanho M.
DROPS Extra 0-209 |
|
|
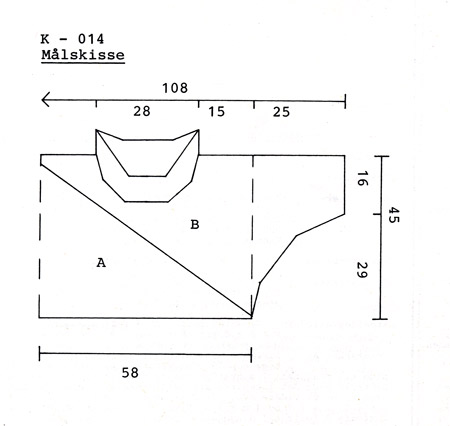
Explicações PONTO DE ARROZ: Carreira 1: * 1 malha meia, 1 malha liga *, repetir de * a *. Carreira 2: Tricotar as malhas meia em liga e as malhas liga em meia. Repetir a carreira 2. PULÔVER: Tricota-se em 4 partes separadamente, A + B = frente, A + B = costas, e unidas entre elas no fim. Cada peça tricota-se em ponto de arroz. FRENTE A: Tricota-se na cor n.º 08, amarelo/castanho mix. Montar 70 malhas com as agulhas 6 mm e tricotar 2 carreiras em ponto de arroz. Arrematar , então, 1 malha à direita em todas as carreiras (= no princípio e no fim da carreira à direita, visto pelo direito) e, ao mesmo tempo, aumentar para a manga à esquerda: 3 vezes 1 malha a cada 5 carreiras, 10 vezes 1 malha a cada 2 carreiras, depois, em todas as carreiras: (3 vezes 1 malha e 1 vez 2 malhas) 2 vezes, 4 vezes 1 malha, 1 vez 2 malhas e 1 vez 1 malha = 51 malhas. Continuar durante 16 cm e, ao mesmo tempo, continuar a diminuir à direita e arrematar. FRENTE B: Tricota-se na cor n.º 07, natural. Montar 2 malhas com as agulhas 6 mm e tricotar 1 carreira em ponto de arroz. Aumentar , então, 1 malha à esquerda em todas as carreiras e, ao mesmo tempo, aumentar para a manga à direita como se fez para a frente A. Quando os aumentos para a manga estiverem feitos, tricotar 5 carreiras (continuar a aumentar à esquerda) e arrematar , então, 10 malhas para o decote, a 60 malhas do rebordo da manga. Terminar cada lado separadamente, e arrematar para o decote em todas as carreiras: 6 vezes 1 malha e a cada 2 carreiras: 6 vezes 1 malha. Tricotar 4 carreiras e arrematar. COSTAS A: Como se fez para a frente A, mas em sentido contrário. COSTAS B: Como se fez para a frente B, mas em sentido contrário e arrematar para o decote quando a peça medir 41 cm a partir da carreira de montagem. Arrematar 24 malhas, a 53 malhas do rebordo da manga e terminar cada lado separadamente. Arrematar para o decote: 5 vezes 1 malha a cada 2 carreiras, e arrematar as restantes malhas. MONTAGEM: Unir entre elas as frentes A + B e as costas A + B, avesso contra avesso. Costurar juntamente com ponto de alinhavo, a cerca de 1 cm dos rebordos das costuras para que se possam ver ligeiramente pelo direito. Costurar a frente e as costas nos ombros e nos lados. Levantar cerca de 89 malhas à volta do decote com a pequena agulha circular 6 mm em natural e tricotar 7 cm em ponto de arroz e arrematar. |
|
 |
|
Terminou este projecto?Então, identifique as suas fotos com as tags #dropspattern ou mostre-as na galeria #dropsfan. Precisa de ajuda para este modelo?Encontrará 16 turotiais em vídeo, uma rubrica Comentários/Perguntas e muito mais ao visitar a página do modelo em www.garnstudio.com © 1982-2026 DROPS Design A/S. Todos os direitos reservados. Este documento, incluuindo as suas su-secções, tem copyrights. Saia mais o que pode fazer com os nossos modelos no fim de cada uma das páginas do nosso site. |


Com mais de 40 anos no design de modelos de tricô e de croché, a DROPS Design oferece uma das mais vastas colecções demodelos gratuitos na Internet - traduzidos em 17 línguas. Neste dia de hoje, temos 324 catálogos e 12290 modelos - dos quais 12271 estão traduzidos em português.
Trabalhamos com muito empenho para lhe proporcionar o melhor que o tricô e o croché têm para oferecer, para lhe fornecer inspiração e conselhos bem como fios da mais elevada qualidade a preços incríveis! Gostaria de usar os nossos modelos para outros fins que não uso pessoal? Pode ler o que lhe é permitido fazer no Copyright texto que se encontra na parte de baixo de todos os nossos modelos. Bom tricô! Bom croché!
Deixe um comentário acerca do modelo DROPS Extra 0-209
Gostaríamos muito de saber o que tem a dizer-nos acerca deste modelo!
Se deixar uma pergunta acerca do modelo, certifique-se de que escolhe a categoria adequada no formulário abaixo para acelerar o processo relativo à resposta. Os campos obrigatórios estão assinalados com um *.