
Categorias populares
Procura um fio?


Comentários / Perguntas (18)
![]() Annemieke escreveu:
Annemieke escreveu:
Als je een proeflesje met patroon M III breit, geeft het patroon aan waar je recht en waar averechts moet breien op de goede kant. Wat brei je dan op de verkeerde kant? Bij recht averechts en bij averechts recht?
15.12.2025 - 11:54DROPS Design respondeu:
Dag Annemieke,
Waar je averecht op de goede kant breit, brei je recht op de verkeerde kant en waar je recht op de goede kant breit, brei je averecht op de verkeerde kant.
15.12.2025 - 21:01
![]() Julianne escreveu:
Julianne escreveu:
What size does this pattern make? (S,M,L?)
11.04.2025 - 17:37DROPS Design respondeu:
Hello Julianne! There are two sizes: small/medium and large. Please also look at the garment measurements drawing under the pattern (cm). Hope it helps! Happy knitting!
11.04.2025 - 20:41
![]() Sandi escreveu:
Sandi escreveu:
Could you please confirm which size the male model is wearing? Is it the S/M or the M/L? Thanks and regards!
30.05.2023 - 13:18DROPS Design respondeu:
Dear Sandy, most of the time, the models are wearing size S/M, but remember to measure a similar garment you (or the person who will wear the jumper) have and like the shape and compare these measurements to the one in the chart. Read more about chart here. Happy knitting!
30.05.2023 - 15:57
![]() Isidora escreveu:
Isidora escreveu:
Hej, Har aldrig stuckit något förutom halsdukar och tycker nog därför detta mönster är otydligt och svårt.. men jag undrar om det ska vara flätor på ärmarna eller inte? På bilden finns flätor men det finns inga instruktioner på detta.. jag förstår inte heller bål-delen.. dock har jag inte börjat med den ännu Vänliga hälsningar
23.03.2023 - 14:39DROPS Design respondeu:
Hei Isidora Jo, det er fletter på ermene. I oppskriften står det: Byt till rundst 4 och sticka M.I (M.I stickas på hela ärmen x 3 ganger rundt + 1 maske). Om du ser på diagram M.1 vil du se at det er en stor flette med 9 omganger glattstrikk mellom hver "flette". Oppskrifter som ble skrevet på 1980/1990 tallet ble skrevet på en enklere måte enn hva oppskrifter blir gjort i dag. Men bare send inn spørsmål, så skal vi svare deg så godt vi kan (bare husk å oppgi hvilken str du strikker, hvor du er i oppskriften og hva problemet er). mvh DROPS Design
27.03.2023 - 12:04
![]() Miko Diaz escreveu:
Miko Diaz escreveu:
What does M.1, M.2, and M. 3 means? I am still a beginner and I am confused with these.
31.01.2022 - 16:58DROPS Design respondeu:
Dear Mrs Diaz, these are the name of the pattern diagrams, ie M.1 = M.I = the bottom 10 rows in diagram; M.2 = M.II = the next 9 rows and M.3 = MIII = the last 5 rows. Read more about diagrams here. Happy knitting!
31.01.2022 - 17:52
![]() Donna Solomon escreveu:
Donna Solomon escreveu:
I am confused about how to add on the 110 st after completing the ribbing. It says to continue in M1 at the same time inc 110 st. How do I do this? And, what type of stitch increase should I use? Could I add the 110 st on the last row of ribbing and then start MI? Thank you
22.01.2022 - 00:47DROPS Design respondeu:
Dear Mrs Solomon, this lesson explains how to increase evenly; you can use any increase technique you like. You probably can increase on the last row of ribbing, to start M.1 over the increased number of sts if it looks easier to you. Happy knitting!
24.01.2022 - 08:31
![]() Donna Solomon escreveu:
Donna Solomon escreveu:
I've just started this pattern and casted on the 160 stitches to start the ribbing. This looks too small to go around a waist. Am I reading this wrong?
17.01.2022 - 15:24DROPS Design respondeu:
Dear Mrs Solomon, remember to check your tension, you should have 23 sts x 28 rows in M.1/20 sts x 28 rows in M.2 with needle size 4 mm = 10 x 10 cm; you then start with ribbing edge on smaller needles, make sure your cast on edge is not too tight - and work ribbing edge with smaller needles (on this kind of pattern, the bottom edge is tightening piece together). Happy knitting!
17.01.2022 - 15:36
![]() Wyffels Rita escreveu:
Wyffels Rita escreveu:
Ik zou graag deze trui breien voor mijn kleinzoon die maat 13/14 jaar heeft. Kunnen jullie het breipatroon voor deze leeftijd doorsturen ? Dank u wel voor de moeite !!
21.01.2020 - 12:15
![]() Kari Schjerven escreveu:
Kari Schjerven escreveu:
Strikker nå på ermet, men skal det ikke være fletter under ermet? Skjønner ikke helt hva som menes her, virker som det bare skal være rettstrikking her (har tils 4 fletter), hilsen Kari
10.04.2019 - 14:01DROPS Design respondeu:
Hei Kari. Du kan gjerne strikke de økte maskene fortøpende inn i M.1 på hver side av midtmasken (slik at det vokser ut 1 ny rapport av M.1 på hver side av midten). Vent med fletting til du har nok masker til 1 hel flette på hver side av merket. God fornøyelse
11.04.2019 - 10:50
![]() Anne Mette Madsen escreveu:
Anne Mette Madsen escreveu:
Will it be possible to print the pattern ? The link is not working
30.08.2016 - 09:58DROPS Design respondeu:
Hi Anne. There should be no problem printing the pattern. I just tried and it worked.
30.08.2016 - 10:03
|
||||||||||
DROPS 13-18 |
||||||||||
|
|
||||||||||
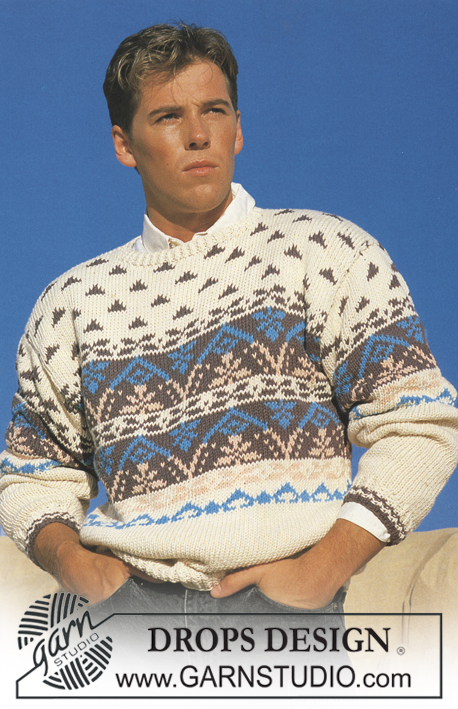
Pulôver DROPS com torcidos em Muskat. Do S ao L
DROPS 13-18 |
||||||||||
|
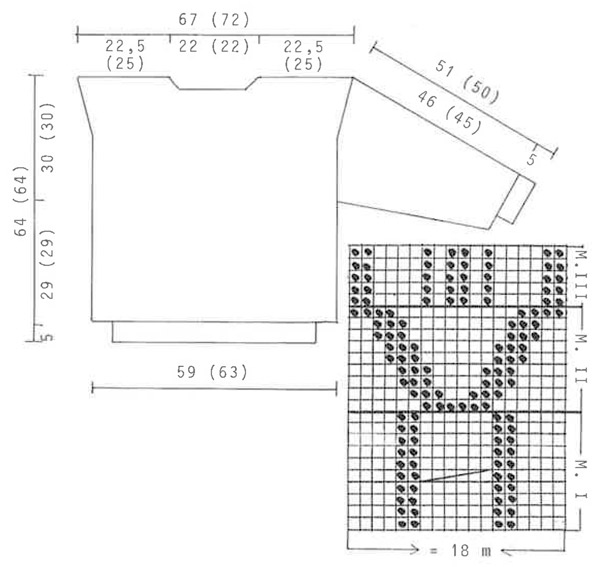
Explicações Ponto fantasia: Ver diagrama abaixo. O diagrama mostra o motivo pelo direito. 1 quadrado = 1 malha x 1 carreira Canelado: *1 malha torcida em meia, 1 malha liga *, repetir de *a * Costas & frente: O pulôver tricota-se em redondo na agulha circular. Com a agulha circular 2,5 mm montar 160-168 malhas e tricotar 5 cm de canelado. Continuar com a agulha circular 4 mm seguindo M1 e, ao mesmo tempo, distribuir 110-120 aumentos na 1.ª carreira = 270-288 malhas ( 15 torcidos para o tamanho S/M e 16 para o tamanho M/L). MANTER A MESMA TENSÃO DA INDICADA PARA A AMOSTRA! A 34 cm de altura total, dividir a peça em 2 partes e terminar as costas e a frente separadamente. Para o tamanho S/M, ter atenção para centrar um torcido a meio da frente, para o tamanho M/L temos 8 torcidos para a frente e 8 para as costas. Frente: = 135-144 malhas. Continuar seguindo M1. A 45-45 cm de altura total, tricotar M2, depois, terminar seguindo M3. Ao mesmo tempo, a 61-61 cm de altura total, arrematar para o decote as 45-46 malhas centrais e terminar cada parte separadamente. Arrematar para o decote no princípio da carreira em todas as carreiras a partir do decote: 1 vez 2 malhas e 1 vez 1 malha. Arrematar as restantes malhas a 64-64 cm de altura total. Costas: = 135-144 malhas. Continuar como se fez para a frente. A 63-63 cm de altura total, arrematar para o decote as 49-50 malhas centrais depois 1 malha no lado do decote na carreira seguinte. Arrematar as restantes malhas a 64-64 cm de altura total. Mangas: Com as agulhas de pontas duplas 2,5 mm montar 42-44 malhas. Tricotar 5 cm de canelado. Continuar com as agulhas de pontas duplas 4 mm seguindo M1 e, ao mesmo tempo, distribuir 31-29 aumentos na 1.ª carreira = 73-73 malhas. Ao mesmo tempo, depois do canelado, aumentar 2 malhas sob a manga 33 vezes ao todo alternadamente a cada 3 e 4 carreiras = 139-139 malhas. A 51-50 cm de altura total, arrematar todas as malhas. Montagem: Costurar os ombros. Com as agulhas 2,5 levantar cerca de 110 malhas à volta do decote e tricotar 3 cm de canelado, arrematar. Costurar as mangas. |
||||||||||
Explicações do diagrama |
||||||||||
|
||||||||||
 |
||||||||||
Terminou este projecto?Então, identifique as suas fotos com as tags #dropspattern ou mostre-as na galeria #dropsfan. Precisa de ajuda para este modelo?Encontrará 23 turotiais em vídeo, uma rubrica Comentários/Perguntas e muito mais ao visitar a página do modelo em www.garnstudio.com © 1982-2026 DROPS Design A/S. Todos os direitos reservados. Este documento, incluuindo as suas su-secções, tem copyrights. Saia mais o que pode fazer com os nossos modelos no fim de cada uma das páginas do nosso site. |
||||||||||


Com mais de 40 anos no design de modelos de tricô e de croché, a DROPS Design oferece uma das mais vastas colecções demodelos gratuitos na Internet - traduzidos em 17 línguas. Neste dia de hoje, temos 324 catálogos e 12290 modelos - dos quais 12271 estão traduzidos em português.
Trabalhamos com muito empenho para lhe proporcionar o melhor que o tricô e o croché têm para oferecer, para lhe fornecer inspiração e conselhos bem como fios da mais elevada qualidade a preços incríveis! Gostaria de usar os nossos modelos para outros fins que não uso pessoal? Pode ler o que lhe é permitido fazer no Copyright texto que se encontra na parte de baixo de todos os nossos modelos. Bom tricô! Bom croché!
Deixe um comentário acerca do modelo DROPS 13-18
Gostaríamos muito de saber o que tem a dizer-nos acerca deste modelo!
Se deixar uma pergunta acerca do modelo, certifique-se de que escolhe a categoria adequada no formulário abaixo para acelerar o processo relativo à resposta. Os campos obrigatórios estão assinalados com um *.