
Categorias populares
Procura um fio?


Comentários / Perguntas (24)
![]() Lynn escreveu:
Lynn escreveu:
Hello, is the v neck worked in the round?
13.08.2024 - 11:54DROPS Design respondeu:
Dear Lynn, to shape V-neck you will divide front piece into 2 sides/pieces and finish each piece separately. Happy knitting!
13.08.2024 - 16:03
![]() Nellie escreveu:
Nellie escreveu:
I sent a question three days ago, and still have not received a response…when do you think I can expect a reply.?
02.03.2024 - 02:49DROPS Design respondeu:
Dear Nellie, as your question was posted as a comment, it might have been missed, sorry for that. After you have decreased for the armholes, ther are 64-66 sts (S -M) on the needle, then you will cast off the middle 28-30 sts for neck = 18 sts left for each shoulder in both sizes. You now work each shoulder separately. At the beginning of next row from neck (from RS on left shoulder back/from WS on right shoulder back), you will cast off 2 sts = 16 sts remain for the shoulder. Happy knitting!
04.03.2024 - 10:34
![]() Nellie escreveu:
Nellie escreveu:
I need a simple straight forward explanation on shaping the armhole. I cast off 16 sts, one stitch every other row, then when the sweater measures 49 cm please instruct me the decrease amount of stitches for each row, till there are 16 stitches left. I am confused with the number of sts indicated.
19.01.2024 - 01:25
![]() Nellie escreveu:
Nellie escreveu:
I would like to knit this for a twelve year old girl.
12.01.2024 - 22:50
![]() LISA MORRISON escreveu:
LISA MORRISON escreveu:
Hello, This is my first sweater as a beginner and I would like to know if there is any video to help me understand the v-neck for this pattern, as shown "V-neck: When the piece measures 52 cm divide the piece at center front and put half the sts on a st holder = 53 sts. 1st side: Dec 1 st at the neck edge every other row 16-17-17-18-18 times." I've found videos that use a different technique than dividing the piece at center front if I am understanding the instructions.
05.09.2023 - 23:50DROPS Design respondeu:
Dear Mrs Morrison, when piece measures 52 cm, slip the last 53 stitches (seen from RS) on a thread/stitch holder for right shoulder and work now the first 53 sts on needle for left shoulder. and work each shoulder separately, starting with the left. Cast off at the beginning of each row from RS for armhole and decrease at the end of every row from RS for neck. Cast off when piece measures 76 cm. Work the right shoulder the same way, decreasing for neck at the beg of every row from RS and casting off for armhole at the beg of every row from WS. Happy knitting!
06.09.2023 - 09:17
![]() Sophie escreveu:
Sophie escreveu:
I don't understand the decreases for the armholes on the back piece. I can't get the number of stitches to add upp when I do it as the front.
01.03.2023 - 23:50DROPS Design respondeu:
Dear Sophie, back piece will be worked as front piece until neck, this means you cast on the same number of stitches, increase 1 st on each side after vent and cast off for armholes on each side (a total of 12-18-24-28-34 sts) as you did for front piece (see for your size). Happy knitting!
02.03.2023 - 11:02
![]() Sophie escreveu:
Sophie escreveu:
How should the decreases be done for the neck in the front piece? I cannot seem to get the two parts the same way. Do I k2tog or slip 1 k 1?
28.02.2023 - 23:52DROPS Design respondeu:
Dear Sophie, you can work K2 tog on one front piece and slip 1, K1 on the other front piece, as you rather get a visible decrease (work K2 tog on right front piece/slip 1, K1 on left front piece) or rather more discreet (K2 tog on left front piece/slip 1,K1 on right front piece). Happy knitting!
01.03.2023 - 09:50
![]() Kate Lynam escreveu:
Kate Lynam escreveu:
How should I bind off at the end of a row? The traditional bind off only works at the beginning of a row. Should I use a decrease instead when shaping the neck and sleeves, if so which one would you recommend? Thank you Regards Kate
07.05.2022 - 11:22DROPS Design respondeu:
Dear Ms. Lynam, you can bind off at the beginning of every row - i.e. from both right and wrong side = both sides of piece. Happy knitting!
08.05.2022 - 00:13
![]() Christel Van Oers escreveu:
Christel Van Oers escreveu:
Hallo, moet er bij het breien van het achterpand ook een split gemaakt worden? Er staat niets over een split bij het achterpand, vandaar de vraag .. Alvast bedankt!
05.03.2022 - 12:00DROPS Design respondeu:
Dag Christel,
Je breit inderdaad voor het achterpand ook een split.
07.03.2022 - 12:52
![]() Madelon escreveu:
Madelon escreveu:
Bedankt voor het antwoord op mijn vraag. Ik heb er nog een. Als ik klaar ben met de boord staat er ‘Leg de rechter halsboord over de linker en naai de ribbelst aan de opgenomen st’ als ik dat doe naai om het hoofdgat dicht. En wat naai ik op de opgenomen steken? Want daar heb ik toch al de ribbelsteek/boord op gebreid? Ik hoor het graag.
17.02.2022 - 13:28DROPS Design respondeu:
Dag Madelon,
Excuses ik heb een fout gemaakt zie ik. Je neemt wel steken rondom op, maar je breit heen en weer in plaats van in de rondte. Je breit dus eerst 2 naalden recht en daarna boordsteek.
17.02.2022 - 13:55
|
|
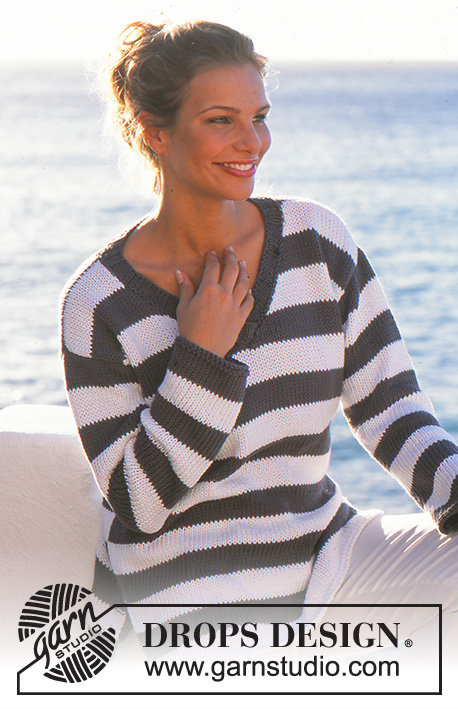
Marinière |
|
 |
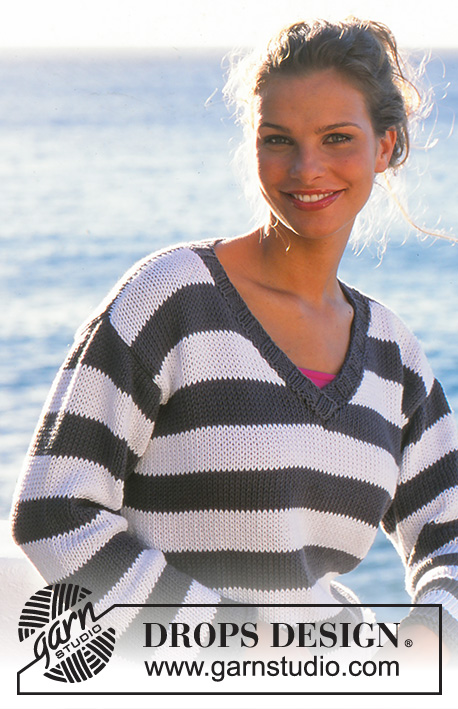 |
Pulôver DROPS em Paris
DROPS 81-7 |
|
|
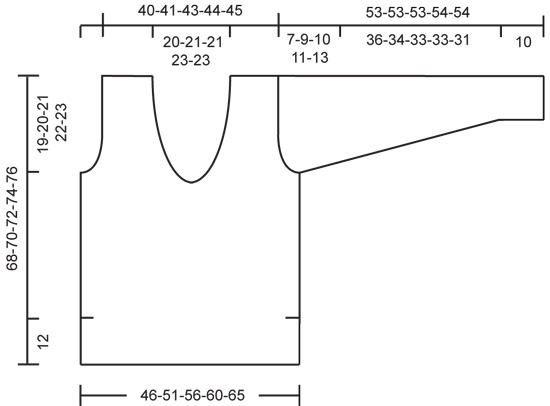
---------------------------------------------------------- NOTA: Existem termos diferentes de tricô e croché em português de Portugal e do Brasil. Malha = Ponto Canelado = Barra Ponto Jarreteira = Cordões de Tricô Ponto Liga = Ponto Tricô Croché : mpa – meio ponto alto pa – ponto alto pad – ponto alto duplo pat – ponto alto triplo pb – ponto baixo pbx – ponto baixíssimo pc – ponto corrente ---------------------------------------------------------- AMOSTRA 16 ms/pts x 20 carreiras = 10 x 10 cm em ponto meia com as agulhas 5,5 mm RISCAS *8 carreiras em branco, 8 carreiras em cinza* repetir de *a* EXPLICAÇÕES FRENTE Com o fio branco e as agulhas 5 mm montar 74-82-90-96-104 ms/pts ; tricotar 4 carreiras em ponto jarreteira. Continuar com as agulhas 5,5 mm em ponto meia, com 3 ms/pts de orla em ponto jarreteira de cada lado da peça (para as fendas dos lados), e seguir as riscas acima. A 12 cm de altura total, as fendas estão acabadas. Aumentar 1 m/p de cada lado da peça = 76-84-92-98-106 ms/pts. Tricotar 4 carreiras em ponto jarreteira nas 4 ms/pts de cada lado da peça e, depois, continuar em ponto meia em todas as ms/pts. Ler com atenção antes de continuar Decote em V : a 48-49-50-51-52 cm de altura total, dividir a peça a meio da frente e colocar metade das ms/pts em espera num alfinete de ms/pts = 38-42-46-49-53 ms/pts. 1.º lado : diminuir 1 m/p no lado do decote 16-17-17-18-18 vezes a cada 2 carreiras Cava : a 49-50-51-52-53 cm de altura total, rematar para a cava no lado a cada 2 carreiras : 0-0-0-1-1 vez 4 ms/pts, 1 vezes 3 ms/pts, 0-1-3-2-3 vezes 2 ms/pts e 3-4-3-3-4 vezes 1 m/p. Quando as diminuições do decote e da cava estão feitas, temos 16-16-17-17-18 ms/pts para o ombro. A cerca de 68-70-72-74-76 cm de altura total – ajustar para depois de 1 risca inteira – rematar todas as ms/pts. 2.º lado : retomar as ms/pts em espera e tricotar como o 1.º lado, mas em sentido contrário. COSTAS Com o fio cinza escuro e as agulhas 5 mm montar 74-82-90-96-104 ms/pts, tricotar 4 carreiras em ponto jarreteira. Continuar em riscas como se fez para a frente – inverter as riscas de maneira a que as riscas brancas da frente sejam equivalentes às riscas cinza das costas nos lados. Formar as cavas como se fez para a frente = 64-66-68-70-72 ms/pts. A 66-68-70-72-74 cm de altura total, rematar as 28-30-30-32-32 ms/pts centrais para o decote e, depois, 2 ms/pts na carreira seguinte = 16-16-17-17-18 ms/pts para cada ombro. A 68-70-72-74-76 cm de altura total, rematar todas as ms/pts. MANGAS Com as agulhas 5 mm e o fio cinza escuro, montar 40-41-42-43-44 ms/pts. Tricotar 4 carreiras em ponto jarreteira e, depois, continuar com as agulhas 5,5 mm e as riscas como se fez para as costas. A 10-10-10-12-12 cm de altura total, aumentar 1 m/p de cada lado da peça 8-9-11-12-13 vezes a cada 4.5-4-3-2.5-2 cm = 56-59-64-67-70 ms/pts A 46-44-43-43-41 cm de altura total, rematar de cada lado da peça a cada 2 carreiras : 1 vez 4 ms/pts, 3 vezes 2 ms/pts e 0-1-2-4-5 vezes 1 m/p, depois, 2 ms/pts até 52-52-52-53-53 cm de altura total e, por fim, 1 vez 3 ms/pts. A manga mede cerca de 53-53-53-54-54 cm de altura total. Rematar as restantes ms/pts. MONTAGEM Fazer a costura dos ombros. Orla do decote : com o fio cinza escuro e a agulha circular 5 mm levantar à volta do decote cerca de 101-119 ms/pts (número múltiplo de 6 + 5) ; tricotar 2 carreiras em ponto jarreteira e, depois, continuar em canelado/barra da seguinte maneira (pelo avesso ) : 1 m/p ourela em ponto jarreteira, *3 ms/pts liga/tricô, 3 ms/pts meia* repetir de *a* e terminar com 3 ms/pts liga/tricô, 1 m/p ourela em ponto jarreteira. A 4 cm de altura de gola, rematar as ms/pts como elas se apresentam. Colocar o lado direito da gola por cima do lado esquerdo e costurar as ms/pts ourela em ponto jarreteira à orla, onde as ms/pts foram levantadas. Montar as mangas. Costurar as mangas e os lados nas ms/pts ourela, deixando a abertura para as fendas nos lados. |
|
 |
|
Terminou este projecto?Então, identifique as suas fotos com as tags #dropspattern ou mostre-as na galeria #dropsfan. Precisa de ajuda para este modelo?Encontrará 19 turotiais em vídeo, uma rubrica Comentários/Perguntas e muito mais ao visitar a página do modelo em www.garnstudio.com © 1982-2026 DROPS Design A/S. Todos os direitos reservados. Este documento, incluuindo as suas su-secções, tem copyrights. Saia mais o que pode fazer com os nossos modelos no fim de cada uma das páginas do nosso site. |
|


Com mais de 40 anos no design de modelos de tricô e de croché, a DROPS Design oferece uma das mais vastas colecções demodelos gratuitos na Internet - traduzidos em 17 línguas. Neste dia de hoje, temos 324 catálogos e 12290 modelos - dos quais 12271 estão traduzidos em português.
Trabalhamos com muito empenho para lhe proporcionar o melhor que o tricô e o croché têm para oferecer, para lhe fornecer inspiração e conselhos bem como fios da mais elevada qualidade a preços incríveis! Gostaria de usar os nossos modelos para outros fins que não uso pessoal? Pode ler o que lhe é permitido fazer no Copyright texto que se encontra na parte de baixo de todos os nossos modelos. Bom tricô! Bom croché!
Deixe um comentário acerca do modelo DROPS 81-7
Gostaríamos muito de saber o que tem a dizer-nos acerca deste modelo!
Se deixar uma pergunta acerca do modelo, certifique-se de que escolhe a categoria adequada no formulário abaixo para acelerar o processo relativo à resposta. Os campos obrigatórios estão assinalados com um *.