
Categorias populares
Procura um fio?


Comentários / Perguntas (28)
![]() Gudrun escreveu:
Gudrun escreveu:
Guten Tag, ich habe beim Rückenteil auf jeder Seite die Maschen abgenommen. Die Zunahme soll nach 5 cm erfolgen. Muss ich nun erst noch 5 cm stricken? Vielen Dank für Ihre Unterstützung Gudrun
15.03.2025 - 12:58DROPS Design respondeu:
Liebe Gudrun, die Abnahmen sollen nach ca 4 cm fertig sein (insgesamt. 11 Reihen *1. R: Abnahme, 2. Reihe ohne Abnahmen. 3. Reihe abnehmen; 4. Reihe ohne abnahmen, 5. Reihe abnehmen*, insgesamt 2 Mal von *bis* stricken, dann bei der nächsten Reihe abnehmen = 7 Mal insgesamt abwechslungsweise in jeder Reihe und in jeder 2. Reihe), so können Sie die Zunahmen nach 5 cm ab Anschlagksante anfangen. Viel Spaß beim Stricken!
17.03.2025 - 07:39
![]() Cecile Vandenborre escreveu:
Cecile Vandenborre escreveu:
Zou graag dat patroon willen bestellen vind het heel mooi en wil het proberen het te breien bedankt groetjes Cecile
20.02.2025 - 07:32
![]() Gre Minnaert escreveu:
Gre Minnaert escreveu:
Mooie spencer ik vraag me af of de armsgaten niet te wijd zijn
03.02.2025 - 19:55
![]() Monique Gallardo escreveu:
Monique Gallardo escreveu:
Le modèle de ce gilet est très beau. Modèle que je cherchais... Merci pour partage...
14.11.2024 - 21:40
![]() Brigid escreveu:
Brigid escreveu:
It's still unclear to me. one surface is mostly knit stiches (smoother texture), and one surface is mostly purl (bumpy texture) which is the right side and which is the wrong side? Thank you
13.11.2024 - 11:25DROPS Design respondeu:
Dear Brigid, the right side is the side where you work alternately (K1, P1) - you can add a marker on this side of piece to remember that's the right side. Happy knitting!
13.11.2024 - 17:06
![]() Brigid escreveu:
Brigid escreveu:
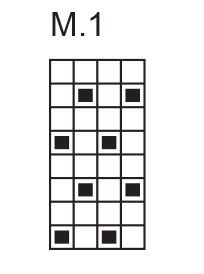
When knitting the ridge M.1, every second row is entirely knit stitches. Are these knit rows on the right side or the wrong side of the piece ? Thank you
12.11.2024 - 23:38DROPS Design respondeu:
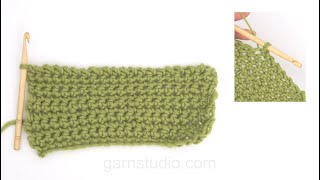
Dear Brigid, M.1 is a kind of seed/moss stitch, so start from RS with row 1: (K1, P1) repeat from (to), Row2: purl all stitches, Row 3: (P1, K1) repeat from (to), Row 4: purl all stitches. Repeat these 4 rows. Happy knitting!
13.11.2024 - 08:05
![]() Brigid escreveu:
Brigid escreveu:
Does the back of this also have the texture, or is it just stocking stitch?
07.10.2024 - 15:42DROPS Design respondeu:
Dear Brigid, back piece is here worked entirely in stocking stitch, only front pieces are worked in moss/seed stitch. Happy knitting!
07.10.2024 - 16:08
![]() Ellen escreveu:
Ellen escreveu:
How do you do the bind off on the right front piece after casting on the stitches?
04.09.2024 - 15:51DROPS Design respondeu:
Hi Ellen, The text should say to decrease, not bind off, inside the 1 edge stitch by the armhole. Decrease by working 2 stitches together after working the edge stitch. Happy knitting!
05.09.2024 - 06:41
![]() Teresa Soza escreveu:
Teresa Soza escreveu:
Please, I need a more detalles instruction for the increases in the L side at the beginning of front
04.08.2024 - 22:02DROPS Design respondeu:
Dear Mrs Soza, for the right front piece you will increase on the right side of piece (1 time on every row, 2 times on every other row) - either at the beg of row from RS or at the end of row from WS; and at the same time increase on the left side of piece = at the end of every row from RS. Happy knitting!
05.08.2024 - 08:14
![]() Bärbel Grabsch escreveu:
Bärbel Grabsch escreveu:
Hallo, was ist mit den Zunahmen in jeder Reihe gemeint? Bezieht sich das nur auf Hinreihen oder muss in Hin-und Rückreihen zugenommen werden? Vor den Randmaschen und nach den Randmaschen? Ich habe schon einige Teile nach euren Anleitungen gestrickt, komne diesmal aber irgendwie nicht zurecht. Liebe Grüße Bärbel
17.07.2024 - 16:32DROPS Design respondeu:
Liebe Bärbel, wenn in jeder Reihe zugenommen werden soll, dann sind auch die Rück-Reihen gemeint (also Hin- UND Rück-Reihen). Die Zunahmen arbeiten Sie direkt neben der Randmasche (die Randmasche bleibt immer ganz außen am Rand). Gutes Gelingen weiterhin!
22.07.2024 - 10:16
|
|||||||
Tropical Oceania |
|||||||
 |
 |
||||||
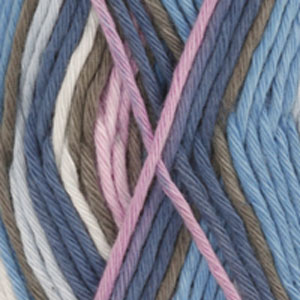
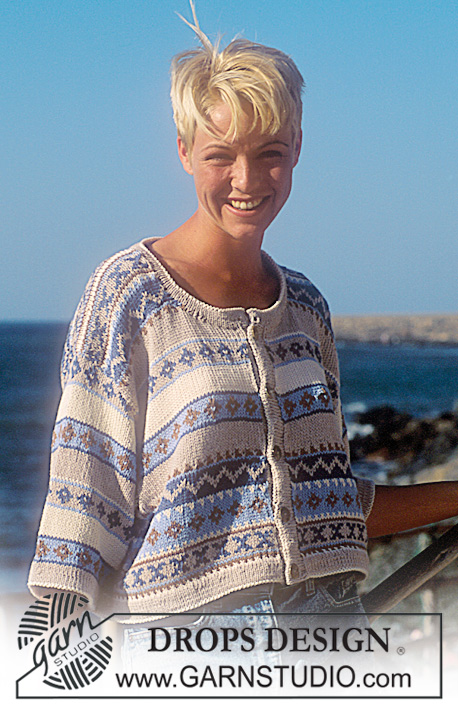
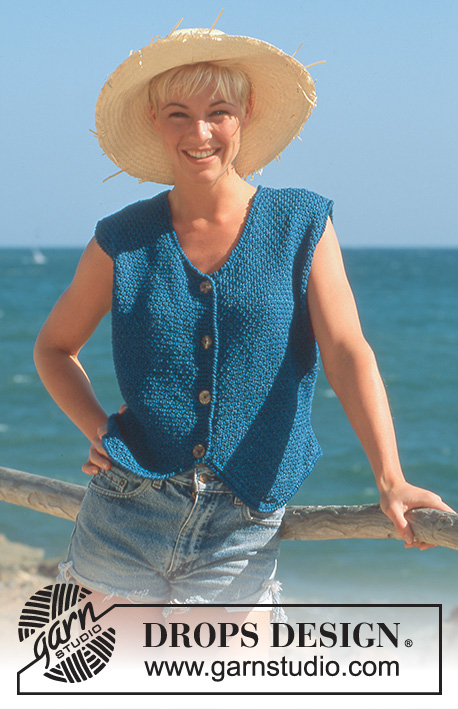
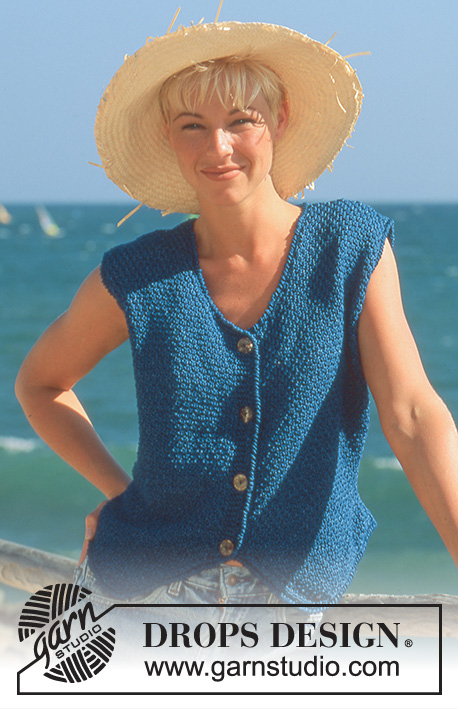
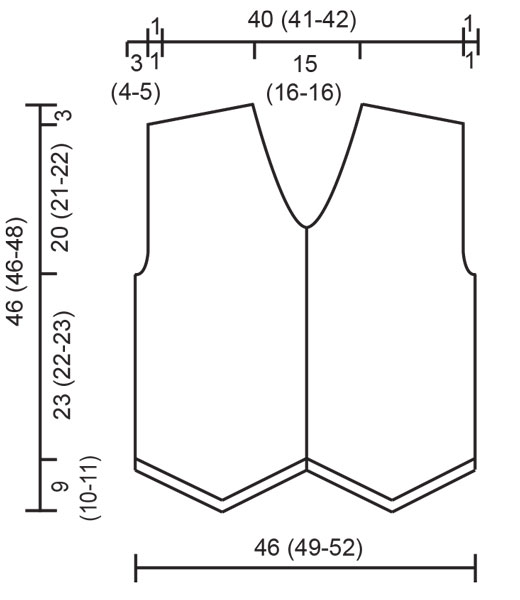
Colete DROPS em ponto texturado, em Muskat. Do S ao L.
DROPS 41-7 |
|||||||
|
Explicações Amostra: 20 malhas x 26 carreiras = 10 x 10 cm em ponto meia com as agulhas 4 mm Ponto jarreteira (em idas e voltas): Tricotar todas as carreiras em meia Casas: Fazer as casas na orla da frente direita: arrematar a 3.ª e a 4.ª malhas a partir do rebordo, montar 2 malhas na carreira seguinte. Fazer as casas quando a peça medir: 1-1-1, 10-10-11, 19-19-20 e 28-28-30 cm de altura total. Frente direita: Com o fio azul marinho e as agulhas 4 mm montar 3 malhas e tricotar M1 e, AO MESMO TEMPO, aumentar de cada lado da peça a 1 malha dos rebordos da seguinte maneira: À direita (= no meio do lado da frente): 14-15-16 vezes 1 malha Tamanho S: alternadamente em todas as carreiras e a cada 2 carreiras Tamanhos M e L: alternadamente 1 vez todas as carreiras, 2 vezes a cada 2 carreiras À esquerda (= no lado): 13-14-15 vezes 2 malhas Tamanhos S e M: alternadamente 1 vez em todas as carreiras, 2 vezes a cada 2 carreiras Tamanho L: a cada 2 carreiras = 43-46-49 malhas. A peça mede cerca de 9-10-11 cm de altura total. Medir a partir daqui. Montar 1 malha à esquerda (= malha ourela para a costura) e 5 malhas à direita (= orla frente) = 49-52-55 malhas. Tricotar as 5 malhas de orla da frente em ponto jarreteira. Não esquecer as casas – ver acima. Continuar diminuindo à esquerda 1 1 malha do rebordo alternadamente 1 vez em todas as carreiras e 2 vezes a cada 2 carreiras: 7 vezes 1 malha = 42-45-48 malhas. A 5 cm de altura total, aumentar à esquerda a 1 malha do rebordo a cada 4 carreiras: 10 vezes 1 malha = 52-57-58 malhas. A 2.-23-23 cm de altura total, arrematar para a cava à esquerda a cada 2 carreiras: 3-3-4 vezes 2 malhas e 1-3-3 vezes 1 malha = 45-46-47 malhas. A 29-29-31 cm de altura total, arrematar para o decote à direita a cada 2 carreiras: 1 vez 5-6-6 malhas, 3 vezes 2 malhas e 4 vezes 1 malha e a cada 4 carreiras: 5 vezes 1 malha. AO MESMO TEMPO, a 43-43-45 cm de altura total, arrematar para o ombro a cada 2 carreiras: 3 vezes 6 malhas e depois as 7-7-8 últimas malhas. A peça mede cerca de 46-46-48 cm de altura total (comprimento total incluindo a parte de baixo da frente = cerca de 55-56-59 cm). Frente esquerda: Tricota-se como a frente direita, mas em sentido contrário sem as casas. Costas: Com o fio azul marinho e as agulhas 4 mm montar 88-94-100 malhas (incluindo 1 malha ourela de cada lado da peça). Tricotar em ponto meia e, AO MESMO TEMPO, diminuir a 1 malha dos rebordos de cada lado da peça alternadamente 1 vez em todas as carreiras e 2 vezes a cada 2 carreiras 7 vezes 1 malha = 74-80-86 malhas. A 5 cm de altura total, aumentar de cada lado da peça a cada 4 carreiras: 10 vezes 1 malha = 94-100-106 malhas. A 23-22-23 cm de altura total, arrematar para as cavas a cada 2 carreiras: 3-3-4 vezes 2 malhas e 1-3-3 vezes 1 malha = 80-82-84 malhas. A 43-43-45 cm de altura total, arrematar para os ombros a cada 2 carreiras: 3 vezes 6 malhas, depois as 7-7-8 restantes malhas. AO MESMO TEMPO, a 44-44-46 cm de altura total, arrematar para o decote as 26-28-28 malhas centrais depois 2 malhas no lado do decote na carreira seguinte. Todas as malhas estão arrematadas. A peça mede cerca de 46-46-48 cm de altura total. Montagem Costurar os ombros e os lados. Com a agulha de croché 4 mm e o fio azul marinho, crochetar 1 carreira de pontos baixos pelo direito: 30 pontos baixos à volta do decote das costas, 38 pontos baixos ao longo do decote em V, 55 pontos baixos ao longo da frente, 28 pontos baixos até à ponta, 30 pontos baixos ao longo do outro lado da ponta, 70 pontos baixos ao longo das costas depois 1 carreira em ponto caranguejo (carreira de pontos baixos crochetados da esquerda para a direita pelo direito) Repetir estas 2 carreiras à volta das cavas em cerca de 85 pontos baixos. Costurar os botões. |
|||||||
Explicações do diagrama |
|||||||
|
|||||||
 |
|||||||
 |
|||||||
Terminou este projecto?Então, identifique as suas fotos com as tags #dropspattern ou mostre-as na galeria #dropsfan. Precisa de ajuda para este modelo?Encontrará 17 turotiais em vídeo, uma rubrica Comentários/Perguntas e muito mais ao visitar a página do modelo em www.garnstudio.com © 1982-2026 DROPS Design A/S. Todos os direitos reservados. Este documento, incluuindo as suas su-secções, tem copyrights. Saia mais o que pode fazer com os nossos modelos no fim de cada uma das páginas do nosso site. |
|||||||


Com mais de 40 anos no design de modelos de tricô e de croché, a DROPS Design oferece uma das mais vastas colecções demodelos gratuitos na Internet - traduzidos em 17 línguas. Neste dia de hoje, temos 324 catálogos e 12290 modelos - dos quais 12271 estão traduzidos em português.
Trabalhamos com muito empenho para lhe proporcionar o melhor que o tricô e o croché têm para oferecer, para lhe fornecer inspiração e conselhos bem como fios da mais elevada qualidade a preços incríveis! Gostaria de usar os nossos modelos para outros fins que não uso pessoal? Pode ler o que lhe é permitido fazer no Copyright texto que se encontra na parte de baixo de todos os nossos modelos. Bom tricô! Bom croché!
Deixe um comentário acerca do modelo DROPS 41-7
Gostaríamos muito de saber o que tem a dizer-nos acerca deste modelo!
Se deixar uma pergunta acerca do modelo, certifique-se de que escolhe a categoria adequada no formulário abaixo para acelerar o processo relativo à resposta. Os campos obrigatórios estão assinalados com um *.