
Categorias populares
Procura um fio?


Comentários / Perguntas (13)
![]() Kath escreveu:
Kath escreveu:
Bonjour! Je ne suis pas certaine de bien saisir pourquoi en tricotant une housse de coussin carré, nous devons faire des augmentations suite au montage initial et des diminutions vers la fin du tricot avant le rabattage. S'il est carré, ne devrait-il pas y avoir un nombre de mailles constant. Merci beaucoup pour les précisions.
30.11.2025 - 22:29DROPS Design respondeu:
Bonjour Kath, il faut plus de mailles pour tricoter des torsades que pour du jersey, ainsi, lorsque l'on monte le nombre de mailles requis, on va avoir la bonne largeur pour du jersey, mais il faudra ensuite augmenter pour conserver la même largeur quand on va faire les torsades, et, à la fin, il faudra donc diminuer les mailles augmentées pour éviter que le bord ne gondole/ne soit plus large que la partie torsades. Bon tricot!
01.12.2025 - 10:57
![]() Annabelle Garcia Y Vallejo escreveu:
Annabelle Garcia Y Vallejo escreveu:
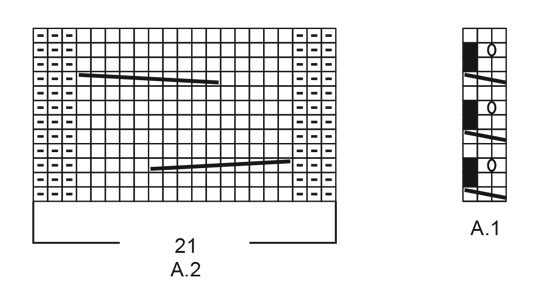
Bonjour, Concernant le diagramme A1 ligne 1 : faut il tricoter les mailles sur lesquelles on fait passer la maille? Ligne 2 sur la torsade ,tricote-t-on à l'endroit où à l'envers? Merci pour votre réponse
18.02.2025 - 11:02DROPS Design respondeu:
Bonjour Mme Garcia Y Vallejo, notez que la housse se tricote en rond = tous les tours à l'endroit; au 1er rang de A.1, tricotez les 3 mailles de A.1à l'endroit puis passez la 1ère de ces 3 mailles par-dessus les 2 autres, ainsi, il ne reste plus que 2 mailles. Au tour suivant, tricotez ces 2 mailles à l'endroit, puis au3ème tour, tricotez: 1 m end, 1 jeté, 1 m end = vous avez de nouveau 3 mailles, tricotez ces 3 mailles à l'endroit au rang suivant. Répétez ces 4 rangs. Retrouvez ici, en vidéo comment tricoter ce type de petite torsade. Bon tricot!
18.02.2025 - 17:17
![]() Rachel escreveu:
Rachel escreveu:
Hi. Am knitting Pillars of Valhalla . Am struggling with the no stitch squares. My reading about it seems to indicate that it balances out decreases, however there are no decreases only increases and I end up with extra stitches at the end of each row! Would love some help!!
18.01.2025 - 01:13DROPS Design respondeu:
Dear Rachel, the A.1 pattern have differents stitchcount in different rows. In the first row, you have 3 stitches, from which you decrease 1, thus in the 2-3. row you ill have 2 stitches there, but in the 3rd row, you make a YO (the little O sign between the two stitches on the diagram) between the two stitches so you will have 3 stitches again. Happy Knitting!
18.01.2025 - 01:54
![]() Rose escreveu:
Rose escreveu:
Hi, How do we follow the A.1 and A.2 pattern? From top to bottom? How do we follow A.1? Would it be for example: 1st A.1: K3 2nd A.1: K3 3rd A.1: skip and KYOK or 1st A.1: K3 2nd A.1: skip KYOK 3rd A.1: skip and K2 Thank you!
22.09.2024 - 11:44DROPS Design respondeu:
Dear Rose, you can read our lesson on knitting charts here: https://www.garnstudio.com/lesson.php?id=68&cid=19. The charts are read from the bottom up. Since it's worked in the round all rows of the chart are read from left to right. In the 1st row of A.1 you have: knit 3, pass the first stitch knitted over the other 2, so it lies around them (= 1 stitch decreased). On the next round, knit 2 (the black square is ignored, don't skip stitches). Happy knitting!
23.09.2024 - 01:11
![]() Genise Huey escreveu:
Genise Huey escreveu:
I am getting more decreases when I do as pattern says: I knit 2 stitches and then knit two together and then knit 3 and then knit two together. K2, k2tg k3, k2tg…..
17.09.2024 - 22:09DROPS Design respondeu:
Dear Mrs Huey, adjust the number of stitches worked between each decrease so that you decrease the correct number of stitches - read more here. Happy knitting!
18.09.2024 - 08:26
![]() Maureen Gillespie escreveu:
Maureen Gillespie escreveu:
For the pattern repeat, on the wrong side (even) rows, should I reverse the stokinette stitch to be p1, k1? [Original instructions show "11-20 stitches in stockinette stitch (*k1, p1*)"] Thank you!
08.11.2023 - 21:58DROPS Design respondeu:
Dear Mrs Gillepsie, there is no wrong side rows as the piece is worked in the round, diagrams are showing all the rows, so work all rows in diagram reading from right towards the left and knit all stitches in stocking stitch. Happy knitting!
09.11.2023 - 08:26
![]() Maureen escreveu:
Maureen escreveu:
NO STITCH: What do I do with the first stitch? K together with 2nd stitch? transfer to the right needle? drop? Thank you!
12.10.2023 - 22:05DROPS Design respondeu:
Dear Maureen, after you have worked 1st row in A.1 (= knit 3 and pass the first of these 3 sts over the 2 sts), there are only 2 sts left, just knit these 2 sts . On next round, you will then work K1, YO, K1 (there are 3 sts again). Happy knitting!
13.10.2023 - 08:45
![]() Maureen escreveu:
Maureen escreveu:
Pattern repeat *A1, A2* If A1 is hold 3 sticthes on cable needle, k3, then k3 from cable needle = 28 stitches (not 25)
12.10.2023 - 19:46DROPS Design respondeu:
Dear Maureen, A.1 is first worked over 3 stitches but on the first row you will decrease 1 stitch (knit 3, pass the first of these 3 sts over the next 2), and on row 2 you will make 1 yarn over to get 3 sts again - so that A.1 is counted over 3 sts. You will then work: A.1, A.2, A.1, A.2, A.1, A.2, A.1. = 3+21+3+21+3+21+3=75 sts in total. Happy knitting!
13.10.2023 - 08:35
![]() Judy escreveu:
Judy escreveu:
This pillow comes in two sizes which are accounted for in the two numbers of sts to cast on and work. However, when you get to the length of the pillow, there is only one number. Doesn't the larger pillow need to be made a little longer in order to make it square? I am assuming the 38 cm is for the smaller pillow. How long should I make it for the larger pillow?
06.10.2022 - 19:36DROPS Design respondeu:
Hi Judy, for the larger pillow you should work until work measures 43 cm - added on pattern,thanks for nociting. Happy knitting!
18.11.2022 - 14:26
![]() UteEspunkt escreveu:
UteEspunkt escreveu:
Tolle Anleitung! Perfekt beschrieben u einfach zum Nacharbeiten! Und ein wunderbares Garn (Nepal) .. meine Freundinnen sind ganz neidisch auf mein Kissen 😁
03.02.2021 - 18:34
|
||||||||||||||||||||||
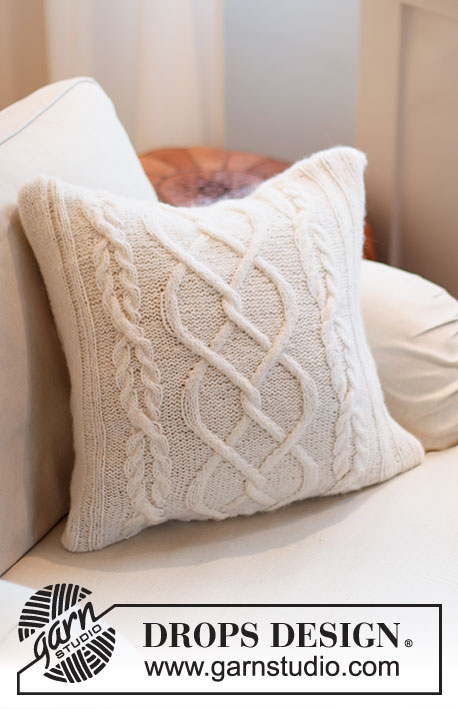
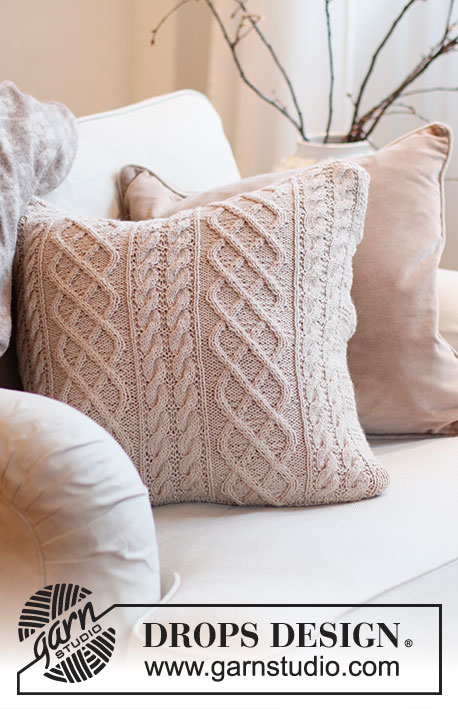
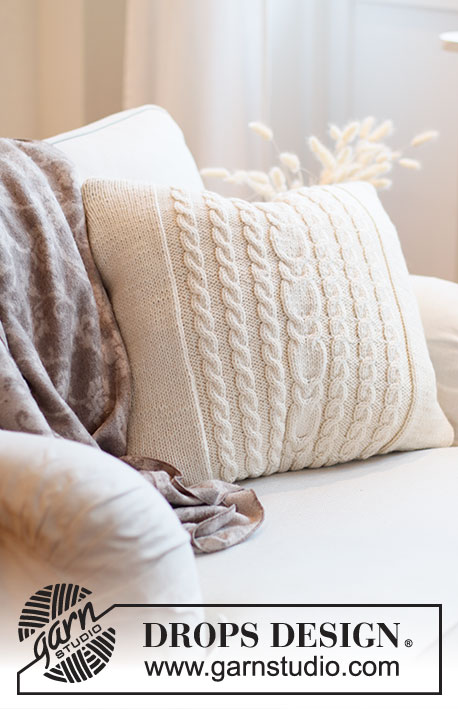
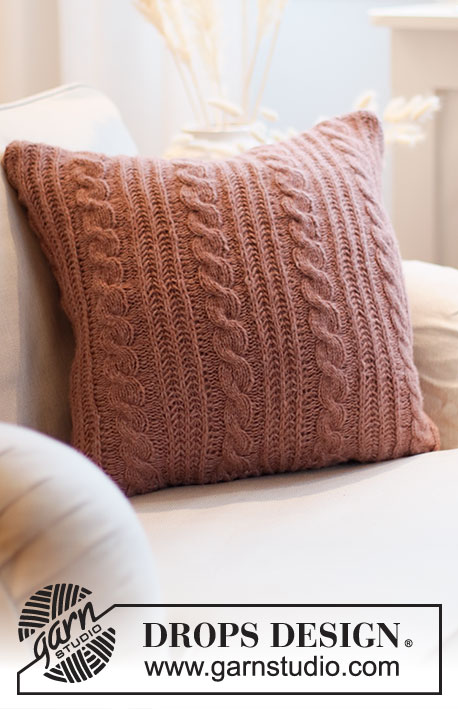
Columns of Valhalla Pillow#columnsofvalhallapillow |
||||||||||||||||||||||
 |
 |
|||||||||||||||||||||
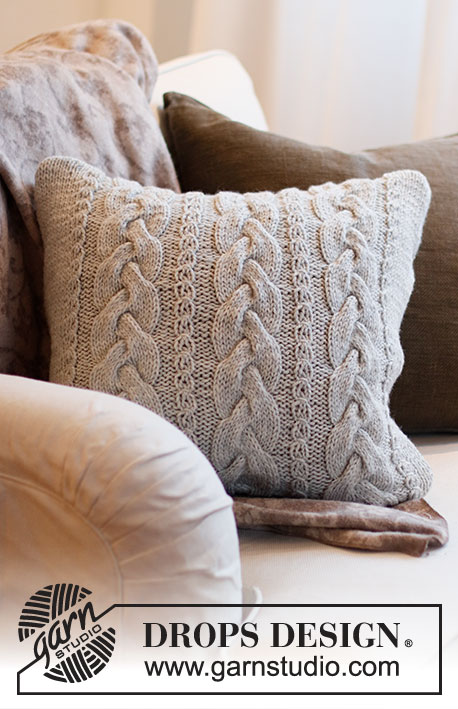
Almofada tricotada com torcidos em DROPS Nepal.
DROPS 215-42 |
||||||||||||||||||||||
|
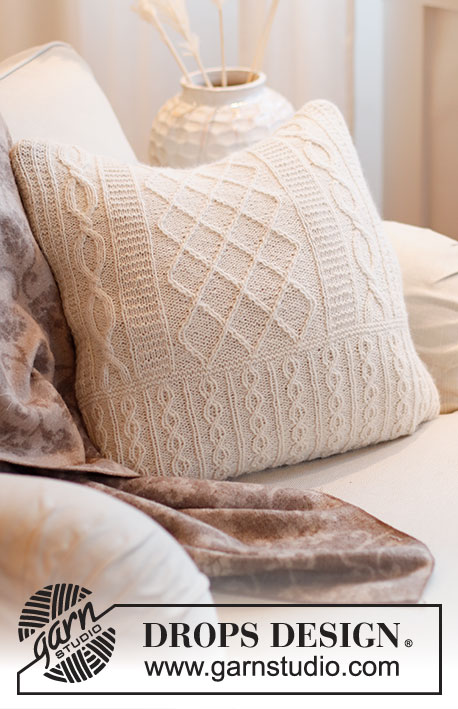
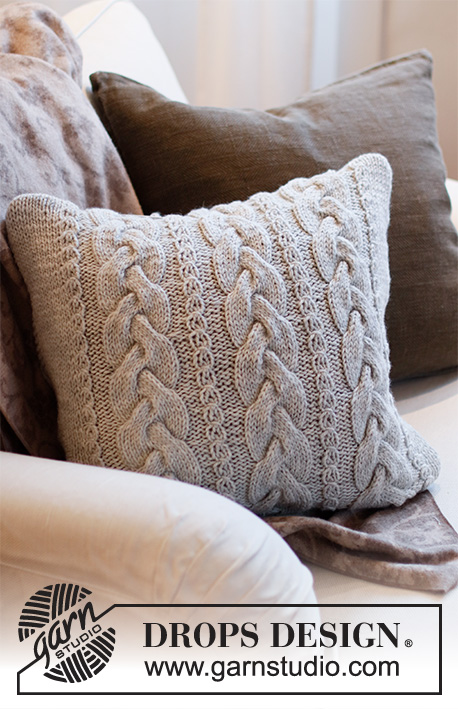
------------------------------------------------------- TÉCNICAS USADAS: ------------------------------------------------------- PONTO JARRETEIRA (A) (em redondo): 1 barra jarreteira = 2 carreiras; Tricotar 1 volta liga e 1 volta meia. PONTO JARRETEIRA (B) (em redondo): 1 barra jarreteira = 2 carreiras; Tricotar 1 volta meia e 1 volta liga. AUMENTOS/DIMINUIÇÕES (a intervalos regulares): Para calcular quando aumentar/diminuir, contar o número total de malhas (por ex. 61 malhas), e dividi-lo pelo número de aumentos/de diminuições a fazer (por ex. 14) = 4.3. AUMENTOS: Fazer 1 laçada depois de alternadamente cada 4.ª e 5.ª malha. Na carreira seguinte, tricotar as laçadas torcidas para evitar buracos. DIMINUIÇÕES: Tricotar juntamente em meia alternadamente cada 3.ª e 4.ª malha e cada 4.ª e 5.ª malha. PONTO FANTASIA: Ver os diagramas A.1 e A.2 – tricotar as 75 malhas seguintes da seguinte maneira: A.1, A.2, A.1, A.2, A.1, A.2, A.1. ------------------------------------------------------- A PEÇA COMEÇA AQUI: ------------------------------------------------------- CAPA DE ALMOFADA – SUMÁRIO DA PEÇA: Tricota-se em redondo, na agulha circular e de cima para baixo, com uma costura na parte de cima e na parte de baixo. Temos torcidos à frente e nas costas. CAPA: Montar 144-162 malhas com a agulha circular 4,5 mm e tricotar 2 BARRAS JARRETEIRA A – ver acima. Tricotar então 1 volta meia aumentando AO MESMO TEMPO da seguinte maneira: aumentar 14 malhas a intervalos regulares – ver AUMENTOS/DIMINUIÇÕES - por cima das 61 primeiras malhas (= 75 malhas), tricotar 11-20 malhas meia, aumentar 14 malhas a intervalos regulares por cima das 61 malhas seguintes (= 75 malhas) e terminar com tricotar em meia 11-20 = 172-190 malhas. Continuar da seguinte maneira: Tricotar 75 malhas no PONTO FANTASIA – ver acima -, 11-20 malhas em ponto meia, 75 malhas no ponto fantasia e terminar com 11-20 malhas em ponto meia. MANTER A MESMA TENSÃO DA INDICADA PARA A AMOSTRA! Continuar desta maneira até a peça medir 38-43 cm – ajustar a altura para depois de uma carreira 4 ou 12 do ponto fantasia. Na carreira seguinte, diminuir da seguinte maneira. Tricotar 1 volta meia diminuindo 14 malhas a intervalos regulares por cima das 75 primeiras malhas – ver AUMENTOS/DIMINUIÇÕES (= 61 malhas), tricotar 11-20 malhas meia diminuindo 14 malhas a intervalos regulares por cima das 75 malhas seguintes (= 61 malhas), terminar com 11-20 malhas meia = 144-162 malhas. Tricotar 2 BARRAS JARRETEIRA B – ver acima arrematar frouxamente. MONTAGEM: Dobrar a peça centrando os torcidos a meio da frente e a meio das costas. Costurar as malhas da montagem juntamente, na alça mais exterior das malhas, enfiar a almofada na capa e costurar as malhas arrematadas juntamente da mesma maneira. |
||||||||||||||||||||||
Explicações do diagrama |
||||||||||||||||||||||
|
||||||||||||||||||||||
 |
||||||||||||||||||||||
Terminou este projecto?Então, identifique as suas fotos com as tags #dropspattern #columnsofvalhallapillow ou mostre-as na galeria #dropsfan. Precisa de ajuda para este modelo?Encontrará 18 turotiais em vídeo, uma rubrica Comentários/Perguntas e muito mais ao visitar a página do modelo em www.garnstudio.com © 1982-2026 DROPS Design A/S. Todos os direitos reservados. Este documento, incluuindo as suas su-secções, tem copyrights. Saia mais o que pode fazer com os nossos modelos no fim de cada uma das páginas do nosso site. |
||||||||||||||||||||||


Com mais de 40 anos no design de modelos de tricô e de croché, a DROPS Design oferece uma das mais vastas colecções demodelos gratuitos na Internet - traduzidos em 17 línguas. Neste dia de hoje, temos 324 catálogos e 12290 modelos - dos quais 12271 estão traduzidos em português.
Trabalhamos com muito empenho para lhe proporcionar o melhor que o tricô e o croché têm para oferecer, para lhe fornecer inspiração e conselhos bem como fios da mais elevada qualidade a preços incríveis! Gostaria de usar os nossos modelos para outros fins que não uso pessoal? Pode ler o que lhe é permitido fazer no Copyright texto que se encontra na parte de baixo de todos os nossos modelos. Bom tricô! Bom croché!
Deixe um comentário acerca do modelo DROPS 215-42
Gostaríamos muito de saber o que tem a dizer-nos acerca deste modelo!
Se deixar uma pergunta acerca do modelo, certifique-se de que escolhe a categoria adequada no formulário abaixo para acelerar o processo relativo à resposta. Os campos obrigatórios estão assinalados com um *.