
Oblíbené kategorie
Hledáte přízi?


Komentáře / Otázky (49)
![]() Nova napsala:
Nova napsala:
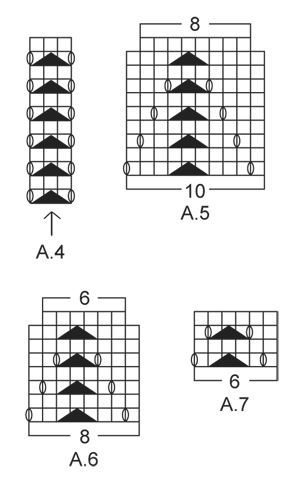
At the beginning of the A4 graph is the YO between the last stitch on the body and the first stitch on the sleeve?
07.04.2021 - 13:43Odpověď DROPS Design :
Dear Nova, the stitch with the arrow in A.4 should be the one with the marker at the transitions, so that you will have 1 yarn over, the double decrease with marker in the middle stitch, 1 yarn over; this means there will be one hole (yarn over) on body and on sleeve. Happy knitting!
07.04.2021 - 14:26
![]() Nova napsala:
Nova napsala:
After attaching the sleeves for size L and beginning middle back for the first round, it says to start on the same row for the sleeve as for the body. Does this mean if I’m on row 4 on the body (A1) that I start on row 4 for the sleeves (A3)? Also A1 the arrow designates the middle of the sleeve but the graph starts with A4 which is 3 stitches and A3 is another 3 sts total 6 sts wouldn't the middle be half of 68 sts which is 34 sts?
06.04.2021 - 14:03Odpověď DROPS Design :
Dear Nova, you should finish the sleeves 8adjust its length) so you will end up in the same row if the pattern as on the body, so you can continue the pattern without disrupting it. The arrow should match the middle of the sleeves, the upper middle line, put the stitch marked there, and count outwards to find out where you should start. Happy Knitting!
06.04.2021 - 14:26
![]() Nova napsala:
Nova napsala:
This is becoming a real challenge but I’m not going to give up! I am attaching the sleeves to the body but notice you don’t mention double pointed needles in your materials needed for this project. How are you supposed to knit these sleeves together with the body without them? It won’t work.
25.03.2021 - 01:52Odpověď DROPS Design :
Dear Nova, when you have knitted the sleeves, you put all the stitches on one curcular needle, (back, sleeve, fron, sleeve), and knot the circular needle on the round. You don't knit "together" as a three needle bind off, but along with the body, in one big circle, that is getting decreased as you get to the neckline. Happy Knitting!
25.03.2021 - 02:26
![]() Nova napsala:
Nova napsala:
Hi again. I’m up to the yoke and I’m really confused about this section of the pattern. The fact that there are 3 graphs to be worked is a challenge in itself. The confusion is in the A4 graph between the body and the sleeves, does this have to do with the shaping of the raglan?
09.03.2021 - 13:31Odpověď DROPS Design :
Dear Nova, pattern A.4 is between each body and sleeve, right at the raglan line. Shaping happens before and after this pattern. Happy Knitting!
09.03.2021 - 13:57
![]() Nova napsala:
Nova napsala:
When you get to the side where the first increases have been worked you have two extra stitches so to keep the eyelet pattern uniform, the space between the next eyelet is 9 stitches and that throws the whole eyelet pattern out. I don’t know how you can keep the eyelet pattern 7 stitches between with these increases on the side. The new repeat would make more sense at the beginning of the round.
26.02.2021 - 23:15Odpověď DROPS Design :
See answer below - if you can't work a part of decrease (K2 tog, YO), over the new stitches, just work these stitches in stocking stitch without the lace pattern. You shoulud have the correct number of sts between each eyelet in width. Hope this will help. Happy knitting!
01.03.2021 - 08:00
![]() Nova napsala:
Nova napsala:
The beginning of the round the increases can be worked out but it’s the increases halfway on the side marker those stitches throw the whole eyelet pattern out. You can’t do 7 stitches between the pattern it doesn’t work out I’ve tried it
26.02.2021 - 22:52Odpověď DROPS Design :
Dear Nova, if you don't have enough stitches to work the whole lace pattern on the side, this means there are not enough stitches yet, just work these stitches in stocking stitch. Work the lace pattern over the new stitches only if you have enough stitches to work them. This means each lace pattern should be worked with 7 knit stitches in between. Happy knitting!
01.03.2021 - 07:58
![]() Nova napsala:
Nova napsala:
Are you saying to read the graph from left to right and then right to left alternately and the added stitches will work out with the eyelet pattern?
26.02.2021 - 16:33Odpověď DROPS Design :
Hi Nova, when working in the round all rounds are worked from the right side, and the diagram is read solely from right to left. When starting a new round, simply start working the first symbol on the next row in diagram. Happy knitting!
28.02.2021 - 21:14
![]() Nova napsala:
Nova napsala:
For example on the 3rd round after the first increases there are 4 stitches left at the end of the round and I’m not sure whether to knit those stitches as normal or do the pattern.
26.02.2021 - 15:19Odpověď DROPS Design :
Dear Nova, see previous answer, make always sure that the eyelet pattern fit in height, it shouldn't be displaced. Happy knitting!
26.02.2021 - 16:17
![]() Nova napsala:
Nova napsala:
When doing the body and the A3 and making the increases on either side of the markers I notice that those extra stitches will throw the alternate pattern out where the holes should be. Is that how it’s supposed to be?
26.02.2021 - 15:08Odpověď DROPS Design :
Dear Nova, the increased stitches should be worked in A.3, this means at the beg of A.3 work the new stitches as a new repeat reading diagram from the left towards the right (= there should be always 7 sts before the next K2 tog, YO in the lace pattern. And at the end of A.3, work the new stitches as a new repeat of A.3 (reading from the right towards the left). Hope this will help. Happy knitting!
26.02.2021 - 16:16
![]() Annette Wollbrecht napsala:
Annette Wollbrecht napsala:
Er der en venlig sjæl som kan fortælle mig, om A4 skal strikkes både før og efter markeringerne (altså 2 gange) eller kun 1 gang?
11.06.2020 - 20:09Odpověď DROPS Design :
Hej Annette, A4 skal strikkes én gang i hver raglanovergang og der skal tages ind på hver side ifølge forklaringen til RAGLAN øverst i opskriften. God fornøjelse!
12.06.2020 - 10:19
|
||||||||||||||||||||||||||||
White Romance#whiteromancetop |
||||||||||||||||||||||||||||
 |
 |
|||||||||||||||||||||||||||
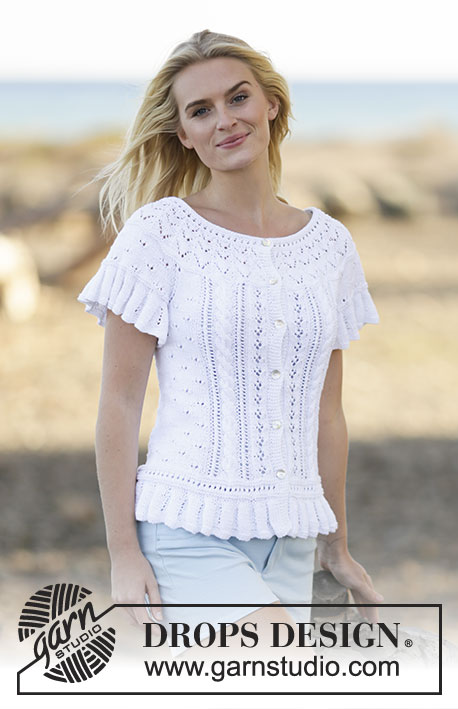
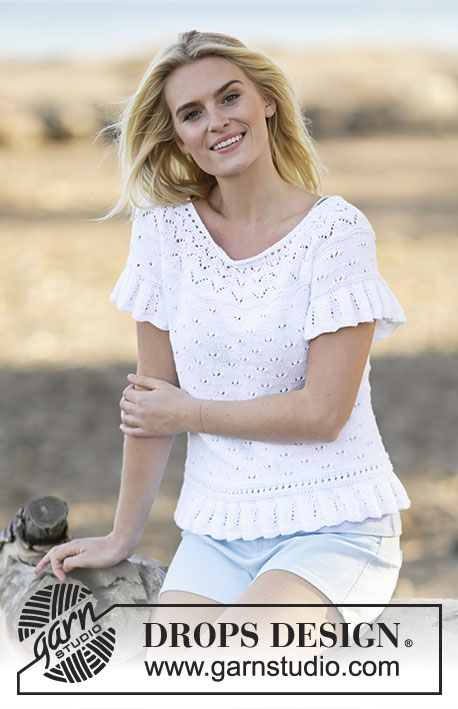
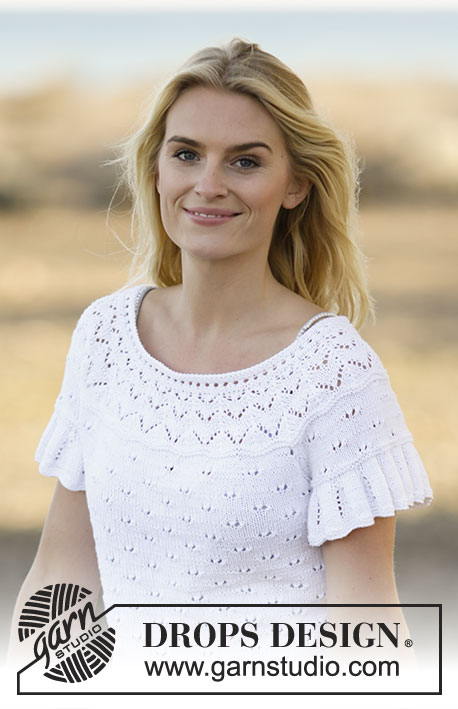
DROPS top - halenka s krátkými rukávy, kruhovým sedlem a ažurovým vzorem pletený z příze "Safran". Velikost: S-XXXL.
DROPS 159-12 |
||||||||||||||||||||||||||||
|
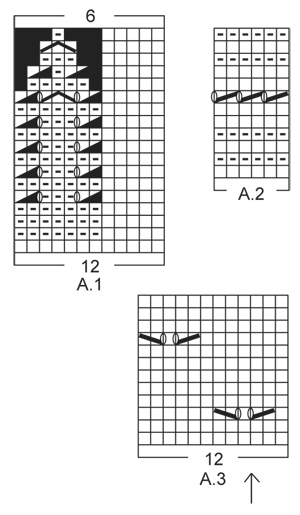
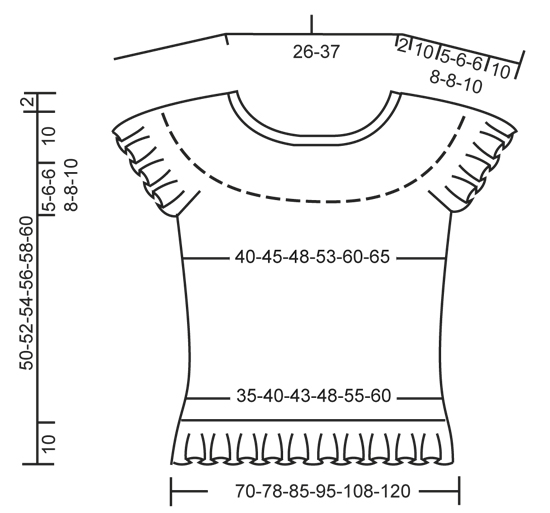
VROUBKOVÝ VZOR: Pleteme střídavě 1 kruhovou řadu hladce, 1 obrace. 1 vroubek = 2 kruhové řady. AŽUROVÝ VZOR: Viz schémata A.1 až A.7; zobrazeny jsou všechny řady vzoru nahlížené z lícové strany. TIP - PŘIDÁVÁNÍ: Přidáváme nahozením. V následující kruhové řadě pleteme nahození hladce za zadní nit, aby se v pletenině netvořily dírky – přidaná oka pleteme lícovým žerzejem. RAGLÁNOVÉ ZKOSENÍ: Pro raglánové zkosení ujímáme na každé straně vzoru A.4 všude tam, kde se stýkají rukávy a trup. ZA vzorem A.4 ujímáme přetažením, tj. 1 oko sejmeme hladce, 1 upleteme hladce a sejmuté přes ně přetáhneme. PŘED vzorem A.4 splétáme 2 oka hladce. ---------------------------------------------------------- TOP - HALENKA: TRUP: Pleteme od dolního okraje k průkrčníku v kruhových řadách na kruhové jehlici. Na kruhovou jehlici č.2,5 nahodíme přízí Safran 336-372-408-456-516-576 ok a upleteme 2 vroubky vroubkovým vzorem – viz výše. Pak pleteninu převedeme na kruhovou jehlici č.3 a pleteme vzor A.1. Po dokončení 1 celé sekvence vzoru A.1 (na výšku) máme na jehlici 168-186-204-228-258-288 ok. Pokračujeme vzorem A.2. Po jeho dokončení upleteme 2 kruhové řady hladce a SOUČASNĚ přidáme v poslední kruhové řadě rovnoměrně 0-6-0-0-6-0 ok = 168-192-204-228-264-288 ok. Označíme si začátek kruhové řady a druhou značku vložíme za 84.-96.-102.-114.-132.-144. oko (= boky). Nyní pleteme vzor A.3. SOUČASNĚ ve výši 12 cm přidáme na obou stranách obou značek 1 oko – viz TIP - PŘIDÁVÁNÍ (= 4 přidaná oka). Toto přidávání opakujeme vždy po 4-4-4-5-5-5 cm výšky, celkem 6x na každé straně = 192-216-228-252-288-312 ok – POZN.: Přidaná oka pleteme lícovým žerzejem. Pleteme až do výše 35-36-38-38-40-40 cm. Následující kruhovou řadu pleteme takto: uzavřeme 5-5-5-6-6-6 ok (= polovina prvního průramku), 86-98-104-114-132-144 ok upleteme (= přední díl), uzavřeme dalších 10-10-10-12-12-12 ok (= druhý průramek; tj. uzavřeme 5-5-5-6-6-6 ok na každé straně značky), upleteme následujících 86-98-104-114-132-144 ok (= zadní díl) a zbylých 5-5-5-6-6-6 ok uzavřeme (= polovina prvního průramku). Pleteninu teď odložíme a upleteme rukávy. RUKÁV: Pleteme v kruhových řadách na kruhové jehlici. Na kruhovou jehlici č.2,5 nahodíme přízí Safran 144-156-156-168-168-180 ok a upleteme 2 vroubky vroubkovým vzorem – viz výše. Pak pleteninu převedeme na kruhovou jehlici č.3 a pleteme vzor A.1. Po jeho dokončení máme na jehlici 72-78-78-84-84-90 ok. Upleteme 2 vroubky a SOUČASNĚ v poslední kruhové řadě uzavřeme prostředních 10-10-10-12-12-12 ok na vnitřní straně rukávu = na jehlici zbývá 62-68-68-72-72-78 ok. Díl odložíme a upleteme stejným způsobem druhý rukáv. SEDLO: Rukávy a trup převedeme na stejnou kruhovou jehlici (rukávy přiložíme k trupu v místech uzavřených pro průramky; oka pouze přesuneme, nepleteme je) = 296-332-344-372-408-444 ok. SOUČASNĚ si označíme 1. i poslední oko každého rukávu (= 4 značky). Začínáme uprostřed zad a pleteme vzorem jako dosud; SOUČASNĚ pleteme rukávy vzorem A.3 (šipka ve schématu označuje střed rukávu, začínáme stejnu řadou vzoru, jakou zrovna pleteme trup). Navíc pleteme ve všech místech, kde se stýkají rukávy a trup, vzor A.4 (šipka ve schématu by měla odpovídat označenému oku). Když upleteme 2 kruhové řady nad všemi oky, začneme tvarovat RAGLÁNOVÉ ZKOSENÍ – viz výše (= ujmeme 8 ok). Toto ujímání opakujeme v každé 4. kruhové řadě, celkem 4-5-5-7-7-8x = 264-292-304-316-352-380 ok. Upleteme 2 vroubky nad všemi oky a SOUČASNĚ ujmeme v 1. kruhové řadě rovnoměrně 4-12-4-6-12-10 ok = 260-280-300-310-340-370 ok. Upleteme 2 kruhové řady hladce. Nyní začneme ujímat pro vytvarování kruhového sedla a pleteme v kruhových řadách vzor A.5 (= v kruhové řadě opakujeme sekvenci vzoru celkem 26-28-30-31-34-37x – POZN.: v případě potřeby převedeme pleteninu na kratší kruhovou jehlici). Po dokončení 1 celé sekvence vzoru A.5 (na výšku) pleteme namísto vzoru A.5 vzor A.6. Po dokončení 1 celé sekvence vzoru A.6 (na výšku) máme na jehlici 156-168-180-186-204-222 ok. Pak pleteme namísto vzoru A.6 vzor A.7. Po dopletení 1 celé sekvence vzoru A.7 (na výšku) tvarujeme pomocí zkrácených řad zadní průkrčník. Označíme si střed předního dílu. Plést začínáme uprostřed zadního dílu a pleteme hladce až po posledních 14-14-16-16-18-20 ok před značkou. Práci otočíme a pleteme hladce zpáteční řadu až po 14-14-16-16-18-20 ok před značkou z druhé strany. Práci otočíme, pleteme hladce po posledních 30-30-34-34-38-42 ok před značkou. Práci otočíme a pleteme hladce zpáteční řadu až po 30-30-34-34-38-42 ok před značkou z druhé strany. Práci otočíme, pleteme hladce po posledních 46-46-52-52-58-64 ok před značkou. Práci otočíme a pleteme hladce zpáteční řadu až po 46-46-52-52-58-64 ok před značkou z druhé strany. Práci otočíme, pleteme hladce po posledních 62-62-70-70-76-86 ok před značkou. Práci otočíme a pleteme hladce zpáteční řadu až po 62-62-70-70-76-86 ok před značkou z druhé strany. Práci otočíme a pleteme hladce zpět k začátku kruhové řady. LEM PRŮKRČNÍKU: Pleteninu převedeme na kruhovou jehlici č.2,5 a pleteme v kruhových řadách nad všemi oky vzor A.2. SOUČASNĚ v 1. kruhové řadě ujmeme rovnoměrně 22-24-24-26-30-32 ok = 134-144-156-160-174-190 ok. Po dokončení celé sekvence vzoru A.2 všechna oka volně hladce uzavřeme. Top měří asi 52-54-56-58-60-62 cm od náramenice k dolnímu okraji. DOKONČENÍ: Sešijeme otvory v podpaží. |
||||||||||||||||||||||||||||
Vysvětlivky ke schématu |
||||||||||||||||||||||||||||
|
||||||||||||||||||||||||||||
 |
||||||||||||||||||||||||||||
 |
||||||||||||||||||||||||||||
 |
||||||||||||||||||||||||||||
Dokončili jste tento model?Pak označte své fotky tagem #dropspattern #whiteromancetop nebo je pošlete do galerie #dropsfan. Potřebujete s tímto návodem poradit?Otevřete-li si návod na stránce garnstudio.com, najdete tam 27 výukových video-ukázek, Komentáře/Dotazy a další užitečné informace. © 1982-2026 DROPS Design A/S. Vyhrazujeme si veškerá práva. Tento dokument, včetně všech jeho dílčích částí, podléhá autorským právům. Podrobnější komentář k možnostem užití našich návodů najdete dole pod každým návodem na našich stránkách. |
||||||||||||||||||||||||||||


V oblasti pletené a háčkované módy působí DROPS Design více než 40 let. Díky tomu vám můžeme nabídnout jednu z nejrozsáhlejších kolekcí modelů s bezplatnými návody dostupnými na internetu - navíc v 17 jazycích. K dnešnímu dni máme na 324 katalogů a 12245 návodů celkem - z nich je už 7531 dostupných v [češtině].
Přidejte komentář k návodu DROPS 159-12
Rádi bychom věděli, co si o tomto modelu myslíte!
Pokud se chcete na něco zeptat, dbejte prosím na to, abyste ve formuláři níže vybrali správnou kategorii - díky tomu se dříve dozvíte, co potřebujete vědět. Povinná pole jsou označena *.