
Oblíbené kategorie
Hledáte přízi?


Komentáře / Otázky (21)
![]() Julia Schueler napsala:
Julia Schueler napsala:
Hallo, ich habe nicht richtig aufgepasst und den Kragenteil nicht rund sondern hin und her gestrickt. Nach 27cm aufgeteilt und eine Seite nun in Hin und Her fertig gestellt. Ich kann mir irgendwie nicht vorstellen, wie das Teil nachher aussieht oder angezogen wird. Ich werde nun den Kragen zusammen naehen, damit er rund wird. Haben Sie noch einen Tipp? Danke im Voraus, Julia
12.12.2014 - 13:42Odpověď DROPS Design :
Antwort siehe unten! :-)
14.12.2014 - 10:24
![]() Julia Schueler napsala:
Julia Schueler napsala:
Hallo, ich habe nicht richtig aufgepasst und den Kragenteil nicht rund sondern hin und her gestrickt. Nach 27cm aufgeteilt und eine Seite nun in Hin und Her fertig gestellt. Ich kann mir irgendwie nicht vorstellen, wie das Teil nachher aussieht oder angezogen wird. Ich werde nun den Kragen zusammen naehen, damit er rund wird. Haben Sie noch einen Tipp? Danke im Voraus, Julia
12.12.2014 - 10:48Odpověď DROPS Design :
Sie können auf dem Foto ja das Vorderteil sehen, dieser "Lappen", der sich an den Halsteil anschließt. Das sieht auf der Rückseite, im Nacken den Rücken runter, ebenso aus. Wenn Ihnen das hinten zu lang ist, können Sie den hinteren Teil auch einfach kürzer stricken. Sie können den oberen Teil des Kragens, den Halsteil, einfach zusammennähen, das ist kein Problem.
14.12.2014 - 10:01
![]() Kate napsala:
Kate napsala:
V popisu je spatna delka lanka, ma byt 60cm ne 80cm, pro zacatecnika to muze byti matouci. Diky za opravu.
08.12.2014 - 14:52Odpověď DROPS Design :
Dobrý den, díky za upozornění - opraveno.
10.12.2014 - 00:10Diane Carlson napsala:
Hi again. I just posted a question but have found my answer in the other comments made for this pattern. Looks like I have to rip out a row and get back to 120 stitches. Oh well, live and learn!
23.11.2014 - 03:08Diane Carlson napsala:
I have started this pattern but am confused about the M1 on all stitches. Will I have 240 stitches on my needle after I M1 on all stitches? Thank you for your help.
23.11.2014 - 03:00Odpověď DROPS Design :
Dear Mrss Carlson, you have 120 sts for the neck warmer (ie "collar"), you work M1 on all sts, ie you repeat the 3 sts in diagram a total of 40 times around (Row 1 = *K1, P2* repeat from *-* around). When piece measures 27 cm, divide work in 2 pieces and finished each piece (front & back piece = 60 sts each) separately back and forth on needle. Happy knitting!
24.11.2014 - 11:04
![]() Carole napsala:
Carole napsala:
It did not say in the pattern to start at the bottom right square and read from right to left every round . Now I am dividing the stitches. My last right side row was K1P2 reading from right to left. Now going back on the wrong side am I going to K1P2 or am I going to P2K1? Pattern just not matching.
20.01.2014 - 01:43Odpověď DROPS Design :
Dear Carole, look at your last st worked from RS at the end of row and mark it on the diagram, you will then know how where to start from WS. Happy knitting!
20.01.2014 - 09:24
![]() Carole napsala:
Carole napsala:
My last row on right side on 60 stitches was Purl 2 Knit 1 and then I added a stitch on the end to make 61. Please just tell me what to do going back across on the wrong side. I have worked on this all day and keep ripping out. I did not have any trouble until I divided the stitches. Thank you.
04.01.2014 - 06:14Odpověď DROPS Design :
Dear Carole, just mark in diagram where you stopped from RS and continue following diag back and forth, reading from right to left the RS rows and from right to left the WS rows. the first 2 sts each side should be worked in garter st. Happy knitting!
04.01.2014 - 10:52
![]() Carole Lewis napsala:
Carole Lewis napsala:
After you cast on stitches, are the first 4 rows worked in the round--Rnd 1-k, Rnd-2 p, Rnd-3 k, and Rnd-4 p. Then do you start working back and forth or continue in the round. Diagram is confusing to me.
28.12.2013 - 02:03Odpověď DROPS Design :
Dear Mrs Lewis, after cast on sts, continue in the round until work measures 27 cm, then divide in 2 pieces and work each part separately. In the diagram, 1 square = 1st x 1row, in the round, start on the bottom corner on the right side towards the left every round. When working in rows, read WS rows from left towards the right. Happy knitting!
30.12.2013 - 15:21
![]() Colleen napsala:
Colleen napsala:
Confused when switching from knitting in the round to knitting back and forth. Cannot get the pattern to match. Last row worked (RS) was P1K2 across. What would be the pattern going from row 2 (WS)? Thanks.
09.02.2013 - 14:44Odpověď DROPS Design :
Dear Colleen, it seems last round you work was a row 2 in the diagram, so that you have to continue with row 3 in the diagram, seen from WS. Happy knitting!
11.02.2013 - 09:19Maria Del Consuelo Hernandez napsala:
Hola me gustaria que me dijeran como terminar mi prenda gracias
30.11.2011 - 03:13
|
|||||||
Snuggles#snugglesneckwarmer |
|||||||
|
|
|||||||
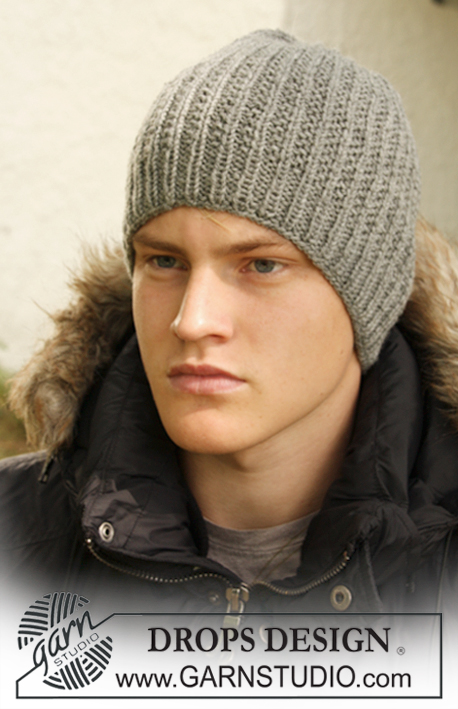
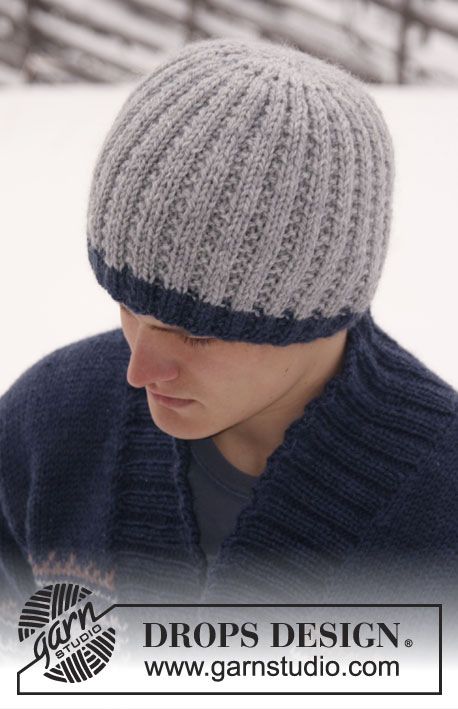
DROPS nákrčník pletený strukturovaným vzorem z příze „Karisma“.
DROPS 135-30 |
|||||||
|
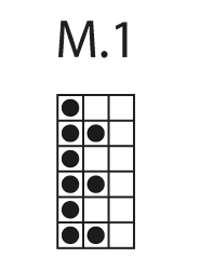
VROUBKOVÝ VZOR (v lícových a rubových řadách): stále hladce VROUBKOVÝ VZOR (v kruhových řadách): 1 kruhová řada hladce, 1 kruhová řada obrace. VZOR: viz schéma M. 1. Na schéma nahlížíme z lícové strany. ---------------------------------------------------------------------- NÁKRČNÍK: Pleteme ve směru shora dolů. PAMATUJTE NA SPRÁVNÉ NAPĚTÍ PŘÍZE! Na kruhovou jehlici č. 4 nahodíme přízí Karisma 120 ok, spojíme do kruhu. 4. řady pleteme VROUBKOVÝM VZOREM – viz popis výše! Dále pokračujeme vzorem M. 1. Ve výšce 27 cm práci rozdělíme na přední a zadní díl. Prvních 60 ok ponecháme na jehlici, zbývajících 60 ok odložíme na pomocnou jehlici. PŘEDNÍ DÍL: Nad 60 oky pleteme lícové a rubové řady vzorem. SOUČASNĚ v první řadě na konci přidáme nově 1 oko = 61 ok. Pleteme vzorem M. 1, na obou stranách pleteme 2 oka VROUBKOVÝM VZOREM – viz popis výše. Ve výšce 12 cm od rozdělení upleteme 4. řady VROUBKOVÝM VZOREM a oka volně uzavřeme. Díl měří asi 40 cm. ZADNÍ DÍL: Oka z pomocné jehlice vrátíme na pracovní jehlici a díl upleteme stejně jako přední díl. |
|||||||
Vysvětlivky ke schématu |
|||||||
|
|||||||
 |
|||||||
Dokončili jste tento model?Pak označte své fotky tagem #dropspattern #snugglesneckwarmer nebo je pošlete do galerie #dropsfan. Potřebujete s tímto návodem poradit?Otevřete-li si návod na stránce garnstudio.com, najdete tam 11 výukových video-ukázek, Komentáře/Dotazy a další užitečné informace. © 1982-2026 DROPS Design A/S. Vyhrazujeme si veškerá práva. Tento dokument, včetně všech jeho dílčích částí, podléhá autorským právům. Podrobnější komentář k možnostem užití našich návodů najdete dole pod každým návodem na našich stránkách. |
|||||||


V oblasti pletené a háčkované módy působí DROPS Design více než 40 let. Díky tomu vám můžeme nabídnout jednu z nejrozsáhlejších kolekcí modelů s bezplatnými návody dostupnými na internetu - navíc v 17 jazycích. K dnešnímu dni máme na 324 katalogů a 12290 návodů celkem - z nich je už 7603 dostupných v [češtině].
Přidejte komentář k návodu DROPS 135-30
Rádi bychom věděli, co si o tomto modelu myslíte!
Pokud se chcete na něco zeptat, dbejte prosím na to, abyste ve formuláři níže vybrali správnou kategorii - díky tomu se dříve dozvíte, co potřebujete vědět. Povinná pole jsou označena *.