
Oblíbené kategorie
Hledáte přízi?


Komentáře / Otázky (18)
![]() Birgitta napsala:
Birgitta napsala:
Hej 🧶🙏☀️ Förstår inte hur jag ska öka på armen så mönstret stämmer . Med vänlig hälsning, Birgitta
24.02.2026 - 12:14Odpověď DROPS Design :
Hei Birgitta. Strikk de økte maskene i glattstrikk til du har nok masker til at de kan inngå i mønstret. Men husk at når du starter på mønstret, så sørg for å få en rapport midt oppå ermet. mvh DROPS Design
09.03.2026 - 09:47
![]() Lydie napsala:
Lydie napsala:
Bonjour et merci de vos réponses, de plus rapides. Comment tricoter les motifs quand le nombre de mailles est inférieur aux 12 du diagramme ? Cordialement Lydie
24.11.2025 - 16:53
![]() Lydie napsala:
Lydie napsala:
Comment tricoter les motifs avec les augmentations de la manche ? Merci de votre réponse Cordialement
20.11.2025 - 22:10Odpověď DROPS Design :
Bonjour Lydie, les augmentations à la fin de tour se tricotent comme la maille suivante du motif (en lisant le diagramme de droite à gauche), celles au début du tour vont se tricoter comme la maille précédente (on va lire le diagramme de gauche à droite pour étendre le motif vers la droite). Bon tricot!
21.11.2025 - 07:43
![]() Lydie napsala:
Lydie napsala:
Peut on tricoter les manches avec une aiguille circulaire D avance merci
05.11.2025 - 22:22Odpověď DROPS Design :
Bonjour Lydie, tout à fait, vous pouvez commencer les manches avec une aiguille circulaire de 40 cm ou bien dès le début tricoter en magic loop avec une aiguille circulaire de 80 cm. Bon tricot!
06.11.2025 - 09:19
![]() Lone napsala:
Lone napsala:
Hvordan får man placeret en rapport på midten?
06.09.2025 - 18:18Odpověď DROPS Design :
Hei Lona. Da må man telle hvor mange masker man har, og så finne ut hvor man skal starte på diagrammet i forhold til hvor mange masker man har fra midt under til midt oppå. mvh DROPS Design
22.09.2025 - 10:15
![]() Alice napsala:
Alice napsala:
Is there a simple way to convert this pattern to a cardigan? I just love the design!
24.08.2025 - 18:30Odpověď DROPS Design :
Dear Alice, we don't make custom patterns. You will need to calculate the pattern by checking how to center the texture patterns while adding the bands. It would be easier to look for a simple cardigan worked in DROPS Karisma and then work the texture pattern over that cardigan. Happy knitting!
26.08.2025 - 23:12
![]() Silke napsala:
Silke napsala:
Moin Der Pullover ist wunderschön und ich würde ihn mir gerne stricken. Aber leider nur bis Gr. L . Das ist mir zu klein. Wird die Anleitung aktualisiert? Die neueren Anleitungen sind meistens bis Gr. XXL.
23.08.2025 - 19:58Odpověď DROPS Design :
Liebe Silke, hier finden Sie Modellen für XXL mit einer ähnlichen Maschenprobe, das kann Ihnen inspirieren, um dieses Modell zu den gewüsnchten Größe anzupassen. Viel Spaß beim Stricken!
25.08.2025 - 10:01
![]() Lena napsala:
Lena napsala:
Ik heb een proeflesje gebreid van de wol die voor dit patroon genoemd wordt en nu is het proeflapje 11 breedt en 11,5 hoog. Maar ik vind de stevigheid en dichtheid van het lapje al best hoog en wil liever niet een dunnere naald gebruiken. Wat kan ik doen?
03.04.2025 - 10:02Odpověď DROPS Design :
Dag Lena,
Dit is wel de normale stekenverhouding voor dit garen. Als je het toch losser wilt hebben, zou je het patroon om kunnen rekenen op basis van je stekenverhouding. Dus berekenen hoeveel steken je op moet zetten om dezelfde breedte te krijgen. Je zult dus minder op moeten zetten.
09.04.2025 - 11:00
![]() Jillian Watson napsala:
Jillian Watson napsala:
I require a shorter garment than the pattern shows. I have adjusted the length of the body between the bottom & the split for the armholes. Do i adjust the armhole length accordingly, or do I follow the armhole measurement shown on the pattern to accommodate the sleeve? Thank you.
01.03.2025 - 11:07Odpověď DROPS Design :
Dear Jillian, the upper section, from the armholes to the neck, should remain the same, since these yoke decreases are fundamental to keep the correct shaping of the piece.To shorten the piece you only need to shorten the body section, between the lower edge and before the armholes. Happy knitting!
02.03.2025 - 18:43
|
|||||||
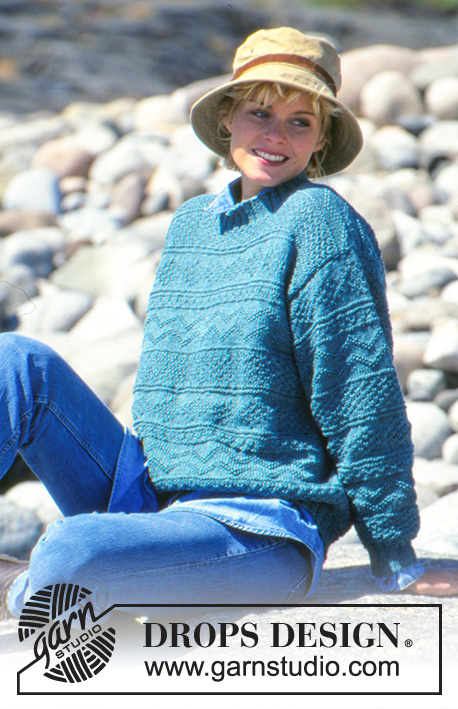
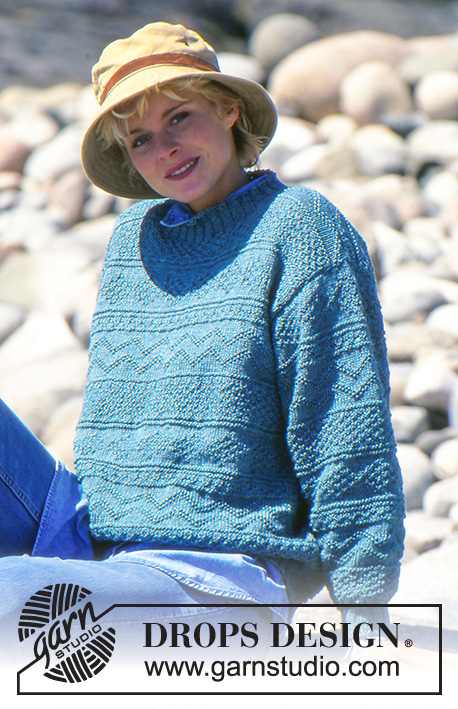
Water Textures |
|||||||
 |
 |
||||||
Dámský a pánský pulovr pletený z příze DROPS Karisma
DROPS 40-8 |
|||||||
|
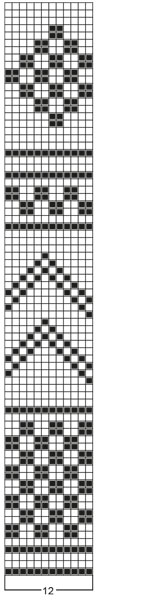
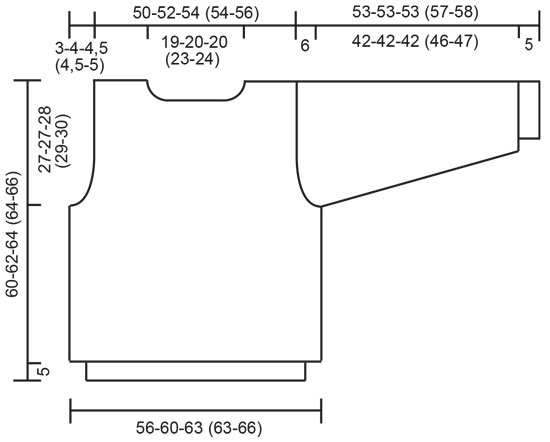
ZKUŠEBNÍ VZOREK: 20 ok na šířku x 30 řad na výšku jehlicí č. 4 a vzorem = 10 x 10 cm. POZNÁMKA: Uvedená síla jehlic je pouze orientační. VZOR: Viz schéma (1 schéma = 1 sekvence vzoru). Zobrazeny jsou všechny řady vzoru nahlížené z lícové strany. PRUŽNÝ VZOR: * 2 oka hladce, 2 oka obrace *. Mezi *-* opakujeme. TRUP: Údaje v () = pánská velikost. Na kruhovou jehlici č. 2,5 nahodíme 188-192-200 (200-208) ok a upleteme 5 cm výšky pružným vzorem. Pleteninu převedeme na kruhovou jehlici č. 4, pleteme vzor podle schématu a SOUČASNĚ v 1. kruhové řadě přidáme rovnoměrně 40-48-52 (52-56) ok = 228-240-252 (252-264) ok. Ve výši 33-35-36 (35-36) cm uzavřeme na každé straně 4 oka (= průramky; dbáme na to, aby sekvence vzoru ležela uprostřed předního dílu). Přední a zadní díl dokončíme odděleně. PŘEDNÍ DÍL: = 110-116-122 (122-128) ok. Tvarujeme průramky - v každé 2. řadě uzavíráme: 2 oka 2-2-2 (2-3)x, 1 oko 1-2-3 (3-2)x = 100-104-108 (108-112) ok. Ve výši 55-57-59 (59-61) cm uzavřeme prostředních 28-30-30 (36-38) ok (= průkrčník). Pak uzavíráme v každé 2. řadě 2 oka 2x, 1 oko 1x. Ve výši 60-62-64 (64-66) cm uzavřeme všechna oka. ZADNÍ DÍL: = 110-116-122 (122-128) ok. Pro vytvarování průramku uzavíráme stejným způsobem jako u předního dílu = 100-104-108 (108-112) ok. Ve výši 58-60-62 (62-64) cm uzavřeme prostředních 34-36-36 (42-44) ok (= průkrčník). V následující řadě uzavřeme u průkrčníku ještě 2 oka. Ve výši 60-62-64 (64-66) cm všechna oka uzavřeme. RUKÁV: Na ponožkové jehlice č. 2,5 nahodíme 48-48-48 (48-52) ok a upleteme 5 cm výšky pružným vzorem. Pleteninu převedeme na ponožkové jehlice č. 4 a pleteme VZOR (dbáme na to, abychom sekvenci vzoru umístili doprostřed rukávu), současně v 1. kruhové řadě přidáme rovnoměrně 6-6-8 (10-8) ok = 54-54-56 (58-60) ok. SOUČASNĚ přidáme 2 oka v podpaží. Takto přidáváme celkem 27-27-28 (29-30)x u velikostí: Dámská: S+M+L: každou 4. kruhovou řadu, Pánská: S/M+M/L: střídavě v každé 4. a 5. kruhové řadě = 108-108-112 (116-120) ok. Ve výši 47-47-47 (51-52) cm uzavřeme v podpaží 6 ok a pleteme v řadách. V každé 2. řadě uzavíráme na každé straně rukávové hlavice 4 oka 8x. Nakonec uzavřeme i všechna zbývající oka. Rukáv měří asi 53-53-53 (57-58) cm. DOKONČENÍ: Sešijeme náramenice. Na ponožkové jehlice č. 2,5 nabereme kolem průkrčníku asi 100-112 ok a pleteme pružným vzorem do výšky 5 cm. Potom všechna oka uzavřeme. Nakonec vsadíme rukávy. |
|||||||
Vysvětlivky ke schématu |
|||||||
|
|||||||
 |
|||||||
 |
|||||||
Dokončili jste tento model?Pak označte své fotky tagem #dropspattern nebo je pošlete do galerie #dropsfan. Potřebujete s tímto návodem poradit?Otevřete-li si návod na stránce garnstudio.com, najdete tam 17 výukových video-ukázek, Komentáře/Dotazy a další užitečné informace. © 1982-2026 DROPS Design A/S. Vyhrazujeme si veškerá práva. Tento dokument, včetně všech jeho dílčích částí, podléhá autorským právům. Podrobnější komentář k možnostem užití našich návodů najdete dole pod každým návodem na našich stránkách. |
|||||||


V oblasti pletené a háčkované módy působí DROPS Design více než 40 let. Díky tomu vám můžeme nabídnout jednu z nejrozsáhlejších kolekcí modelů s bezplatnými návody dostupnými na internetu - navíc v 17 jazycích. K dnešnímu dni máme na 324 katalogů a 12290 návodů celkem - z nich je už 7605 dostupných v [češtině].
Přidejte komentář k návodu DROPS 40-8
Rádi bychom věděli, co si o tomto modelu myslíte!
Pokud se chcete na něco zeptat, dbejte prosím na to, abyste ve formuláři níže vybrali správnou kategorii - díky tomu se dříve dozvíte, co potřebujete vědět. Povinná pole jsou označena *.