
Suositut kategoriat
Etsitkö tiettyä lankaa?


Kommentit / Kysymykset (48)
![]() Gitte kirjoitti:
Gitte kirjoitti:
Jeg kan ikke finde video på opskrift 176-25 Strikkes der på vangpinden uden mønster og bare rat?
06.04.2026 - 21:49DROPS Design vastasi:
Hei Gitte. Har dessverre ingen video. Når det strikkes fra vrangen (blank firkant i diagrammet) strikkes disse vrang (fra vrangen). mvh DROPS Design
07.04.2026 - 13:21
![]() Laura kirjoitti:
Laura kirjoitti:
Quanti gr di filato sono necessari per la taglia S/M ? grazie
09.02.2025 - 10:59DROPS Design vastasi:
Buongiorno Laura, può trovare la quantità di filato necessaria per i modelli DROPS di fianco alla foto. Per questo modello nella taglia S/M sono necessari 350 g di Bomull-Lin. Buon lavoro!
09.02.2025 - 11:08
![]() Sussie Rosberg kirjoitti:
Sussie Rosberg kirjoitti:
Vet inte vad jag gör för fel,jag har dragit upp arbetet 8 ggr nu. Rad 3,5,9,11 det är alltid på dessa rader det blir fel när halva ihoptagningen är mellan A o B Eller/och B och C Jag får bara inte ihop det oavsett om jag skjuter på mönstret eller stickar som det är där sista och första ihoptagningen blir en maska när jag repeterar B. Provar en gång till sen lägger jag ner.
20.02.2024 - 13:31DROPS Design vastasi:
Hej Sussie, hvis du prøver at tænke på hele rækken, så på pind 3 har du altid 3 r imellem hver hulmønster. På pind 5 har du 2 hulm, 1rm, 2hulm, 1rm, 2hulm, 2r osv...
23.02.2024 - 13:11
![]() Susan Hoff kirjoitti:
Susan Hoff kirjoitti:
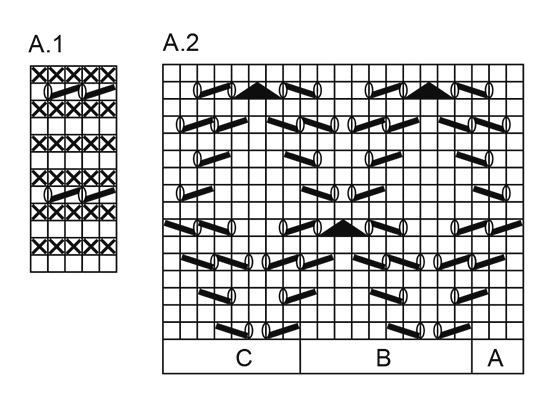
Hello! I am new to chart reading and am having trouble deciphering how to properly do the A.2 B repeat on rows 3,7,11, and 15. There are "knit 2 tog" stitches between A.2 A and A.2 B. Where do I start and end the repeat? Thank you so much for your time. Susan H.
27.10.2023 - 19:09DROPS Design vastasi:
Dear Mrs Hoff, on row 3 for ex, work the last st in A.together with the first stitch B = this is now the new last st in A and the yarn over is now the first st in B; at the end of B, work tog the last st B with the first st next B / C; this is now the new last stitch B and the yarn over is the new first st next B/C. Same for all these row where the sts are worked together with the next stitch. Happy knitting!
28.10.2023 - 08:55
![]() Vanessa kirjoitti:
Vanessa kirjoitti:
This is my first ever chart! Why is A.1 shorter than A.2..? The shortness is making me so confused as the pattern instructions include A.1 from the beginning but comparing the charts makes it looks like it doesn't start until row 9, as that is where it lines up with A.2! Thank you 😊
26.10.2023 - 08:25DROPS Design vastasi:
Dear Vanessa, different charts may have different lengths because the pattern is shorter. So A.1 is a 12-row pattern, which will start over after every 12th row. Meanwhile, A.2 is a 16-row pattern, which will be repeated vertically/ start over after every 16th row. They don't need to be aligned between themselves; A.1 are the edges of the piece and A.2 the rest of the poncho. Happy knitting!
29.10.2023 - 19:46
![]() Sheila kirjoitti:
Sheila kirjoitti:
Hi. I’ve been working on this and I am almost halfway and still am confused on how to make the side piece that connects to the front. The diagram is showing it as an “L” shape but the directions tell me to make it as just a “l” shape. This would mean that the back goes straight across and not down to a point as the front goes. Am I missing something? Is there a view of the back once assembled? Do I make a separate piece and attach it ?
21.09.2023 - 15:59DROPS Design vastasi:
Dear Sheila, in this video we are showing how to sew this kind of poncho, ie you work a long band then one of the short side is sewn along the side of the long side. Hope it will help you. Happy knitting!
21.09.2023 - 16:58
![]() Sharon Hunt kirjoitti:
Sharon Hunt kirjoitti:
Hello! I am knitting the 7th of 8 balls of yarn and the length is 96 cm. Will this be enough to get to the length stayed in the pattern? Am a chubby, short girl would that affect how long to make this? I would really hate to have to rip this our since everything else is going ok. I am also still confuse as to how this is supposed to be sewn.
26.04.2023 - 17:29DROPS Design vastasi:
Dear Mrs Hunt, did you get correct tension in both width (17 sts = 10 cm) and height (22 rows = 10 cm)? If you need more rows for 10 cm, you might require more yarn. In this video, we show how to assembly such a poncho, this might help you. Happy knitting!
27.04.2023 - 08:06
![]() Sharon Hunt kirjoitti:
Sharon Hunt kirjoitti:
Hi started making this poncho and bought 8 balls of yarn for the project. Am still making the largest size but the length of the small size. The yarn is still not enough. I have used up 5 and half balls and the length is 33.5 inches. This is really strange. Disappointing that yarn bought for the large is not enough for the small. Are measurements before or after blocking? Seems like I have to order more yarn to finish this. Am knitting to gauge. Ladies at the drops store is confused too
22.04.2023 - 15:57DROPS Design vastasi:
Dear Sharon, if the gauge matches the one in the pattern, then the quantities should be correct. The measurements are from before assembling. That is, it's the final measument of the rectangle right before you start to sew it. In any case, if you have 5.5/8 balls used and you are 3/4 of the garment done, you should have enough to finish. Happy knitting!
23.04.2023 - 18:29
![]() Sharon Hunt kirjoitti:
Sharon Hunt kirjoitti:
Glad to report that I figured it out. The chart is correct and the problem was me. The pattern is a joy to knit once one figures it out.
08.04.2023 - 20:07
![]() Sharon Hunt kirjoitti:
Sharon Hunt kirjoitti:
Hi! I have been working on this pattern for days now ripping and starting multiple time. I have inserted markers after each repeat and have colour coded Lines between a, b, c pattern. I have double checked after each pattern repeat to make sure that I have the amount of stitches between same. I have counted after each row to make sure I have 91 sts every time but twice now I have ended up with 1 stitch more on one row. Now am on row 11 and there is not enough stitches to complete this row.
08.04.2023 - 11:43
|
|||||||||||||||||||
Inayah#inayahponcho |
|||||||||||||||||||
|
|
|||||||||||||||||||
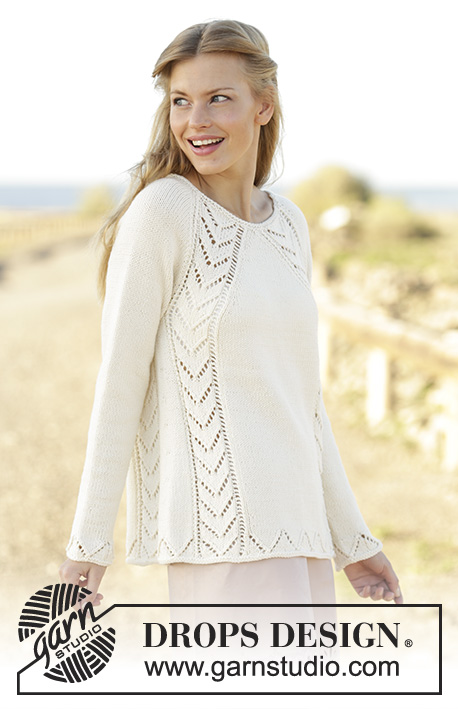
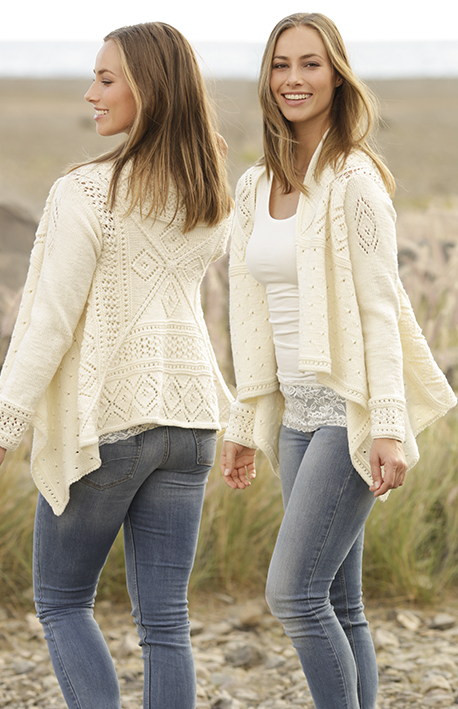
Pitsineuleponcho DROPS Bomull-Lin -langasta. Koot S-XXXL.
DROPS 176-25 |
|||||||||||||||||||
|
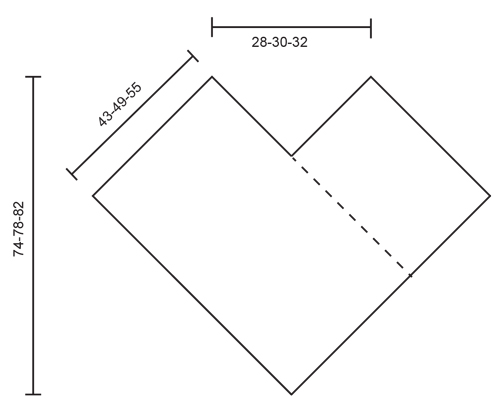
AINAOIKEINNEULE tasona: Neulo kaikki kerrokset oikein. MALLINEULE: Katso ruutupiirrokset A.1 ja A.2. Piirrokset näyttävät mallineuleen kaikkia kerroksia oikealta puolelta katsottuna. ---------------------------------------------------------- PONCHO: Neulotaan tasona kuten huivi ja ommellaan lopuksi yhteen ponchoksi. Luo 71-81-91 silmukkaa pyöröpuikolle nro 5 Bomull-Lin -langalla. Neulo 4 kerrosta AINAOIKEAA (katso selitys yllä). Jatka neulomalla seuraavasti (1.kerros = oikea puoli): A.1 (= 5 silmukkaa), A.2 A (= 3 silmukkaa), neulo seuraavilla 50-60-70 silmukalla mallineuletta piirroksen A.2 B mukaisesti, A.2 C (= 8 silmukkaa), neulo lopuksi mallineuletta piirroksen A.1 mukaisesti. TARKISTA NEULETIHEYS! Jatka mallineuletta tähän tapaan, kunnes työn korkeus on 43-49-55 cm. Kiinnitä 1 merkki työn sivuun, päätösreuna kiinnitetään myöhemmin sivuun tästä alkaen. Neulo mallineuletta kuten aiemmin, kunnes työn korkeus on 112-121-130 cm. Päätä silmukat kerralla. VIIMEISTELY: Kiinnitä lyhytsivu (= päätösreuna) pitkittäissivuun, merkistä alas luomisreunaan asti. Ompele uloimmista silmukanreunoista. Vastakkainen pitkittäissivu muodostaa kärjen keskelle eteen. |
|||||||||||||||||||
Ruutupiirroksen selitykset |
|||||||||||||||||||
|
|||||||||||||||||||
 |
|||||||||||||||||||
 |
|||||||||||||||||||
Oletko tehnyt tämän mallin?Tägää tällöin kuviasi #dropspattern #inayahponcho tai lähetä kuvat #dropsfan galleriaan. Tarvitsetko apua tämän ohjeen kanssa?Löydät 18 ohjevideota, kommentteja/kysymyksiä ja muuta osoitteessa www.garnstudio.com © 1982-2026 DROPS Design A/S. Pidätämme kaikki oikeudet. Tämä tiedosto ja kaikki sen alatiedostot on suojattu tekijänoikeuslailla. Lue lisää siitä, mitä voit tehdä ohjeillamme, verkkosivujemme jokaisen ohjeen alaosasta. |
|||||||||||||||||||


DROPS Design on toiminut neule- ja virkkausalalla yli 40 vuotta ja meillä on yksi kaikkein laajin valikoima ilmaisia ohjeita verkossa - käännettynä 17 kielelle. Tänään meiltä löytyy 325 lehteä ja 12298 ohjetta - joista 11747 ohjetta on käännetty suomeksi.
Työskentelemme ahkerasti, jotta voisimme antaa teille kaikkein parhaimpia neule- ja virkkausohjeita, inspiraatiota ja neuvoja sekä korkealaatuisia lankoja todella edulliseen hintaan! Haluaisitko käyttää ohjeitamme muuhun kuin henkilökohtaiseen käyttöön? Voit lukea säännöistä ohjeiden Tekijänoikeus -tekstissä, joka löytyy kaikkien ohjeidemme alapuolelta. Hauskoja hetkiä käsitöiden parissa!
Lisää kommentti ohjeeseen DROPS 176-25
Haluamme mielellämme kuulla mielipiteesi tästä ohjeesta!
Mikäli haluat esittää kysymyksen, valitse oikea kategoria alla olevasta valikosta - tällä tavoin saat vastauksen nopeammin. Pakolliset kentät on merkitty tähdellä *.