
Suositut kategoriat
Etsitkö tiettyä lankaa?


Kommentit / Kysymykset (33)
![]() Paola kirjoitti:
Paola kirjoitti:
Perché il numero totale di maglie deve essere divisibile per 7 + 1 maglia se lo schema è su 7 maglie? Sto lavorando direttamente in tondo anche il bordo, vale anche in quel caso? Grazie
29.10.2025 - 21:56DROPS Design vastasi:
Buonasera Paola, il motivo deve avere la maglia in più perchè si deve spostare, è un motivo a spirale. Buon lavoro!
31.10.2025 - 18:14
![]() Paola kirjoitti:
Paola kirjoitti:
Perché il numero totale di maglie deve essere divisibile per 7 + 1 maglia se lo schema è su 7 maglie? Sto lavorando direttamente in tondo anche il bordo, vale anche in quel caso? Grazie
29.10.2025 - 21:55DROPS Design vastasi:
Buonasera Paola, il motivo deve avere la maglia in più perchè si deve spostare, è un motivo a spirale. Buon lavoro!
31.10.2025 - 18:18
![]() Inger Pettersson kirjoitti:
Inger Pettersson kirjoitti:
Tusen, tusen tack för alla fina gratismönster ni publicerar! När jag stickat klart denna mössa, kommer den att skickas till Ukraina. /Inger
02.08.2025 - 23:52
![]() Gitt-Marie G kirjoitti:
Gitt-Marie G kirjoitti:
Ja förstår inte mönstret ,stickar med rundsticka runt runt och börjar möstret * sticka 1 en,2 m räta tills, 2 rm, 2am*varvet ut . 2v spiralmönster4rm,2am.* Sticka 1 rm, 2rm tills,1 rm,2am ** Sticka 2varn spiralmönster 3rm,2am * sticka 1 rm,2 tills ,2am** Sticka 1 v spiralmönster 2rm och 2am m.m.
04.05.2025 - 17:26DROPS Design vastasi:
Hej Gitt-Marie, se gerne vores video hvordan du strikker spiralmønster. Klik på videoer øverst i opskriften :)
08.05.2025 - 10:49
![]() Jean Ryan kirjoitti:
Jean Ryan kirjoitti:
How much wool do i actually need to knit this hat?
25.10.2024 - 15:14
![]() Jean Ryan kirjoitti:
Jean Ryan kirjoitti:
How much wool is actualy used to complete the hat?
25.10.2024 - 15:13DROPS Design vastasi:
Dear Mrs Ryann you will find the total amount of yarn required under the header together with sizes, needle size and tension, for this hat you need for example 100 g DROPS Alaska/50 g a ball = 2 balls Alaska; should you like to use any other yarn, feel free to use the yarn converter. Happy knitting!
25.10.2024 - 16:14
![]() Janice M Underwood kirjoitti:
Janice M Underwood kirjoitti:
When you day displace a stitch do you mean you are actually moving the rib pattern over one stitch?
03.04.2024 - 14:34DROPS Design vastasi:
Dear Mrs Underwood, by repeating the pattern in the round, the purl stitch will automatically move - in this video we show how to work such a spiral pattern with K4, P2, even if the number of K stitches is different, it can help you to understand how it works, but remember to follow the correct number of stitches stated for the size in the pattern. Happy knitting!
03.04.2024 - 15:58
![]() Janice M Underwood kirjoitti:
Janice M Underwood kirjoitti:
I am working this pattern, and find errors. The rib is 5x2 but you say cast on 78. that is not divisible by 7. you do not indicate wrong side or right so I am working I believe on the wrong side. Also, what does "displace" a stitch mean, and where does this happen, in the decrease section? The order of steps is very confusing.
02.04.2024 - 22:51DROPS Design vastasi:
Hi Janice, The rib is divisible by 7 + 1, as the spiral pattern consists of 7 stitches and the 1 stitch at the end is the stitch used when displacing. You are working in the round, so always from the right side. The displacement occurs when you begin the new round with the extra stitch at the end of the previous round. This is also the case when working decreases. Happy knitting!
03.04.2024 - 06:36
![]() Lori kirjoitti:
Lori kirjoitti:
Hi. Thank you for your reply on July 10, 23. I should have been clearer in my question. I was not suggesting a rib. Why do the instructions begin knitting flat & then require joining the edging when the hat is complete. Would the same affect be achieved with a Cast on & Knit 1 row, Purl 1 row until the desired rows prior to the start of the pattern? Thank you again for your time.
10.07.2023 - 17:28DROPS Design vastasi:
Dear Lori, as explained in the previous response, working in the round in garter stitch will result in a slight misalignment at the end of the round. For that reason, we work it back and forth and then join the piece together and continue in the round. Happy knitting!
10.07.2023 - 17:40
![]() Lori kirjoitti:
Lori kirjoitti:
This pattern advises to Cast on and work 4 ridges in Garter Stitch (back & forth). Then place piece together and work in the round. Why do you instruct starting the hat using this method rather than Knit and Purl in the round after the desired number of stitches are Cast on? Thank you.
10.07.2023 - 02:01DROPS Design vastasi:
Hi Lori, This pattern has a garter stitch bottom edge rather than rib. Garter stitch will have a slight 'jump' at the back if it is worked in the round (knit 1 round, purl 1 round), which is why it is worked back and forth before finishing the hat in the round. You can work a ribbed edge in the round if you wish, but this will not be quite so close-fitting as the garter stitch. Happy knitting!
10.07.2023 - 07:29
|
|
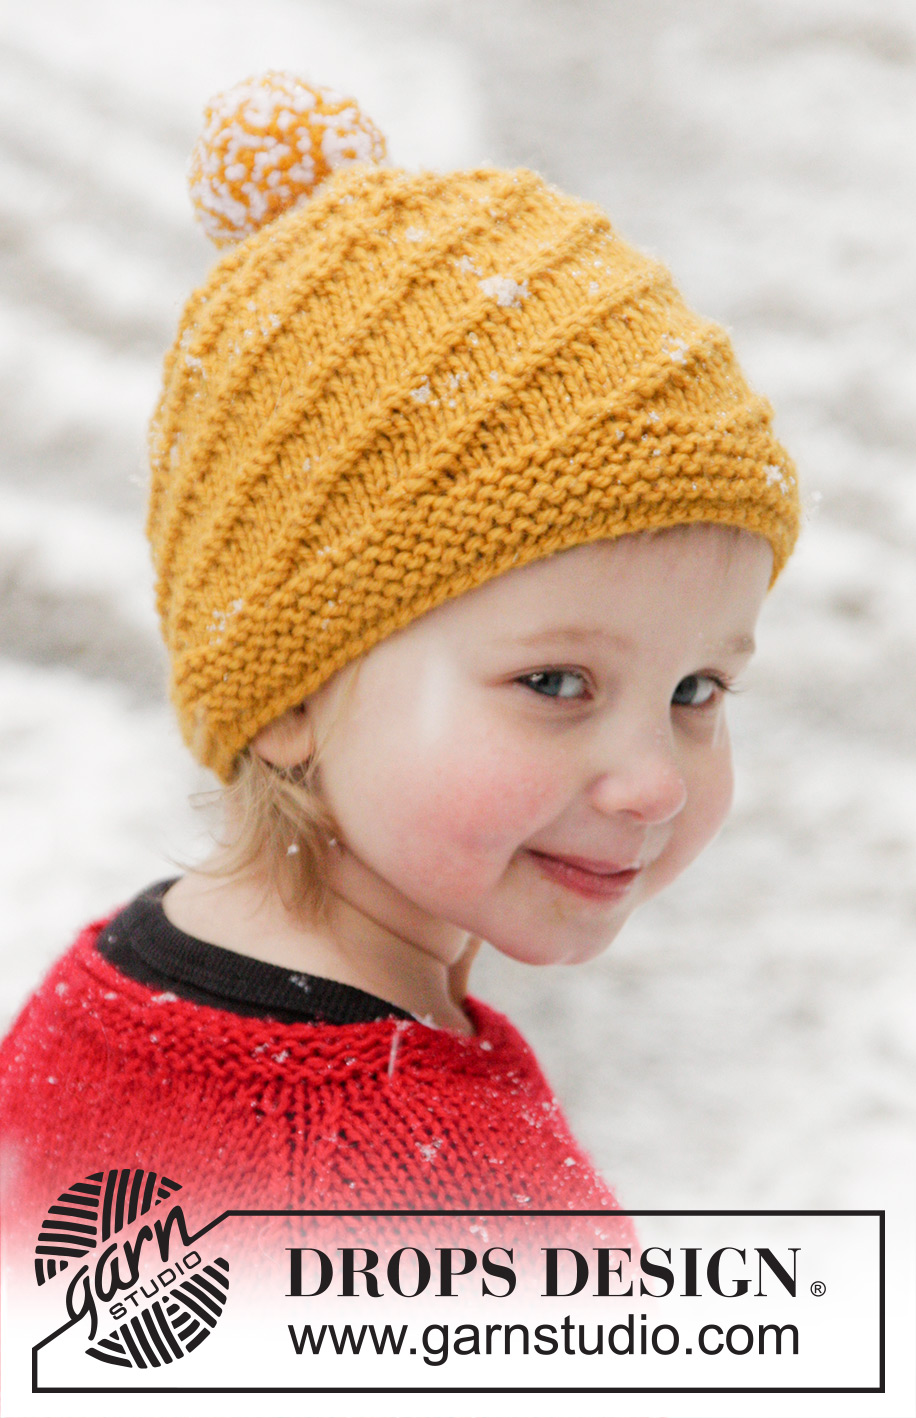
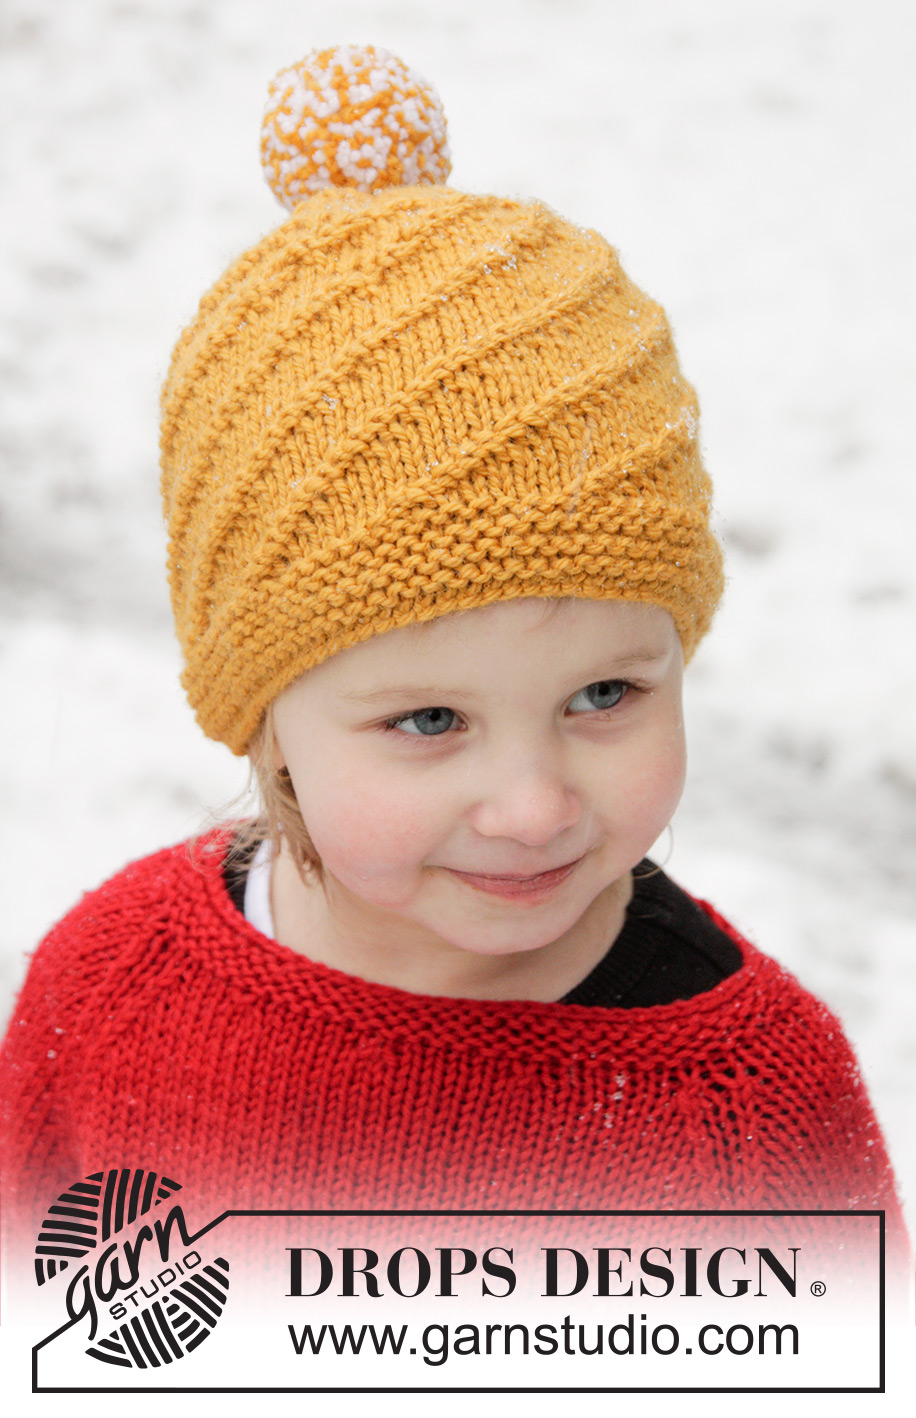
Swirl N Twirl#swirlntwirlhat |
|
 |
 |
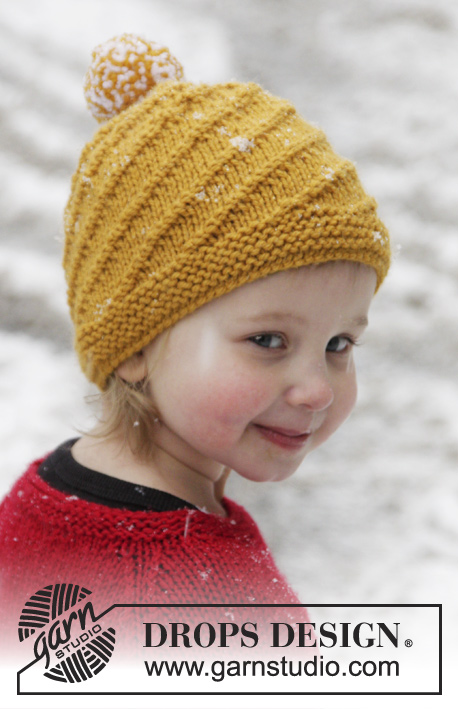
DROPS vinoraitamyssy ”Alaska”-langasta. Koot 1-12 v.
DROPS Extra 0-1020 |
|
|
AINAOIKEINNEULE tasona: Neulo kaikki kerrokset oikein. VINORAIDAT: Neulo *5-6-5-5-6 s oikein, 2 s nurin*, toista *-* koko krs:n ajan. 1 mallikerta = 7-8-7-7-8 s ja silmukkaluku on 7-8-7-7-8 + 1 s:lla jaollinen. Kun neulotaan suljettua neuletta, mallikertojen s:t siirtyvät jokaisella krs:lla automaattisesti 1 s:n verran oikealle ja työhön muodostuu vinoraitoja. KAVENNUSVINKKI: Kavenna 1 s ennen jokaista merkkiä seuraavasti: Neulo kunnes merkkiä edeltää 2 s, nosta seuraava s oikein neulomatta, neulo 1 s oikein, vedä nostettu s neulotun yli. ---------------------------------------------------------- MYSSY: Luo 78-81-85-85-89 s pyöröpuikolle nro 4,5 sinapinkeltaisella langalla ja neulo tasona 8 krs AINAOIKEAA (kts. selitys yllä). Jatka sitten neulomalla VINORAITOJA (kts. selitys yllä) suljettuna neuleena. TARKISTA NEULETIHEYS! Neulo kunnes työn korkeus on n. 11-13-13-14-16 cm. HUOM! Älä venytä työtä mitattaessasi, mallineuleen vuoksi työstä tulee sekä korkeus- että leveyssuunnassa melko joustava. Jatka vinoraitoja ja tee SAMALLA kavennukset seuraavasti: *Neulo 1 s oikein, neulo 2 s oikein yhteen, neulo 2-3-2-2-3 s oikein, 2 s nurin*, toista *-* koko krs:n ajan =67-71-73-73-78 s. Neulo 2 krs vinoraitoja seuraavasti: 4-5-4-4-5 s oikein, 2 s nurin. *Neulo sitten 1 s oikein, neulo 2 s oikein yhteen, 1-2-1-1-2 s oikein, 2 s nurin*, toista *-* koko krs:n ajan = 56-61-61-61-67 s. Neulo 2 krs vinoraitoja seuraavasti: 3-4-3-3-4 s oikein ja 2 s nurin. *Neulo 1 s oikein, neulo 2 s oikein yhteen, 0-1-0-0-1 s oikein, 2 s nurin*, toista *-* koko krs:n ajan = 45-51-49-49-56 s. Neulo 1 krs vinoraitoja seuraavasti: 2-3-2-2-3 s oikein ja 2 s nurin. Neulo seuraavalla krs:lla kaikki s:t oikein ja kiinnitä SAMALLA 5 merkkiä työhön näin: Kiinnitä ensimmäinen merkki krs:n alkuun, kiinnitä sitten seuraavat 4 merkkiä aina 9-10-10-10-11 s:n välein. Ensimmäisen ja viimeisen merkin välissä on nyt 9-11-9-9-12 s. Jatka neulomalla sileää neuletta ja kavenna SAMALLA ennen jokaista merkkiä 1 s (LUE KAVENNUSVINKKI). Toista tällaiset kavennukset joka 2. krs yht. 3-4-4-4-4 kertaa = 30-31-29-29-36 s. Tee sitten kavennukset jokaisella krs:lla 3-3-3-3-4 kertaa = 15-16-14-14-16 s. Neulo seuraava krs näin: Neulo 1-0-0-0-0 s oikein, neulo sitten loput s:t pareittain oikein yhteen = 8-8-7-7-8 s jäljellä työssä. Katkaise lanka, vedä lanka loppujen silmukoiden läpi, kiristä aukko umpeen ja päättele langanpäät hyvin. Ompele myssyn sivun ainaoikein -neule yhteen uloimmista silmukanreunoista. TUPSU: Käytä molempia värejä ja tee 1 tupsu, jonka halkaisija on n. 10 cm. Kiinnitä tupsu myssyn päälaelle. |
|
Oletko tehnyt tämän mallin?Tägää tällöin kuviasi #dropspattern #swirlntwirlhat tai lähetä kuvat #dropsfan galleriaan. Tarvitsetko apua tämän ohjeen kanssa?Löydät 18 ohjevideota, kommentteja/kysymyksiä ja muuta osoitteessa www.garnstudio.com © 1982-2026 DROPS Design A/S. Pidätämme kaikki oikeudet. Tämä tiedosto ja kaikki sen alatiedostot on suojattu tekijänoikeuslailla. Lue lisää siitä, mitä voit tehdä ohjeillamme, verkkosivujemme jokaisen ohjeen alaosasta. |
|


DROPS Design on toiminut neule- ja virkkausalalla yli 40 vuotta ja meillä on yksi kaikkein laajin valikoima ilmaisia ohjeita verkossa - käännettynä 17 kielelle. Tänään meiltä löytyy 324 lehteä ja 12290 ohjetta - joista 11706 ohjetta on käännetty suomeksi.
Työskentelemme ahkerasti, jotta voisimme antaa teille kaikkein parhaimpia neule- ja virkkausohjeita, inspiraatiota ja neuvoja sekä korkealaatuisia lankoja todella edulliseen hintaan! Haluaisitko käyttää ohjeitamme muuhun kuin henkilökohtaiseen käyttöön? Voit lukea säännöistä ohjeiden Tekijänoikeus -tekstissä, joka löytyy kaikkien ohjeidemme alapuolelta. Hauskoja hetkiä käsitöiden parissa!
Lisää kommentti ohjeeseen DROPS Extra 0-1020
Haluamme mielellämme kuulla mielipiteesi tästä ohjeesta!
Mikäli haluat esittää kysymyksen, valitse oikea kategoria alla olevasta valikosta - tällä tavoin saat vastauksen nopeammin. Pakolliset kentät on merkitty tähdellä *.