
Suositut kategoriat
Etsitkö tiettyä lankaa?


Kommentit / Kysymykset (58)
![]() Kathy kirjoitti:
Kathy kirjoitti:
Hello again, I apologize for having multiple questions, and I very much appreciate your help. After knitting the central cable portion, I have 207 rows. If I pick up a stitch on every row, I will have a rib consisting of 444 stitches (207 x 2 + 15 cast on edge + 15 cast off edge) for the rib rather than the 342 to 366 called for in the pattern. I could not determine from the pattern if I am supposed to pick up a stitch at each row. Would you please advise me? thank you.
03.04.2023 - 07:36DROPS Design vastasi:
Hi Kathy, You do not need to pick up 1 stitch in each row - depending on the size you are working, you pick up approx. 310 to 366 stitches in addition to the cast-on and cast-off edges. This will be approx. pick up on first row, skip 1 row, pick up on 3rd and 4th row, skip 1 row, pick up on 6th and 7th row etc. Hope this helps and happy Easter!
04.04.2023 - 06:51
![]() Kathy kirjoitti:
Kathy kirjoitti:
Hello, Do you recommend blocking the central cable portion before adding the rib? Thank you.
03.04.2023 - 06:42DROPS Design vastasi:
Hi Kathy, it is not necessary. Block the piece after completing the whole thing. Happy knitting!
04.04.2023 - 07:50
![]() Kathy kirjoitti:
Kathy kirjoitti:
I am confused by the increases and decreases. I have two questions. (1) does “inside 1 edge st” mean immediately after the first stitch of the row and immediately before the last stitch of the row? why is the increase done with a yarn over, which is used when you want to make a hole (such as lace). the instructions next say to knit into the back of the stitch to avoid a hole. I found the video confusing. Can I use another form of increase, such as Make One Right or Left? Thank you.
01.04.2023 - 04:47DROPS Design vastasi:
Dear Kathy, yes, inside the edge stitch is immediately after the first stitch or before the last stitch of the row. You can increase in several different ways; yarn overs are the most basic and easier to work, even though there may be a small gap remaining (take into account that, since it's twisted on the next row, the gap will be smaller than in lace patterns). But of course you can use M1R or M1L for this pattern. Happy knitting!
02.04.2023 - 22:45
![]() Freda Corrigan kirjoitti:
Freda Corrigan kirjoitti:
Greetings, can I knit this neckwear using knit N purl stitching I really love the style but not good with pattern reading Thank you hope to hear from you soon
23.06.2022 - 14:58DROPS Design vastasi:
Dear Mrs Corrigan, we only have diagrams to this pattern, but this lesson will explain you how to read a knitting diagram. Happy knitting!
23.06.2022 - 16:15
![]() Tanya kirjoitti:
Tanya kirjoitti:
I am sorry but i am lost on what this means. Could you lease step by step clarify this. "When Rib measures 2 cm inc every other P section to P2. When piece measures 3 cm inc remaining purl sections to P2. When Rib measures 5 cm inc every other purl section from P2 to P3. Cast off on next row in Rib." Thank you
24.11.2019 - 06:59DROPS Design vastasi:
Dear Tanya, to beginn with you are knitting a K2, P2 rib. At the first increase (when piece is 2 cm) you knit the row like this: * K1, P1, K1, P1, make 1, * and repeat *-*. In the next oncrease row (piece is 3 cm), you knit *K1, 1 P, make1, K2, P2. * and repeat *-*. For the next increase round (piece is 5 cm, you knit like this: K2, P1, K2, P1, make 1, P1 * and repeat *-*. Casting of in rib means that you cast of knit stitches with knit stitches, and purl stitches with purl stitches. I hope this helps. Happy Knitting!
24.11.2019 - 16:16
![]() Tanya kirjoitti:
Tanya kirjoitti:
Hello: I see this says a sport weight yarn, would that be sport weight in "Canada" too or would it be classified as DK in Canada. I am also a bit confused as in some places that sell your yarn it says it is 4 ply others say 5 ply..
18.11.2019 - 20:31DROPS Design vastasi:
Dear Tanya, we are glad to inform you that our yarns are available in Canada - please check retailer list in/to Canada here. Happy knitting!
19.11.2019 - 08:51
![]() Joyce Boatman kirjoitti:
Joyce Boatman kirjoitti:
Name it Beauty as it is Beautiful
17.11.2019 - 01:22Ngaire kirjoitti:
Truly love this. Can this be knitted on straight needles
28.03.2018 - 06:19DROPS Design vastasi:
Dear Mrs Ngaire, the main part of the neck warmer can be worked on straight needle, but the edge (ribbingn part) is then worked in the round picking up sts around whole neck warmer. Happy knitting!
28.03.2018 - 15:52
![]() Joana Rodrigues kirjoitti:
Joana Rodrigues kirjoitti:
Só uma pequena nota em relação à tradução para Português: Nas dicas para as diminuições, falta acrescentar que, antes da m/p ourela, deve-se tricotar 2 ms/pts juntamente em liga/tricô enfiando a agulha na alça de trás (m/pt liga/tricô torcida/o)
03.12.2016 - 21:06DROPS Design vastasi:
Obrigado pela nota. Vamos editar as explicações. Bom tricô! Boas Festas!
16.12.2016 - 17:06Gwen Schmitt kirjoitti:
I was wondering how much yarn to buy? I have a customer that wants to use a different yarn called Lions Pride Woolspun for this. Can anyone convert it for me and tell me how much to buy?
16.04.2016 - 06:40DROPS Design vastasi:
Dear Mrs Schmitt, We are able to provide free patterns thanks to our yarns sold throughout the world. You will therefore understand that we can only recomand you to contact our DROPS Storefor any further help & assistance. Thank you for your comprehension.
18.04.2016 - 09:02
|
|||||||||||||
DROPS 98-1 |
|||||||||||||
|
|
|||||||||||||
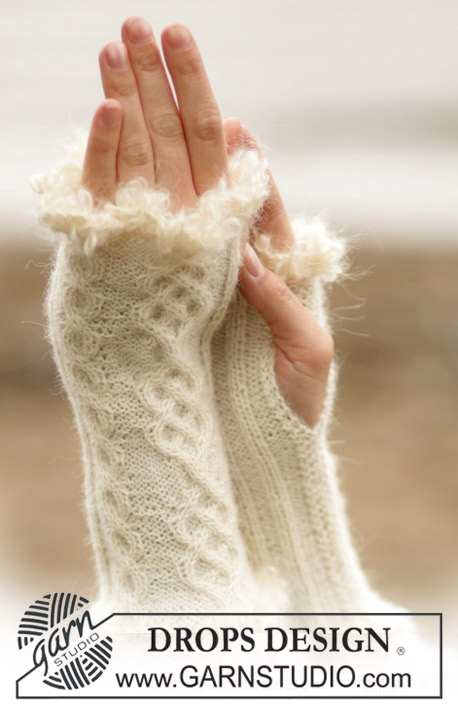
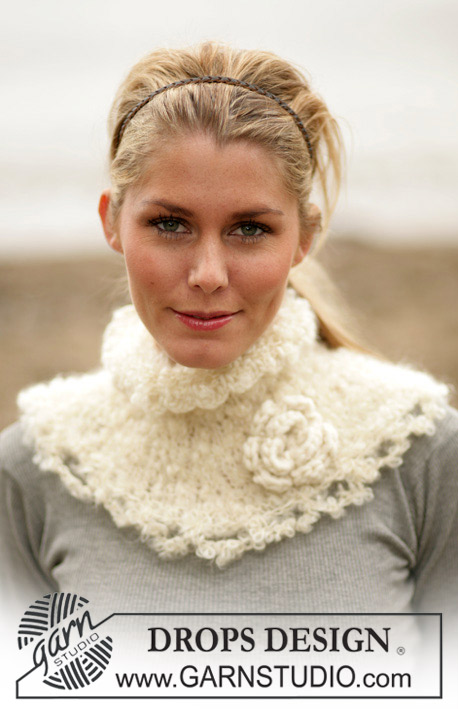
”Alpaca”-langalla neulotut kaulus ja hiuspanta
DROPS 98-1 |
|||||||||||||
|
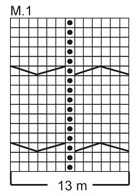
Kuvio: Katso piirros M.1. Piirros esittää kuviota oikealta puolelta katsottuna. Vinkki s:oiden lisäämiseen: Toteuta lisäykset 1. reuna-s:n sisäpuolella tekemällä langankierto puikolle. Seuraavalla krs:lla langankierto neulotaan kiertäen (neulo siis s:oiden takareunaan, eikä etureunaan), jotta ei synny reikiä. Kavennusvinkki: Toteuta kavennukset 1. reuna-s:n sisäpuolella. Kavenna näin 1. reuna-s:n jälkeen: neulo 2 s nurin yhteen. Kavenna näin ennen 1. reuna-s: neulo 2 kierrettyä s nurin yhteen (neulo siis s:oiden takareunaan, eikä etureunaan). Kaulus: Ensin neulotaan keskimmäinen osa palmikoineen. Tämän jälkeen poimitaan s:oita koko työn ympäriltä ja neulotaan joustin. Luo 2-kertaisella Alpaca-langalla 15 s pyöröpuikolle nro 4. Neulo 2 krs:ta oikein (edestakaisin), ja neulo tämän jälkeen M.1-piirroksen mukaisesti (=13 s) neulomalla kummassakin reunassa 1 reuna-s oikein. Jatka kuviota näin (reuna-s oikein joka krs:lla), samalla kun lisäät kummassakin reunassa 1 s joka 2. krs:lla yhteensä 6 kertaa – lue vinkki s:oiden lisäämiseen = 27 s – lisätyt s:t neulotaan nurjalla puolella oikein ja oikealla puolella nurin. Kun työn korkeus on 65 cm, päätetään kummassakin reunassa 1 s joka 2. krs:lla yhteensä 6 kertaa – lue kavennusvinkki = 15 s. Neulo tämän jälkeen 2 krs:ta oikein, ja päätä löyhästi. Joustin: Työ neulotaan suljettuna neuleena. Poimi 2-kertaisella Alpaca-langalla 342-366 s (3:lla jaollinen määrä) koko kauluksen ympäriltä pyöröpuikolle nro 4. Neulo 1 krs nurin ja 1 krs oikein. Tämän jälkeen neulotaan joustinta 2 o/1 n. Kun joustimen pituus on 2 cm, tehdään lisäyksiä neulomalla joka 2. nurja s kahteen kertaan. Kun joustimen pituus on 3 cm, tehdään lisäyksiä neulomalla toiset joka toiset nurjat s:t kahteen kertaan. Kun joustimen pituus on 5 cm, tehdään lisäyksiä neulomalla joka toiset 2 nurja s 3:ksi nurjaksi s:ksi. Seuraavalla krs:lla päätetään löyhästi neulomalla oikeat s:t oikein ja nurjat nurin. Virkattu kukka: Virkkaa Snow-langalla ja koukulla nro 7 seuraavasti: neulo 4 kjs ja liitä ne rinkulaksi virkkaamalla 1. kjs:aan 1 ps. 1. krs: Virkkaa rinkulaan 6 ks, ja päätä krs virkkaamalla 1 ps 1. ks:aan. 2. krs: * 4 kjs, 1 pylväs 1. näistä 4:stä kjs:sta, 1 ks seuraavaan s:aan *, toista *-*, ja päätä krs virkkaamalla 1 ps krs:n alkuun = 6 lehteä. Leikkaa ja kiinnitä lanka. Ompele pieni hakaneula kukan taakse, ja kiinnitä kukka kaulukseen. Hiuspanta: Luo 2-kertaisella Alpaca-langalla 4 s puikoille nro 4. Neulo putkineuletta näin: * 1 o, aseta lanka työn eteen, nosta 1 s kuten nurjaa neulottaessa, aseta lanka jälleen työn taakse *, toista *-* joka krs:lla. Päätä, kun hiuspannan pituus on n. 150 cm. |
|||||||||||||
Ruutupiirroksen selitykset |
|||||||||||||
|
|||||||||||||
 |
|||||||||||||
Oletko tehnyt tämän mallin?Tägää tällöin kuviasi #dropspattern tai lähetä kuvat #dropsfan galleriaan. Tarvitsetko apua tämän ohjeen kanssa?Löydät 22 ohjevideota, kommentteja/kysymyksiä ja muuta osoitteessa www.garnstudio.com © 1982-2026 DROPS Design A/S. Pidätämme kaikki oikeudet. Tämä tiedosto ja kaikki sen alatiedostot on suojattu tekijänoikeuslailla. Lue lisää siitä, mitä voit tehdä ohjeillamme, verkkosivujemme jokaisen ohjeen alaosasta. |
|||||||||||||


DROPS Design on toiminut neule- ja virkkausalalla yli 40 vuotta ja meillä on yksi kaikkein laajin valikoima ilmaisia ohjeita verkossa - käännettynä 17 kielelle. Tänään meiltä löytyy 324 lehteä ja 12290 ohjetta - joista 11706 ohjetta on käännetty suomeksi.
Työskentelemme ahkerasti, jotta voisimme antaa teille kaikkein parhaimpia neule- ja virkkausohjeita, inspiraatiota ja neuvoja sekä korkealaatuisia lankoja todella edulliseen hintaan! Haluaisitko käyttää ohjeitamme muuhun kuin henkilökohtaiseen käyttöön? Voit lukea säännöistä ohjeiden Tekijänoikeus -tekstissä, joka löytyy kaikkien ohjeidemme alapuolelta. Hauskoja hetkiä käsitöiden parissa!
Lisää kommentti ohjeeseen DROPS 98-1
Haluamme mielellämme kuulla mielipiteesi tästä ohjeesta!
Mikäli haluat esittää kysymyksen, valitse oikea kategoria alla olevasta valikosta - tällä tavoin saat vastauksen nopeammin. Pakolliset kentät on merkitty tähdellä *.